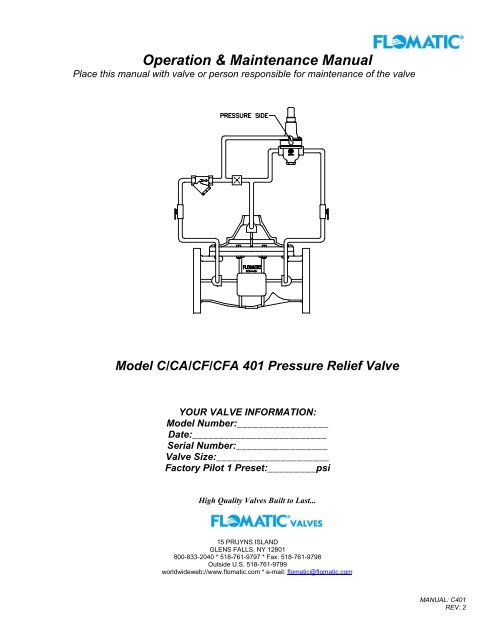
Model C401/CF401-Pressure Relief Valve
Model C401/CF401-Pressure Relief Valve
Model C401/CF401-Pressure Relief Valve
- No tags were found...

Create successful ePaper yourself
Turn your PDF publications into a flip-book with our unique Google optimized e-Paper software.
TROUBLE SHOOTING GUIDEA. PROBLEM : <strong>Valve</strong> opens and will not close resulting in excessive outlet pressure.CAUSE1. Main valve is air bound.2. Shut-off (isolation) valve at the inlet side of controls isclosed.3. Indicator stuffing box or sight glass is leaking.4. Ruptured diaphragm in pilot valve. (Evidenced by leakfrom vent hole in spring chamber.)5. Fouled orifice or needle valve.6. Fouled strainer.7. Damaged pilot valve seat.8. Ruptured diaphragm in main valve.9. Sticks or stones lodged under seat of main valve.10. Worn seat packing and/or seat ring in main valve.11. Incorrect adjustment of pilot valve (set too low).12. Leakage from one or more fittings in the controls.13. Damaged o-ring stem seal.CAUSE1. Incorrect adjustment of pilot valve. (Set too high)2. Needle valve (if installed) open too far.3. Shut off (isolation) valve at the outlet side of the controlsis closed.4. Fouled pilot valve5. Worn or eroded orifice (or needle valve seat).CORRECTION1. Open 1/8" air bleeder at the top of valve to release air.2. Open shut-off valve.3. Tighten packing nut or replace packing seals.4. Replace diaphragm.5. Open needle valve wide (counter clockwise) to flushseat, & after 4 or 5 seconds return to original setting, orremove and clean orifice.6. Disassemble, clean or replace screen.7. Disassemble, clean and replace damaged parts.8. Disassemble and replace diaphragm.9. Disassemble and remove. Replace damaged parts.10. Disassemble and replace damaged parts.11. For back pressure valve turn adjusting screw clockwiseslowly until valve resumes control and the desired inletpressure is obtained. For relief valve, turn pilotadjusting screw clockwise until valve closes.12. Tighten or replace fitting.13. Disassemble and replace o-ring.B. PROBLEM: <strong>Valve</strong> is closed and will not open.CORRECTION1. For back pressure turn pilot valve adjusting screwcounter clockwise slowly until the valve opens and thedesired inlet pressure is obtained. For relief valve turnpilot adjusting screw counter clockwise slowly until thevalve opens, then turn clockwise till valve closes.2. Turn adjusting cap clockwise slowly until valve opensand a reduced outlet pressure is observed. Lock in thisposition.3. Open shut-off valve.4. Disassemble and clean. If necessary, replace stem andseat ring.5. Replace orifice (or needle valve).Test To Isolate Source Of Problem(After visual inspection of external leaks)1. With the main line gate valves open and the back pressure (relief) valve under pressure, close the control shut-off(isolation) valve at the outlet side of the back pressure (relief) pilot control. THE MAIN VALVE SHOULD CLOSE.If the valve remains fully open the source of the problem could be:(A) fouled orifice or needle; (B) fouled strainer; (C) control shut off valve at inlet is closed; (D) ruptured main valvediaphragm.If the valve is partially closed the source of the problem could be:(A) damaged: main valve seat packing or seat ring; (B) debris under seat; (C) main valve is air-bound; (D) damagedstem o-ring.If the valve closes fully, the source of the problem could be:(A) pilot valve out of adjustment; (B) damaged pilot valve stem or set ring; (C) partially fouled strainer or needle valve.2. With the main line gate valves open and the back pressure (relief ) valve under pressure, close both shut-off(isolation) valves (inlet and outlet sides) in the controls and open the air bleeder pet cock to release water from thepower chamber above the diaphragm of the main valve. Water will flow from the pet cock as the piston of the mainvalve moves tot he full open position.If water continues to flow from the pet cock, the source of the problem could be:(A) damaged: main valve diaphragm or stem seal o-ring; (B) loose locknut.MANUAL: <strong>C401</strong>REV: 2