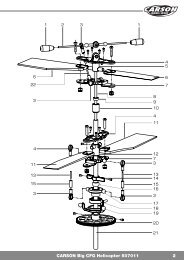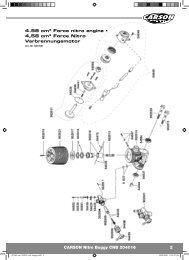
CARSON Raptor Pro V25 www.carson-modelsport.com - Tamiya
CARSON Raptor Pro V25 www.carson-modelsport.com - Tamiya
CARSON Raptor Pro V25 www.carson-modelsport.com - Tamiya
- No tags were found...

You also want an ePaper? Increase the reach of your titles
YUMPU automatically turns print PDFs into web optimized ePapers that Google loves.
Betriebsanleitung Seite 2 - 12 Instruction Manual Page 14 - 24 Mode d’emploi Page 26 - 37 Instrucciones Página 38 - 49 Istruzioni d’uso Pagina 50 - 60<strong>V25</strong><strong>www</strong>.<strong>carson</strong>-<strong>modelsport</strong>.<strong>com</strong><strong>CARSON</strong> <strong>Raptor</strong> <strong>Pro</strong> <strong>V25</strong>
DSehr geehrter KundeWir beglückwünschen Sie zum Kauf Ihres <strong>CARSON</strong> RC-Modell autos,das nach dem heutigen Stand der Technik gefertigt wurde.Da wir stets um Weiterentwicklung und Verbesserung unserer<strong>Pro</strong>dukte bemüht sind, behalten wir uns eine Änderung in technischerHinsicht und in Bezug auf Ausstattung, Materialien und Design jederzeitund ohne Ankündigung vor.Aus geringfügigen Abweichungen des Ihnen vorliegenden <strong>Pro</strong>duktesgegenüber Daten und Abbildungen dieser Anleitung können daherkeinerlei Ansprüche abgeleitet werden.Diese Bedienungs- und Montageanleitung ist Bestandteil des<strong>Pro</strong>dukts. Bei Nichtbeachtung der Bedienungsanleitung und derenthaltenen Sicherheitsanweisungen erlischt der Garantieanspruch.Bewahren Sie diese Anleitung zum Nachlesen und für die even tuelleWeitergabe des Modells an Dritte auf.GarantiebedingungenFür dieses <strong>Pro</strong>dukt leistet <strong>CARSON</strong> eine Garantie von 24 Monatenbetreffend Fehler bei der Herstellung in Bezug auf Material undFertigung bei normalem Gebrauch ab dem Kauf beim autorisiertenFachhändler. Im Falle eines Defekts während der Garantiezeit bringenSie das Modell zusammen mit dem Kaufbeleg zu Ihrem Fachhändler.<strong>CARSON</strong> wird nach eigener Entscheidung, falls nicht anders im Gesetzvorgesehen:(a) Den Defekt durch Reparatur kostenlos in Bezug auf Material undArbeit beheben;(b) Das <strong>Pro</strong>dukt durch ein gleichartiges oder im Aufbau ähnlichesersetzen; oder(c) Den Kaufpreis erstatten.Alle ersetzten Teile und <strong>Pro</strong>dukte, für die Ersatz geleistet wird, werdenzum Eigentum von <strong>CARSON</strong>. Im Rahmen der Garantie leistungendürfen neue oder wiederaufbereitete Teile verwendet werden.Auf reparierte oder ersetzte Teile gilt eine Garantie für die Restlaufzeitder ursprünglichen Garantiefrist. Nach Ablauf der Garantiefristvorgenommene Reparaturen oder gelieferte Ersatzteile werden inRechnung gestellt.Von der Garantie ausgeschlossen sind:• Beschädigung oder Ausfall durch Nichtbeachten der Sicherheitsanweisungenoder der Bedienungsanleitung, höhere Gewalt, Unfall,fehlerhafte oder außergewöhnliche Beanspruchung, fehlerhafteHandhabung, eigenmächtige Veränderungen, Blitzschlag oderanderer Einfluss von Hochspannung oder Strom.• Schäden, die durch den Verlust der Kontrolle über Ihr Fahrzeugentstehen.• Reparaturen, die nicht durch einen autorisierten <strong>CARSON</strong> Servicedurchgeführt wurden• Verschleißteile wie etwa Sicherungen und Batterien• Rein optische Beeinträchtigungen• Transport-, Versand- oder Versicherungskosten• Kosten für die Entsorgung des <strong>Pro</strong>dukts sowie Einrichten und vomService vorgenommene Einstell- und Wiedereinrichtungsarbeiten.Durch diese Garantie erhalten Sie spezielle Rechte, darüber hinaus istauch eine von Land zu Land verschiedene Geltendmachung andererAnsprüche denkbar.KonformitätserklärungHiermit erklärt Dickie-<strong>Tamiya</strong> GmbH & Co. KG, dass sich dieses Modelleinschließlich Fernsteueranlage in Übereinstimmung mit den grundlegendenAnforderungen folgender EG-Richtlinien: 98/37EG fürMaschinen und 89/336/EWG über die elektro magnetische Verträglichkeitund den anderen relevanten Vorschriften der Richtlinie 1999/5/EG(R&TTE) befindet.Die Original-Konformitätserklärung kann angefordert werden:Dickie-<strong>Tamiya</strong> GmbH & Co. KG • Werkstraße 1 • D-90765 Fürth •GermanyBedeutung des Symbols auf dem <strong>Pro</strong>dukt, derVerpackung oder Gebrauchsanleitung: Elektrogerätesind Wertstoffe und gehören am Ende derLaufzeit nicht in den Hausmüll! Helfen Sie unsbei Umweltschutz und Recourcenschonung undgeben Sie dieses Gerät bei den entsprechendenRücknahmestellen ab. Fragen dazu beanwortetIhnen die für Abfallbeseitigung zuständige Organisationoder Ihr Fachhändler.Wir wünschen Ihnen viel Spaß mit Ihrem<strong>CARSON</strong> Modellauto und jederzeit gute Fahrt!Vor dem Gebrauch Ihres neuen Modells lesen Sie bitte dieses Handbuch sorgfältig durch!2<strong>CARSON</strong> <strong>Raptor</strong> <strong>Pro</strong> <strong>V25</strong>
InhaltVorwort .......................................................................................................................... 2Lieferumfang ............................................................................................................... 3Sicherheitsanweisungen ......................................................................................... 4Zum Betreiben des Motors erforderliches Zubehör ..................................... 5Für den Zusammenbau erforderliches Werkzeug ......................................... 6a. Ihre Fernsteuerung .............................................................................................. 6b. Chassis ...................................................................................................................... 7c. Einlegen der Empfängerbatterien ................................................................. 7d. Funktionstest ......................................................................................................... 8e. Letzte Vorbereitungen ....................................................................................... 8f. Es kann losgehen... fast ...................................................................................... 9g. Einschalten der RC-Anlage .............................................................................10h. Steuern des Modells .........................................................................................10i. Wartung und Pflege ......................................................................................... 11j. Einstelltipps für das 2-Gang Getriebe ........................................................ 11k. <strong>Pro</strong>blembehandlung ........................................................................................ 12Montageanleitung ...................................................................................................62Schrauben ...................................................................................................................90Ersatzteile ....................................................................................................................92Force 25R – 4,01 cm 3 Motor ..................................................................................98DLieferumfangChassisSender(Nur in der RTR Versionenthalten)<strong>CARSON</strong> <strong>Raptor</strong> <strong>Pro</strong> <strong>V25</strong>3
DSicherheitsanweisungenSicherheitsanweisung und bestimmungsgemäßeVerwendungEin Verbrenner-RC-Modellauto ist ein ferngesteuertes, mit spe ziel lemModellkraftstoff betriebenes Modellauto. Es ist aus schließlich fürHobbyzwecke ausgelegt und darf nur auf dafür vorgesehenenBahnen und Plätzen, nicht in geschlossenen Räumen gefahrenwerden.Mit einem Verbrenner-RC-Modellauto dürfen keine Güter, Per sonenoder Tiere transportiert werden.Um Bedienungsfehler zu vermeiden, muss vor der Benutzungunbedingt die Gebrauchsanweisung gelesen werden!Modellautos dürfen nur mit einer Karosserie, die ordnungs gemäßangebracht ist, betrieben werden.Vor dem Abnehmen der Karosserie den Motor abkühlen lassen, daKühlkopf und Auspuff im Betrieb heiß werden.Das Modell darf nicht dauerhaft in unmittelbarer Nähe von Personenbetrieben werden, da unter Umständen Gehörschäden auftretenkönnen.Um zu vermeiden, dass das Modell mit Störungen im Steuerungssystemund dadurch unkontrolliert fährt, sind die Batterien desSenders und des Empfängers auf einwandfreien Ladezustand hin zuüberprüfen.Die korrekte Montage der Modellautos muss stets vor und nach jederFahrt überprüft werden, gegebenenfalls Schrauben und Mutternnachziehen.Die Tankanlage muss vor jedem Gebrauch auf Dichtheit geprüftwerden. Der Tankdeckel muss stets dicht verschlossen sein.Dieses Modell ist kein Spielzeug!• Funkferngesteuerte Modelle sind kein Spielzeug, Ihre Bedienungmuss schrittweise erlernt werden.• Kinder unter 14 Jahren sollten das Modell nur unter Aufsicht vonErwachsenen in Betrieb nehmen.Das Fahren von ferngesteuerten Autos ist ein faszinierendes Hobby,das jedoch mit der nötigen Vorsicht und Rücksichtnahme betriebenwerden muss. Ein ferngesteuertes Modell auto, das ein beachtlichesGewicht aufweist und eine sehr hohe Ge schwindig keit erreicht, kannin einem unkontrollierten Fahr zu stand er heb liche Beschädigungenund Verletzungen verursachen, für die Sie als Betreiber haftbar sind.Vergewissern Sie sich bei Ihrer Versicherung, ob Sie beim Aus übenIhres Hobbys versichert sind. Nur ein einwandfrei zu sam men gebautesModell wird erwartungsgemäß funktionieren und reagieren.Improvisieren Sie niemals mit untauglichen Hilfs mitteln, sondernverwenden Sie im Bedarfsfall nur Originalersatzteile. Auch bei einemvormontierten Modell soll ten Sie alle Verbindungen auf exakten undfesten Sitz kontrollieren.Fahren Sie niemals, ohne sich von denfolgenden Punkten überzeugt zu haben:• Empfängerakku und Senderakku müssen vollständig geladen sein.• Überprüfen Sie vor dem Start die Funkreichweite.• Überprüfen Sie das ordnungsgemäße Ansprechen der Servos aufdie Steuersignale.• Alle Funktionsteile des Fahrzeugs sind in einwandfreiem Zustandund überprüft.• Sämtliche Schrauben sind auf festen Sitz überprüft.• Es ist kein RC- oder anderer Sender in der Nähe in Betrieb, derFunkstörungen verursachen könnte. Störsignale auf gleicherFrequenz können bewirken, dass Sie die Kontrolle über Ihr Modellverlieren. Schalten Sie immer zuerst den Sender ein, um zu vermeiden,dass der Empfänger unkontrolliert auf ein fremdes Funksignalreagiert.• Schalten Sie nach Beendigung des Fahrbetriebes zuerst denEmpfänger, dann den Sender aus.• Fahren Sie auch nicht unter Hochspannungsleitungen oder Funkmastenoder bei Gewitter!• Atmosphärische Störungen können die Signale Ihres Fernsteuersendersbeeinflussen.• Die Elektrik des Modells ist nicht wasserdicht. Fahren Sie deshalbnicht bei Regen, Schnee, durch Pfützen oder nasses Gras.• Das ferngesteuerte Modell darf nur auf geeignetem Gelände undnicht auf öffentlichen Vekehrsflächen betrieben werden.• Nicht in der Nähe von Personen und Tieren fahren!• Fahren Sie nicht, wenn sie übermüdet oder anderweitig in IhrerReaktionsfähigkeit beeinträchtigt sind.• Halten Sie immer direkten Sichtkontakt zum Modell.• Fahren Sie das Modell nur mit ordnungsgemäß angebrachterKarosserie.• Regelmäßige Wartung und Pflege ist für erstklassige Fahr leistungnotwendig.• Das Modell hat Teile, die sich im Betrieb erhitzen, z.B. die Ober seitedes Motors, die Abgasanlage, das Metallgetriebe und vieles mehr.Die Berührung dieser Teile während des Betriebs kann zu Verletzungenführen.Achten Sie auf Ladezustandsanzeige Ihres Senders.• Mit halbleeren Akkus können Sie die Kontrolle über das Modellverlieren.• Mischen Sie im Sender niemals volle Akkus/Batterien mit halbleerenoder Akkus unterschiedlicher Kapazität.• Versuchen Sie nie, Trockenbatterien zu laden (nur Akkus sindaufladbar).Bei längerem Nichtgebrauch ist der Empfängerakku unbedingt zuentfernen.4<strong>CARSON</strong> <strong>Raptor</strong> <strong>Pro</strong> <strong>V25</strong>
Bezüglich des Kraftstoffes bitte folgendesbeachten:• Unter Verschluss und für Kinder und Tiere unzugänglichaufbewahren• Behälter dicht geschlossen halten• Behälter an einem gut belüfteten Ort aufbewahren• Von Zündquellen fernhalten – Nicht rauchen• Nicht verschlucken und Berührung mit der Haut vermeidenKraftstoffreste und -behälter müssen als Sondermüll beseitigt werden.Bei Unfall oder Unwohlsein sofort den Arzt hinzuziehen (wenn möglichdas Etikett des Kraftstoffs vorzeigen).Zum SchlussBitte lesen Sie diese Betriebsanleitung sorgfältig durch, bevor Sieirgendwelche Arbeiten beginnen.Nach jeder Fahrt sollten Sie die wichtigsten Bauteile und Verbindungenüberprüfen. Eine einzige gelockerte Schraube kannausreichen, um Ihr Modell in eine gefährliche Situation geraten zulassen! Warten Sie Ihr Modell regelmäßig und wechseln Sie defekteoder abgenutzte Bauteile gegen Original-Ersatzteile aus.Wir wünschen Ihnen viel Spaß mit Ihrem<strong>CARSON</strong>-Modellauto und jederzeit gute Fahrt!DZum Betreiben des Motorserforderliches ZubehörGlühkerzenstecker50 090 5042After Run Öl Luftfilteröl50 090 5044 50 003 2648Kraftstoff -füllflasche50 001 3330KraftstoffNitroset50 090 5072<strong>CARSON</strong>-Kraftstoffe werden empfohlenLiter Nitromethan N O Verwendung1,0 10% 50 090 5052 Einlaufen/Beginner1,0 16% 50 090 5053 Normal2,5 16% 50 090 5054 Normal1,0 25% 50 090 5055 Race2,5 25% 50 090 5056 Race<strong>CARSON</strong>-ROSSI GlühkerzenN O Bezeichnung Motorart Kraftstoffart Temperatur50 090 5006 Glühkerze Rossi R2 heiß 2 - 3,5 ccm ohne Nitro +0° - +15C°50 090 5007 Glühkerze Rossi R3 medium 3,5 - 6 ccm ohne Nitro -2° - +18C°50 090 5008 Glühkerze Rossi R4 kalt 6 - 10 ccm ohne Nitro -5° - +20C°50 090 5009 Glühkerze Rossi R5 extra 3,5 - 10 ccm 10% Nitro -7° - +22°50 090 5010 Glühkerze Rossi R6 kalt universal 10-13% Nitro +10° - +25°50 090 5011 Glühkerze Rossi R7 kalt universal 13-15% Nitro +15° - +30°50 090 5012 Glühkerze Rossi R8 extra kalt universal 13-15% Nitro +20° - +40°Für den Sender werden 8 Stück AA Batterien/Akkus benötigt.<strong>CARSON</strong> <strong>Raptor</strong> <strong>Pro</strong> <strong>V25</strong>5
DFür den Zusammenbau erforderliches WerkzeugModellbaumesser 30 007 4053Sekundenkleber 30 005 3339Spitzzange 30 007 4034Schere 30 001 3305Kreuzschlitz-Schraubendreher(klein und groß) und Inbusschlüssel1,5/ 2 / 2,5 mm 30 007 4023Kreuzschlüssel 30 001 3118Pinzette 30 007 4003Seitenschneider 30 007 4035a. Ihre Fernsteuerung (nur bei RTR-Version)Bitte lesen Sie die, Ihrem RC-System beiliegende Anleitung, genaudurch.Vor dem Einbau müssen die Servos in Mittelstellung gebracht werden. en.Dazu schalten Sie bitte den betriebsbereiten Sender und Empfängerein. Stellen Sie die Trimmhebel am Sender auf Mittelstellung. Jetztschalten Sie den Empfänger und dann den Sender aus. Die Servos sindjetzt für den Einbau genau auf Neutralstellung.EmpfängerantenneEmpfängerbatterienSenderSchalterGasservoLenkservo6<strong>CARSON</strong> <strong>Raptor</strong> <strong>Pro</strong> <strong>V25</strong>
. ChassisLuftfilterMotorKarosseriehalterDÜberrollbügelGetriebeHintereStoßdämpferEmpfängerboxAuspuffEin-/AusschalterHinterreifenGasservoTankVorderreifenChassisVordere Stoßdämpferc. Einlegen der EmpfängerbatterienLegen Sie vier „AA“ Batterien in die Batteriehalterung des Empfängersein (siehe Bild 1). Achten Sie auf die korrekte Polung. VerbindenSie dann den Akku mit dem zugehörigen Stecker zum Empfänger.Schwarz muss mit schwarz und rot mit rot verbunden werden.Schließen Sie dann das Batteriefach mit der zugehörigen Abdeckung.Bild 1Insider Tipp:Benutzen Sie wiederaufladbare Batterien. Diese halten länger undsind auf längere Sicht gesehen billiger. Ersetzten Sie die vier „AA“Batterien durch unseren NiMh 6 V/ 1100 mAh Akkupack(N O 50 060 8036 JR).<strong>CARSON</strong> <strong>Raptor</strong> <strong>Pro</strong> <strong>V25</strong>7
Dd. FunktionstestSchalten Sie immer zuerst die Fernbedienung ein, bevor Sie Ihr Autoeinschalten. Nun können Sie Ihr Auto einschalten, indem Sie den EIN/AUS-Schalter am Auto betätigen. Hinweis: Überprüfen Sie immer dieEinstellung Ihrer Fernbedienung, vor der Benutzung Ihres Autos.Überprüfen Sie bitte, ob die Lenkung zentriert ist. Sollte dies nicht derFall sein, benutzen Sie den ST-Trimm-Knopf links neben dem Lenkrad.Die Drehung nach links sollte das Auto nach links fahren lassen, eineRechtsdrehung nach rechts.Nun muss der Vergaser in die Neutralstellung gebracht werden.Ent fernen Sie den Luftfilter vom Vergaser.Im Vergaserhals muß ein Spalt von ca. 1 - 1,5 mm zu sehen sein (sieheBild 2). Sollte der Spalt größer sein, kann es sein, dass der Motor mitzu hoher Drehzahl läuft. Dies kann dazu führen, dass die Bremsenund/ oder die Kupplungsbeläge vorzeitig ab ge nutzt werden und eserschwert das Fahren des Autos.Benutzen Sie den TH-Trimm (siehe Bild 3) um den Servoarm, wennnötig, in die neutrale Position zu bringen. In der Neutralpositionsollten die Bremsen nicht schleifen. Die Einstellung erfolgt mit einem1,5 mm - Inbusschlüssel über einen Stellring am Bremsgestänge.Wenn Sie mit den Einstellungen zufrieden sind, bringen Sie den Luftfilterwieder an.Bild 21 - 1,5 mmBild 3TH-Trimme. Letzte Vorbereitungen...Stecken Sie die Kraftstoff-Flasche zusammen. Drücken Sie diesezusammen und stecken Sie die Spitze in einen Kanister mit NitroAutokraftstoff. Lassen Sie langsam mit dem Druck nach und dieFlasche füllt sich von selbst. Danach, drücken Sie langsam die Flaschezusammen um den Benzintank Ihres Autos aufzufüllen.Insider Tipp 1:Der Kraftstoff hält sich länger, wenn Sie diesen an einem kalten,dunklen und trockenen Platz aufbewahren.Insider Tipp 2:Lassen Sie den Glühkerzenstecker niemals länger als 10 Sekunden amMotor angeschlossen. Wenn Sie diesen zu lange benutzen, kann diesdazu führen, dass die Glühkerze vorzeitig durchbrennt. Benutzen Siewiederaufladbare Glühzünder für längere Lebensdauer.Insider Tipp 3:Zum Starten feuerfeste Handschuhe anziehen!8<strong>CARSON</strong> <strong>Raptor</strong> <strong>Pro</strong> <strong>V25</strong>
f. Es kann losgehen... fast!Das Einfahren des Motors ist der wichtigste Schritt, um sicherzugehen,dass Ihr Motor immer schnell und verlässlich läuft. Einfach gesagt:LASSEN SIE DIESEN TEIL NICHT AUS!Der Motor ist vom Hersteller schon „Voreingestellt“. Benutzen Sie einePlattform und stellen Sie das Auto so darauf, dass die Reifen keinenBodenkontakt haben und sich frei bewegen können.Der Gashebel der Fernsteuerung muss in der Position „neutral“ sein.Platzieren Sie den Glühkerzenstecker auf der Glühkerze und ziehenSie das Startseil kräftig heraus (siehe Bild 4). Es darf jedoch nicht mehrals 25 cm herausgezogen werden! Wenn Sie es weiter herausziehen,kann das Seil reißen. Es ist besser, das Startseil kurz und kräftig zuziehen, als zu weit heraus. Sollte das Startseil hängen bleiben, rotierenSie bitte das Schwungrad etwas mit Ihrem Finger. Das sollte das Seilautomatisch wieder in die Startposition bringen. Nach einigen Zügen,sollte der Motor mit viel Rauch starten.Tipp:Werkseinstellung vom Vergaser:Mit folgender Grundeinstellung springt der Motor sofort an und läuftsauber und ausreichend fett:• Leerlaufschraube: ca. 1 mm Luftspalt;• Hauptdüsennadel: ganz schließen, dann 4 Umdrehungen öffnen;• Gemisch-Schraube (Anlenkung): mit dem Rand des Lenk hebelsbündig, dann 1 Umdrehung schließen.Bild 5DBild 4fettermagererBild 6Sollte der Motor <strong>Pro</strong>bleme im Leerlauf haben, drehen Sie bitte dieSchraube für den Leerlauf im Uhrzeigersinn immer um 1/8 Schritteweiter. Das erhöht den Leerlauf, was ein korrektes Einfahren desMotors ermöglicht. Führen Sie diesen Vorgang nur in einem gutdurchlüfteten Raum durch, vorzugsweise im Freien, z.B. Ihrer Einfahrt.Nicht verbranntes Öl des Kraftstoffes kann sich am Auspuff sammeln,legen Sie etwas unter.Lassen Sie das Auto im Leerlauf über 2 bis 3 Tankfüllungen laufenund überprüfen Sie die Temperatur des Motors etwa alle zweiMinuten. Lassen Sie zwischen den Tankfüllungen 10 - 15 Min Pausezum Abkühlen. Der Motorkühlkörper sollte mit dem Finger berührtwerden können und nicht zu heiß sein. (ACHTUNG! Nicht anfassen!)Sollte die Oberfläche zu heiß werden, erhöhen (drehen gegen denUhrzeigersinn) Sie die Hauptdüsennadel um 1/8. Gehen Sie in kleinenSchritten vor, wenn Sie solche Veränderungen vornehmen.fettermagererSobald der Einfahrprozess abgeschlossen ist, muss die Hauptdüsennadelmindestens 3 1⁄4 Umdrehungen geöffnet sein. Bei hohenAußentemperaturen wird es nötig sein, die Einstellungen etwas fetterzu wählen.Insider Tipp:Nach der Einlauf-Periode können Sie Ihr Auto bei fetter Vergaser-Einstellung langsam fahren und vermeiden Sie längere Zeiten beiVollgas. Stimmen Sie die Einstellung mit 1/8 Drehungen vorsichtigab. Der Leerlauf erhöht sich um so mehr, je mehr Sie das Gemisch imMotor abmagern.<strong>CARSON</strong> <strong>Raptor</strong> <strong>Pro</strong> <strong>V25</strong>9
Dg. Einschalten der RC-AnlageACHTUNG! Immer zuerst den Sender einschalten!ONEinschalten des Empfängers• Der Ein/Aus-Schalter befindet sich auf derEmpfängerbox.• Befestigen Sie das Antennenröhrchen, durchdas das Antennenkabel geführt wird.• Setzen Sie die Karosserie auf und sichern diesemit den Karosseriesplinten.Bild 7ONh. Steuern des Modells• Stellen Sie das Modell so ab, dass die Räder frei in der Luft hängen.• Drehen Sie das Steuerrad bis zum Anschlag nach rechts und links.Die Räder sollen dem Lenkausschlag folgen.• Schlagen die Räder entgegengesetzt ein, betätigen sie denServo-Reverse Schalter (ST in Position REV).• Zum Regeln der Fahrgeschwindigkeit betätigen Sie denGas/Bremshebel- nach hinten (Vorwärtsfahrt, Gas geben) bzw.- nach vorne (Bremsen, Rückwärtsfahrt).NeutralLinks Rechts10<strong>CARSON</strong> <strong>Raptor</strong> <strong>Pro</strong> <strong>V25</strong>
i. Wartung und PflegeSchäden, die daraus resultieren, dass der Motor nicht eingefahrenwurde und/oder die durch falsche Einstellung entstehen, fallen nichtunter die Gewährleistungsgarantie.Es gibt zwei verschiedene Möglichkeiten die Temperatur Ihres Motorszu überprüfen. Sie können sich eine Temperaturanzeige kaufen. Diezweite billigere Methode, jedoch weniger genau, ist der „Spucketest“.Reiben Sie etwas Spucke auf die Oberseite des Kühlkörpers und sie wirdinnerhalb von 3 – 4 Sekunden verschwinden (der Siedepunkt von Wasserist normalerweise 100 °C). Sollte die Spucke sofort verschwinden, ist dieWahrscheinlichkeit sehr groß, dass der Motor zu heiß gelaufen ist.Der Motor bringt beste Leistung und kann einfacher wieder neugestartet werden bei einer Betriebstemperatur von 100 °C bis125 °C. Abhängig vom Wetter, Luftdichte und Luftfeuchtigkeit, mussdie Einstellung des Vergasers vor jedem Gebrauch des Fahrzeugesverändert werden. Vorsichtiges Einstellen garantiert eine langeLebensdauer Ihres Motors. Überhitzung erfolgt, wenn das Gemisch imMotor zu mager ist, oder wenn die Einstellung des Vergasers nicht derWetter lage angepasst ist. Durch starke Überhitzung kann es zu Motorschädenkommen.Es gibt viele Tipps und Infos Online, die Ihnen helfen, Ihren Motor einzustellen.3,5 ccm Motoren haben eine sehr lange Lebensdauer undbei richtiger Wartung und Tuning können Sie das Modell stundenlangohne Unterbrechung fahren.Bild 8Benutzen Sie dann spezielles Öl (After Run Öl) für den Vergaser, ziehenSie das Startseil ein paar Mal, damit sich das Öl im Motor verteilt. DieserVorgang empfiehlt sich, wenn Sie planen, das Auto mehr als einenTag nicht zu fahren. Methanol verdunstet und wird zu Wasser, was fürdie Teile im Inneren des Motors schädlich sein kann. Wir empfehlen,dass Sie vor jedem Gebrauch Ihres Autos die Festigkeit aller Schrauben,Muttern und Bolzen überprüfen.Bild 9DAusschaltenNach Beendigung des Fahrens, gibt es zwei Möglichkeiten den Motorauszuschalten. Die erste Möglichkeit ist, ein Tuch dicht auf das Auspuffrohrzu drücken. Der Motor muss im Leerlauf sein, vorzugsweisesollten die Bremsen betätigt sein.Die zweite Möglichkeit besteht darin, den Luftzugang zum Motorabzuklemmen. Der Kraftstoffschlauch sollte nicht abgeklemmtwerden, weil sich der Motor dadurch überhitzen kann.Versuchen Sie den übrig gebliebenen Kraftstoff durch den Motorlaufen zu lassen, um so den Tank vollkommen zu entleeren. DieMotordrehzahl wird sich im Leerlauf erhöhen während der Tank sichentleert, somit sind die o.g. Schritte nicht nötig.Das Auto sollte regelmäßig gereinigt werden. Dazu kann eine strapazierfähigeBürste oder ein Pinsel benutzt werden. Überprüfen Sie vordem Start immer die Batterien von Sender und Empfänger.Insider Tipp:Benutzen Sie Handschuhe, wenn Sie an Ihrem heißen Auto arbeiten!j. Einstelltipps für das2-Gang GetriebeSchaltpunkt des 2-Gang Getriebes:Um den Schaltpunkt des 2-Gang Getriebes einzustellen, entfernt manauf der rechten Fahrzeugseite den Gummipfropfen aus der Öffnungim Getriebekasten. Nun schaut man schräg von oben in das Loch unddreht das Hauptzahnrad solange bis eine Öffnung zu sehen ist.Jetzt das Hauptzahnrad festhalten und die Vorderräder langsamnach vorne drehen bis eine schräge Bohrung sichtbar wird (nicht diegerade Bohrung). Diese jetzt so zurecht drehen, dass man einen 2 mmInbusschlüssel schräg von oben hineinstecken kann. Mit etwas Gefühlerwischt man die Madenschraube auch sofort.Bild 10<strong>CARSON</strong> <strong>Raptor</strong> <strong>Pro</strong> <strong>V25</strong>11
DNach rechts drehen um den Schaltzeitpunkt auf höhere und nachlinks drehen um ihn auf niedrigere Drehzahl einzustellen (nur kleineÄnderungen vornehmen). Nicht vergessen die Öffnung wieder mitdem Gummipfropfen zu verschließen.Slipper:Vorsicht, die Mutter an der Rutschkupplung hat ein Linksgewinde, dasheißt zum Öffnen der Mutter im Uhrzeigersinn drehen. Die Muttersoweit zudrehen, bis die Feder ganz zusammengedrückt ist, dannwieder 1/4 Umdrehung öffnen.k. <strong>Pro</strong>blembehandlungLesen Sie dies, schon bevor es passiert.Der Motor springt nicht anMotor istabgesoffen.Zu viel Benzin istim Motor.Entfernen Sie die Glühkerze. Ziehen Sie dasStartseil 6 – 8 mal.Vorsicht, Kraftstoff kann spritzen.Leerer Tank/kein Kraftstoffim MotorFüllen Sie den Tank auf. Lassen Sie den Motoransaugen, indem Sie das Startseil einmal ziehenund gleichzeitig mit den Fingerspitzen denAuspuff zuhalten.KaputteGlühkerzeBatterie desGlühkerzensteckersist leer.Entfernen Sie die Glühkerze. Stecken Sie dieGlühkerze in den Zünder. Wenn diese schwarzist, ist die Kerze kaputt. Sie sollte hell orangeglühen.Legen Sie eine neue Glühkerze in den Glühkerzenstecker.Wenn diese nur sehr schwachoder überhaupt nicht glimmt, muss eine neueBatterie oder Akku eingelegt werden.ÜberhitzungWenn der Motor bei zu hohen Temperaturenläuft, kann dies dazu führen, dass einGas pfropfen entsteht. Lassen Sie den Motor5 – 10 Minuten abkühlen.Motor stirbt plötzlich abÜberhitzungDie DruckleitungistunterbrochenÜberprüfen Sie die Temperatur. Sollte diese über130°C liegen, muss das Kraftstoffgemisch angereichertwerden. Überprüfen Sie, ob die Rädersich frei bewegen können.Befestigen Sie die Kraftstoffleitung desAuspuffrohres wieder mit dem Benzintankdeckel.SchmutzigerLuftfilterVergaser istlockerWaschen Sie diesen mit Seife und Wasser, dannbenützen Sie Luftfilteröl (N o 50 003 2648).Überprüfen Sie Vergaserhalterungsschraube undMutter. Drücken Sie den Vergaser auf den Motorblock,ziehen Sie die Schraube fest, um Falschluftzu vermeiden.Kontrollverlust/StörungenLeere/schwacheAkkusDie Akkus im Sender sollten voll aufgeladen sein.Ist der Servo sehr langsam, bedeutet dies, dassdie Batterien des Empfängers leer sind.Modell fährtnicht geradeausLenkungstrim ist nicht korrekt eingestellt.Radmuttern sind lose.FalscheEinstellung desSendersDas Modell fährtnichtRichten Sie sich nach der Gebrauchsanweisung,wenn Sie Ihren Sender einstellen.Sender oder Empfänger sind nicht eingeschaltet.Polarität der Akkus oder Akkutyp sind falsch.Modell bleibtnicht stehenModell fährt zulangsamTrimmung für den Gas/Bremshebel ist nichtkorrekt eingestellt.Motor hat an Leistung verloren.Die hinteren Radmuttern sind lose.Staub/Fremdkörper ist in das Getriebe gelangt.Batterien/Akkus zu schwach.12<strong>CARSON</strong> <strong>Raptor</strong> <strong>Pro</strong> <strong>V25</strong>
D<strong>CARSON</strong> <strong>Raptor</strong> <strong>Pro</strong> <strong>V25</strong>13
GBDear CustomerWe congratulate you for buying this <strong>CARSON</strong> RC model car, which isdesigned using state of the art technology.According to our policy of steady development and productimprovement we reserve the right to make changes in specificationsconcerning equipment, material and design at any time withoutnotice.Specifications or designs of the actual product may vary from thoseshown in this manual or on the box.The manual forms part of this product. Should you ignore theoperating and safety instructions, the warranty will be void.Keep this guide for future reference.Limited WarrantyThis product is warranted by <strong>CARSON</strong> against manufacturing defectsin materials and workmanship under normal use for 24 months fromthe date of purchase from authorised franchisees and dealers. In theevent of a product defect during the warranty period, return theproduct along with your receipt as proof of purchase to any <strong>CARSON</strong>store. <strong>CARSON</strong> will, at its option, unless otherwise provided by law:(a) Correct the defect by repairing the product without charging forparts and labour(b) Replace the product with one of the same or similar design; or(c) Refund the purchase price.All replacement parts and products, and products on which a refundis made, be<strong>com</strong>e the property of <strong>CARSON</strong>. New or reconditionedparts and products may be used in the performance of warrantyservices.Repaired or replaced parts and products are warranted for theremainder of the original warranty period. You will be charged forrepair or replacement of the product made after the expiration of thewarranty period.The Warranty does not cover:• Damage or failure caused by or attributable to acts of God, abuse,accident, misuse, improper or abnormal usage, failure to followinstructions, improper installation or maintenance, alteration,lightning or other incidence of excess voltage or current;• Damage caused by losing control of your car;• Any repairs other than those provided by a <strong>CARSON</strong> AuthorisedService Facility;• Consumables such as fuses or batteries;• Cosmetic damage;• Transportation, shipping or insurance costs; or• Costs of product removal, installation, set-up service adjustment orreinstallationThis warranty gives you specific legal rights, and you may also haveother rights which may vary according to the country of purchase.Declaration of ConformityDickie-<strong>Tamiya</strong> GmbH & Co. KG hereby declares that this model kitwith radio, motor, battery and charger is in accordance with the basicrequirements of the following European directives: 98/37 EG and89/336/EWG and other relevant regulations of guideline 1999/5/EG(R&TTE).The original declaration of conformity can be obtained from thefollowing address:Dickie-<strong>Tamiya</strong> GmbH & Co. KG • Werkstraße 1 • D-90765 Fürth •GermanyThe explanation of the symbol on the product,packaging or instructions: Electronic devices arevaluable products and should not be disposed ofwith the household waste when they reach theend of their running time! Help us to protect theenvironment and respect our resources by handingthis appliance over at the relevant recyclingpoints.We wish you good luck and a lot of fun drivingwith your <strong>CARSON</strong> model car.Before driving your new model carefully read these instructions!14<strong>CARSON</strong> <strong>Raptor</strong> <strong>Pro</strong> <strong>V25</strong>
ContentsPreface .......................................................................................................................... 14Included Items........................................................................................................... 15Safety Precautions ................................................................................................... 16Additional Items Needed for Starting the Engine ....................................... 17Tools Needed for the Assembly .......................................................................... 18a. Your Radio System ............................................................................................. 18b. Chassis .................................................................................................................... 19c. Plug in Receiver Batteries ............................................................................... 19d. Check 1...2...3 .......................................................................................................20e. Final Preparations... ...........................................................................................20f. Showtime... almost! ...........................................................................................21g. Turn the Power Switch on ...............................................................................22h. How to Control Your Model ...........................................................................22i. Care and Maintenance .....................................................................................23j. Tips for setting of the 2 speed transmission ............................................23k. Troubleshooting .................................................................................................24Assembly instructions ............................................................................................62Screws ..........................................................................................................................90Spare parts ..................................................................................................................92Force 25R – 4,01 cm 3 Motor ..................................................................................98GBIncluded ItemsChassisTransmitter(included in RTR Versiononly)<strong>CARSON</strong> <strong>Raptor</strong> <strong>Pro</strong> <strong>V25</strong> 15
GBSafety PrecautionsSafety precautions and operating guidelinesThis radio control model vehicle must only be run on the approvedmodel fuel. Always avoid running radio control models in restricted,confined or populated areas. Keep away from roads, highways, peopleand animals. Never run the model indoors.No goods, people or animals may be transported using a RC modelcar with <strong>com</strong>bustion engine.Please ensure that you have read all the safety instructions andoperating procedures before driving the model!The body shell should be correctly attached to the vehicle beforedriving.Allow cooling time for the exhaust and engine <strong>com</strong>ponents beforeremoving the body shell. These parts be<strong>com</strong>e extremely hot duringoperation and could cause serious injury.Do not operate the model permanently where noise may cause anuisance to others, because then you may damage your hearing.To avoid the model running with a faulty control system causing itto drive erratically, check that the batteries in the transmitter andreceiver are properly charged.Always check that all the nuts, bolts and screws and <strong>com</strong>ponents arenot loose. Retighten and adjust as necessary.The fuel tank must be checked each time before use to ensure there isno leakage. The fuel cap must always be tightly closed.This model is not a toy!• This radio controlled model is not a toy. Learning how to control itcorrectly is a gradual process.• Children under 14 years of age should be supervised by an adult.Driving a radio controlled car is a fascinating hobby. However, it hasto be practised with the necessary caution and respect. A radiocontrolled model car can cause damage and injury and the user isliable for any such incident. If driven erratically, a fairly heavy remotecontrolledmodel car which is capable of reaching a high speed cancause substantial damage and injury for which you as the operator areresponsible.Make sure that you have sufficient insurance cover when practisingyour hobby. Only a well maintained model will function in a correctmanner.Never improvise using unsuitable parts and tools. If necessary onlyuse original spare parts. It is the user’s responsibility to ensure that themodel is functioning correctly and that all nuts, bolts and screws areproperly tightened, even with a pre-assembled model.Never drive without first making sure of thefollowing points:• Batteries for transmitter and receiver are well charged and of thecorrect voltage.• Always check the range of radio operation before starting the car.• Make sure that all servos respond correctly to the signals of thetransmitter.• All operable parts are in good condition and you have tested theiroperation.• You have made sure that all screws are tightened.• There is no other RC or similar transmitter nearby, which couldcause interference. Any further radio signal on the same frequencycan cause the loss of control for your model. Always switch on thetransmitter first to avoid any uncontrolled reaction of the receiverto a foreign radio impulse.• To end the operation switch off the receiver first, then thetransmitter.• Keep your car away from high voltage cables or radio masts. Neveruse the model during lightning!• Atmospheric disturbances can affect the signals of your remotecontrolling transmitter.• Do not use the model in wet areas. The electrical connection of themodel is not waterproof. Therefore do not drive while it’s raining,snowing, or in puddles or wet grass.• Always avoid running radio control models in restricted, confinedor populated areas.• Keep away from roads, highways, people and animals!• Do not drive, if you are overtired or your reactivity is impaired inanother way.• Watch your model constantly and do not be<strong>com</strong>e distracted.• The body shell should be correctly attached to the vehicle beforedriving.• Regular maintenance and servicing are required to ensure topperformance.• Allow cooling time for the engine <strong>com</strong>ponents before removingthe body shell. Some parts (e.g. the motor and the muffler) be<strong>com</strong>eextremely hot during operation and could cause serious injury.Pay attention to charge announcement of your transmitter.• Ensure that the batteries for the radio and receiver are fullycharged and of the correct voltage. When the batteries are runninglow you might loose control of your model.• Never use fully loaded batteries and batteries which have alreadyrun low, or batteries of a different capacity at the same time.• Never load batteries which are not rechargeable.If you do not use the model for a longer time you must remove therechargeable battery.16<strong>CARSON</strong> <strong>Raptor</strong> <strong>Pro</strong> <strong>V25</strong>
Please read the following points concerning thefuel:• Keep the fuel in a secure and safe place and away from childrenand animals.• Ensure that the container lid is tightly closed.• Store the fuel in a well ventilated area and away from moisture.• Glow fuel is extremely flammable. Do not smoke.• Avoid skin contact and do not swallow. Read the warning labels onthe container.Dispose of empty fuel containers in an approved manner. Never throwempty cans into a fire.In case of an accident or ingestion contact a doctor immediately.(Present the label of the fuel container if possible.)FinallyPlease read the instructions before operating your model.Each time you have finished driving the model, always check thecorrect operation of the <strong>com</strong>ponents. A single loose screw canresult in a dangerous situation for your model. Maintain your modelregularly and replace damaged or worn out parts by genuine spareparts.We wish you great fun with your <strong>CARSON</strong>model car!GBAdditional Items Needed forStarting the EngineGlow plug heater50 090 5042After Run Oil Air Filter Oil50 090 5044 50 003 2648Fuel bottle50 001 3330FuelNitro set50 090 5072<strong>CARSON</strong>-fuels are re<strong>com</strong>mendedLiter Nitromethan N O Usage1.0 10% 50 090 5052 Run in/Beginner1.0 16% 50 090 5053 Normal2.5 16% 50 090 5054 Normal1.0 25% 50 090 5055 Race2.5 25% 50 090 5056 Race<strong>CARSON</strong>-ROSSI glow plugsN O Article Motor Fuel Temperature50 090 5006 Glow plug Rossi R2 hot 2 - 3.5 ccm without Nitro +0° - +15C°50 090 5007 Glow plug Rossi R3 medium 3.5 - 6 ccm without Nitro -2° - +18C°50 090 5008 Glow plug Rossi R4 cold 6 - 10 ccm without Nitro -5° - +20C°50 090 5009 Glow plug Rossi R5 extra 3.5 - 10 ccm 10% Nitro -7° - +22°50 090 5010 Glow plug Rossi R6 cold universal 10-13% Nitro +10° - +25°50 090 5011 Glow plug Rossi R7 cold universal 13-15% Nitro +15° - +30°50 090 5012 Glow plug Rossi R8 extra cold universal 13-15% Nitro +20° - +40°For the transmitter you need 8 AA batteries/rechargeable batteries.<strong>CARSON</strong> <strong>Raptor</strong> <strong>Pro</strong> <strong>V25</strong> 17
Tools Needed for the AssemblyModelling knife 30 007 4053Instant adhesive 30 005 3339Needle nose pliers 30 007 4034Scissors 30 001 3305GBPhilips screwdriver (small and big)and hex-wrench1,5/ 2 / 2,5 mm 30 007 4023Hexagonal wrench 30 001 3118Tweezers 30 007 4003Side cutter 30 007 4035a. Your Radio System (only for RTR version)Please read the instructions provided with your radio system beforeusing it.The servos must be set at the centre position before installation. To setthe servos at a neutral position, turn on the transmitter and receiver.Set the trim levers in the centre position and turn off the receiver, andthen the transmitter. The servos will be in proper neutral position forinstallation.Receiver antennaBatteries for receiverTransmitterSwitchEngine throttle servoSteering servo18<strong>CARSON</strong> <strong>Raptor</strong> <strong>Pro</strong> <strong>V25</strong>
. ChassisAir filterMotorBody holderRoll barTransmissionRear shock unitsReceiver boxMufflerOn/off switchRear tyreGBGasservoTankFront tyreChassisFront shock unitsc. Plug in Receiver BatteriesInsert 4 “AA” batteries into the receiver battery case as shown(<strong>com</strong>pare picture 1). Make sure positive (+) and negative (-) endsare facing the correct direction. Then plug the pack into the switchharness, inside the radio case. Black goes to black and red goes to red.Replace the battery case cover.Picture 1Racer Tip:Use rechargeable batteries! They last longer and are cheaper inthe long run. Replace the 4 “AA“ car batteries with our NiMh6 V/ 1100 mAh battery pack (N O 50 060 8036 JR).<strong>CARSON</strong> <strong>Raptor</strong> <strong>Pro</strong> <strong>V25</strong> 19
GBd. Check 1...2...3...Always turn the radio on before turning your car on. Now you canswitch on your car using the on/off switch located on the radio box.Note: Always check your radio settings before running your car!Check to make sure your steering is centred. If it is not, use theST-TRIM knob to the left of the steering wheel. Turning left shouldmake the car turn left. Right = right.Now it’s time to set the throttle neutral position. Remove the aircleaner from the carburettor.The opening on the carb slide should be open very little, from1-1.5 mm to allow the engine to idle (picture 2). If it is open more thanthis, the engine may rev higher than normal until brakes are applied.This condition may wear out the brakes and/or clutch shoesprematurely making the car difficult to drive.Use the TH-TRIM tab (picture 3) to move the servo arm into the neutralposition if necessary. While in neutral, the brakes should not be setto “drag”. Adjusting the collars with a 1.5 mm hexagonal wrench willchange your drag brake settings. Replace the air cleaner wheneverything is adjusted to your satisfaction.Picture 21 - 1,5 mmPicture 3TH-Trimme. Final Preparations...Assemble the fuel bottle. Fill the fuel bottle by <strong>com</strong>pressing it andthen insert the spout into the fuel. Allow the bottle to de<strong>com</strong>pressand the suction will fill the fuel bottle. Fill the tank by gentlysqueezing the bottle and ensure that the tank lid is firmly shutwhen finished.Racer Tip 1:Fuel will stay fresh longer if you store it in a cool, dark and dry place.Racer Tip 2:Never leave the glow heater on your engine for more than 10 seconds.A longer time may cause the glow plug to burn out prematurely. Userechargeable glow heaters for longer life.Racer Tip 3:To start the motor, use a fireproof glove!20<strong>CARSON</strong> <strong>Raptor</strong> <strong>Pro</strong> <strong>V25</strong>
f. Showtime... almost!Engine break-in is the most important step to assuring that yourengine is fast and reliable throughout its life. Put simply: DON’T SKIPTHIS PART!The engine is pre-set from the factory for break-in. Use a platform andplace the car so that the wheels are off the ground and free.Make sure the throttle is set at neutral with your radio. Place the glowheater onto the glow plug and give the recoil a sharp pull (picture 4).Do not pull it more than twelve inches! More than that may break thecord and this is not covered under warranty. It is better to give therecoil short sharp pulls rather than long ones. If the pull-start cordgets stuck, rotate the flywheel a little bit with your finger. This shouldmake the cord automatically recoil. Within a few pulls, the engine willstart with a good puff of smoke.Picture 4Racer Tip:Factory setting of carburettor:With the following basic adjustment the engine starts immediately,running perfect and rich enough:• Idle stop screw: approx. 1 mm air gap;• High speed needle valve: screw in <strong>com</strong>pletely, then open 4 fullturns;• Low speed needle valve (linking): flush with the edge of the linkingarm, then 1 full turn clockwise;Picture 5GBrichlowerIf the engine has trouble idling at the rich setting, turn the idle screwclockwise 1/8th of a turn at a time. This will increase the idle allowingthe car to break-in properly. Try to do this in a well-ventilated area,such as your driveway. Unburned oil from the fuel will accumulateunder the exhaust, so be prepared.Let the car idle like this for 2 - 3 tanks of fuel checking the enginetemperature every 2 minutes. Please allow a break of 10 – 15 minutesin between filling the tank to allow the engine to cool down. Youshould be able to touch the head of the engine with your fingertipsand it will be hot, but not un<strong>com</strong>fortably so. (Attention! Do not touch!)If it seems very hot, richen (turn counter-clockwise) the high-end andlow-end needles 1/8th of a turn. Always use small increments whenmaking these kinds of adjustments.Picture 6richlowerAfter run-in is finished the high speed needle valve should be open atleast 3 and 1⁄4 turns. A richer setup is better if outside temperature ishigh.Racer Tip:Drive your car slowly with the rich setting shortly after the break-inperiod avoiding prolonged periods at full throttle. Gradually lean outthe mixture 1/8 of a turn at a time. The idle will increase the more youlean the engine out.<strong>CARSON</strong> <strong>Raptor</strong> <strong>Pro</strong> <strong>V25</strong> 21
g. Turn the Power Switch onCAUTION!Always turn the transmitter´s power switch ON first!GBONSwitch on the receiver• Power switch is on the radio box.• Fix the receiver antenna and wire.• Put the body on and fix it with the body split pins.Picture 7ONh. How to Control Your Model• Raise the tyres off the ground.• Turn the steering wheel to the right and left as far as it will go. Thewheels are to follow the steering direction.• If the wheels operate in the opposite direction, operate the servoReverse switch (ST in position REV).• To regulate the driving speed, actuate the throttle/brake- backwards (forward driving, accelerating) or- forwards (braking, reversing).NeutralLeft Right22<strong>CARSON</strong> <strong>Raptor</strong> <strong>Pro</strong> <strong>V25</strong>
i. Care and Maintenance Picture 8Failure to follow break-in procedure and/or damage caused byimproper tuning will void your engine warranty.There are two ways to “temp” your engine. One, purchase atemperature gauge. The second cheaper, but less accurate methodis the “Spit Test”. Wipe a little bit of saliva on the engine head and itshould burn off in 3 - 4 seconds (the boiling point of water normally is100°C). If it evaporates immediately, chances are the engine is runningtoo hot.The engine will run best and be easier to restart if run around100-125°C. Depending on your weather conditions, air density, andhumidity, your carburettor settings will be changing wherever youdecide to run. Making adjustments in small increments is the best wayto make sure your engine lasts a long time. Overheating is caused byrunning the engine too lean, or too much stress on the engine createdby the environment. Extreme overheating will result in internal failureof engine parts.There are many online resources that will help you with engine tuning.3.5 ccm engines are designed to last a long time, and with propermaintance and tuning, you can drive the model for hours at a time.Then apply after run oil through the carburettor, and pull the pullstarta few times to get it through the engine. This is re<strong>com</strong>mended ifyou plan on storing the car for more than a day. Methanol evaporatesin water and can cause internal corrosion to engine parts. It is alwaysa good idea to check all the screws, nuts, and bolts before and aftereach period of racing.Picture 9GBAfter UseWhen you have finished running your car, there are two options toshut the engine down. The first method is to place a rag over theexhaust outlet (wear gloves). Make sure your engine is normal idle,preferable with the brake activated.The second method is to pinch off the air supply from the engine.Do not pinch the fuel line, as this may cause the engine to overheat.Try and let all the remaining fuel run through the engine, emptyingthe fuel tank. The engine will idle high while the tank is emptied, sothe above two steps may not be necessary.Keeping the car clean will also make it more fun to work on. This canbe achieved with a large heavy-duty paintbrush, or <strong>com</strong>pressed air.Always test the transmitter and receiver batteries before starting theengine.Racer Tip:Wear gloves when working on your hot car!j. Tips for setting of the 2speed transmissionGear switch point of the 2 speed transmission:In order to set the gear switch point of the 2 speed transmission, therubber plug has to be removed on the right vehicle side from theopening in the gear box. Now observe the hole from sloping aboveand turn the main gear until an opening can be seen.Then hold the main gear and slowly turn the front wheels forwarduntil a sloping drilling appears (not the vertical one). Go on turning sothat you can put in a 2 mm hexagonal wrench across from above, withsome subtle intuition you will catch the grub screw immediately.Picture 10<strong>CARSON</strong> <strong>Raptor</strong> <strong>Pro</strong> <strong>V25</strong> 23
Turn to the right for setting the gear switch point for higher and to theleft for lower speed (make only small changes). Don’t forget to closethe opening with the rubber plug.Slipper:Caution, the nut at the sliding clutch has a left-hand thread, whichmeans you have to turn clockwise for opening. Tighten the nut untilthe spring is totally pressed together, then loosen for a 1/4 turn.GBk. TroubleshootingPlease read this before something happens.Engine won’t start.Engine flooded.Too much fuel inengineRemove glow plug. Pull pull-start 6 - 8 times.Beware of spraying fuel.Empty fuel tank/No fuel inengineFill fuel tank. Prime engine by pulling pull-startonce while holding finger tip over muffler(Wear gloves).Dead glow plugDead glowheater batteryRemove glow plug. Place glow plug in heater.If the glow plug does not glow orange the plugmaybe dead. See also glow heater. (Wear gloves)Place new glow plug in heater. If it glows dim ornot at all, replace heater battery.OverheatingRunning at high temperatures may cause vapourlock. Let the car cool down for10 - 15 minutes.Engine stallsOverheatingCheck temperature. If over 130 °C, richen carbmixture. Check to make sure wheels spin freely.Dirty aircleanerWash with soap and water, then use air filter oil(N o 50 003 2648).Disconnectedfuel pressurelineReattach pressure line from exhaust pipe to fueltank lid.CarburettorlooseCheck carb-lock bolt and nut.Press carb onto engine block, tighten nut toprevent air leak.Hard to control, “glitching”Dead/weakbatteriesBatteries in transmitter should be fully charged.Slow servos mean dead receiver batteries.Doesn´t runstraightSteering trim is not adjusted correctly.Front and rear wheel nuts are too loose.ImpropertransmittersettingsModel doesn´tmoveRefer to instructions on setting up yourtransmitter.Transmitter or chassis power switch is not „ON“.Polarity or battery type is wrong.Doesn´t stopRunning tooslowlyThrottle trim is not adjusted correctly.Motor has lost power.Rear wheel nuts are too loose.Dust or foreign objects are inside gears.Batteries have run down.24<strong>CARSON</strong> <strong>Raptor</strong> <strong>Pro</strong> <strong>V25</strong>
<strong>CARSON</strong> <strong>Raptor</strong> <strong>Pro</strong> <strong>V25</strong> 25GB
Cher clientToutes nos félicitations pour l’acquisition de votre voiture en modèleréduit <strong>CARSON</strong> RC, un modèle dernier cri.En vertu de notre engagement pour un développement et uneamélioration continus de nos produits, nous nous réservons ledroit d’effectuer des modifications dans les spécifications de noséquipements, nos matériaux et de notre conception à tout momentet sans avertissement préalable.Les spécifications ou les versions du produit acheté peuvent différerde celles affichées dans le manuel ou sur l’emballage.Le présent manuel fait partie du produit. Tout non-respect desinstructions et des consignes de sécurité qui y sont incluses dispensele fabricant de toute garantie.Conserver le présent manuel <strong>com</strong>me document de référence, etégalement pour pouvoir le transmettre par la suite à un tiers avec lavoiture.FConditions de garantie<strong>CARSON</strong> vous garantit pour 24 mois à partir de la date d’achat (piècesjustificatives à l’appui) que la voiture est exempte de tout défaut.L’utilisation inappropriée, l’usure des éléments au cours de l’utilisation,les transformations de votre propre chef, l’application ou l’utilisationincorrecte, l’endommagement des batteries ou d’autres équipementsau cours de l’utilisation ou l’emploi abusif un l’endommagementcausé par le transport, n’est pas couvert par la responsabilité civile. Encas de défaut survenant durant la période de garantie, rapportez lamaquette avec le justificatif d’achat à votre distributeur.<strong>CARSON</strong> décide alors, sauf dispositions autres prévues par lalégislation :(a) De remédier gratuitement au défaut de matériel et de fabricationen réparant le produit ;(b) De remplacer le produit par un produit identique ou similaire ; ou(c) De rembourser le prix de vente.L’intégralité des pièces ainsi que des produits pouvant faire l’objetd’un échange deviennent la propriété de <strong>CARSON</strong>. Les nouvellespièces ou celles ayant été retraitées peuvent être utilisées dans lecadre des prestations de garantie.Les pièces réparées ou remplacées ne sont sous garantie que pourla durée restante de la période de garantie initiale. Après expirationde la période de garantie, les réparations effectuées ou les piècesdétachées fournies sont facturées.La garantie ne couvre pas :• Tout dommage ou défaillance causé par force majeure, abus,accident, utilisation abusive, erronée ou anormale, non respect desinstructions, mauvaise mise en route ou maintenance insuffisante,altération, éclair ou tout autre conséquence d’une surtension oud’un courant excessif ;• Tout dommage provoqué par la perte de contrôle de la voiture ;• Toute réparation autre que celles réalisées par un organisme agréepar <strong>CARSON</strong> ;• Les consommables tels que les fusibles et les batteries ;• Des dommages esthétiques ;• Le transport, l’expédition et les frais d’assurance ; et• Les frais de retour, d’installation, de mise au point et de remise enroute du produit.Cette garantie vous attribue des droits spécifiques, vous pouvez parailleurs également prétendre à d’autres droits en fonction du paysd’achat.Déclaration de conformitéDickie-<strong>Tamiya</strong> GmbH & Co. KG déclare par la présente que ce kit demodélisme, avec émetteur, moteur, batterie et chargeur respecte lesexigences de base des directives européennes suivantes : 98/37 EG et89/336/EWG ainsi que les autres régulations de la directive 1999/5/EG(R&TTE).La déclaration de conformité originale peut être demandée à l’adressesuivante :Dickie-<strong>Tamiya</strong> GmbH & Co. KG • Werkstraße 1 • D-90765 Fürth •ALLEMAGNESignification du symbole se trouvant sur le produit,l’emballage et le mode d’emploi :Les appareils électroniques sont des produits devaleur et ne doivent pas être éliminés avec lesautres déchets ménagers une fois parvenus à lafin de leur cycle de vie. Aidez-nous à préserverl’environnement et à respecter nos ressources enremettant cet appareil aux points de recyclageconcernés.Nous vous souhaitons beaucoup de plaisir avecla conduite de votre modèle réduit <strong>CARSON</strong>.Lire attentivement ces instructions avant d’utiliser ce nouveau modèle réduit.26<strong>CARSON</strong> <strong>Raptor</strong> <strong>Pro</strong> <strong>V25</strong>
ContenuPréface ..........................................................................................................................26Périmètre de livraison ............................................................................................27Consignes de sécurité ............................................................................................28Articles nécessaires au démarrage du moteur..............................................30Outils nécessaires au montage de la voiture ................................................. 31a. Votre ensemble de radio<strong>com</strong>mande .......................................................... 31b. Châssis ....................................................................................................................32c. Alimentation du récepteur .............................................................................32d. Test de fonction ..................................................................................................33e. Ultimes préparations ........................................................................................33f. Mise en route .......................................................................................................34g. Allumer l’émetteur ............................................................................................35h. Conduite de la voiture ......................................................................................35i. Entretien et maintenance ...............................................................................36j. Réglage de la boîte à 2 vitesses ....................................................................36k. Élimination de pannes .....................................................................................37Assemblage ................................................................................................................62Vis ..................................................................................................................................90Pièces détachées ......................................................................................................92Force 25R – 4,01 cm 3 moteur ...............................................................................98FPérimètre de livraisonChâssisÉmetteur(<strong>com</strong>pris dans laversion RTR)<strong>CARSON</strong> <strong>Raptor</strong> <strong>Pro</strong> <strong>V25</strong> 27
FConsignes de sécuritéGuide des précautions d’utilisationCe modèle radio<strong>com</strong>mandé doit uniquement être utilisé avec lecarburant préconisé. Toujours utiliser les modèles radio<strong>com</strong>mandésdans des lieux sécurisés. Ne pas utiliser sur les voies de circulation,près du public ou d’animaux. Ne pas utiliser en intérieur.Une maquette de voiture RC à moteur à <strong>com</strong>bustion interne ne doitpas servir à transporter des marchandises, des personnes ou desanimaux.Lire attentivement les consignes de sécurité et d’utilisation avant depiloter la voiture !La carrosserie doit être correctement fixée sur la voiture avant ledémarrage.Attendre que le moteur et l’échappement soient refroidis avant deretirer la carrosserie. Ces parties deviennent très chaudes pendantl’utilisation et peuvent causer des brûlures graves.La maquette ne doit pas être utilisée de manière prolongée àproximité immédiate de personnes, car cela peut entraîner des lésionsauditives dans certains cas.Pour éviter les perturbations du système de <strong>com</strong>mande, ce qui setraduirait par une marche incontrôlée de la maquette, il convient devérifier que les piles de l’émetteur et du récepteur sont parfaitementchargées.Toujours vérifier que les écrous et les vis sont correctement serrés etque toutes les pièces sont fixées. Revisser et ajuster si nécessaire.Le système de réservoir doit être vérifié avant chaque utilisation pours’assurer qu’il est bien étanche. Le couvercle du réservoir doit toujoursêtre parfaitement fermé.Ce modèle n’est pas un jouet !• Un modèle télé<strong>com</strong>mandé n’est pas un jouet, sa manipulation doitêtre apprise progressivement.• Les enfants de moins de 14 ans ne doivent pas conduire la voituresans être ac<strong>com</strong>pagnés d’un adulte.La conduite d’une voiture radio<strong>com</strong>mandée est une activitépassionnante. Elle doit toutefois être exercée avec la prudence etl’attention nécessaires. Une voiture télé<strong>com</strong>mandée d’un certainpoids peut, lorsqu‘elle atteint une grande vitesse, provoquer desdégradations et des blessures graves en cas de perte de contrôle duvéhicule et c’est vous qui seriez responsable en tant qu‘utilisateur.Assurez-vous de disposer d’une couverture d’assurance suffisantepour pratiquer cette activité. Seul un modèle bien entretenufonctionnera de manière correcte.N’utiliser que des pièces détachées homologuées et ne jamaisimproviser de réparations avec des éléments inadaptés. L’utilisateurest responsable du bon fonctionnement de la voiture et du bonserrage de tous les écrous, boulons et vis, aussi avec un modèleprémonté.28<strong>CARSON</strong> <strong>Raptor</strong> <strong>Pro</strong> <strong>V25</strong>
Ne jamais démarrer sans avoir vérifié les pointssuivants :• Les batteries de l’émetteur et du récepteur sont correctementchargées et sont à la bonne tension.• Toujours vérifier la portée de la radio<strong>com</strong>mande avant de démarrerla voiture.• Vérifier que les servos répondent correctement aux signaux del’émetteur.• Toutes les pièces mobiles doivent être en bon état et fonctionnercorrectement.• Vérifier que toutes les vis sont serrées.• Vérifier qu’il n’y a pas d’émetteur RC ou similaire à proximité quipourrait provoquer des interférences. Tout signal radio de la mêmefréquence peut entraîner une perte du contrôle de la voiture.Toujours allumer l’émetteur en premier pour éviter toute réactionincontrôlée du récepteur par rapport à un signal radio extérieur.• A la fin de l’utilisation, couper tout d’abord le récepteur, puisl’émetteur.• Maintenir la voiture éloignée des câbles haute tension ou desantennes radio. Ne jamais utiliser la voiture par temps d’orage !• Les perturbations atmosphériques peuvent affecter les signaux del’émetteur.• Ne pas utiliser la voiture dans les zones humides. Les raccordsélectriques de la voiture ne sont pas étanches. Pour cette raison, nepas conduire sous la pluie, la neige ou à travers des flaques d’eauou de l’herbe mouillée.• Toujours éviter de conduire les modèles radio<strong>com</strong>mandés dans deslieux fermés, confines ou densément peuplés.• Maintenir éloigné des routes, autoroutes, des gens et des animaux !• Ne pas conduire en cas de fatigue importante ou dans le cas d’uneréactivité altérée de quelque autre manière.• Toujours conserver la voiture dans le champ visuel, ne pas se laisserdistraire.• La carrosserie doit être correctement attachée au véhicule avant ledémarrage.• Une maintenance et un entretien réguliers sont nécessaires pourdes performances optimales.• Certaines pièces (p.ex. le moteur et le silencieux) peuvent devenirextrêmement chaudes lors d’une utilisation prolongée et peuvententraîner des blessures graves.Bien tenir <strong>com</strong>pte des indications de charge de l’émetteur.• S’assurer que les batteries de l’émetteur et du récepteur sontcorrectement chargées et à la bonne tension. Des batteriesdéchargées peuvent entraîner une perte de contrôle de la voiture.• Ne jamais utiliser simultanément des piles pleines et des pilespartiellement déchargées, ou des batteries de capacitésdifférentes.• Ne jamais tenter de recharger des piles.En cas d’immobilisation prolongée de la voiture, retirer lesbatteries.FLire attentivement les conseils suivantsconcernant le carburant :• Stocker le carburant dans un endroit sécurisé et hors de portée desenfants et animaux.• S’assurer que le bidon est correctement fermé.• Stocker dans un lieu bien ventilé et à l’abri de l’humidité.• Le carburant est extrêmement inflammable. Le tenir éloigné detoute source de chaleur, de flammes nues, d’équipementsélectriques et de batteries. Ne pas fumer à proximité.• Eviter tout contact avec la peau et ne pas inhaler. Lire les consignesde sécurité sur le bidon.Eliminer les bidons vides dans un lieu approprié. Ne jamais jeter lesbidons vides dans le feu.En cas d’accident ou de malaise, contacter immédiatement unmédecin (si possible, présenter l’étiquette du carburant).Derniers conseils :Lire attentivement le présent mode d’emploi avant toute utilisation.Après chaque utilisation, les parties importantes et les connecteursde la voiture doivent être inspectés. Une pièce défectueuse peutprovoquer à elle seule un accident. Vérifier régulièrement la voitureet remplacer si nécessaire les pièces défectueuses avec des pièces derechange d’origine.Nous vous souhaitons beaucoup de plaisir avecvotre modèle réduit <strong>CARSON</strong> !<strong>CARSON</strong> <strong>Raptor</strong> <strong>Pro</strong> <strong>V25</strong> 29
Articles nécessaires audémarrage du moteurPince à bougie50 090 5044Huile deprotection50 090 5044Huile defiltre à air50 003 2648Pipette à essence50 001 3330FSet de Nitro50 090 5072EssenceEssence <strong>CARSON</strong> re<strong>com</strong>mandéeLitre Nitromethan N o Application1,0 10% 50 090 5052 rodage/débutants1,0 16% 50 090 5053 Normal2,5 16% 50 090 5054 Normal1,0 25% 50 090 5055 Race2,5 25% 50 090 5056 Race<strong>CARSON</strong>-ROSSI pince à bougiesN o Article Moteur Carburant Température50 090 5006 Bougie Rossi R2 chaude 2 - 3,5 cm 3 sans nitrométhane +0° - +15C°50 090 5007 Bougie Rossi R3 moyenne 3,5 - 6 cm 3 sans nitrométhane -2° - +18C°50 090 5008 Bougie Rossi R4 froide 6 - 10 cm 3 sans nitrométhane -5° - +20C°50 090 5009 Bougie Rossi R5 extra 3,5 - 10 cm 3 10% nitrométhane -7° - +22°50 090 5010 Bougie Rossi R6 froide universel 10-13% nitrométhane +10° - +25°50 090 5011 Bougie Rossi R7 froide universel 13-15% nitrométhane +15° - +30°50 090 5012 Bougie Rossi R8 extra froide universel 13-15% nitrométhane +20° - +40°L’émetteur utilise 8 piles ou batteries AA.30<strong>CARSON</strong> <strong>Raptor</strong> <strong>Pro</strong> <strong>V25</strong>
Outils nécessaires au montage de la voitureCouteau de bricolage 30 007 4053Colle à prise rapide 30 005 3339Pinces pointues 30 00 4034Ciseaux 30 001 3305Tournevis (petit et grand)et clé à six pas1,5 / 2 / 2,5 mm 30 007 4023Clé hexagonale (Allen) 30 001 3118Pincette 30 00 4003Pinces coupantes 30 00 4035Fa. Votre ensemble de radio<strong>com</strong>mande(uniquement pour la version RTR)Lire attentivement le mode d’emploi fourni avec le système deradio<strong>com</strong>mande avant de s’en servir.Les servos doivent être réglés sur neutre avant leur montage dans lavoiture. Pour atteindre cette position, allumer l’émetteur, mettre lesmanettes sur neutre et ensuite allumer le récepteur, les servos sontmaintenant au neutre. Eteindre l’émetteur tout en prenant soin de neplus déplacer les servos.Antenne du récepteurBatterie du récepteurÉmetteurInterrupteurServo des gazServo de direction<strong>CARSON</strong> <strong>Raptor</strong> <strong>Pro</strong> <strong>V25</strong> 31
. ChâssisFiltre à airMoteurSupport à carrosserieArceau de sécuritéTransmissionPare-chocs arrièresBoîtier de réceptionSilencieuxInterrupteurPneu arrièreFServo des gazRéservoirPneu avantChâssisPare-chocs avantsc. Alimentation du récepteurInsérer 4 piles « AA » dans le boîtier des piles de réception <strong>com</strong>meindiqué (Illustration 1). Vérifier attentivement la polarité des piles(côtés + et -). Connecter ensuite le boîtier sur la prise de l’interrupteurdans le logement radio. Le noir sur le noir et le rouge sur le rouge.Replacer le capot du logement batteries.Illustration 1Conseil :Utiliser des batteries rechargeables. Elles durent plus longtemps etsont plus économiques à long terme. Remplacer les 4 piles par unpack de batteries 6 V Ni-MH 1100 mAh (N o 50 060 8036 JR).32<strong>CARSON</strong> <strong>Raptor</strong> <strong>Pro</strong> <strong>V25</strong>
d. Test de fonctionToujours allumer l’émetteur avant le modèle. Il est maintenantpossible de mettre la voiture sous tension à l’aide de l’interrupteurplacé sur le logement radio. Remarque : Toujours vérifier les réglagesde la radio<strong>com</strong>mande avant d’utiliser la voiture !Vérifier que les roues du modèle sont droites. Dans le cas contraire,utiliser le bouton ST-TRIM placé à droite du volant sur l’émetteur. Enle tournant vers la gauche, la voiture tournera aussi vers la gauche.Inversement pour la droite.Régler maintenant la position neutre des gaz. Retirer le filtre à air ducarburateur.L’ouverture du tiroir de carburateur doit être <strong>com</strong>prise entre 1 et1,5 mm pour que le moteur tourne au ralenti. Si l’ouverture est plusimportante, le moteur tournera à un régime trop élevé sans freinage.Ceci entraînera un mauvais freinage et une usure prématurée desgarnitures de frein rendant le modèle difficile à piloter.Si nécessaire, utiliser la <strong>com</strong>mande TH-TRIM pour placer le palonnierdu servo en position neutre. Dans cette position, les garnitures defrein ne doivent pas être en contact. Ajuster la position des baguesd’arrêt sur la direction avec la clé de 1,5 mm. Replacer ensuite le filtre àair quand les réglages sont satisfaisants.Illustration 21 - 1,5 mmFIllustration 3TH-Trimme. Ultimes préparationsAssembler la pissette de carburant. La presser et insérer le bec dansun bidon de carburant Nitro. Relâcher lentement la pression pourpermettre le remplissage de la pissette. Presser ensuite lentement lapissette pour remplir le réservoir de la voiture.Conseil 1:Le carburant conservera ses qualités plus longtemps s’il est entreposédans un endroit frais, sec et obscur.Conseil 2:Ne jamais laisser le chauffe-bougie plus de 10 secondes sur le moteursous peine de griller le filament de la bougie prématurément. Utiliserde préférence un chauffe-bougie rechargeable.Conseil 3:Porter des gants ignifuges pour le démarrage !<strong>CARSON</strong> <strong>Raptor</strong> <strong>Pro</strong> <strong>V25</strong> 33
Ff. Mise en routeLe rodage du moteur est l’étape la plus importante pour s’assurerd’obtenir les meilleures performances et une grande fiabilité. NE PASOUBLIER CETTE ETAPE !Le moteur est préréglé en usine pour le rodage. Utiliser un support etposer la voiture pour que les roues tournent librement et ne touchentpas le sol.Avec l’émetteur sous tension, vérifier que les gaz sont au neutre.Placer le chauffe-bougie sur le moteur et tirer le lanceur d’un coup sec(illustration 4). Ne pas le tirer de plus de 25 cm sous peine de casser lacorde ! Il est préférable d’effectuer plusieurs petites tractions qu’unegrande. Si la corde du lanceur se coince, tourner légèrement le plateauavec les doigts. Ceci permettra à la corde de s’enrouler automatiquement.Après quelques tractions, le moteur doit démarrer en émettantun peu de fumée.Illustration 4Conseil:Réglage d’usine de carburateur :Avec le réglage suivant, le moteur démarre immédiatement, évolueparfaitement et est assez riche pour une bonne lubrification :• Vis de butée carburateur : Ouverture du tiroir au ralentid’environ 1 mm.• Pointeau principal : pointeau fermé <strong>com</strong>plètement puis ouvrir de4 tours.• Pointeau de reprise : le pointeau doit affleurer la <strong>com</strong>mande, visserensuite d’un tour dans le sens des aiguilles d’une montre.Illustration 5richemoins richeSi le moteur ne tourne pas correctement au ralenti à cause du réglagede la richesse, visser la vis de ralenti par pas d’1/8 de tour. Cecipermettra d’augmenter le ralenti et d’effectuer un rodage correct dumoteur. Cette étape du rodage doit être effectuée dans un endroitbien aéré. Du pétrole non brûlé du carburant peut s’accumuler auniveau de l’échappement, disposer quelque chose en dessous.Répéter cette étape sur 2 ou 3 réservoirs <strong>com</strong>plets en vérifiant latempérature du moteur toutes les 2 minutes. Faire une pause de10 - 15 minutes entre deux réservoirs pleins. On doit pouvoir toucherla culasse du moteur sans se brûler. (Attention ! Ne pas toucher !)Si elle chauffe trop, dévisser (sens trigonométrique) le pointeau etle contre pointeau d’1/8 de tour. Toujours procéder par petitsincréments pour effectuer ces réglages.Illustration 6richemoins richeAprès le rodage, resserrer le pointeau principal : il doit alors êtreouvert de 3 tours 1/4. Si la température extérieure est importante, lacarburation doit être plus riche, ouvrir légèrement le pointeauprincipal.Conseil:Après le rodage, maintenir le réglage du mélange un peu plus richeque la normale et éviter de rester trop longtemps en position pleingaz. Réduire ensuite le mélange par pas d’1/8 de tour. Le régime duralenti augmentera à mesure que le mélange s’appauvrit.34<strong>CARSON</strong> <strong>Raptor</strong> <strong>Pro</strong> <strong>V25</strong>
g. Allumer l’émetteurATTENTION !Toujours allumer l’émetteur en premier er !ONFInterrupteur sur le récepteur• Interrupteur sur le boîtier de réception.• Fixer l’antenne du récepteur et le fil.• Monter la carrosserie et la fixer à l’aide desgoupilles fendues.Illustration 7ONh. Conduite de la voiture• Soulever les pneus du sol.• Tourner le volant à droite et à gauche jusqu’en butée.Les roues doivent suivre le sens de rotation du volant.• Si les roues tournent dans l’autre sens, actionner le<strong>com</strong>mutateur d’inversion (ST en position REV).• Pour régler la vitesse, actionnez le levier des gaz/du frein- vers l’arrière (marche avant, accélération) ou- vers l’avant (freinage, marche arrière).Au centreGauche Droite<strong>CARSON</strong> <strong>Raptor</strong> <strong>Pro</strong> <strong>V25</strong> 35
Fi. Entretien et maintenance Illustration 8L’absence de rodage et/ou des dommages causés par une utilisationincorrecte annulent la garantie.Il existe deux moyens pour surveiller la température du moteur.La première solution est d’acheter un capteur de température. Laseconde solution, plus économique, est de mettre un peu d’eau(salive) sur la culasse et de vérifier qu’elle ne bout qu’au bout de 3 ou4 secondes (Le point d’ébullition de l’eau est normalement 100 °C.).Si elle s’évapore immédiatement, le moteur est trop chaud.Le moteur fonctionne mieux et il est plus facile à démarrer quandsa température de fonctionnement est de 100 - 125 °C. Suivant lesconditions météorologiques il peut être nécessaire de modifier lesréglages du carburateur. Agir sur les réglages par petits incrémentsafin de protéger la longévité du moteur. Un mélange trop pauvreou l’environnement peut provoquer une surchauffe. Une surchauffeexcessive peut endommager des <strong>com</strong>posants du moteur.De nombreux conseils et informations en ligne vous aident à réglerle moteur. Les moteurs 3,5 cm 3 ont une très longue durée de vie. Avecune maintenance et un réglage correct, le modèle réduit peut êtreutilisé pendant des heures sans interruption.Mettre un peu d’huile de stockage dans le carburateur et tirer lestarter plusieurs fois pour répandre cette huile dans tout le moteur.Ceci est re<strong>com</strong>mandé pour stocker la voiture pour plus d’une journée.Les vapeurs de méthanol produisent de l’eau préjudiciable aux partiesinternes du moteur. Il est également conseillé de vérifier la présenceet le serrage de toutes les vis et écrous avant et après chaqueutilisation.Illustration 9Fin de l’utilisationQuand vous avez fini de piloter votre modèle, il existe deux façonsd’arrêter le moteur. La première méthode est d’obturer la sortie del’échappement. Vérifier que le moteur est au ralenti, de préférenceavec les freins serrés.La seconde méthode consiste à pincer l’arrivée d’air au niveau del’admission. Ne pas pincer l’arrivée de carburant sous peine de causerune surchauffe !Il est possible de laisser le carburant restant alimenter le moteurjusqu’à la panne sèche. Le moteur tournera au ralenti jusqu’à son arrêt<strong>com</strong>plet sans avoir à appliquer une des méthodes décrites ci-dessus.Maintenir le modèle le plus propre possible pour pouvoir en profiterlongtemps. Pour cela, utiliser un pinceau ou une soufflette. Toujoursvérifier les batteries d’émission et de réception avant de démarrer lavoiture.Conseil:Le port des gants est conseillé quand la voiture est chaude !j. Réglage de la boîte à2 vitessesIllustration 10Point de <strong>com</strong>mutation de la transmission2 vitesses :Pour pouvoir régler la boîte de vitesses, il faut enlever le bouchoncaoutchouc, à la côté à droite du vehicule, de la aperture de la boîtede vitesse. Vous pouvez visualiser le jeu d’engrenages. Tournerlentement la transmission afin de vous positioner sur l’espace évidé dela masselotte.Puis tenir le pignon principal e tourner lentement les roues vers l’avantjusqu’à ce que la vis six pans apparaîsse à travers l’espace dans la masselotte(pas l’alésage droit). Tourner de telle manière qu’il soit possible36<strong>CARSON</strong> <strong>Raptor</strong> <strong>Pro</strong> <strong>V25</strong>
d’introduire une clé BTR 2 mm obliquement par en haut. Avec un peud’habileté, on attrape également aussitôt la vis sans tête.Visser légèrement (sens des aiguilles d’une montre) pour passer lavitesse à un régime plus haut ou dévisser légèrement pour passerla vitesse à un régime plus bas (ne procéder qu’à de petitschangements). N’oublier pas de remettre le bouchon caoutchoucen place après avoir réglé votre boîte.Slipper :Attention, l’écrou du slipper a un filet avec un pas à gauche, celasignifie que vous devez tourner dans le sens des aiguilles d’unemontre pour défaire l’écrou. Le réglage doit être une fois le ressort enpression totale, ouverture 1/4 de tour.k. Élimination de pannesIl est conseillé de lire ces informations avant la survenue de lapremière panne !Le moteur ne démarre pasFMoteur noyé.Trop decarburant dansle moteurRetirer la bougie. Tirer le lanceur 6 à 8 fois.Se méfier des projections de carburant.Réservoir vide/moteur nonalimentéRemplir le réservoir. Amorcer le moteur entirant sur le lanceur tout en bouchant la sortied’échappement.Bougie morteRetirer la bougie et la placer sur le chauffebougie.Si le filament est noir, la bougie est morte.S’il est orange, la bougie est bonne.SurchauffeUne utilisation à trop haute température peutcauser un serrage du moteur.Laisser refroidir 5 à 10 minutes.Batterie duchauffe bougiemortePlacer une bougie sur le chauffe bougie. Si elles’éclaire faiblement ou pas du tout, remplacer ourecharger la batterie du chauffe bougie.Le moteur caleSurchauffePressurisationcarburantdéconnectéeVérifier la température. Si elle dépasse 130 °C,enrichir le mélange. Vérifier que les rouestournent librement.Reconnecter la durite entre l’échappement et leréservoir.Filtre à airencrasséCarburateurbougeLaver la mousse avec de l’eau savonneuse etl’imbiber d’huile spéciale (N o 50 003 2648).Vérifier la clavette et l’écrou de fixation. Presserle carburateur sur le moteur et serrer l’écrou pouréviter l’entrée d’air.Difficultés pour contrôler le véhiculeBatteriesmortes/videsLa batterie de l’émetteur doit être entièrementchargée. Des servos lents indiquent que labatterie de réception est vide.Course pasdroiteRéglage de direction défectueuxBoulons des roues avant et arrière desserrésRéglage del’émetteurincorrectSe reporter à la notice de l’émetteur.Ne s’arrête pasRéglage des gaz défectueuxLa voiture nebouge pasL’émetteur ou l’interrupteur du châssis sont àl’arrêt.Mauvaise polarité ou mauvais type des batteriesBatteries déchargéesVoiture troplentePerte de puissance du moteurBoulons des roues arrière desserrésPoussière ou corps étrangers dans latransmission<strong>CARSON</strong> <strong>Raptor</strong> <strong>Pro</strong> <strong>V25</strong> 37
Estimado clienteLe felicitamos por la adquisición de su coche radio controlado<strong>CARSON</strong>, que ha sido fabricado con tecnología de actualidad.De acuerdo con nuestra política de constante desarrollo y mejora denuestros productos, nos reservamos el derecho de efectuar cambiosen las especificaciones relativas a equipo, material y diseño de esteproducto en cualquier momento sin noticia previa.Las especificaciones o diseños del producto real podrían variar de losmostrados en el manual o envase.Este manual es <strong>com</strong>ponente del producto. No cumplir lasinstrucciones operativas y de seguridad incluidas invalidará lagarantía.Conserve esta guía <strong>com</strong>o recordatorio o para caso de pasar el modeloa una tercera persona.ECondiciones de la garantíaEste producto está garantizado por <strong>CARSON</strong> contra defectos defabricación en materiales o mano de obra bajo utilización normal porun período de 24 meses desde la fecha de adquisición en <strong>com</strong>erciosautorizados. En caso de defecto del producto durante el período degarantía, lleve el producto y el ticket o recibo de venta <strong>com</strong>o pruebade adquisición a cualquier tienda autorizada <strong>CARSON</strong>.<strong>CARSON</strong> podrá a su elección y salvo que las leyes dispongan otra cosa:(a) Corregir el defecto mediante la reparación del producto sin cargode piezas o mano de obra;(b) Reemplazar el producto por otro del mismo o similar diseño; o(c) Devolver el importe de adquisición del producto.Todas las piezas y productos reemplazados, así <strong>com</strong>o los productoscuyo importe haya sido devuelto, pasan a ser propiedad de <strong>CARSON</strong>.Se podrán utilizar piezas nuevas o reacondicionadas para laprestación del servicio de garantía.Las piezas y productos reparados o reemplazados estarángarantizados por el período restante al vencimiento de la garantía.Cualquier reparación o sustitución del producto tras vencer el períodode garantía será abonada por usted.Esta garantía no cubre:• Daños o fallos causados o atribuibles a fuerzas de la naturaleza,abuso, accidente, uso incorrecto, impropio o anormal, falta deseguimiento de las instrucciones, mantenimiento o instalacionesinadecuadas, alteraciones, tormentas eléctricas u otros incidentescausados por exceso de voltaje o corriente;• Todos los danos causados por la pérdida del control del modelo;• Cualquier reparación no efectuada por un servicio de reparacionesautorizado <strong>CARSON</strong>;• Consumibles <strong>com</strong>o fusibles o baterías;• Daños estéticos;• Transportes, embarques y/o costos de seguros; o• Costos de retirada del producto, instalaciones, servicio de ajuste oreinstalación.Esta garantía le da a usted derechos legales específicos, y ustedtambién podría tener otros derechos que variarían de estado enestado.Declaración de conformidadDickie-<strong>Tamiya</strong> GmbH & Co. KG por la presente declara que este kit demodelo con radio, motor, batería y cargador está en concordanciacon los requerimientos básicos 98/37EG y 89/336/EWG y otras normaspertinentes de la directiva 1999/5/EG (R&TTE).La declaración de conformidad original se puede solicitar a:Dickie-<strong>Tamiya</strong> GmbH & Co. KG • Werkstraße 1 • D-90765 Fürth •AlemaniaSignificado del símbolo en el producto, elembalaje o las instrucciones de uso. ¡Loselectrodomésticos son objetos de valor y, al finalde su vida útil, no deben tirarse a la basuradoméstica! Contribuya a proteger elmedioambiente y los recursos entregandoeste aparato en los puntos de reciclajecorrespondientes. La organización responsable dela recogida de basura o su establecimientoespecializado podrán responder a sus preguntas.¡Le deseamos buena suerte y mucha diversiónconduciendo su coche radio controlado<strong>CARSON</strong>!¡Antes de utilizar su nuevo modelo lea estas instrucciones cuidadosamente!38<strong>CARSON</strong> <strong>Raptor</strong> <strong>Pro</strong> <strong>V25</strong>
Indice decontenidosPrólogo ........................................................................................................................38Contenido del kit ......................................................................................................39Precauciones de seguridad ..................................................................................40Artículos adicionales necesarios para el arranque del motor .................42Herramientas necesarias para el montaje ......................................................43a. Su equipo de radio ............................................................................................43b. Chasis ......................................................................................................................44c. Colocación de baterías receptor ..................................................................44d. <strong>Pro</strong>bando 1...2...3 ................................................................................................45e. Últimos preparativos... .....................................................................................45f. ¡Momento de divertirse... casi! ......................................................................46g. Conecte la emisora ............................................................................................47h. Volante de dirección .........................................................................................47i. Mantenimiento y cuidados ............................................................................48j. Consejos de ajuste de la transmisión .........................................................48k. Guía de problemas ............................................................................................49Montaje ........................................................................................................................62Tornillos .......................................................................................................................90Recambios ..................................................................................................................92Force 25R – 4,01 cm 3 motor ..................................................................................98EContenido del kitChasisEmisora(incluido en la versiónsólo RTR)<strong>CARSON</strong> <strong>Raptor</strong> <strong>Pro</strong> <strong>V25</strong> 39
Precauciones de seguridadPrecauciones de seguridad y normas deoperativaEste modelo radio controlado solo debe ser utilizado con el<strong>com</strong>bustible de modelismo adecuado. Evite siempre utilizar modelosradio controlados en áreas restringidas, reducidas o pobladas.Manténgalo alejado de carreteras, autopistas gente y animales.Nunca utilice el modelo en interiores.Con un automodelo RC de <strong>com</strong>bustión no se deben transportarmercancías, personas ni animales.¡Por favor, cerciórese de haber leído todas las instrucciones deseguridad y procedimientos de operativa antes de utilizar el modelo!La carrocería debería estar correctamente fijada al chasis antes deconducirlo.Permita cierto tiempo para que el escape y el motor se enfríen antesde quitar la carrocería. Estas piezas están extremadamente calientesdurante el uso y podrían causar heridas serias.El modelo no debe utilizarse de forma permanente en lasproximidades inmediatas de personas, ya que bajo ciertascircunstancias pueden causarse daños auditivos.Para evitar que el modelo sufra averías en el sistema de mando y quedebido a ello funcione de manera incontrolada, se deberá <strong>com</strong>probarque las pilas del emisor y del receptor están en perfecto estado decarga.Compruebe siempre que no haya tuercas, tornillos pasadores o<strong>com</strong>ponentes sueltos. Ajuste y reapriete si fuese necesario.Se debe <strong>com</strong>probar la estanqueidad del depósito antes de cada uso.La tapa del depósito debe estar siempre cerrada de forma hermética.E¡Este modelo no es un juguete!• Los modelos radio controlados no son juguetes, su manejo debeser aprendido paso a paso.• Los niños menores de 14 años sólo deberían manejar este modelobajo supervisión adulta.La conducción de coches radio controlados es un fascinante hobbyque debe ser practicado con la necesaria precaución y respeto. Uncoche radio-controlado que tiene un peso considerable y capaz dedesarrollar velocidades muy altas puede causar daños y lesionesen caso de conducción incontrolada, siendo el usuario legalmenteresponsable de ello.Compruebe que dispone de un seguro con la suficiente coberturacontra los daños que pueda causar cuando practique su hobby. Sóloun vehículo montado correctamente funcionará y reaccionará de lamanera esperada.Nunca improvise en las reparaciones y utilice únicamente losrecambios originales si fuese necesario. Igualmente y ante un modelopremontado, deberá repasar todas las conexiones y tortillería paraasegurarse que están correctamente apretados ajustados.40<strong>CARSON</strong> <strong>Raptor</strong> <strong>Pro</strong> <strong>V25</strong>
Nunca <strong>com</strong>ience a conducir sin haberseasegurado de los siguientes puntos:• Las baterías de la emisora y del receptor dan buen voltaje y noestán deterioradas o desgastadas.• Compruebe antes del arranque el alcance de la radiofrecuencia.• Compruebe siempre el funcionamiento del sistema de radio antesde utilizar el coche.• Todos los <strong>com</strong>ponentes operativos están en buenas condiciones yse ha <strong>com</strong>probado su correcto funcionamiento.• Verificado que todos los tornillos estén correctamente apretados.• No hay ninguna otra emisora R/C o similar cercana que puedacausar interferencias. La emisora y el receptor están conectados, yse ha <strong>com</strong>probado el buen funcionamiento de todas sus funciones.Primero conecte la emisora, luego el receptor. Invierta elprocedimiento para la desconexión. Asegúrese que nadie más estáoperando en la misma frecuencia que su radio y que no se aprecianinterferencias.• Siempre apague el motor y desconecte el receptor antes dedesconectar la emisora.• ¡No conduzca bajo líneas de alta tensión, radio mástiles o durantetormentas eléctricas!• Las perturbaciones atmosféricas pueden afectar las señales de suemisora de radio.• Las conexiones eléctricas de su modelo no son estancas. Enconsecuencia, no lo maneje en lluvia, nieve, charcos o hierbahúmeda.• El terreno en el que se pretende operar el modelo no está abiertoal tráfico y• No es usado por personas o animales.• No conduzca si está muy cansado o su poder de reacción estálimitado de algún modo.• Mantenga siempre contacto visual con el modelo.• La carrocería debería estar correctamente fijada al chasis antes deconducirlo.• Un mantenimiento y cuidado periódicos son necesarios para unapotencia de marcha de primera clase.• Estas piezas están extremadamente calientes durante el uso ypodrían causar heridas serias, p, ej. la parte superior del motor, elsistema de escape, el engranaje de metal y mucho más. Tocar estaspiezas durante el funcionamiento puede provocar lesiones.Preste atención a las instrucciones de carga de su emisora.• Asegúrese que las baterías de la emisora y el receptor están<strong>com</strong>pletamente cargadas y tienen el voltaje correcto.• Con baterías medio gastadas podría perder el control de sumodelo.• Nunca utilice baterías recargables o de diferente capacidad. Nuncaintente recargar las baterías.Si no utiliza el modelo por algún tiempo, la batería recargable debeser retirada.EPor favor, lea los siguientes puntos relativos al<strong>com</strong>bustible:• Mantenga el <strong>com</strong>bustible en un sitio seguro y fuera del alcance deniños o animales.• Asegúrese que el recipiente del <strong>com</strong>bustible está bien cerrada yapretada.• Almacene el <strong>com</strong>bustible en un lugar bien ventilado y sinhumedad.• El <strong>com</strong>bustible glow es extremadamente inflamable. Manténgalofuera de fuentes de calor, llamas directas, dispositivos eléctricos ybaterías. No fume cerca del <strong>com</strong>bustible.• Evite el contacto con la piel y no lo inhale. Lea las etiquetas deadvertencia del bote.Deshágase de los botes vacíos del modo legalmente estipulado.Nunca tire botes vacíos al fuego.En caso de accidente o indisposición, acudir inmediatamente almédico (mostrar si es posible la etiqueta del <strong>com</strong>bustible).Por finLea detenidamente estas instrucciones de uso antes de <strong>com</strong>enzarcualquier trabajo.Después de cada uso, todas las piezas importantes así <strong>com</strong>o losconectores deberían ser <strong>com</strong>probados. ¡Un simple tornillo sueltopuede ser suficiente para dejar al modelo en situación peligrosa!Verifique el coche periódicamente y cambie las piezas defectuosas ogastadas por recambio original .¡Le deseamos buena suerte y mucha diversiónconduciendo su coche radio controlado<strong>CARSON</strong>!<strong>CARSON</strong> <strong>Raptor</strong> <strong>Pro</strong> <strong>V25</strong> 41
Artículos adicionales necesariospara el arranque del motorChispómetro50 090 5044Aceite after run Aceite de filtro50 090 5044 50 003 2648Biberón de<strong>com</strong>bustible50 001 3330CombustibleEJuego de Nitro50 090 5072Se re<strong>com</strong>ienda <strong>com</strong>bustible <strong>CARSON</strong>Litros Nitrometano N O Uso1,0 10% 50 090 5052 Rodaje/principiantes1,0 16% 50 090 5053 Normal2,5 16% 50 090 5054 Normal1,0 25% 50 090 5055 Competición2,5 25% 50 090 5056 Competición<strong>CARSON</strong>-ROSSI BujíaN O Articulo Motor Combustible Temperatura50 090 5006 Bujía Rossi R2 hot 2 - 3,5 ccm Sin Nitro +0° - +15C°50 090 5007 Bujía Rossi R3 medium 3,5 - 6 ccm Sin Nitro -2° - +18C°50 090 5008 Bujía Rossi R4 cold 6 - 10 ccm Sin Nitro -5° - +20C°50 090 5009 Bujía Rossi R5 extra 3,5 - 10 ccm 10% Nitro -7° - +22°50 090 5010 Bujía Rossi R6 cold universal 10-13% Nitro +10° - +25°50 090 5011 Bujía Rossi R7 cold universal 13-15% Nitro +15° - +30°50 090 5012 Bujía Rossi R8 extra cold universal 13-15% Nitro +20° - +40°Para la emisora necesitará 8 baterías AAAlcalinas o recargables.42<strong>CARSON</strong> <strong>Raptor</strong> <strong>Pro</strong> <strong>V25</strong>
Herramientas necesarias para el montajeCutter de modelismo 30 007 4053Adhesivo instantáneo 30 005 3339Alicates de punta fina 30 00 4034Tijeras 30 001 3305Destornillador Phillips(pequeño y grande) y Llaves allen1,5 / 2 / 2,5 mm 30 007 4023Liave de cruceta 30 001 3118Pinzas 30 00 4003Tenacillas 30 00 4035Ea. Su equipo de radio (sólo en versión RTR)Por favor, lea las instrucciones facilitadas en su equipo de radio antesde usarlo.Los servos deben ser centrados en posición neutra antes de<strong>com</strong>enzar la instalación. Para efectuar el centrado, conecte el emisory el receptor. Coloque las palancas de los trims en posición central ydesconecte el receptor, después el emisor. Los servos estarán ahora enla posición neutra requerida para su instalación.Antena de receptorBaterias de receptorElementos decontrolInterruptorServo de aceleradorServo de dirección<strong>CARSON</strong> <strong>Raptor</strong> <strong>Pro</strong> <strong>V25</strong> 43
. ChasisFiltro de aireMotorSoporte de carroceríaBarra antivuelcoTransmisiónAmortiguadorestraseroCaja de radioInterruptorEscapeNeumático traseroEServo de gasDepósitoNeumático delanteroChasisAmortiguadoresdelanteroc. Colocación de baterías receptorInserte 4 baterías “AA” en el portapilas según se muestra. Asegúreseque los terminales positivo (+) y negativo (-) estén en la posicióncorrecta. A continuación enchufe el portapilas al conector delinterruptor, dentro de la caja de radio. El rojo va al rojo y el negrova al negro. Coloque la tapa de la caja de radio.Consejo:Utilice baterías recargables. Duran más y las amortizará en pocotiempo. Sustituya el portapilas por nuestro pack 6 V NiMh 1100 mAhacumulador (N O 50 060 8036 JR).Imagen 144<strong>CARSON</strong> <strong>Raptor</strong> <strong>Pro</strong> <strong>V25</strong>
d. <strong>Pro</strong>bando 1...2...3... Imagen 2Siempre conecte primero la emisora antes de conectar el coche.Ahora puede conectar su coche a través del interruptor localizado enla caja de radio. Nota: Compruebe siempre los reglajes de la emisoraantes de utilizar el coche.Asegúrese que la dirección esté centrada. Si no lo estuviese, utilicela palanca del trim de dirección (ST-TRIM) para efectuar el centraje.Girarla hacia la izquierda debería hacer que el coche girase a laizquierda, y viceversa.Ahora es el momento para regular el acelerador en su posición neutra.Quite el filtro de aire del carburador.La apertura de la guillotina debería ser muy pequeña, en torno a1 - 1,5 mm para permitir el ralentí del motor. Si estuviese más abierta,el motor se revolucionará más de lo normal hasta que se apliquenfrenos. Esta situación desgastará prematuramente las zapatas defreno y/o embrague, haciendo al coche difícil de conducir.Utilice la palanca del trim de acelerador (TH-TRIM) para mover el brazode servo a la posición neutral, si fuese necesario. Cuando esté enneutro, los frenos no deberían quedar ajustados. Ajustando losprisioneros del varillaje con una llave allen de 1,5 mm podrá cambiarlos reglajes del freno. Coloque de nuevo el filtro de aire cuando todoquede debidamente ajustado.1 - 1,5 mmEImagen 3TH-Trimme. Últimos preparativos...Ensamble el biberón de <strong>com</strong>bustible. A continuación apriételo eintrodúzcalo en el bote de <strong>com</strong>bustible para coches deautomodelismo. Reduzca la presión y el biberón se llenará solo.Después, introduzca y apriete lentamente el biberón para llenar sudepósito de <strong>com</strong>bustible.Consejo 1:El <strong>com</strong>bustible durará más si lo almacena el un lugar oscuro, fresco yseco.Consejo 2:No deje el chispómetro en su motor durante más de diez segundos.Un tiempo superior podría causar que la bujía se fundiese prematuramente.Utilice chispómetros recargables para mayor duración.Consejo 3:¡Para arrancar el motor, utilice un guante ignífugo!<strong>CARSON</strong> <strong>Raptor</strong> <strong>Pro</strong> <strong>V25</strong> 45
f. ¡Momento de divertirse... casi!El rodaje del motor es el paso más importante para asegurarse queel motor sea rápido y fiable durante su vida útil. Simplemente: NO SESALTE ESTE PASO!El motor está pre-ajustado de fábrica para el rodaje. Busque un tacode madera o una plataforma y coloque el coche de modo que lasruedas giren libremente sin tocar el suelo.Asegúrese con la emisora que el acelerador está en la posición neutra.Coloque el chispómetro en la bujía (imagen 4) y dele un tirón alarrancador. ¡No tire más de 25 cm! Más recorrido podría romper lacuerda. Es mejor dar varios tirones cortos que tirones largos. Si lacuerda del arrancador se atasca, gire un poco el volante de inerciacon los dedos. Esto debería hacer que la cuerda se enrolle automáticamente.Tras algunos tirones, el motor arrancará con una buena nubede humo.Imagen 4Consejo:Reglaje de fábrica del carburador:Con los siguientes ajustes básicos el motor arranca inmediatamente,funciona limpiamente y suficientemente graso:• Tornillo de ralentí:Aproximadamente 1 mm de apertura en el barril.• Aguja de altas: Ciérrela <strong>com</strong>pletamente, a continuación abra 4vueltas <strong>com</strong>pletas.• Aguja de bajas (en leva de apertura): Enrásela con el borde de laleva, a continuación gire a la derecha una vuelta <strong>com</strong>pleta.Imagen 5EEnriquecerAfinarSi el motor tuviese problemas de ralentí con este reglaje “graso”,gire el tornillo de ralentí a la derecha 1/8 de vuelta cada vez. Estoaumentará el ralentí permitiendo al motor rodar adecuadamente.Haga esto en un área bien ventilada, por ejemplo en el exterior de sucasa. El aceite sin quemar del <strong>com</strong>bustible se acumulará en el escape,así que esté preparado.Deje el coche ralentizar de este modo durante 2 – 3 depósitos,<strong>com</strong>probando la temperatura del motor cada dos minutos. Por favor,deje reposar 10 – 15 minutos entre depósito y depósito. Deberíapoder tocar la culata del motor con los dedos, estando caliente elmotor pero sin llegar a quemar. (¡Atención! ¡Non tocar!)Si parece estar demasiado caliente, “engrase” la carburación (gire ala izquierda) mediante la aguja de altas y la de bajas 1/8 de vuelta.Efectúe siempre pequeños incrementos cuando haga este tipo dereglajes.Imagen 6EnriquecerAfinarTras finalizar el período de rodaje, la aguja de altas debería quedarabierta al menos 3 y 1⁄4 vueltas. Un reglaje graso es mejor si latemperatura exterior es alta.Consejo:Conduzca el coche lentamente con la carburación “grasa” durantealgún tiempo tras el rodaje, evitando períodos prolongados a plenogas. Valla “afinando” gradualmente la mezcla 1/8 de vuelta cada vez.El ralentí aumentará en la medida que valla afinando el motor.46<strong>CARSON</strong> <strong>Raptor</strong> <strong>Pro</strong> <strong>V25</strong>
g. Conecte la emisora¡PRECAUCION!¡Conecte siempre primero la emisora!ONConecte el receptor• El interruptor está en la caja de radio.• Fije el cable de la antena del receptor.• Coloque la carrocería y fíjela con los clips decarrocería.Imagen 7EONh. Volante de dirección• Levante las ruedas del suelo y <strong>com</strong>pruebe que todos los controlesresponden.• Gire el volante de dirección a derecha e izquierda a su máximorecorrido. Las ruedas deberían seguir el giro del volante.• Si las ruedas giran en sentido contrario, utilice el interruptorinversor de servo (ST en posición REV).• Para regular la velocidad presione el gatillo- conduciendo hacia delante, para ganar velocidad o- empújelo (frenos, marcha atrás).NeutroIzquierda Derecha<strong>CARSON</strong> <strong>Raptor</strong> <strong>Pro</strong> <strong>V25</strong> 47
Ei. Mantenimiento y cuidados Imagen 8La falta de seguimiento del período de rodaje y/o daños causados pormodificaciones inadecuadas invalidará la garantía de su motor.Hay dos métodos para <strong>com</strong>probar la temperatura del motor. Uno,adquirir una sonda de temperatura. El otro método, más barato peromenos preciso es el „test de saliva”. Ponga un poco de saliva enla culata, ésta debería evaporarse en 3 – 4 segundos (el punto deebullición del agua es normalmente 100°C). Si se evapora inmediatamente,hay probabilidades que el motor esté funcionando demasiadocaliente.El motor funcionará mejor y será más fácil de arrancar en calientesi funciona entre 100 – 125°C. Dependiendo de las condicionesambiéntales, densidad del aire y humedad, los ajustes de lacarburación variarán en el momento de cada utilización. Efectuarajustes en pequeños incrementos es el mejor método para asegurarseque su motor durará largo tiempo. El sobrecalentamiento es causadopor utilizar el motor demasiado afinado, o con demasiado estrésmecánico causado por su entorno de funcionamiento. El sobrecalentamientosevero generará fallos de las piezas internas del motor.Existen muchas fuentes de información “online” que le pueden ayudarcon los ajustes de su motor. Estos motores están diseñados para durarlargo tiempo, y con un adecuado ajuste y mantenimiento, podráutilizar su modelo durante horas cada vez.A continuación aplique aceite “after run” a través del carburador, yaccione el tirador unas cuantas veces para repartirlo dentro del motor.Esto se re<strong>com</strong>ienda si planea no utilizar el coche durante más de undía. El metanol se evapora en agua, que no es buena para las partesinternas del motor. Siempre es buena idea revisar todos los tornillos,tuercas y pasadores antes de cada sesión de uso.Imagen 9ParadaCuando haya acabado de utilizar el coche, hay dos opciones paraparar el motor. El primer método es poner el pulgar en la salida delescape. Asegúrese que el motor se encuentra al ralentí, preferiblementecon los frenos activados.El segundo método es pinzar la entrada de aire al motor. No pince laentrada de <strong>com</strong>bustible, ya que causaría sobrecalentamiento delmotor.Pruebe dejar a que el motor consuma todo el <strong>com</strong>bustible deldepósito hasta vaciarlo. El motor se revolucionará cuando se vacíe eldepósito, de modo que los dos pasos anteriores no serán necesarios.Mantener el coche limpio hará que sea más agradable trabajar en él.Esto se puede lograr con un <strong>com</strong>presor grande similar a los utilizadospara pintar o con aire <strong>com</strong>primido. Compruebe siempre las bateríasde la emisora y receptor antes de arrancar el motor.Consejo:¡Utilice guantes cuando trabaje con el coche caliente!j. Consejos de ajuste de latransmisiónPunto de cambio en la transmisión de2 velocidades:Para ajustar el punto de cambio en la transmisión 2 velocidades, eltapón de goma ha de ser retirado de la apertura en la carcasa detransmisión del lateral derecho del vehículo. Ahora observe al agujerodesde la inclinación superior y gire la corona hasta que se pueda veruna apertura.A continuación sujete la corona y gire suavemente las ruedasdelanteras hacia delante hasta que aparezca un taladro inclinado (noel vertical). Continúe girando de modo que pueda introducir una llaveallen de 2 mm desde arriba, con un poco de intuición acertará con eltornillo hexagonal immediatemente.Imagen 1048<strong>CARSON</strong> <strong>Raptor</strong> <strong>Pro</strong> <strong>V25</strong>
Gire la llave a la derecha para ajustar el punto de cambio a másrevoluciones y a la izquierda para menos revoluciones (haga sólopequeñas modificaciones). No olvide cerrar la apertura con el tapónde goma.Slipper:Precaución, la tuerca del embrague deslizante (slipper) tiene roscaa izquierda, lo que significa que debe girarla a la derecha para abrirel embrague. Apriete la tuerca hasta que el muelle esté totalmente<strong>com</strong>primido, a continuación aflójela 1/4 de vuelta.k. Guía de problemas¡Lea esto antes de que ocurra!El motor no arrancaMotor ahogado.Mucho<strong>com</strong>bustible enel motor.Cuidado conel <strong>com</strong>bustiblepulverizadoQuite la bujía. Accione el tirador 6 – 8 veces.Atención, el <strong>com</strong>bustible puedo chorrear.Bujía fundida. Quite la bujía. Colóquela en elchipómetro. Si no prende (oscura), está fundida.Si prende (brillante), está correcta.Depósito de<strong>com</strong>bustiblevacío/no hay<strong>com</strong>bustible enel motorSobrecalentamientoLlene el depósito. Deje que el motor aspiretirando una vez del cable de arranque y tapandoal mismo tiempo el escape con la punta de losdedos.Rodar a altas temperaturas puede producirbloqueo de vapores en el motor. Déjelo enfriardurante 5 – 10 minutos.EChispómetrogastadoPonga una bujía nueva en el chispómetro.Si brilla muy levemente o no brilla, cambie labatería del chispómetro.El motor se paraSobrecalentamientoToma de presióndesconectadaCompruebe la temperatura. Si está por encimade 130°C, enriquezca la mezcla. Compruebe quelas ruedas giran libremente.Recoloque el tubo de presión del escape aldepósito de <strong>com</strong>bustible.Filtro de airesucioCarburadorsueltoLávelo con jabón y agua, a continuación utiliceaceite de filtro de aire (N o 50 003 2648).Compruebe el pasador de sujeción delcarburador y su tuerca. Presione el carburadorcontra el bloque de motor y apriete la tuercapara evitar tomas de aire.Difícil de controlar, interferenciasBateríasgastadas/dañadasLas baterías de la emisora deberían estar<strong>com</strong>pletamente cargadas. La lentitud defuncionamiento de los servos significa bateríasde receptor gastadas.No va rectoEl trim de dirección no está correctamenteajustado.Las tuercas de rueda delanteras y trasera estánmuy sueltas.Ajusteinadecuado dela emisoraRemítase a las instrucciones de ajuste de suradio.No paraEl trim de acelerador no está correctamenteajustado.El modelo no semueveEl interruptor de la emisora o del coche no estáconectado.La polardad o el tipo de batería es incorrecto.Las baterías están gastadas.Funciona muylentoEl motor ha perdido potencia.Las ruedas están muy sueltas.Han entrado en los engranajes polvo u otrosobjetos.<strong>CARSON</strong> <strong>Raptor</strong> <strong>Pro</strong> <strong>V25</strong> 49
Caro ClienteCi congratuliamo con lei per l’acquisto di questo modello radio<strong>com</strong>andato <strong>CARSON</strong>,che è stato progettato secondo gli ultimi ritrovatidella tecnica.Per mantenere sempre aggiornati i nostri prodotti ci riserviamoil diritto di effettuare qualsiasi aggiornamento tecnico atto amigliorarne le qualità senza alcun preavviso.Alcune caratteristiche tecniche di questo prodotto possono perciòessere diverse da quelle illustrate in questo manuale o sulla scatola.Questo manuale fa parte di questo prodotto. In caso che non dovesteseguire le istruzioni e le avvertenze di sicurezza riportate in questomanuale scade il diritto di garanzia.Conservate questo manuale per la rilettura e per un’eventualeinoltrare di questo modello a terzi.ICondizioni di GaranziaQuesto prodotto è garantito da <strong>CARSON</strong>, da difetti di fabbricazionenei materiali e lavorazioni, riscontrati nel normale utilizzo del modello,per 24 mesi dalla data di acquisto presso un rivenditore autorizzato. Incaso di prodotto difettoso durante il periodo di garanzia, recarsicon il prodotto e lo scontrino o ricevuta presso qualsiasi rivenditore<strong>CARSON</strong>.<strong>CARSON</strong> a sua discrezione, provvederà in accordo alle normativevigenti:(a) Riparare il prodotto senza addebitare nulla;(b) Sostituire il prodotto con un altro uguale o di simili caratteristiche,o(c) Rimborsare il prezzo di acquisto.Tutte le parti sostituite o rimborsate diventano di proprietà della<strong>CARSON</strong>. Nell’ambito delle prestazioni di garanzia possono essereutilizzati elementi nuovi o ritrattati.Le parti nuove sostituite o riparate possono essere utilizzate per ilservizio di garanzia. Le parti riparate o sostituite in garanzia sono aloro volta coperti da garanzia.Dalla garanzia sono esclusi:• Danni o guasti causati da eventi naturali, normale usura, abusi,incidenti, utilizzo non corretto, inosservanza delle istruzioni,montaggio non corretto, imperizia dell’utilizzatore, mancanza dimanutenzione, fulmini o altri incidenti causati da eccesso divoltaggio;• Tutti i danni causati dalla perdita di controllo del modello• Tutte le riparazioni non effettuate da personale autorizzato<strong>CARSON</strong>• Le parti di consumo e le batterie• Danni estetici non funzionali• Trasporto, spedizione o costi assicurativi• Costi di ritiro del prodotto, installazioni, regolazioni ereinstallazioni.La garanzia in ogni caso è applicata in conformità alle vigenti normenello stato dove il prodotto è stato acquistato.Dichiarazione di conformitàDickie-<strong>Tamiya</strong> GmbH & Co. KG dichiara che questo modello in tuttele sue parti, radio, motore, batteria, caricabatteria, è in regola con leSEGUENTI DIRETTIVE EUROPEE: 98/37EG e 89/336/EWG Inoltre èconforme alle direttive 1999/5/EG (R&TTE).La dichiarazione originale di conformità può essere richiestaal seguente indirizzo:Dickie-<strong>Tamiya</strong> GmbH & Co. KG • Werkstraße 1 • D-90765 Fürth •GermanySignificato del simbolo sul prodotto, sullaconfezione o nelle istruzioni per l’uso. Gliapparecchi elettrici sono prodotti riciclabili equindi, al termine del loro ciclo di vita, non devonoessere gettati tra i rifiuti domestici! Aiutateci atutelare l’ambiente e a preservare le risorse,conferendo questo apparecchio presso i relativicentri di raccolta. Se avete domande a questoproposito, vi consigliamo di rivolgervi all’enteresponsabile dello smaltimento dei rifiuti o alvostro rivenditore specializzato.Vi auguriamo buona fortuna e buondivertimento alla guida del vostro modello<strong>CARSON</strong>.Prima di utilizzare il vostro nuovo modello leggete attentamente queste istruzioni!50<strong>CARSON</strong> <strong>Raptor</strong> <strong>Pro</strong> <strong>V25</strong>
ContenutoPrefazione ...................................................................................................................50Contenuti del kit .......................................................................................................51Misure di sicurezza ..................................................................................................52Articoli necessari non <strong>com</strong>presi per la messa in moto del modello .....53Utensili necessari al montaggio del modello ................................................54a. Il suo apparato radio .........................................................................................54b. Telaio .......................................................................................................................55c. Alimentazione batterie della ricevente .....................................................55d. Controlli .................................................................................................................56e. Preparativi finali..................................................................................................56f. Messa in strada! ..................................................................................................57g. Accendere il trasmettitore ..............................................................................58h. Come controllare il vostro modello ............................................................58i. Servizio e manutenzione ................................................................................59j. Suggerimenti regolativi per la trasmissione 2 corse ............................59k. Trattamento dei problemi ..............................................................................60Montaggio ..................................................................................................................62Viti ..................................................................................................................................90Ricambi ........................................................................................................................92Motore Force 25R – 4,01 cm 3 ................................................................................98Contenuti del kitITelaioTrasmettitore(incluso in RTRversione solo)<strong>CARSON</strong> <strong>Raptor</strong> <strong>Pro</strong> <strong>V25</strong> 51
Misure di sicurezzaPrecauzioni di sicurezza e guida operativaQuesto modello radio<strong>com</strong>andato deve utilizzare solo miscelaapprovata. Evitate sempre di usare il modello in zone vietate, limitateo popolate. State lontani da strade, autostrade, persone ed animali.Non utilizzate mai il modello in luoghi chiusi.Con l‘automodellino radio<strong>com</strong>andato a scoppio non è consentitotrasportare merci, persone o animali.Prima di iniziare ad utilizzare il modello leggere attentamente questeistruzioni!La carrozzeria deve essere ben fissata sul modello prima della messain moto.Aspettare che il motore e gli scarichi si siano raffreddati prima diasportare la carrozzeria, queste parti diventano presto caldi e possonocausare gravi ustioni.Non deve essere azionato in modo continuativo nelle immediatevicinanze di persone perché potrebbe causare danni all’udito.Per evitare guasti del sistema di controllo e la conseguentemarcia incontrollata del modellino, controllare che le batterie deltrasmettitore e del ricevitore siano perfettamente cariche.Verificare il serraggio dei dadi e delle viti del modello dopo ogni corsaed usare se necessario del frena filetti.Prima di ogni utilizzo, controllare la tenuta stagna dell’impianto delserbatoio. Il coperchio del serbatoio deve risultare sempre chiuso atenuta stagna.IQuesto modello non è un giocattolo!• I modelli radio<strong>com</strong>andati non sono giocattoli, l’utilizzo di essi deveessere imparato passo passo.• I bambini sotto i 14 anni possono guidare il modello solo sotto lasupervisione di un adulto.Guidare un modello radio<strong>com</strong>andato è un affascinante hobby chedeve essere praticato con la necessaria cautela e rispetto. Poichégli automodellini tele<strong>com</strong>andati hanno un peso considerevole eraggiungono velocità molto elevate, nella marcia incontrollatapossono provocare notevoli danni e lesioni dei quali dovrà risponderel‘utilizzatore.Cautelatevi con una sufficiente copertura assicurativa, che vi consentadi praticare il vostro hobby in assoluta sicurezza. Il vostro modellofunzionerà bene solo se sarà tenuto in perfetta efficienza.Utilizzare solo ricambi originali e non montare mai parti non adatte.La responsabilità del modello è direttamente di chi lo guida, per cuiassicurarsi prima dell’utilizzo che tutto funzioni correttamente e chetutta la viteria sia ben stretta.Non iniziare a guidare prima di avere osservatoi seguenti punti:• Le batterie del trasmettitore e della ricevente siano ben cariche edel corretto voltaggio.• Controllare sempre le operazioni radio prima di far partire ilmodello.• Assicuratevi che tutti servo<strong>com</strong>andi rispondano correttamente alsegnale del trasmettitore.• Tutte le parti del modello siano in buone condizioni edassicuratevi della loro funzionalità .• Dovete essere sicuri che tutte le viti siano ben strette.• Che non ci siano altri modelli o trasmettitori nelle vicinanzeche possano causare interferenze. Segnali di disturbo sullastessa frequenza possono far perdere il controllo del modellino.Accendere sempre prima il trasmettitore per evitare reazioniincontrollate della ricevente o percezione di segnali estranei.• Dietro guidare: spegnere sempre prima la ricevente e quindi iltrasmettitore.• Tenete il vostro modello lontano da cavi di alta tensione o antenneradio. Non usare mai il modello durante temporali con fulmini!• I disturbi atmosferici possono influire sui segnali delteletrasmettitore.• Il sistema elettrico del modellino non è impermeabile all‘acqua.Pertanto non guidare nella pioggia, nella neve, nelle pozzanghereo sull‘erba bagnata.• Evitate sempre di guidare il modello in zone ristrette e limitate o inaree popolate.• State lontani da strade, autostrade,persone e animali!• Non guidare se si è stanchi o se le proprie capacità di reazione sonoridotte per altri motivi.• Guardare continuamente il modello e non distrasi.• La carrozzeria deve essere fissata correttamente al modello primadell’utilizzo.• Manutenzione e cure periodiche sono necessarie per otteneredelle prestazioni ottimali.• Fare raffreddare tutte le <strong>com</strong>ponenti del motore prima dirimuovere la carrozzeria. Queste parti durante l’uso diventanoestremamente calde e possono causare gravi ustioni.Assicurarsi che le batterie siano ben cariche e del corretto voltaggio.• Quando le batterie si stanno scaricando potreste perdere ilcontrollo del modello.• Non mischiare mai nel trasmettitore accumulatori/batterie carichicon accumulatori/batterie semiscarichi o con accumulatori dicapacità diversa.• Cercare di non caricare mai pile a secco (solo gli accumulatori sonoricaricabili).Dopo l’utilizzo rimuovere le batterie dal modello.52<strong>CARSON</strong> <strong>Raptor</strong> <strong>Pro</strong> <strong>V25</strong>
Per il carburante rispettare quanto segue:• Tenere la miscela in un luogo sicuro e fuori dalla portata deibambini e di animali domestici.• Assicurarsi che il recipiente sia ben chiuso.• Tenere la miscela in luogo ben ventilato ed asciutto.• Il carburante è estremamente infiammabile. Tenerlo lontano datutte le fonti di calore, da fiamme libere, apparecchi elettrici ebatterie. Non fumare nelle immediate vicinanze.• Evitate di toccare e Assolutamente Non inalare. Leggereattentamente le avvertenze riportate sulla confezione.Buttare il contenitore vuoto negli appositi bidoni. Non buttare ilrecipiente anche vuoto sul fuoco.In caso d‘infortunio o di malore, consultare immediatamente unmedico (recare possibilmente con sé l‘etichetta del carburante).A fine utilizzoLeggere attentamente le presenti istruzioni prima di intraprenderequalsiasi operazione.Dopo ogni utilizzo, verificate sempre che tutte le parti siano inperfetta efficienza, e ricordatevi che un solo particolare difettoso puòcausare gravi danni alle persone. Controllate periodicamente il vostromodello e sostituite le eventuali parti danneggiate solo con ricambioriginali del modello.Vi auguriamo buona fortuna e buondivertimento con il vostro modello <strong>CARSON</strong>.Articoli necessari non <strong>com</strong>presiper la messa in moto del modelloAccendi candela50 090 5044Olio After Run Olio filtro50 090 5044 50 003 2648Riempitore50 001 3330IMiscelaSet Nitro50 090 5072Miscela <strong>CARSON</strong>Litro Nitrometano N O Utilizzo1,0 10% 50 090 5052 Rodaggio/principianti1,0 16% 50 090 5053 Normale2,5 16% 50 090 5054 Normale1,0 25% 50 090 5055 Race2,5 25% 50 090 5056 RaceCandele <strong>CARSON</strong>-ROSSIN O Articolo Motore Miscela Temperature50 090 5006 Glow plug Rossi R2 hot 2 - 3,5 ccm senza Nitro +0° - +15C°50 090 5007 Glow plug Rossi R3 medium 3,5 - 6 ccm senza Nitro -2° - +18C°50 090 5008 Glow plug Rossi R4 cold 6 - 10 ccm senza Nitro -5° - +20C°50 090 5009 Glow plug Rossi R5 extra 3,5 - 10 ccm 10% Nitro -7° - +22°50 090 5010 Glow plug Rossi R6 cold universal 10-13% Nitro +10° - +25°50 090 5011 Glow plug Rossi R7 cold universal 13-15% Nitro +15° - +30°50 090 5012 Glow plug Rossi R8 extra cold universal 13-15% Nitro +20° - +40°Per la trasmittente necessitano 8batterie AA Stilo a secco o ricaricabili.<strong>CARSON</strong> <strong>Raptor</strong> <strong>Pro</strong> <strong>V25</strong> 53
Utensili necessari al montaggio del modelloCutter 30 007 4053Colla istantanea 30 005 3339Pinze 30 00 4034Forbici 30 001 3305Cacciaviti esagonali mm.1,5/ 2 / 2,5 mm 30 007 4023Chiave candela 30 001 3118Pinzetta 30 00 4003Tronchesine 30 00 4035Ia. Il suo apparato radio (Solo nella versione RTR)Vi preghiamo di leggere le istruzioni del vostro radio<strong>com</strong>ando primadi usarlo.I servi debbono essere regolati al centro prima di essere installati.Per regolare una posizione neutra accendere il trasmettitore e laricevente. Regolare i trims in posizione centrale e spegnere laricevente. I servi saranno ora regolati al centro e pronti perl’installazione.Antenna riceventeBatteria riceventeTrasmittenteInterruttoreServo gasServo sterzo54<strong>CARSON</strong> <strong>Raptor</strong> <strong>Pro</strong> <strong>V25</strong>
. TelaioFiltro dell’ariaMotoreSupporto per carrozzeriaRollbarTrasmissioneAmmortizzatoriposterioriEmpfängerboxInterruttoreSilenziatoreGomme posterioreServo del gasSerbatoioGomme anterioriTelaioIAmmortizzatori anterioric. Alimentazione batterie della riceventeInserire 4 batterie tipo “AA” nel porta batterie della ricevente <strong>com</strong>eda foto. Assicuratevi di posizionare le batterie con la giusta polarità,positivo (+) e negativo (-). Quindi collegate la spinetta della batteriacon la spinetta dell’interruttore. Il nero con il nero ed il rosso con ilrosso. Riposizionate il vano batterie.Immagine 1Consiglio:Utilizzate delle batterie ricaricabili. Hanno una buona durata e siammortizzeranno in breve tempo. Sostituire il porta pile con il nostropacco batterie 6 V NiMh 1100 mAH (N O 50 060 8036 JR).<strong>CARSON</strong> <strong>Raptor</strong> <strong>Pro</strong> <strong>V25</strong> 55
d. Controlli Immagine 2Accendere sempre prima il trasmettitore e dopo la ricevente. Orapotete accendere il vostro modello utilizzando l’interruttore on/off posizionato sulla scatola radio. Controllate sempre le regolazioniprima di accendere il modello.Controllate che lo sterzo sia centrato. Se non lo fosse, usate ilpomello ST-TRIM a sinistra del volantino di <strong>com</strong>ando sterzo. Girandoil volantino verso sinistra il modello deve girare a sinistra e girando adestra il modello deve andare a destra.Consiglio: Leggere attentamente il manuale della vostra radio pereffettuare le regolazioni avanzate.Adesso bisogna regolare l’acceleratore in posizione neutra. Rimuovereil filtro dell’aria.L’apertura della ghigliottina deve essere molto ridotta, da 1 a 1,5 mmper permettere al motore di girare al minimo (immagine 2). Se è moltopiù aperta il motore rimarrà accelerato anche con il freno azionato,provocando una più rapida usura sia delle pastiglie dei freni che dellafrizione, creando difficoltà di guida del modello.Quindi utilizzate se necessaria la regolazione del trim TH-TRIM(immagine 3) per mettere il servo in posizione neutra. In questaposizione neutra il freno non deve essere bloccato. Se necessita agitecon chiavetta esagonale da 1,5 mm. sul collarino della leva freno.Rimontare il filtro aria quando avete finito le regolazioni.Immagine 31 - 1,5 mmITH-Trimme. Preparativi finaliAssemblare il riempitore miscela. Per riempire di miscela il riempitore,bisogna <strong>com</strong>primerlo ed immergerne il beccuccio nel contenitoredella miscela. Lasciare de<strong>com</strong>primerlo e si riempirà di miscela.Riempite il serbatoio premendo dolcemente sul riempitore edassicurarsi a fine riempimento che il tappo sia ben chiuso.Consiglio 1:La miscela durerà più a lungo se tenuta in luogo fresco, asciutto ed albuio.Consiglio 2:Non lasciare più di 10 secondi la pipette candela collegata allacandela. Un tempo superiore né può causare la bruciatura prematuradel filamento. Per una maggiore durata utilizzate una pipetta candelaricaricabile.Consiglio 3:Per l’avviamento utilizzare appositi guanti ignifughi!56<strong>CARSON</strong> <strong>Raptor</strong> <strong>Pro</strong> <strong>V25</strong>
f. Messa in strada!Un buon rodaggio del motore, assicura buone prestazioni e lunga vitaal vostro motore. Assolutamente: NON SALTATE QUESTA PARTE!Il motore è già regolato per il rodaggio. Posizionate il modello su unsupporto in maniera che le ruote siano libere di muoversi.Assicuratevi che il gas sia in posizione neutra. Collegate la pipettacandela alla candela (immagine 4) e date una tirata secca. Non tiratepiù di 25 cm! Se esagerate si può rompere la corda. E’ meglio daremolti strappetti corti che uno ampio, non è una motosega! Se lacorda si arrotola, girate con le dita il volano. Questo movimento faraccogliere la cordicina dello strappo. Dopo poche tirate, il motore siavvierà emettendo abbastanza fumo.Immagine 4Consiglio 1:Regolazioni alla fabbrica del carburatore:Con queste regolazioni di base già effettuate dalla fabbrica, il motoresi avvierà immediatamente e sarà ben regolato:• Vite di arresto ghigliottina: approssimativamente 1 mm. di apertura• Spillo del massimo: serrarlo <strong>com</strong>pletamente e poi aprire di 4 giri<strong>com</strong>pleti• Spillo del minimo: portarlo rasente alla leva del gas e fare un giro<strong>com</strong>pleto in senso orario.Immagine 5più grassopiù magroISe il motore regolato così grasso fa fatica a tenere il minimo, girate laregolazione del minimo di 1/8 di giro alla volta in senso orario. Cosìaumenterete il minimo e farete un buon rodaggio. Effettuate questeoperazioni in un’area ben ventilata, magari sul marciapiede di casa.L’olio della miscela non bruciato si depositerà sotto la vostra marmitta.Continuate questo rodaggio per 2/3 serbatoi <strong>com</strong>pleti, controllandola temperatura ogni 2 minuti. Aspettate 10/15 minuti da un serbatoioall’altro per permettere al motore di raffreddarsi. Toccando con lapunta delle dita la testa del motore, dovrà essere calda, ma non bollente.(Attenzione! Non toccare!)Se vi sembra troppo calda, ingrassate leggermente girando sempredi 1/8 di giro. Fate sempre delle piccole regolazioni, quando andateintorno alla carburazione.Immagine 6più grassopiù magroDopo avere effettuato il rodaggio l’apertura dello spillo del massimodeve essere ridotta a 3 giri e 1/4. Se le temperature esterne sono piùalte usare una carburazione più grassa.Consiglio 2:Durante questa fase guidate il modello evitando lunghe accelerazioni.Gradualmente smagrite sempre con piccole regolazioni di 1/8 di giro.Smagrendo il minimo si alzerà.<strong>CARSON</strong> <strong>Raptor</strong> <strong>Pro</strong> <strong>V25</strong> 57
g. Accendere il trasmettitoreATTENZIONE! Accendere sempre prima il trasmettitore!ONInterruttore della ricevente• L’interruttore della ricevente è dentro la scatoladi protezione.• Inserire l’antenna della ricevente nell’appositaguaina flessibile.• Montate la carrozzeria e fissatela con le clips indotazione.Immagine 7IONh. Come controllare il vostro modello• Alzare le gomme da terra e controllare che i <strong>com</strong>andi rispondano.• Girate il volantino dello sterzo a destra e a sinistra. Le ruote devonosterzare seguendo i <strong>com</strong>andi.• Se le ruote girano in modo inverso, invertite i Reverse del servo(ST in posizione REV).• Per regolare la velocità agire sulla leva del gas/freno- indietro (per andare avanti ed accelerare) e/o- in avanti (per frenare o andare in retromarcia).Posizione neutraSinistra Destra58<strong>CARSON</strong> <strong>Raptor</strong> <strong>Pro</strong> <strong>V25</strong>
i. Servizio e manutenzione Immagine 8La non esecuzione di un buon rodaggio, e/o il danneggiamentocausato da parti Tuning invalideranno la garanzia sul motore.Ci sono 2 metodi per provare la temperatura del vostro motore.Acquistare una sonda termica. La seconda meno costosa, ma anchemeno accurata è la tecnica della saliva. Mettere un po’ di saliva sullatesta del motore e dovrebbe evaporare in 3⁄4 secondi (la temperaturadi ebollizione dell’acqua è normalmente 100 °C). Se evaporaimmediatamente può voler dire che il motore sta scaldando troppo.Il motore gira bene e si riavvia facilmente se non supera i 100/125gradi ti temperatura. A secondo della temperatura, della densitàdell’aria, umidità, il carburatore va regolato di conseguenza. Fare dellepiccole regolazioni è sempre la cosa migliore, per far durare più alungo il vostro motore. Il surriscaldamento è causato da unaregolazione troppo magra, o da un utilizzo in condizioni critiche.Questo surriscaldamento può danneggiare le parti interne del motore.Ci sono molti accorgimenti che potete usare per fare durare più alungo il vostro motore, e potete guidare il vostro modello per molteore. I motori da 3,5 ccm si contraddistinguono per la durata estremamentelunga e, con una manutenzione e tuning corretti, l’automodellopuò funzionare per ore senza interruzione.Applicare dall’apertura del carburatore un olio “After Run” e daredei colpetti con lo strappo, in maniera da metterlo in circolo. Questopasso è necessario se non utilizzate la macchina per più di un giorno,in quanto il metanolo evaporando lascia dei residui di acqua che sonodannosi per il motore. E’ consigliabile controllare sempre che tutte leviti ed i dadi siano ben stretti ed ove necessario applicare del frenafiletti.Immagine 9Fine utilizzoPer spegnere il motore ci sono 2 sistemi. Il primo metodo è quello dichiudere con un dito lo scarico. Assicuratevi che il motore sia al giustominimo e con il freno attivato.Il secondo metodo consiste nel tappare il filtro dell’aria, quindifacendogli mancare ossigeno. Non strozzare mail il tubetto miscela,può causare un surriscaldamento del motore.Nel caso si lasci consumare tutta la miscela contenuta nel serbatoio, ilmotore si spegnerà da solo. Il numero di giri del motore aumenta nelfunzionamento al minimo mentre il serbatoio si svuota, pertanto leoperazioni indicate sopra non servono.IMantenere la macchina pulita aiuta anche a lavorarci intorno. Perpulire si può utilizzare un <strong>com</strong>pressore ad aria, o appositi prodottispray o a pennello. Controllare sempre le batterie del trasmettitore edella ricevente prima di mettere in funzione il motore.Consiglio:Indossare appositi guanti quando il motore è caldo!j. Suggerimenti regolativi perla trasmissione 2 marceMomento di <strong>com</strong>mutazione del cambio a 2 marcePer regolare il momento di <strong>com</strong>mutazione del cambio a 2 marcetogliere il tappo in gomma dall’apertura della scatola del cambio sullato destro del veicolo, dopodiché guardare dall‘alto e di traverso nelforo e ruotare l‘ingranaggio principale, finché non si vede un‘apertura.A questo punto, fissare l’ingranaggio principale e ruotare lentamentele ruote anteriori in avanti, finché non <strong>com</strong>pare un foro obliquo (nonil foro dritto). Ruotare ora le ruote anteriori in modo tale da poterinserire di traverso e dall’alto una brugola per svitare da 2 mm. Con unpo’ di sensibilità è possibile prendere subito anche il grano filettato.Immagine 10<strong>CARSON</strong> <strong>Raptor</strong> <strong>Pro</strong> <strong>V25</strong> 59
Per regolare il momento della <strong>com</strong>mutazione su un numero di giri piùalto ruotare verso destra; per regolarlo su un numero di giri più basso,verso sinistra (eseguire solo piccole variazioni). Ricordarsi di richiuderel’apertura con il tappo in gomma.Pattino (Slipper)Attenzione: la filettatura del dado dell’innesto a frizione è sinistrorsa,quindi per svitarlo ruotarlo in senso orario. Avvitare il dado fino alla<strong>com</strong>pressione <strong>com</strong>pleta della molla, dopodiché svitarlo nuovamentedi 1/4 di giro.k. Trattamento dei problemiLeggere queste avvertenze prima che si verifichino!Il motore non parteMotoreingolfato.Troppa miscelanel motoreCandelabruciataAlimentatorecandelascaricoSmontare la candela, tirare lo strappo 6 - 8 volte,attenzione agli spruzzi di miscela.Smontare la candela, collegarla alla pipettacandela. Se rimane nera vuol I dire che èbruciata, se diventa arancio è ancora buona.Montate una candela nuova. Se non si accende,cambiate la pipetta candela o sostituite labatteria.Serbatoiovuoto/non arrivamiscela almotoreSurriscaldamentoRiempite il serbatoio. Tappare con un dito loscarico e fare l’avviamento con lo strappo.Se il motore è molto caldo si può bloccare, quindilasciare raffreddare per 5/10 minuti.ICalo di prestazioni del motoreSurriscaldamentoControllare la temperatura. Se supera 150 gradi,ingrassare la carburazione. Assicuratevi che leruote girino senza impedimenti.Filtro aria sporcoLavarlo con acqua e sapone, quindi imbevetelocon l’apposito olio per filtri (N O 50 003 2648).Tubetto presadi pressionestaccatoRicollegare la presa di pressione della marmittaal serbatoio.CarburatorelentoControllare il dado bloccaggio carburatore.Spingere il carburatore nell’apposita sede estringere bene il dado per evitare bolle d’aria.Difficoltà di controllo, InterferenzeBatteriescariche odanneggiateLe batterie del trasmettitore debbono essere<strong>com</strong>pletamente cariche. Se i servi si muovonolentamente si stanno scaricando le batterie dellaricevente.Non va drittoIl trim dello sterzo non è regolato bene.I dadi bloccaggio ruote anteriori e posteriorisono troppo serrati.RegolazionitrasmettitoresbagliateIl modello non simuoveControllare le istruzioni di regolazione delradio<strong>com</strong>mando.Il trasmettitore o l’interruttore del modello nonè acceso.Errata polarità o batteria sbagliata.Le batterie sono esaurite.Non frenaVa pianoIl trim del freno non è regolato bene.Il motore ha perso potenza.I dadi bloccaggio ruote posteriori sono troppostretti.C’è sporco o corpi estranei negli ingranaggi.60<strong>CARSON</strong> <strong>Raptor</strong> <strong>Pro</strong> <strong>V25</strong>
<strong>CARSON</strong> <strong>Raptor</strong> <strong>Pro</strong> <strong>V25</strong> 61I
50 020 5032 1x2x50 000 2158 8 x 16 x 5 mm2x50 020 5083 4 x 7 x 1.5 mmMontageanleitung • Assembly •Assemblage • Montaje • Montaggio1Differenzial • Gear Differential • Différentiel • Coronal • DifferenzialeFettGreaseFettGrease50 020 5082FettGrease50 020 503450 020 5032 2x50 020 503450 020 503250 020 508250 020 5033FettGrease50 020 508350 020 5034 2x6x50 020 5082 8.1 x 12.7 x 0.3 mmFettGrease50 020 503450 020 503750 000 215850 020 503250 020 508250 020 5034 4x50 020 508350 020 5033 2x50 020 506250 020 503250 020 508450 000 215850 020 5037 1x50 020 5032Montage50 020 5032 1x50 020 50372x vorne + hinten2x front + backMontage250 020 50352x50 020 5037 1x4x50 020 5084 3 x 15 mm50 020 503850 000 215850 020 5038 1x2x50 000 2158 8 x 16 x 5 mm62<strong>CARSON</strong> <strong>Raptor</strong> <strong>Pro</strong> <strong>V25</strong>Schraubensicherungslack •Liquid screw lock • Frein filet •Líquido fijatornillos • FrenafilettiFett • Grease • Graisse •Grasa • GreaseSilikonöl • Silicon oil • Huile silcone •Aceite de silicona • Silicon Oil
8x50 020 5085 3 x 10 mm3Vorderes Differenzial • Front differential •Différentiel avant •50 020 5035Diferencial delantero •Differenziale anteriore50 020 508750 020 50864x50 020 5758 14.5 x 16 x 0.2 mm50 020 508550 020 575850 020 507650 020 5076 2x50 020 503950 020 503650 020 5039 2x50 020 575850 020 508550 020 503550 020 50364x50 020 5086 3 x 20 mm8x50 020 5087 3 x 30 mm50 020 5036 4x50 020 508750 020 5086 Sollten die Zahnräder durchrutschen, so müssenSie beide Unterleg-Scheiben auf die Seite desZahnrads stecken. If gears start slipping, apply both shims to theside behind the bevel gear. Si les pignons glissent, il est nécessaired‘enficher les deux rondelles du côté du pignon. Si las ruedas dentadas patinaran, deberá colocarlas dos arandelas en el lado de la rueda dentada. Qualora le ruote dentate slittino, infilareentrambe le rondelle dal lato della ruota dentata.4 Hinteres Differentzial • Rear differential • Différentiel arrière •Diferenciales trasero •50 020 5087Differenziale posterioreMontage50 020 503550 020 5086Montage50 020 508550 020 575850 020 507650 020 503650 020 503950 020 575850 020 503550 020 508750 020 508650 020 5085 Sollten die Zahnräder durchrutschen,50 020 5036 so müssen Sie beide Unterleg-Scheiben aufdie Seite des Zahnrads stecken. If gears start slipping, apply both shims to the side behind the bevelgear. Si les pignons glissent, il est nécessaire d‘enficher les deux rondelles ducôté du pignon. Si las ruedas dentadas patinaran, deberá colocar las dos arandelas enel lado de la rueda dentada. Qualora le ruote dentate slittino, infilare entrambe le rondelle dal latodella ruota dentata.<strong>CARSON</strong> <strong>Raptor</strong> <strong>Pro</strong> <strong>V25</strong> 63
50 000 2158 8x5Aufhängung • Suspension •Suspension •Suspensión • 50 020 5439Sospensioni50 020 502050 020 544550 000 21584x50 020 5445 4x50 000 215850 020 5439650 020 5439 4x50 020 576250 020 576250 020 5439 4x50 020 50154x50 020 5439 5 x 5 mm4x8x50 020 5762 4 x 17 mm50 020 576250 020 576278x50 020 5762 3 x 6 mm50 001 1341Montage50 020 5018 4x50 020 50474x50 001 1341 3 x 7 x0.6 mm50 020 50184x850 020 5007 4x50 020 5043 50 020 5007 50 020 50434x64<strong>CARSON</strong> <strong>Raptor</strong> <strong>Pro</strong> <strong>V25</strong>
50 0020 5018 4x950 001 13414x50 001 1341 3 x 7 x 0.6 mm4x50 0020 50181050 0020 5045 2x2x2x50 0020 5762 6 x 6 mm50 0020 504550 0020 576211Montage50 0020 5045 2x2x50 0020 5762 6 x 6 mm2x50 0020 504550 0020 5762<strong>CARSON</strong> <strong>Raptor</strong> <strong>Pro</strong> <strong>V25</strong> 65
50 020 5045 4x6x50 020 5089 3 x 15 mm12Montage Achse vorne + hinten • Assembly of the axle front + rear •Assemblage d’essieu avant + arrière • Montaje eje delantero + trasero •Montaggio assale anteriore + posteriore50 020 5044 1x50 0020 505450 0020 504850 0020 508950 0020 508950 0020 504550 0020 508950 0020 504450 0020 506050 0020 504550 0020 50512xvorne/hintenfront/back50 0020 504850 0020 5048Montage50 0020 504850 0020 506050 0020 504550 0020 508950 0020 50604x66<strong>CARSON</strong> <strong>Raptor</strong> <strong>Pro</strong> <strong>V25</strong>
50 020 5056 2x13Gestänge für Hinterachse • Linkage for rear axle • Barre de essieu arrière •Varillaje de eje trasero • Collegamenti per assale posteriore50 020 5055 1x50 020 50552x2x50 020 5089 3 x 15 mm50 020 50562x50 020 5090 3 x 20 mm2x50 020 5091 3 x 23 mm14Montage Hinterachse • Assembly rear axle • Assemblage essieu arrière •Montaje eje trasero •50 020 5091Montaggio assale posteriore50 020 5092 2x50 020 509250 001 14476x50 020 5093 4 x 17 mm50 020 509050 001 1447 2x50 020 5059Montage50 020 508950 020 509150 020 505850 020 509250 001 144750 020 5093<strong>CARSON</strong> <strong>Raptor</strong> <strong>Pro</strong> <strong>V25</strong> 67
2x50 020 5089 2 x 15 mm15Hinterachse • Rear axle • Essieu arrière • Eje trasero • Assale posteriore2x50 020 5086 3 x 20 mm50 020 508950 020 505950 020 508616Vorderachse • Front axle • Essieu avant • Eje delantero • Assale anteriore2x50 020 5089 3 x 15 mmMontage2x50 020 5086 3 x 20 mm50 020 508950 020 50596x50 020 5093 4 x 17 mm50 020 505950 020 508650 020 509368<strong>CARSON</strong> <strong>Raptor</strong> <strong>Pro</strong> <strong>V25</strong>
50 020 5056 2x17Lenkung • Steering • Direction • Dirección • Sterzo50 020 504650 020 5055 1x50 020 505550 020 505650 020 50462x50 020 505618Vorderachse • Front axle • Essieu avant • Eje delantero • Assale anteriore50 020 5011 1x50 020 505750 020 505750 020 501150 020 5057 2x50 020 501150 020 50111x50 020 5094 3 x 15 mm19Lenkgestänge • Steering linkage •Barre de direction • Varillaje de dirección •Collegamenti sterzo50 020 5095Montage50 001 1447 3x50 020 509550 020 504150 020 509450 020 506950 020 5041 1x50 020 5095 3 x 25 mm50 020 5041 2x50 020 504150 001 144750 020 506950 020 50162x50 020 5016 3 x 12.5 mm<strong>CARSON</strong> <strong>Raptor</strong> <strong>Pro</strong> <strong>V25</strong> 69
50 020 5019 2x20Vorderachse + Lenkung • Front axle + Steering • Essieu avant + direction •Eje delantero + dirección • Assale anteriore + sterzo50 020 50912x50 020 5096 4 x 17 mm50 020 509250 020 501950 001 144750 020 5096Montage2x50 020 5091 3 x 23 mm50 020 5092 2x50 001 1447 2x70<strong>CARSON</strong> <strong>Raptor</strong> <strong>Pro</strong> <strong>V25</strong>
50 020 7071 1x21Chassis • Chassis • Châssis •Chasis • Telaio50 020 707150 020 707150 020 7071 1x1x50 003 2438 4 x 4 mm50 020 509750 020 50091x50 020 5097 4 x 8 mm2250 020 509850 020 509950 020 50731x50 020 5098 3 x 14.5 mm50 020 509850 020 50733x50 020 5099 3.5 x 10 mm50 020 500950 020 509850 020 509950 020 5099Montage4x50 020 5100 4 x 8 mm23Motorhalter • Engine holder • Support à moteur •Soporte de motor •SchraubensicherungslackSupporto motoreThread lock50 020 5100SchraubensicherungslackThread lock50 020 5121 1x50 020 512150 020 5121 1x50 020 512150 020 5121<strong>CARSON</strong> <strong>Raptor</strong> <strong>Pro</strong> <strong>V25</strong> 71
24Überrollkäfig • Rollcage • Arceau desécurité • Arco de seguridad • Roll cage50 020 5097SchraubensicherungslackThread lock50 020 5074 2x4x50 020 5097 4 x 8 mm50 020 507450 020 5074SchraubensicherungslackThread lock50 020 509750 020 5074Montage25Montage Tank • Assemblyfueltank • Assemblage duréservoir de carburant• Montaje depósitode <strong>com</strong>bustible •Montaggio serbatoio50 020 510150 020 5085 3 x 10 mm72<strong>CARSON</strong> <strong>Raptor</strong> <strong>Pro</strong> <strong>V25</strong>
282-Gang Getriebe • 2 Speed gear • Boîte 2 vitesses •Mecanismo de cambio de dos velocidades • Cambio a 2 marce50 020 5116 1x50 020 511650 020 5116 1x50 020 5116 1x50 020 5116 1xSchraubensicherungslackThread lock Einstelltipps 2-Gang Getriebesiehe Seite 11. Adjusting tips for 2 speedgear see page 23. Conseils de réglage de boîte 2vitesses sur la page 36. Consejos de ajuste de latransmisión de dosvelocidades ver página 48. Suggerimenti regolativi perla trasmissione 2 corse vedipagina 59.50 020 5116 1x50 020 506450 020 5116 1x50 020 510350 020 5103SchraubensicherungslackThread lock50 020 50292x50 020 5103 6.0 x 0.8 mmMontage50 020 5064 1x50 020 5029 1x50 020 575950 020 5068 1x50 020 506850 020 506850 020 5068 1x 50 020 5759 1x74<strong>CARSON</strong> <strong>Raptor</strong> <strong>Pro</strong> <strong>V25</strong>
2x50 020 5085 3 x 10 mm29Montage Getriebe •Assembly gear •Assemblage boîte de vitesses •Montaje de transmisión •Montaggio50 020 5061trasmissione50 020 506150 020 508550 020 5061303x50 000 2158 8 x 16 x 5 mm50 020 506350 000 215850 020 5063 1x8x50 020 5105 3 x 25 mm31Montage3x50 000 2158 8 x 16 x 5 mm50 000 215850 020 510550 020 5061<strong>CARSON</strong> <strong>Raptor</strong> <strong>Pro</strong> <strong>V25</strong> 75
3250 020 5760 1xSekundenkleberThread lock50 020 5076 1x50 020 507650 020 576033SchraubensicherungslackThread lock50 020 5760 1x50 020 507650 020 5076 1x50 020 5760Montage3450 020 5040 1x50 020 50401x50 001 1333 3 x 3 mm50 020 5040 1x50 020 504050 001 133376<strong>CARSON</strong> <strong>Raptor</strong> <strong>Pro</strong> <strong>V25</strong>
50 020 5016 2x35Montage Bremse • Brake assemly • Assemblage de freinage •Montaje freno • Montaggio freno50 020 5021 2x50 020 501650 020 502150 020 501650 020 5017 1x50 020 501650 020 502150 020 501750 020 5016 2x50 020 5025 1x36Montage Hauptzahnrad/Slipper • Main gearwheel/slipper assembly •Montage du pignon principal/slipper • Montaje de la rueda dentadaprincipal/slipper • Montaggio ingranaggio principale/pattino50 020 5024 1x 50 020 5023 1x50 020 5022 1x50 020 5025SekundenkleberInstant Cement50 020 502350 020 5028Montage50 020 5026 1x50 020 502650 020 5026 1x50 020 5028 1x50 020 5028 1x50 020 502250 020 502450 020 5027 Einstelltipps Slipper siehe Seite 12. Adjusting tips for Slipper see page 24. Conseils de réglage Slipper sur la page 37. Consejos de ajuste Slipper ver página 49. Suggerimenti regolativi per il pattino vedipagina 60.<strong>CARSON</strong> <strong>Raptor</strong> <strong>Pro</strong> <strong>V25</strong> 77
8x50 020 5107 3 x 10 mm37Montage Radio-Box • Assembly Radio Box • Assemblage supportrécepteur • Montaje caja de radio • Montaggio scatola protezionericevente50 020 5107 50 020 51071x50 020 5094 3 x 15 mm1x50 020 5050 3.2 x 9x 0.8 mm50 020 504250 020 509450 020 5050 1x50 020 504250 020 505050 020 5107Tuning TippMontageSilicon-OilSilikonöl/Getriebeöl 908052-5550 020 510750 090 8052 Silicon Oil 50 ml 100050 090 8053 Silicon Oil 50 ml 300050 090 8054 Silicon Oil 50 ml 500050 090 8055 Silicon Oil 50 ml 700090°78<strong>CARSON</strong> <strong>Raptor</strong> <strong>Pro</strong> <strong>V25</strong>
50 020 5049 1x38Gas- + Bremsgestänge • Throttle + brake linkage •Barre des gaz et de freinage • Varillaje de acelerador + freno •Collegamenti freno e acceleratore50 020 5049 50 020 5049392x50 020 5070 2 x 10 mm50 001 1333 4x50 020 505250 001 133350 020 507050 020 507050 020 505250 0020 5052 4x50 001 133350 020 505350 020 505250 020 5070 1x50 001 133350 020 505350 020 505250 020 507050 020 5053 1x50 001 133350 020 5049Montage50 020 5053 1x4050 020 505350 020 5053 1x50 020 5053<strong>CARSON</strong> <strong>Raptor</strong> <strong>Pro</strong> <strong>V25</strong> 79
50 020 5001 1x50 020 57611x7.15 x 12 x 0.5 mm50 000 214750 020 576250 020 57614150 020 5000Montage Motor • Assembly engine •Assemblage moteur • Montaje motor •Montaggio motore50 000 214750 020 500450 020 500350 020 500550 020 500150 020 576150 020 500250 020 500550 020 576150 020 5000 1x1x50 020 5761 3 x 8 x 0.5 mm1x50 020 5761 5.3 x 7.5 x 0.3 mm0.3 mm Legen Sie so viele Ausgleichs-Scheiben unter, so dasszwischen Kupplungsglocke und Kupplungsschraube max. einSpiel von 0,3 mm entsteht. Shim clutch bell until there is about 0.3 mm play between clutch bell and screw. Intercalez autant de disques de <strong>com</strong>pensation que nécessaire pour que le jeuentre la cloche d‘embrayage et la vis d‘embrayage soit de 0,3 mm au plus. Coloque tantas arandelas de <strong>com</strong>pensación <strong>com</strong>o para que entre la campana delembrague y el tornillo del embrague se forme <strong>com</strong>o máximo un juego de 0,3 mm. Inserire sotto il numero di rondelle di <strong>com</strong>pensazione necessario per avere tra lacampana della frizione ela vite della frizione un gioco massimodi 0,3 mm.Montage1x50 020 5761 5.1 x 9 x 0.5 mm50 020 5005 1x50 020 5005 3x42Luftfilter •Air cleaner •Filtre à air •Filtro de aire •Filtro aria50 020 5075SchraubensicherungslackThread lock50 020 5003 3x50 020 510950 020 5002 1x2x50 000 2147 5 x 10 x 4 mm50 020 50084x50 020 5109 3 x 10 mm50 020 500850 020 50081x50 020 5762 3 x 8 mm50 020 500880<strong>CARSON</strong> <strong>Raptor</strong> <strong>Pro</strong> <strong>V25</strong>
4x50 020 5048 4 x 8 mm43Montage Chassis • Assembly chassis • Assemblage châssis •Montaje chasis • Montaggio telaio50 020 51088x50 020 5108 4 x 15 mm Überprüfen Sie die Motor-Befestigungsschrauben nach jedemEinsatz auf Festigkeit. Please recheck engine-mounting screws after every run to makesure all screws are properly tightened. Après chaque utilisation, vérifiez que les vis de fixation du moteursont bien serrées. Compruebe que los tornillos de fijación del motor sigan firmesdespués de cada uso. Dopo ogni utilizzo controllare che le viti di fissaggio del motoresiano ben serrate.50 020 5108Montage50 020 510850 020 5048SchraubensicherungslackThread lock<strong>CARSON</strong> <strong>Raptor</strong> <strong>Pro</strong> <strong>V25</strong> 81
6x50 020 5099 3.5 x 10 mm44Montage Chassis • Assembly chassis • Assemblage châssis •Montaje chasis •Montaggio telaio50 020 509950 020 50994550 020 5097SchraubensicherungslackThread lock50 020 57614x50 020 5097 4 x 8 mmMontage4x4.1 x 8 x50 020 5761 0.8 mm Überprüfen Sie die Motor-Befestigungsschrauben nach jedemEinsatz auf Festigkeit. Please recheck engine-mounting screwsafter every run to make sure all screws areproperly tightened. Après chaque utilisation, vérifiez que les vis defixation du moteur sont bien serrées. Compruebe que los tornillos de fijación del motorsigan firmes después de cada uso. Dopo ogni utilizzo controllare che le viti di fissaggiodel motore siano ben serrate.82<strong>CARSON</strong> <strong>Raptor</strong> <strong>Pro</strong> <strong>V25</strong>
4x50 020 5097 4 x 8 mm468x50 020 5099 3.5 x 10 mm4x50 020 5110 3.5 x 15 mm50 020 511050 020 505050 020 511150 020 50971x50 020 5111 2.5 x 10 mm50 020 509950 020 5110SchraubensicherungslackThread lock50 020 50091xMontage50 020 509950 020 509750 020 511050 020 5099SchraubensicherungslackThread lock50 020 509750 020 511050 020 50101x<strong>CARSON</strong> <strong>Raptor</strong> <strong>Pro</strong> <strong>V25</strong> 83
50 020 5497 8x47Stoßdämpfer Montage • Assembly shocks •Assemblage amortisseurs •Montaje de los amortiguadores •Assemblaggio ammortizzatori50 020 5497 8x50 020 5527 8x50 020 5497 8x50 020 5497 8x50 020 5525 8xÖlOil50 020 5497 8xLeave 3 mm50 020 5497 16x20'Montage50 020 5525 8x50 020 5497 8x50 020 5497 8x8x50 020 552684<strong>CARSON</strong> <strong>Raptor</strong> <strong>Pro</strong> <strong>V25</strong>
8x8x50 020 5094 3 x 15 mm48 Stoßdämpfer Montage vorne •Assembly front shocks • Assemblageamortisseurs avants • Montaje de losamortiguadores delantero •Montaggio ammortizzatoridavanti50 020 509450 020 511250 020 57614x50 020 5112 3 x 40 mm50 020 512250 020 509450 001 144750 001 144750 020 50978x3.2 x 9 x50 020 5761 0.8 mm50 001 1447 4x49Stoßdämpfer Montage hinten • Assembly rear shocks • Assemblageamortisseurs arrières • Montaje de los50 001 1447amortiguadores trasero •Montaggio ammortizzatoridietro50 020 576150 020 5094Montage2x50 020 5097 4 x 8 mm50 020 51224x50 020 5101 2.5 x 8 mm50 020 509450 020 511250 020 511250 020 5101<strong>CARSON</strong> <strong>Raptor</strong> <strong>Pro</strong> <strong>V25</strong> 85
50AbdeckungRC-Box •Radio boxcover • Cachedu boîtier RC •Cubierta de la caja RC •Copertura box RC50 001 139250 020 504250 001 139250 001 1392 3x50 001 139251Montage1x50 020 5113 3 x 10 mmGas-/Bremsgestänge• Throttle/brakelinkage • Barre degaz et de freinage •Varillaje deaccelerador/freno •Collegamentiacceleratore/freno50 020 51139.5 mm86<strong>CARSON</strong> <strong>Raptor</strong> <strong>Pro</strong> <strong>V25</strong>
4x50 020 5114 4 x 7 x 1.5 mm52Tank • Fuel tank • Réservoir de carburant • Depósito de <strong>com</strong>bustible •Serbatoio50 020 511450 001 1392 2x50 001 139250 020 511453Montage Auspuff • Assembly exhaust • Assemblage pot d’échappement •Montaje escape • Montaggio scarico50 003 2437Montage50 020 503150 020 5031 1x1x50 020 5031 5 x 5 mm50 020 5031<strong>CARSON</strong> <strong>Raptor</strong> <strong>Pro</strong> <strong>V25</strong> 87
54Reifen • Tyres • Pneus • Neumático • Pneumatici50 090 8047 4x50 090 804750 090 0086Montage50 090 804788<strong>CARSON</strong> <strong>Raptor</strong> <strong>Pro</strong> <strong>V25</strong>
50 090 8060 4x55Montage Karosserie • Body assembly • Assemblage carrosserie • Montajecarrocería • Montaggio carrozzeria50 090 806050 090 8060Montage<strong>CARSON</strong> <strong>Raptor</strong> <strong>Pro</strong> <strong>V25</strong> 89
Schrauben •Screws • Vis •Tornillos • Viti50 020 5028 10x Mutter10x Nut50 020 5086 10x Schraube 3 x 20 mm10x Screw50 000 2147 2x Kugellager 5 x 10 x 4 mm2x Ball bearing50 020 5048 10x Schraube 4 x 8 mm10x Screw50 020 5087 10x Schraube 3 x 30 mm10x Screw50 000 2158 2x Kugellager 8 x 16 x 5 mm2x Ball bearing50 020 5050 10x Scheibe 3.2 x 9 x 0.8 mm10x Shim50 020 5089 10x Schraube 3 x 15 mm10x Screw50 001 1333 10x Madenschraube 3 x 3 mm10x Grub screw50 020 5070 10x Schraube 2 x 10 mm10x Screw50 020 5090 10x Schraube 3 x 20 mm10x Screw50 001 1341 10x Klemmring 3 x 7 x 0.6 mm10x Clamp ring50 020 5082 10x Scheibe 8.1 x 12.7 x 0.3 mm10x Shim50 020 5091 10x Schraube 3 x 23 mm10x Screw50 001 1447 10x Mutter10x Nut50 020 5083 10x Scheibe 4 x 7 x 1.5 mm10x Shim50 020 5092 10x Scheibe10x WasherSchrauben50 003 2437 10x Madenschraube 5 x 5 mm10x Grub screw50 020 5084 10x Schraube 3 x 15 mm10x Screw50 020 5093 10x Schraube 4 x 17 mm10x Screw50 003 2438 10x Madenschraube 4 x 4 mm10x Grub screw50 020 5085 10x Schraube 3 x 10 mm10x Screw50 020 5094 10x Schraube 3 x 15 mm10x Screw90<strong>CARSON</strong> <strong>Raptor</strong> <strong>Pro</strong> <strong>V25</strong>
50 020 5095 10x Schraube 3 x 25 mm10x Screw50 020 5104 10x Schraube 3 x 12 mm10x Screw50 020 5114 10x Kugellager 4 x 7 x 1.5 mm10x Ball bearing50 020 5096 10x Schraube 4 x 17 mm10x Screw50 020 5105 10x Schraube 3 x 25 mm10x Screw50 020 5761 Schrauben Set 1Screw set 110x4.1 x 8 x 0.8 mm10x5.3 x 7.5 x 0.3 mm50 020 5097 10x Schraube 4 x 8 mm10x Screw50 020 5107 10x Schraube 3 x 10 mm10x Screw10x3.2 x 9 x 0.8 mm10x5.1 x 9 x 0.5 mm50 020 5098 10x Schraube 3 x 14.5 mm10x Screw50 020 5108 10x Schraube 4 x 15 mm10x Screw10x3 x 8 x 0.5 mm10x7.15 x 12 x 0.5 mm50 020 5099 10x Schraube 3.5 x 10 mm10x Screw50 020 5109 10x Schraube 3 x 10 mm10x Screw50 020 5762 Schrauben Set 2Screw set 250 020 5100 10x Schraube 4 x 8 mm10x Screw50 020 5110 10x Schraube 3.5 x 15 mm10x Screw10x4 x 17 mm10x6 x 6 mm10x3 x 6 mm50 020 5101 10x Schraube 2.5 x 8 mm10x Screw50 020 5111 10x Schraube 2.5 x 10 mm10x Screw10x3 x 8 mmSchrauben50 020 5103 10x Klemmring 6.0 x 0.8 mm10x Clamp ring50 020 5113 10x Schraube 3 x 10 mm10x Screw<strong>CARSON</strong> <strong>Raptor</strong> <strong>Pro</strong> <strong>V25</strong> 91
ErsatzteileSpare PartsPièces détachéesRecambiosRicambi50 020 5000 KupplungsglockeClutch bell 18tooth50 020 5007 4x Gestänge4x Tie-rod50 020 5008 MotorböckeEngine mount50 020 5017 BremsscheibeBrake disk50 020 5018 2x Gelenkbolzen2x Hinge pin1x1x50 020 5001 KlemmringClamp ring50 020 5009 Antriebsknochen Mitte/vorneDog bone center front50 020 5019 2x Kurbelwelle2x Bell crank shaft50 020 5002 MutterPilot nut50 020 5010 Antriebsknochen Mitte/hintenDog bone center rear50 020 5020 2x Lenkhebel links/rechts2x Knuck arm left/right50 020 5003 3x Kupplungsfeder3x Clutch spring50 020 5011 Gestänge LenkungSteering tie-rod2x50 020 5004 3x Kupplungsbacken3x Clutch shoe50 020 5021 2x Bremsbelag2x Brake pad4xErsatzteile50 020 5005 SchwungradFly wheel50 020 5015 2x Lenkrollen2x Castor block50 020 5022 SlipperkupplungsmitnehmerSlipper clutch hub50 020 5006 5x Differenzial O-Ring5x Diff o-ring50 020 5016 Stahl BremssattelSteel brake caliper50 020 5023 Slipper-ScheibeSlipper metal plate2x2x92<strong>CARSON</strong> <strong>Raptor</strong> <strong>Pro</strong> <strong>V25</strong>
Continuation Spare Parts • Ersatzteile Fortsetzung • Continuation pièces détachées • Recambios (continuación) • Altri Ricambi50 020 5024 KupplungsscheibeSlipper pad50 020 5031 Auspuff SetExhaust set50 020 5035 Diff GehäuseDiff cover50 020 5025 5x Antriebswelle5x Drive shaft pin50 020 5026 KupplungsscheibenSlipper shims50 020 5036 2x Versteifung2x Arm brace50 020 5027 AntriebsritzelSpur gear50 020 5037 Schräges ZahnradBevel gear ring1x3x1x50 020 5028 Sicherungsmutter/Feder SetSlipper lock nut/spring set50 020 5032 Differenzial AntriebsmittnehmerDiff out drives50 020 5038 ZahnradBevel gear1x1x50 020 5029 KupplungsfedersetClutch spring set3x50 020 5033 5x Diff Getriebestifte5x Diff gear shaft50 020 5039 2x Mitnehmer2x Cup jointErsatzteile50 020 5030 Kupplungs SetClutch holder set50 020 5034 Diff Ritzel SetDiff gear set50 020 5040 Bremsnocke/StellkolbenBrake cam/piston set2x 4x 6x 4x<strong>CARSON</strong> <strong>Raptor</strong> <strong>Pro</strong> <strong>V25</strong> 93
Continuation Spare Parts • Ersatzteile Fortsetzung • Continuation pièces détachées • Recambios (continuación) • Altri Ricambi50 020 5041 RegelachsensetSteering rack set50 020 5045 4x Stift4x Pin50 020 5050 Servo Saver SetServo saver set2x1x50 020 5042 Radio Box SetRadio box set50 020 5046 8x Gestängeende8x Tie rod end long50 020 5047 2x Querlenker unten2x Lower arm50 020 5051 2x Spritzwandklammer2x Bulkhead brace1x50 020 5052 5x Stopper5x Stopper1x1x1x5x50 020 5053 GasgestängeThrottle linkage50 020 5043 2x Arm oben2x Upper arm50 020 5048 QuerlenkerträgerBulk head setErsatzteile50 020 5054 2x Dämpferbrücke2x Shock tower2x2x1x50 020 5044 2x Gelenkpfosten2x Joint post50 020 5049 BremspfostenBrake post94<strong>CARSON</strong> <strong>Raptor</strong> <strong>Pro</strong> <strong>V25</strong>
Continuation Spare Parts • Ersatzteile Fortsetzung • Continuation pièces détachées • Recambios (continuación) • Altri Ricambi50 020 5055 4x Gewindestange4x Tie rod50 020 5061 2-Gang_getriebeTwo speed gear box50 020 5056 8x Kugelkopf lang8x Ball end long50 020 5057 5x Kugelkopf kurz5x Ball end short50 020 5058 UnterbodenschutzFront and rear skid plate50 020 5062 2x Diff Abdeckung2x Diff cover50 020 5067 Zweiter GangSecond gear50 020 5063 AntriebsritzelDrive gear50 020 5068 Halterung 1. GangFirst gear holder50 020 5059 Versteifung StoßfängerBumper brace50 020 5064 AntriebswelleDrive shaft50 020 5069 SteuerhebelSteering bell cranks1x2x50 020 5060 AntriebswelleDog bone50 020 5065 5x Schraubwelle5x Screw shaft50 020 5070 Gas/Bremse GestängesetThrottle/brake linkage setErsatzteile4x4x4x2x3x1x50 020 5066 HauptzahnradFirst gear1x1x1x1x<strong>CARSON</strong> <strong>Raptor</strong> <strong>Pro</strong> <strong>V25</strong> 95
Continuation Spare Parts • Ersatzteile Fortsetzung • Continuation pièces détachées • Recambios (continuación) • Altri Ricambi50 020 5071 Auspuff Montage SetExhaust mounting set50 020 5075 LuftfiltersetAir filter kit50 020 5121 Motor MontagesetEngine mounting plate set1x1x1x50 020 5072 Tank SetFuel tank set1x50 020 5122 2x Karosseriehalter2x Body mount post2x1x1x50 020 5076 5x Schraubwelle5x Screw shaft50 020 5073 TankhalterungFuel tank mounting post50 020 5120 2x Aluminium Chassis2x Alum chassis50 020 5439 4x Mitnehmer 17 mm4x 17 mm Hex hub50 020 5074 2x Tragegriff2x Handle bar50 020 5445 2x Radachse2x Wheel axleErsatzteile50 020 5464 DämpferteileShock parts2x 2x 4x2x 2x 2x2x2x2x2x2x96<strong>CARSON</strong> <strong>Raptor</strong> <strong>Pro</strong> <strong>V25</strong>
Continuation Spare Parts • Ersatzteile Fortsetzung • Continuation pièces détachées • Recambios (continuación) • Altri Ricambi50 020 5526 2x Dämpferfeder hinten2x Rear shock spring50 020 5760 Center MitnehmerCenter outdrives50 090 3241 Silikon-BenzinschlauchFuel silicon tube50 020 5527 2x Dämpferschaft hinten2x Rear shock shaft50 060 8037 Empfängerakku 6 V/ 1100 mAhReceiver battery 6 V/ 1100 mAh50 090 8060 6x Splint6x Split-pin50 020 5709 2x Stoßdämpfer2x Damper50 090 8115 2x Antennenrohr schwarz2x Antenna pipe black50 020 5755 Karosserie RAPTOR <strong>Pro</strong> mit DekorRAPTOR <strong>Pro</strong> body with decals50 020 5758 UnterlegscheibeWasher50 090 0086 Reifenset 17 mmTyre set 17 mmErsatzteile50 020 5759 10x Klemmring10x Clamp ring<strong>CARSON</strong> <strong>Raptor</strong> <strong>Pro</strong> <strong>V25</strong> 97
Force 25R – 4,01 cm 3Motor • Motor • Moteur • Motor • MotoreArt.-Nr. 50 090 100950 005 447450 005 458250 005 453050 090 204950 005 458150 005 443650 005 462950 005 443550 090 200450 090 200550 090 200750 005 460050 005 466850 005 466750 005 466450 005 469050 005 469150 005 452650 090 201150 005 455050 005 464850 090 200650 005 453050 005 453650 005 447250 005 453650 005 449850 005 449950 005 452750 0900 205050 005 456750 005 456850 0900 200150 005 453750 090 205150 005 458450 005 454650 005 459450 090 2054Motor98<strong>CARSON</strong> <strong>Raptor</strong> <strong>Pro</strong> <strong>V25</strong>
4,01 cm 3 Motor • Motor • Moteur • Motor • Motore Art.-Nr. 50 090 1009Art.-Nr. Bezeichnung Description Description50 005 4435 Düsenstockdichtung unten Lower seal of nozzle case Bourrage de gicleur en bas50 005 4436 Düsenstockdichtung oben Upper seal of nozzle case Bourrage de gicleur superieur50 005 4472 Kolbenbolzen Piston gudgeon pin Axe de piston50 005 4474 Zylinderkopfschrauben Cylinder head bolt Vis de fix. Culasse 4p50 005 4498 Regulierungsabdeckung Throttle boot Couvercle du palonnier50 005 4499 Gestängeanschluss Throttle screw cap (brass) Levier de <strong>com</strong>mande50 005 4526 Gehäusedichtung hinten Rear packing for fuel mixture O-Ring de carter arrière50 005 4527 2x Vergaser O-Ringe 2x Supply needle valve „O“-ring set O-Ring du carburateur50 005 4530 Hauptdüsennadel O-Ring Main needle valve „O“-ring O-Ring du pointeau gicleur50 005 4536 2x Kolbensicherungsring 2x ”G”-pin snap ring set Prince de l´axe de piston50 005 4537 Kugellager 607Z Ball bearing 607Z Roulement à billes 607Z50 005 4546 4x Gehäusedeckelschr. M2,6 x 6 4x Rear cover bolt M2.6 x 6 4x Vis de fix. couvercle de carter50 005 4550 Klemmrollen-Freilauf One way bearing set Roue libre avec bague de fixation50 005 4567 Vergaser-Einspannstift Carburetor setting pin Vis de fix. carburateur50 005 4568 Klemmkonus Drive copper washer Cône50 005 4581 Düsenstock Main needle seat Gicleur50 005 4582 Hauptdüsennadel Main needle Pointeau gicleur50 005 4584 Kugellager 6901 13 x 24 x 6 mm Ball bearing 6901 - 13 mm Roulement à billes 690150 005 4594 Kurbelwelle OS Crankshaft OS Vilebrequin OS50 005 4600 Brennraum 25R Burn room Chambre de <strong>com</strong>bustion50 005 4629 Kraftstoffanschlussnippel Fuel nippel brass Conduite d´essence50 005 4648 Seilzugstarter A parts assembly for start engine Pièces „A“ du démarreur à tirette50 005 4664 Laufgarnitur komplett Cylinder sleeve/piston Corps de cylindre et piston50 005 4667 Zylinderkopfdichtung 0,2 mm Cylinder head washer 0,2 mm Joint de culasse50 005 4668 Zylinderkopfdichtung 0,1 mm Cylinder head washer 0.1 mm Joint de culasse50 005 4690 Druckfeder 7,2 x 2,4 mm Pressure spring 7.2 x 2.4 mm Ressort 7,5 x 2,4 mm50 005 4691 Starterzapfen 5,2 x 2,55 mm Starter pivot 5.2 x 2.55 mm Pivot starter 5,2 x 2,55 mm50 090 2001 Vergaser-Komplettset Carburetor <strong>com</strong>pletely cet Carburateur <strong>com</strong>plet50 090 2004 Vergaser-Gehäuse Carburetor Mmain body Corps de carburateur50 090 2005 Drossel-Kegelventil Throttle valve Tiroir50 090 2006 Drosselnadel Throttle needle (super/turbo) Pointeau de carburateur50 090 2007 Leerlauf-Einstellschraube Throttle stop adjustment screw Vis de réglage ralenti50 090 2011 Seilzugstarterteile mit Flansch Recoil start unit assembly 3.5 ccm Démarreur à tirette avec bride50 090 2049 Zylinderkopf blau lang Cylinder head blue Culasse bleu longue50 090 2050 Pleuel Connecting rod Bielle50 090 2051 Kurbelwellengehäuse Crankcase Carter du vilebrequin50 090 2054 Kurbelwelle SG Crankshaft SG Vilebrequin SGMotor<strong>CARSON</strong> <strong>Raptor</strong> <strong>Pro</strong> <strong>V25</strong> 99
For Germany:Service-Hotline:Mo - Do 8.00 – 17.00 UhrFr 8.00 – 14.30 Uhr<strong>CARSON</strong>-Model SportAbt. ServiceMittlere Motsch 996515 Sonneberg01805–73 33 0014 ct/min<strong>CARSON</strong>-MODEL SPORTWerkstraße 1 • D-90765 Fürth • Germany<strong>www</strong>.<strong>carson</strong>-<strong>modelsport</strong>.de