41884. Installazione IS 12-14-16-19.p65 - Mase Generators of North ...
41884. Installazione IS 12-14-16-19.p65 - Mase Generators of North ...
41884. Installazione IS 12-14-16-19.p65 - Mase Generators of North ...
- No tags were found...

Create successful ePaper yourself
Turn your PDF publications into a flip-book with our unique Google optimized e-Paper software.
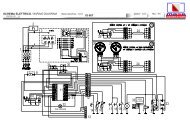
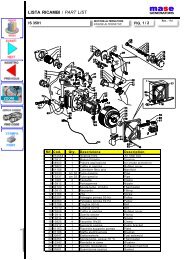
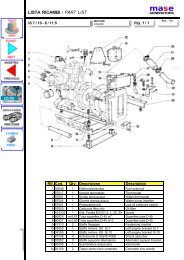
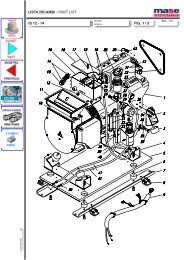
GENERATORSGB<strong>IS</strong> <strong>12</strong>-<strong>14</strong>-<strong>16</strong>-192 Prescriptions for safety during installation andsetup- The personnel in charge <strong>of</strong> installation and starting<strong>of</strong> the generator must always wear a protectivehelmet, safety shoes and overalls.- Use protective gloves.- Do not leave disassembled parts, tools or anythingelse not forming part <strong>of</strong> the system on or near theengine.- Never leave inflammable liquids or cloths soaked ininflammable liquids in proximity <strong>of</strong> the generator,near electric equipment (including lamps) or parts<strong>of</strong> the electrical system.- Take the necessary precautions to prevent thedanger <strong>of</strong> electrocution.- Check that the earthing system has been installedand constructed in accordance with regulations.3 INSTALLATION3.1 Characteristics <strong>of</strong> the installation spaceThe generator must be installed in a sufficiently airedspace, supplying a little amount <strong>of</strong> air necessary for thecombustion <strong>of</strong> the motor.The space must be separate and acoustically insulatedfrom living areas.The generator should be positioned so that normalmaintenance operations can easily be carried out.Propulsion motors are recommended for installation inthe area as long as they comply with the above-mentionedconditions.3.2 Fastening the unit to the groundTo fasten the unit securely, a base should be installed toabsorb vibrations and support the weight.Drill holes in the base according to the instructions infig.1.3.3 VentilationThe generator is equipped with an internal forced coolingsystem through a water/air exchanger.The air needed for combustion is taken in through theopening on the base (fig.2) so care must be taken toensure that this opening is always free.4 COOLING WATER CIRCUITThe engine is cooled by an closed circuit system heatexchanger.On installation a sea water feed circuit should be fitted forcooling and a waste system to expel the mixture <strong>of</strong> fluegas and water.4.1 Sea water feed systemBoats usually use one <strong>of</strong> two systems to collect water(fig. 3):1 - Direct infeed system2 - System with baffleMASE recommends the direct infeed system (ref.1 fig. 3)since this system prevents water under pressure enteringthe suction ducts and instead forms a pressure whichcan easily be overcome by the water pump <strong>of</strong> the electricgenerator.Do not apply any type <strong>of</strong> protectivehood to the direct infeed system.The baffle system might cause the following problems:a - If it is installed with the slots facing the prow.In this case, during navigation and with the electricgenerator <strong>of</strong>f, pressure is accumulated in the waterinfeed duct which might cause the system to fill up,even as far as the exhaust port, allowing water toenter the cylinders.b - If it is installed with the slots facing the stern.In this case a depression might accumulate in thewater infeed duct during navigation, preventing thewater pump from starting up the cooling plant, orlimiting the capacity and subsequently causing theelectric generator to overheat.4.2.1 Typical installation with generator above thewaterline (Fig.4)1 Sea exhaust2 Silencer3 Muffler4 Water filter5 Main system tap6 Sea intake7 Drain tapA - Pipes - inner diameter Ø45 mm.B - Pipes - inner diameter Ø25 mm.C - Pipes - inner diameter Ø20 mm.D - Pipes - inner diameter Ø<strong>16</strong> mm.- 17 -