Operating/Safety Instructions Consignes d'utilisation/de sécurité ...
Operating/Safety Instructions Consignes d'utilisation/de sécurité ...
Operating/Safety Instructions Consignes d'utilisation/de sécurité ...
- No tags were found...

You also want an ePaper? Increase the reach of your titles
YUMPU automatically turns print PDFs into web optimized ePapers that Google loves.
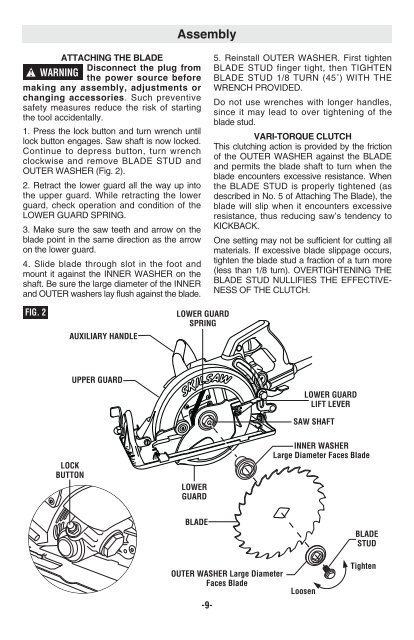
SM 1619X04759 11-12_SM 1619X04759 11-12.qxp 11/20/12 2:05 PM Page 9AssemblyATTACHING THE BLADE! WARNINGDisconnect the plug fromthe power source beforemaking any assembly, adjustments orchanging accessories. Such preventivesafety measures reduce the risk of startingthe tool acci<strong>de</strong>ntally.1. Press the lock button and turn wrench untillock button en gages. Saw shaft is now locked.Continue to <strong>de</strong>press button, turn wrenchclockwise and remove BLADE STUD andOUTER WASHER (Fig. 2).2. Retract the lower guard all the way up intothe upper guard. While retracting the lowerguard, check operation and condition of theLOWER GUARD SPRING.3. Make sure the saw teeth and arrow on thebla<strong>de</strong> point in the same direction as the arrowon the lower guard.4. Sli<strong>de</strong> bla<strong>de</strong> through slot in the foot andmount it against the INNER WASHER on theshaft. Be sure the large diameter of the INNERand OUTER washers lay flush against the bla<strong>de</strong>.5. Reinstall OUTER WASHER. First tightenBLADE STUD finger tight, then TIGHTENBLADE STUD 1/8 TURN (45˚) WITH THEWRENCH PROVIDED.Do not use wrenches with longer handles,since it may lead to over tightening of thebla<strong>de</strong> stud.VARI-TORQUE CLUTCHThis clutching action is provi<strong>de</strong>d by the frictionof the OUTER WASHER against the BLADEand permits the bla<strong>de</strong> shaft to turn when thebla<strong>de</strong> encounters excessive resistance. Whenthe BLADE STUD is properly tightened (as<strong>de</strong>scribed in No. 5 of Attaching The Bla<strong>de</strong>), thebla<strong>de</strong> will slip when it encounters ex cessiveresistance, thus reducing saw’s ten<strong>de</strong>ncy toKICKBACK.One setting may not be sufficient for cutting allmaterials. If ex cessive bla<strong>de</strong> slippage occurs,tighten the bla<strong>de</strong> stud a fraction of a turn more(less than 1/8 turn). OVERTIGHTENING THEBLADE STUD NULLIFIES THE EFFECTIVE-NESS OF THE CLUTCH.FIG. 2AUXILIARY HANDLELOWER GUARDSPRINGUPPER GUARD1/41/23/41XMBEROODLOWER GUARDLIFT LEVERSAW SHAFTLOCKBUTTONLOWERGUARDINNER WASHERLarge Diameter Faces Bla<strong>de</strong>BLADEBLADESTUDOUTER WASHER Large DiameterFaces Bla<strong>de</strong>-9-LoosenTighten