Uni-Troll 10 - Cannon Downriggers
Uni-Troll 10 - Cannon Downriggers
Uni-Troll 10 - Cannon Downriggers
- No tags were found...

You also want an ePaper? Increase the reach of your titles
YUMPU automatically turns print PDFs into web optimized ePapers that Google loves.
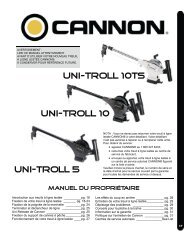
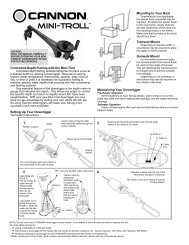
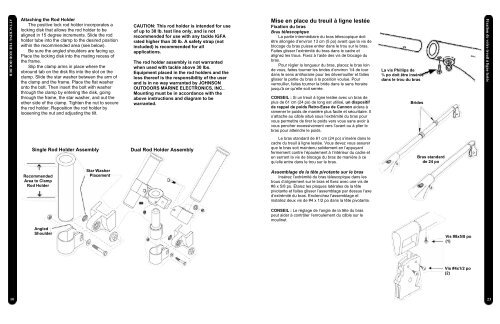
ATTACHING THE ROD HOLDERAttaching the Rod HolderThe positive lock rod holder incorporates alocking disk that allows the rod holder to bealigned in 15 degree increments. Slide the rodholder tube into the clamp to the desired positionwithin the recommended area (see below).Be sure the angled shoulders are facing up.Place the locking disk into the mating recess ofthe frame.Slip the clamp arms in place where theobround tab on the disk fits into the slot on theclamp. Slide the star washer between the arm ofthe clamp and the frame. Place the flat washeronto the bolt. Then insert the bolt with washerthrough the clamp by entering the disk, goingthrough the frame, the star washer, and out theother side of the clamp. Tighten the nut to securethe rod holder. Reposition the rod holder byloosening the nut and adjusting the tilt.CAUTION: This rod holder is intended for useof up to 30 lb. test line only, and is notrecommended for use with any tackle IGFArated higher than 30 lb. A safety strap (notincluded) is recommended for allapplications.The rod holder assembly is not warrantedwhen used with tackle above 30 lbs.Equipment placed in the rod holders and theloss thereof is the responsibility of the userand is in no way warranted by JOHNSONOUTDOORS MARINE ELECTRONICS, INC..Mounting must be in accordance with theabove instructions and diagram to bewarranted.Mise en place du treuil à ligne lestéeFixation du brasBras télescopiqueLa partie intermédiaire du bras télescopique doitêtre allongée d’environ 13 cm (5 po) avant que la vis deblocage du bras puisse entrer dans le trou sur le bras.Faites glisser l’extrémité du bras dans le cadre etalignez les trous. Fixez à l’aide des vis de blocage dubras.Pour régler la longueur du bras, placez le bras loinde vous, faites tourner les brides d’environ 1/4 de tourdans le sens antihoraire pour les déverrouiller et faitesglisser la partie du bras à la position voulue. Pourverrouiller, faites tourner la bride dans le sens horairejusqu’à ce qu’elle soit serrée.CONSEIL : Si un treuil à ligne lestée avec un bras deplus de 61 cm (24 po) de long est utilisé, un dispositifde rappel de poids Retro-Ease de <strong>Cannon</strong> aidera àramener le poids de manière plus facile et sécuritaire. Ils’attache au câble situé sous l’extrémité du bras pourvous permettre de tirer le poids vers vous sans avoir àvous pencher excessivement vers l’avant ou à plier lebras pour atteindre le poids.La vis Phillips de¾ po doit être inséréedans le trou du brasBridesFixation de votre treuil à ligne lestéeSingle Rod Holder AssemblyDual Rod Holder AssemblyLe bras standard de 61 cm (24 po) s’insère dans lecadre du treuil à ligne lestée. Vous devez vous assurerque le bras soit maintenu solidement en l’appuyantfermement contre l’épaulement à l’intérieur du cadre eten serrant la vis de blocage du bras de manière à cequ’elle entre dans le trou sur le bras.Bras standardde 24 poRecommendedArea to ClampRod HolderStar WasherPlacementAssemblage de la tête pivotante sur le brasInsérez l’extrémité du bras télescopique dans lestrous d’alignement sur le bras et fixez avec une vis de#8 x 5/8 po. Étalez les plaques latérales de la têtepivotante et faites glisser l’assemblage par dessus l’axed’extrémité du bras. Enclenchez l'assemblage etinstallez deux vis de #4 x 1/2 po dans la tête pivotante.CONSEIL : Le réglage de l’angle de la tête du braspeut aider à contrôler l’enroulement du câble sur lemoulinet.AngledShoulderVis #8x5/8 po(1)Vis #4x1/2 po(2)<strong>10</strong>23