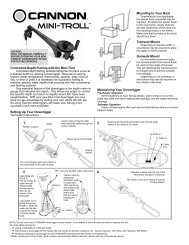
MOUNTING & SETUPDecks thinner than 1/4"Use a <strong>Cannon</strong> Deck Plate to preventdeflection and add stability to decks thinner than1/4". Use the deck plate as a template to mark thehole locations.If access to the underside of the deck is notavailable, the deck plate can be mounted usingscrews and wellnuts. Drill 1/2" holes. Use four1/4”-20 x 2" flat head screws and four wellnuts tomount deck plate as pictured. Tighten the screwsso the wellnuts are firmly compressed.Where the underside is accessible, mount thedeck plate using screws, nuts, and washers. Drill9/32" holes. Use four 1/4”-20 x 2" flat headscrews, nuts and washers (flat and lock). Fastenplate to deck as pictured. To secure the low-profilebase to the deckplate use four 1/4”-20 x 1 1/2"truss head screws.<strong>Cannon</strong> Deck PlateFonctionnement de votre treuil àligne lestéeAprès avoir installé le treuil à ligne lestée <strong>Cannon</strong>sur votre bateau, relâchez une longueur de ligne devotre canne à pêche et enroulez-la pour que le leurrese trouve à distance de 1,5 à 30 m (5 à <strong>10</strong>0 pi) dubateau. Ceci s’appelle une retombée.Attachez la ligne à pêche fermement dans ledéclencheur de ligne. Abaissez le poids à laprofondeur voulue, tel qu'indiqué sur le profondimètre.Placez la canne à pêche dans le support et embobinezla section lâche pour que votre canne à pêcheprésente une légère courbure. Lorsqu’un poissonmordra à l’hameçon, la ligne se séparera dudéclencheur. Vous serez alors libre de manipuler votrecanne à pêche pour capturer le poisson.Pour baisserle poidsFonctionnement de votre treuil à ligne lestéeDeck Up to 7/16" ThickWellnutBaseDeck Thicker Than 7/16"Washers, Screws,& NutsNOTE: When using the telescopic boom, we strongly recommend the use of a deck plate on allboats to provide adequate stability for the downrigger.Descente du poidsVous pouvez abaisser le poids pour la pêche àtraîne à une vitesse régulière en tournant doucementla poignée dans le sens antihoraire (dans le sensopposé au bras). En fonction de la manière dont voustournez la manivelle, vous pouvez faire descendre lepoids de pêche à la traîne aussi rapidement oulentement que vous voulez. Tournez la poignée de lamanivelle dans le sens horaire (vers le bras) jusqu'àentendre un déclic pour arrêter le poids. Vous pouvezainsi décider de laisser le poids descendre rapidementou lentement à une profondeur de la pêche à la traîneprédéterminée. Avec plusieurs treuils, vous pouvezfaire descendre tous les poids lentement, un à la fois,et ensuite les arrêter chacun à leur tour.Pour lever lepoidsFOR <strong>Uni</strong>-<strong>Troll</strong> <strong>10</strong> and <strong>Uni</strong>-<strong>Troll</strong> <strong>10</strong> TS:The Low-Profile Swivel Base mounting followsthe same procedure as for the deck plate exceptthat four 1/4"-20 x 1 1/2" truss head screws areused to fasten the mounting base and fouradditional 1/4"-20 x 2 1/2" truss head screws fix theswivel base to the boat deck.Mounting the Downrigger on the BaseSlide the bottom of the frame over the lip of thebase, with the boom outboard or facing the stern.Move the frame over the base until the latch clicksinto place. If properly seated, the frame shouldcompletely cover the base.CAUTION: If not fully seated, your downrigger canbe dislodged from the base.Tip: Periodically check base to ensure integrity. Thebase should be replaced at least every 5 years.Low-Profile Swivel BaseRemontée du poidsTournez la poignée de la manivelle dans le senshoraire (vers le bras) aussi rapidement que vous lesouhaitez pour remonter le poids.Réglage de la tension d'embrayageL'embrayage fait partie du mécanisme de lamanivelle. Tournez la poignée de la manivelle dans lesens horaire pour augmenter la traînée, et dans lesens antihoraire pour la diminuer.Avertissement : Retirez le poids du treuil avant denaviguer ou de le transporter dans une remorque.NOTA : si votre moulinet continue de glisser même sivous serrez solidement le bouton de réglage du frein,reportez-vous à la section de Dépistage desproblèmes dans ce livret.6Latch27
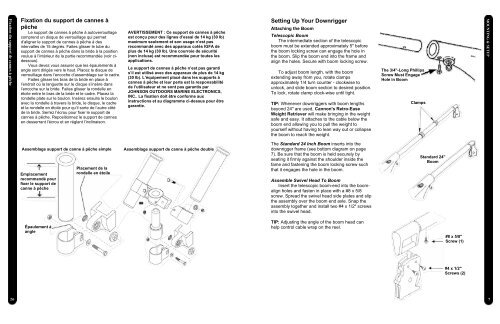
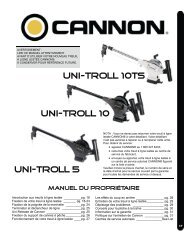
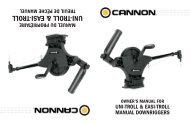
Fixation du support de cannes à pêcheFixation du support de cannes àpêcheLe support de cannes à pêche à autoverrouillagecomprend un disque de verrouillage qui permetd’aligner le support de cannes à pêche à desintervalles de 15 degrés. Faites glisser le tube dusupport de cannes à pêche dans la bride à la positionvoulue à l’intérieur de la partie recommandée (voir cidessous).Vous devez vous assurer que les épaulements àangle sont dirigés vers le haut. Placez le disque deverrouillage dans l’encoche d’assemblage sur le cadre.Faites glisser les bras de la bride en place àl’endroit où la languette sur le disque s’insère dansl’encoche sur la bride. Faites glisser la rondelle enétoile entre le bras de la bride et le cadre. Placez larondelle plate sur le boulon. Insérez ensuite le boulonavec la rondelle à travers la bride, le disque, le cadreet la rondelle en étoile pour qu’il sorte de l’autre côtéde la bride. Serrez l’écrou pour fixer le support decannes à pêche. Repositionnez le support de cannesen desserrant l’écrou et en réglant l’inclinaison.AVERTISSEMENT : Ce support de cannes à pêcheest conçu pour des lignes d’essai de 14 kg (30 lb)maximum seulement et son usage n’est pasrecommandé avec des apparaux cotés IGFA deplus de 14 kg (30 lb). Une courroie de sécurité(non incluse) est recommandée pour toutes lesapplications.Le support de cannes à pêche n’est pas garantis’il est utilisé avec des apparaux de plus de 14 kg(30 lb). L’équipement placé dans les supports àcannes à pêche et leur perte est la responsabilitéde l’utilisateur et ne sont pas garantis parJOHNSON OUTDOORS MARINE ELECTRONICS,INC.. La fixation doit être conforme auxinstructions et au diagramme ci-dessus pour êtregarantie.Setting Up Your DownriggerAttaching the BoomTelescopic BoomThe intermediate section of the telescopicboom must be extended approximately 5" beforethe boom locking screw can engage the hole inthe boom. Slip the boom end into the frame andalign the holes. Secure with boom locking screw.To adjust boom length, with the boomextending away from you, rotate clampsapproximately 1/4 turn counter - clockwise tounlock, and slide boom section to desired position.To lock, rotate clamp clock-wise until tight.TIP: Whenever downriggers with boom lengthsbeyond 24" are used, <strong>Cannon</strong>'s Retro-EaseWeight Retriever will make bringing in the weightsafe and easy. It attaches to the cable below theboom end allowing you to pull the weight toyourself without having to lean way out or collapsethe boom to reach the weight.The 3/4"-Long PhillipsScrew Must EngageHole in BoomClampsMOUNTING & SETUPAssemblage support de canne à pêche simpleEmplacementrecommandé pourfixer le support decanne à pêchePlacement de larondelle en étoileAssemblage support de canne à pêche doubleThe Standard 24 Inch Boom inserts into thedownrigger frame (see bottom diagram on page7). Be sure that the boom is held securely byseating it firmly against the shoulder inside thefame and fastening the boom locking screw suchthat it engages the hole in the boom.Assemble Swivel Head To BoomInsert the telescopic boom-end into the boomalignholes and fasten in place with a #8 x 5/8screw. Spread the swivel head side plates and slipthe assembly over the boom end axle. Snap theassembly together and install two #4 x 1/2" screwsinto the swivel head.Standard 24"BoomÉpaulement àangleTIP: Adjusting the angle of the boom head canhelp control cable wrap on the reel.#8 x 5/8"Screw (1)#4 x 1/2"Screws (2)267