
Create successful ePaper yourself
Turn your PDF publications into a flip-book with our unique Google optimized e-Paper software.
F<br />
D<br />
<strong>NL</strong><br />
D <strong>GB</strong><br />
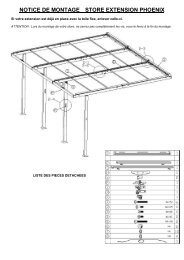
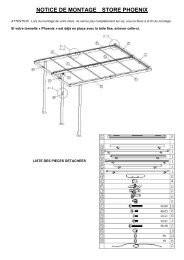
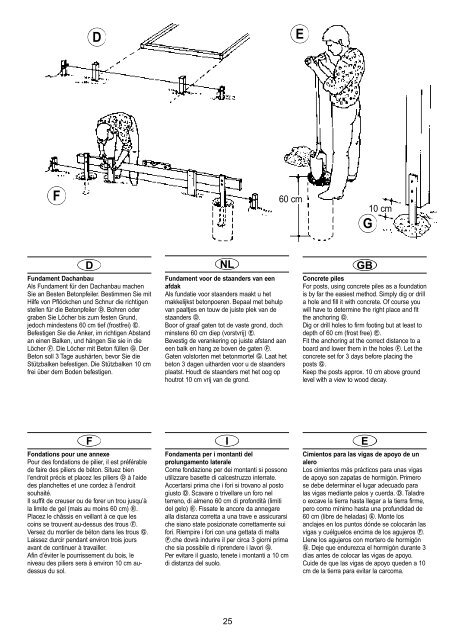
Fundament Dachanbau<br />
Als Fundament für den Dachanbau machen<br />
Sie an Besten Betonpfeiler. Bestimmen Sie mit<br />
Hilfe von Pflöckchen und Schnur die richtigen<br />
stellen für die Betonpfeiler �. Bohren oder<br />
graben Sie Löcher bis zum festen Grund,<br />
jedoch mindestens 60 cm tief (frostfrei) �.<br />
Befestigen Sie die Anker, im richtigen Abstand<br />
an einen Balken, und hängen Sie sie in die<br />
Löcher �. Die Löcher mit Beton füllen �. Der<br />
Beton soll 3 Tage aushärten, bevor Sie die<br />
Stützbalken befestigen. Die Stützbalken 10 cm<br />
frei über dem Boden befestigen.<br />
Fundament voor de staanders van een<br />
afdak<br />
Als fundatie voor staanders maakt u het<br />
makkelijkst betonpoeren. Bepaal met behulp<br />
van paaltjes en touw de juiste plek van de<br />
staanders �.<br />
Boor of graaf gaten tot de vaste grond, doch<br />
minstens 60 cm diep (vorstvrij) �.<br />
Bevestig de verankering op juiste afstand aan<br />
een balk en hang ze boven de gaten �.<br />
Gaten volstorten met betonmortel �. Laat het<br />
beton 3 dagen uitharden voor u de staanders<br />
plaatst. Houdt de staanders met het oog op<br />
houtrot 10 cm vrij van de grond.<br />
Concrete piles<br />
For posts, using concrete piles as a foundation<br />
is by far the easiest method. Simply dig or drill<br />
a hole and fill it with concrete. Of course you<br />
will have to determine the right place and fit<br />
the anchoring �.<br />
Dig or drill holes to firm footing but at least to<br />
depth of 60 cm (frost free) �.<br />
Fit the anchoring at the correct distance to a<br />
board and lower them in the holes �. Let the<br />
concrete set for 3 days before placing the<br />
posts �.<br />
Keep the posts approx. 10 cm above ground<br />
level with a view to wood decay.<br />
F I E<br />
Fondations pour une annexe<br />
Pour des fondations de pilier, il est préférable<br />
de faire des piliers de béton. Situez bien<br />
l’endroit précis et placez les piliers � à l’aide<br />
des planchettes et une cordez à l’endroit<br />
souhaité.<br />
Il suffit de creuser ou de forer un trou jusqu’à<br />
la limite de gel (mais au moins 60 cm) �.<br />
Placez le châssis en veillant à ce que les<br />
coins se trouvent au-dessus des trous �.<br />
Versez du mortier de béton dans les trous �.<br />
Laissez durcir pendant environ trois jours<br />
avant de continuer à travailler.<br />
Afin d’éviter le pourrissement du bois, le<br />
niveau des piliers sera à environ 10 cm audessus<br />
du sol.<br />
Fondamenta per i montanti del<br />
prolungamento laterale<br />
Come fondazione per dei montanti si possono<br />
utilizzare basette di calcestruzzo interrate.<br />
Accertarsi prima che i fori si trovano al posto<br />
giusto �. Scavare o trivellare un foro nel<br />
terreno, di almeno 60 cm di profondità (limiti<br />
del gelo) �. Fissate le ancore da annegare<br />
alla distanza corretta a una trave e assicurarsi<br />
che siano state posizionate correttamente sui<br />
fori. Riempire i fori con una gettata di malta<br />
�.che dovrà indurire il per circa 3 giorni prima<br />
che sia possibile di riprendere i lavori �.<br />
Per evitare il guasto, tenete i montanti a 10 cm<br />
di distanza del suolo.<br />
25<br />
E<br />
60 cm<br />
G<br />
10 cm<br />
Cimientos para las vigas de apoyo de un<br />
alero<br />
Los cimientos más prácticos para unas vigas<br />
de apoyo son zapatas de hormigón. Primero<br />
se debe determinar el lugar adecuado para<br />
las vigas mediante palos y cuerda. �. Taladre<br />
o excave la tierra hasta llegar a la tierra firme,<br />
pero como mínimo hasta una profundidad de<br />
60 cm (libre de heladas) �. Monte los<br />
anclajes en los puntos dónde se colocarán las<br />
vigas y cuélguelos encima de los agujeros �.<br />
Llene los agujeros con mortero de hormigón<br />
�. Deje que endurezca el hormigón durante 3<br />
días antes de colocar las vigas de apoyo.<br />
Cuide de que las vigas de apoyo queden a 10<br />
cm de la tierra para evitar la carcoma.