Register and win! KMR 1250 B - Kärcher
Register and win! KMR 1250 B - Kärcher
Register and win! KMR 1250 B - Kärcher

Create successful ePaper yourself
Turn your PDF publications into a flip-book with our unique Google optimized e-Paper software.
Remove the oil drain hose from the<br />
holder.<br />
Unscrew oil drain plug.<br />
Pull out oil dipstick.<br />
Drain off oil.<br />
Screw in the oil drain screw along with<br />
the new washer.<br />
Insert the oil drain hose in the holder.<br />
Fill engine oil in the opening of the oil<br />
dip stick.<br />
Oil grade: see Technical Data<br />
Insert the oil dip again.<br />
Wait at least 5 minutes.<br />
Check engine oil level.<br />
Cleaning <strong>and</strong> replacing the fuel filter<br />
Danger<br />
Never use petrol or cleaning solutions with low<br />
infllamation point to clean the filter inserts.<br />
Open the device hood.<br />
Unscrew <strong>win</strong>g nut.<br />
Remove the paper inlay <strong>and</strong> the foam<br />
inlay <strong>and</strong> check them.<br />
Insert cleaned or new inlays.<br />
Screw on <strong>win</strong>g nut.<br />
Paper inlay (1)<br />
Clean paper inlay or replace if too dirty.<br />
– Cleaning: Blow out the paper inlay from<br />
the inside using compressed air or<br />
knock it on a hard surface. Do not brush<br />
it off because the dirt will get pressed<br />
into the fiber.<br />
Foam insert (2)<br />
Clean foam insert.<br />
– Cleaning: Wash the foam insert in a solution<br />
made of household detergent <strong>and</strong><br />
warm water. Rinse the accessories <strong>and</strong><br />
let dry thoroughly. Then dip the insert in<br />
clean engine oil <strong>and</strong> press out excess<br />
oil. If there is too much oil in the insert,<br />
the motor will let out smoke during first<br />
start.<br />
24 EN<br />
Clean fuel filter cup<br />
Danger<br />
Risk of fire <strong>and</strong> explosion!<br />
– Smoking <strong>and</strong> naked flames are strictly<br />
prohibited.<br />
Set fuel valve to “OFF” (1).<br />
Add O-ring to the fuel filter cup (2).<br />
Do not wash the fuel cup with non-inflammable<br />
or flame-retarding solvents.<br />
Let dry thoroughly.<br />
Insert fuel filter cup <strong>and</strong> tighten.<br />
Set fuel valve to “ON”.<br />
Check for leaks.<br />
Check hydraulic unit<br />
Do visual inspection. Infom oil loss to<br />
hydraulic unit, cylinder or hoses to<br />
<strong>Kärcher</strong> Customer Service.<br />
Replacing side brush<br />
Park the sweeper on an even surface.<br />
The side-brushes lift up.<br />
Turn ignition key to "0" <strong>and</strong> remove it.<br />
Loosen the fastening screws.<br />
Remove the wiper blade.<br />
Fix in the new wiper blade.<br />
Checking roller brush<br />
Park the sweeper on an even surface.<br />
Raise roller brush.<br />
Turn ignition key to "0" <strong>and</strong> remove it.<br />
Secure the machine with wheel chock(s) to<br />
prevent it from rolling away.<br />
Lock parking brake.<br />
Remove belts or cords from roller brush.<br />
Replacing roller brush<br />
Replacement is due if a visible deterioration<br />
in sweeping performance caused by<br />
bristle wear is evident.<br />
Park the sweeper on an even surface.<br />
Lower roller brush.<br />
Turn ignition key to "0" <strong>and</strong> remove it.<br />
Secure the machine with wheel<br />
chock(s) to prevent it from rolling away.<br />
Lock parking brake.<br />
- 9<br />
Open right side-flap (1).<br />
Loosen the safety bolts at the lower end of<br />
the fork (2) <strong>and</strong> tilt the drawbar to the rear.<br />
Loosen knurled-head screw (3).<br />
Remove roller brush arm (4).<br />
Open roller brush flap (rotating lock) (5).<br />
Draw out the roller brush (6).<br />
Turn in the adjustment screw of the roller<br />
brush in clockwise direction (-) up to the<br />
stop.<br />
Assemble it back in the reverse sequence.<br />
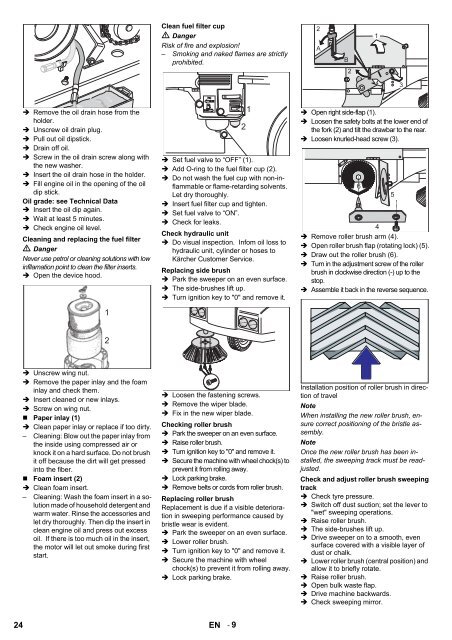
Installation position of roller brush in direction<br />
of travel<br />
Note<br />
When installing the new roller brush, ensure<br />
correct positioning of the bristle assembly.<br />
Note<br />
Once the new roller brush has been installed,<br />
the sweeping track must be readjusted.<br />
Check <strong>and</strong> adjust roller brush sweeping<br />
track<br />
Check tyre pressure.<br />
Switch off dust suction; set the lever to<br />
"wet" sweeping operations.<br />
Raise roller brush.<br />
The side-brushes lift up.<br />
Drive sweeper on to a smooth, even<br />
surface covered with a visible layer of<br />
dust or chalk.<br />
Lower roller brush (central position) <strong>and</strong><br />
allow it to briefly rotate.<br />
Raise roller brush.<br />
Open bulk waste flap.<br />
Drive machine backwards.<br />
Check sweeping mirror.