Register and win! KMR 1250 B - Kärcher
Register and win! KMR 1250 B - Kärcher
Register and win! KMR 1250 B - Kärcher

Create successful ePaper yourself
Turn your PDF publications into a flip-book with our unique Google optimized e-Paper software.
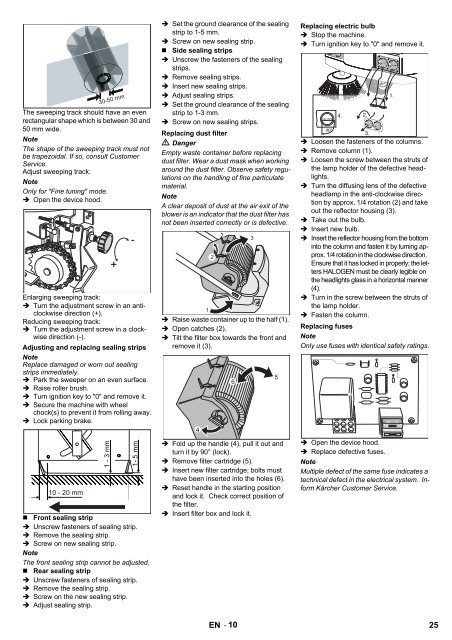
The sweeping track should have an even<br />
rectangular shape which is between 30 <strong>and</strong><br />
50 mm wide.<br />
Note<br />
The shape of the sweeping track must not<br />
be trapezoidal. If so, consult Customer<br />
Service.<br />
Adjust sweeping track:<br />
Note<br />
Only for "Fine tuning" mode.<br />
Open the device hood.<br />
Enlarging sweeping track:<br />
Turn the adjustment screw in an anticlockwise<br />
direction (+).<br />
Reducing sweeping track:<br />
Turn the adjustment screw in a clockwise<br />
direction (-).<br />
Adjusting <strong>and</strong> replacing sealing strips<br />
Note<br />
Replace damaged or worn out sealing<br />
strips immediately.<br />
Park the sweeper on an even surface.<br />
Raise roller brush.<br />
Turn ignition key to "0" <strong>and</strong> remove it.<br />
Secure the machine with wheel<br />
chock(s) to prevent it from rolling away.<br />
Lock parking brake.<br />
Front sealing strip<br />
Unscrew fasteners of sealing strip.<br />
Remove the sealing strip.<br />
Screw on new sealing strip.<br />
Note<br />
The front sealing strip cannot be adjusted.<br />
Rear sealing strip<br />
Unscrew fasteners of sealing strip.<br />
Remove the sealing strip.<br />
Screw on the new sealing strip.<br />
Adjust sealing strip.<br />
Set the ground clearance of the sealing<br />
strip to 1-5 mm.<br />
Screw on new sealing strip.<br />
Side sealing strips<br />
Unscrew the fasteners of the sealing<br />
strips.<br />
Remove sealing strips.<br />
Insert new sealing strips.<br />
Adjust sealing strips.<br />
Set the ground clearance of the sealing<br />
strip to 1-3 mm.<br />
Screw on new sealing strips.<br />
Replacing dust filter<br />
Danger<br />
Empty waste container before replacing<br />
dust filter. Wear a dust mask when working<br />
around the dust filter. Observe safety regulations<br />
on the h<strong>and</strong>ling of fine particulate<br />
material.<br />
Note<br />
A clear deposit of dust at the air exit of the<br />
blower is an indicator that the dust filter has<br />
not been inserted correctly or is defective.<br />
Raise waste container up to the half (1).<br />
Open catches (2).<br />
Tilt the filter box towards the front <strong>and</strong><br />
remove it (3).<br />
Fold up the h<strong>and</strong>le (4), pull it out <strong>and</strong><br />
turn it by 90° (lock).<br />
Remove filter cartridge (5).<br />
Insert new filter cartridge; bolts must<br />
have been inserted into the holes (6).<br />
Reset h<strong>and</strong>le in the starting position<br />
<strong>and</strong> lock it. Check correct position of<br />
the filter.<br />
Insert filter box <strong>and</strong> lock it.<br />
EN<br />
- 10<br />
Replacing electric bulb<br />
Stop the machine.<br />
Turn ignition key to "0" <strong>and</strong> remove it.<br />
Loosen the fasteners of the columns.<br />
Remove column (1).<br />
Loosen the screw between the struts of<br />
the lamp holder of the defective headlights.<br />
Turn the diffusing lens of the defective<br />
headlamp in the anti-clockwise direction<br />
by approx. 1/4 rotation (2) <strong>and</strong> take<br />
out the reflector housing (3).<br />
Take out the bulb.<br />
Insert new bulb.<br />
Insert the reflector housing from the bottom<br />
into the column <strong>and</strong> fasten it by turning approx.<br />
1/4 rotation in the clockwise direction.<br />
Ensure that it has locked in properly; the letters<br />
HALOGEN must be clearly legible on<br />
the headlights glass in a horizontal manner<br />
(4).<br />
Turn in the screw between the struts of<br />
the lamp holder.<br />
Fasten the column.<br />
Replacing fuses<br />
Note<br />
Only use fuses with identical safety ratings.<br />
Open the device hood.<br />
Replace defective fuses.<br />
Note<br />
Multiple defect of the same fuse indicates a<br />
technical defect in the electrical system. Inform<br />
<strong>Kärcher</strong> Customer Service.<br />
25