1 - ManageMyLife
1 - ManageMyLife
1 - ManageMyLife

You also want an ePaper? Increase the reach of your titles
YUMPU automatically turns print PDFs into web optimized ePapers that Google loves.
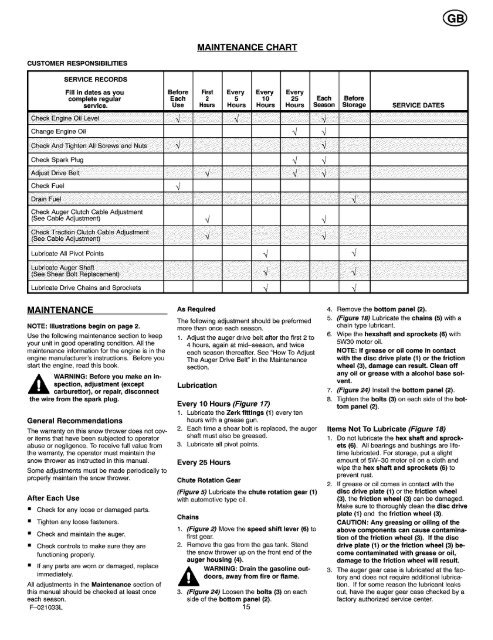
CUSTOMER RESPONSIBILITIES<br />
SERVICE RECORDS<br />
MAINTENANCE CHART<br />
Fill in dates as you Before First Every Every Every<br />
complete regular Each 2 5 10 25 Each Before<br />
service. Use Hours Hours Hours Hours Season Storage SERVICE DATES<br />
Change Engine Oil _/<br />
_i_,.<br />
Check Spark Plug _/<br />
Check Fuel<br />
Check Auger Clutch Cable Adjustment<br />
(See Cable Adjustment)<br />
Lubricate All Pivot Points 4 4<br />
ii_i' !#_!__i i¸ is° _i _m ¸_' ,1¸i ¸!i i¸¸ _i _'i ¸!i i_i_i ¸i¸¸ i_ i_iii_ ili¸¸_. i!! _ii _il ii_i i! i¸ii ¸!_ i!iili! ¸i_ _!i i!i i'll i!i _i!. _ii _ii_!i!i! i!i ¸!i !i_ ¸!! !i!i i¸ i_ ¸i! ¸ii _! !!_i ¸_ii_ii. ii!_ !i!_i!i !iil ¸i¸i_i !ii ,i i_ ii ¸!_i ii!_ i_!i !._i!i !i _ii_i i_i¸! i_i_ ¸_ !i. iii!il _i! !ii ii!!i ¸!i ii_i! ¸ii_! !_i i¸ii!!!_: !.!i¸i!!i!! i!_i i_i _i_i _i ¸i_i i!!if! ii!i i¸ '!i ¸i¸¸ i__!_ _i_i ¸i¸ !i_!i_iii _i¸!! _ii _il ii_i i! i¸ii ¸!_ i!iili! ¸i__!i ii !i i'll i!i _i !ii ¸i i¸ iilil i!ii ¸ii iil i:i ii!i iil ¸_!i i¸! il !i i¸_i !: ili _i¸i!i i:ii i_i¸i!i i:ii i_i¸ i!i i:ii i_i i¸i!i i:ii i_i¸i!i i:ii iiii!i i<br />
Lubricate Drive Chains end Sprockets _ _/<br />
MAINTENANCE<br />
NOTE: Illustrations begin on page 2.<br />
Use the following maintenance section to keep<br />
your unit in good operating condition. All the<br />
maintenance information for the engine is in the<br />
engine manufacturer's instructions. Before you<br />
start the engine, read this book.<br />
_k<br />
spection,<br />
ARNING:<br />
adjustment<br />
Before you<br />
(except<br />
make an in-<br />
carburettor), or repair, disconnect<br />
the wire from the spark plug.<br />
General Recommendations<br />
The warranty on this snow thrower does not cover<br />
items that have been subjected to operator<br />
abuse or negligence. To receive full value from<br />
the warranty, the operator must maintain the<br />
snow thrower as instructed in this manual.<br />
Some adjustments must be made periodically to<br />
propedy maintain the snow thrower.<br />
After Each Use<br />
• Check for any loose or damaged parts.<br />
• Tighten any loose fasteners.<br />
• Check end maintain the auger.<br />
• Check controls to make sure they ere<br />
functioning properly.<br />
• If any parts are worn or damaged, replace<br />
immediately.<br />
All adjustments in the Maintenance section of<br />
this manual should be checked at least once<br />
each season.<br />
F-021033L<br />
As Required<br />
The following adjustment should be preformed<br />
more than once each season.<br />
1. Adjust the auger drive belt after the first 2 to<br />
4 hours, again at mid-season, and twice<br />
each season thereafter. See "How To Adjust<br />
The Auger Drive Belt" in the Maintenance<br />
section.<br />
Lubrication<br />
Every 10 Hours (Figure 17)<br />
1, LubdcatetheZerkfittings (1) everyten<br />
hours with a grease gun.<br />
2. Each time a shear bolt is replaced, the auger<br />
shaft must also be greased.<br />
3. Lubricate ell pivot points.<br />
Every 25 Hours<br />
Chute Rotation Gear<br />
(Figure 5) Lubricate the chute rotation gear (1)<br />
with automotive type oil,<br />
Chains<br />
1, (Figure 2) Move the speed shift lever (6) to<br />
first gear.<br />
2, Remove the gas from the gas tank. Stand<br />
the snow thrower up on the front end of the<br />
auger housing (4).<br />
_k<br />
doors,<br />
ARNING:<br />
away<br />
Drain<br />
from<br />
the<br />
fire<br />
gasoline<br />
or flame.<br />
out-<br />
3, (Figure 24) Loosen the bolts (3) on each<br />
side of the bottom panel (2),<br />
15<br />
4, Remove the bottom panel (2).<br />
5, (Figure 18) Lubricate the chains (5) with a<br />
chain type lubricant.<br />
6, Wipe the hexshaft and sprockets (6) with<br />
5W30 motor oil,<br />
NOTE: If grease or oil come in contact<br />
with the disc drive plate (1) or the friction<br />
wheel (3), damage can result. Clean off<br />
any oil or grease with a alcohol base solvent.<br />
7, (Figure 24) Install the bottom panel (2).<br />
8, Tighten the bolts (3) on each side of the bottom<br />
panel (2).<br />
Items Not To Lubricate (Figure 18)<br />
1, De not lubricate the hex shaft and sprockets<br />
(6). All bearings and bushings are lifetime<br />
]ubdcated. For storage, put a slight<br />
amount of 5W-30 motor oil on a cloth and<br />
wipe the hex shaft and sprockets (6) to<br />
prevent rust.<br />
2. If grease or oil comes in contact with the<br />
disc drive plate (1) or the friction wheel<br />
(3), the friction wheel (3) can be damaged.<br />
Make sure to thoroughly clean the disc drive<br />
plate (1) and the friction wheel (3).<br />
CAUTION: Any greasing or oiling of the<br />
above components can cause contamination<br />
of the friction wheel (3). If the disc<br />
drive plate (1) or the friction wheel (3) become<br />
contaminated with grease or oil,<br />
damage to the friction wheel will result.<br />
3. The auger gear case is lubricated at the factory<br />
and does not require additional lubrication.<br />
If for some reason the lubricant leaks<br />
out, have the auger gear case checked by a<br />
factory authorized service center.