Mod. 1092 Sch./Ref./Typ/Ref. 1092/407
Mod. 1092 Sch./Ref./Typ/Ref. 1092/407
Mod. 1092 Sch./Ref./Typ/Ref. 1092/407

Create successful ePaper yourself
Turn your PDF publications into a flip-book with our unique Google optimized e-Paper software.
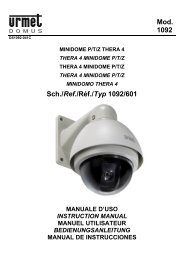
<strong>Mod</strong>.<br />
<strong>1092</strong><br />
DS<strong>1092</strong>-060<br />
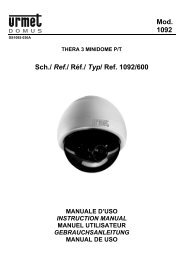
MONITOR COLORE LCD VGA 17”<br />
VGA LCD 17” COLOUR MONITOR<br />
FARBMONITOR 17”<br />
MONITOR COLOR DE 17” LCD VGA<br />
<strong>Sch</strong>./<strong>Ref</strong>./<strong>Typ</strong>/<strong>Ref</strong>. <strong>1092</strong>/<strong>407</strong><br />
MANUALE D’USO<br />
INSTRUCTIONS<br />
GEBRAUCHSANLEITUNG<br />
MANUAL DE INSTRUCCIONES
ITALIANO<br />
INDICE<br />
1 Informazioni generali ............................................................................................................................. 3<br />
1.1 Descrizione prodotto e tipo di impiego......................................................................................... 3<br />
1.1.1 Caratteristiche generali ........................................................................................................................ 3<br />
1.2 Apertura della confezione ............................................................................................................ 3<br />
1.2.1 Contenuto della confezione.................................................................................................................. 3<br />
1.3 Avvertenze ................................................................................................................................... 3<br />
1.3.1 Alimentazione....................................................................................................................................... 3<br />
1.3.2 Precauzioni per la sicurezza ................................................................................................................ 3<br />
1.3.3 Precauzioni per l’installazione .............................................................................................................. 4<br />
1.3.4 Pulizia del dispositivo ........................................................................................................................... 4<br />
1.3.5 Privacy e Copyright .............................................................................................................................. 4<br />
2 Comandi e regolazioni ........................................................................................................................... 5<br />
2.1 Controlli diretti .............................................................................................................................. 5<br />
2.2 Controlli con menu OSD .............................................................................................................. 6<br />
2.2.1 Colori.................................................................................................................................................... 7<br />
2.2.2 Immagine ............................................................................................................................................. 8<br />
2.2.3 Funzioni................................................................................................................................................ 9<br />
2.2.4 Impostazioni Menu ............................................................................................................................. 10<br />
2.2.5 Vari..................................................................................................................................................... 11<br />
3 Qualità dei monitor LCD e pixel .......................................................................................................... 12<br />
4 Specifiche prodotto.............................................................................................................................. 12<br />
DS<strong>1092</strong>-060 2
1 INFORMAZIONI GENERALI<br />
Caro Cliente,<br />
La ringraziamo dell’acquisto di questo prodotto.<br />
Il presente documento descrive come installare ed utilizzare il modello di Monitor LCD VGA 17” URMET Domus S.p.A.<br />
<strong>Sch</strong>.<strong>1092</strong>/<strong>407</strong>.<br />
Prima di usare l’apparecchiatura, leggere il presente manuale che ne descrive l’uso corretto e sicuro.<br />
Conservare questo manuale con attenzione ed in un luogo facilmente reperibile per poterlo consultare prontamente<br />
quando necessario.<br />
1.1 DESCRIZIONE PRODOTTO E TIPO DI IMPIEGO<br />
Il monitor a colori “LCD VGA” <strong>Sch</strong>.<strong>1092</strong>/<strong>407</strong> ha una struttura molto solida ed è progettato per funzionare in modo<br />
continuativo, per cui può essere impiegato in impianti a TV a circuito chiuso senza rischi di sovra-affaticamento.<br />
Il monitor a schermo piatto dispone di uno schermo a cristalli liquidi (liquid crystal display, LCD) a matrice attiva, con<br />
transistor a pellicola sottile (thin-film transistor, TFT).<br />
NOTA BENE<br />
Il prodotto URMET Domus S.p.A. <strong>Sch</strong>.<strong>1092</strong>/<strong>407</strong> è destinato ad impianti TVCC.<br />
1.1.1 CARATTERISTICHE GENERALI<br />
‣ Area visualizzabile 17”<br />
‣ Comandi frontali<br />
‣ Ingresso e cavo VGA<br />
‣ Ingresso audio su connettore Jack<br />
‣ Ampia inclinazione per consentire la visualizzazione da una posizione seduta o in piedi, o durante gli<br />
spostamenti da un lato all’altro<br />
‣ Menù OSD multilingua per facilitare l’impostazione e l’ottimizzazione della schermata<br />
‣ Dimensioni compatte<br />
1.2 APERTURA DELLA CONFEZIONE<br />
Verificare che l’imballo ed il contenuto non presentino danni visibili. Se alcune parti non sono presenti o risultano<br />
danneggiate, contattare immediatamente il rivenditore. In questi casi non tentare di utilizzare il dispositivo. Se il prodotto<br />
dovesse essere rimandato al fornitore, assicurarsi di spedirlo con il suo imballo originale.<br />
1.2.1 CONTENUTO DELLA CONFEZIONE<br />
‣ Monitor LCD<br />
‣ Alimentatore 12VCC; 4A<br />
‣ Cavo di alimentazione<br />
NOTA BENE<br />
La composizione degli accessori a corredo può essere variata senza alcun preavviso.<br />
1.3 AVVERTENZE<br />
1.3.1 ALIMENTAZIONE<br />
‣ Questo dispositivo deve essere alimentato esclusivamente con l’alimentatore fornito in dotazione. Verificare il<br />
valore della tensione di rete alla quale l’alimentatore dovrà essere collegato.<br />
‣ Per scollegare il cavo di alimentazione dalla presa impugnare la spina evitando di tirare il cavo.<br />
1.3.2 PRECAUZIONI PER LA SICUREZZA<br />
‣ Per prevenire il rischio di incendio e folgorazione evitare di esporre il dispositivo alla pioggia o all'umidità e di<br />
introdurre al suo interno qualsiasi oggetto solido o liquido. Se ciò dovesse avvenire scollegare il dispositivo dalla<br />
rete di alimentazione e farlo controllare da personale qualificato.<br />
‣ In nessun caso il dispositivo deve essere aperto. Per qualsiasi intervento di riparazione rivolgersi a personale<br />
qualificato oppure contattare il centro assistenza tecnico autorizzato.<br />
‣ Conservare questa apparecchiatura lontano dalla portata dei bambini; in caso contrario questi potrebbero<br />
danneggiarla, o danneggiarla accidentalmente.<br />
‣ Non toccare questa apparecchiatura con le mani bagnate per evitare scosse elettriche o danni meccanici.<br />
‣ Se l’apparecchiatura dovesse cadere o il contenitore esterno dovesse risultare danneggiato, cessarne l’utilizzo.<br />
Se si continuasse ad utilizzarla in queste condizioni, potrebbe essere provocata una scossa elettrica. In questo<br />
caso contattare il rivenditore, o l’installatore autorizzato.<br />
‣ Si consiglia di scollegare il cavo di alimentazione qualora il monitor non dovesse essere utilizzato per parecchio<br />
tempo.<br />
DS<strong>1092</strong>-060 3
1.3.3 PRECAUZIONI PER L’INSTALLAZIONE<br />
‣ Per prevenire il surriscaldamento del dispositivo, collocarlo in una posizione che permetta il passaggio dell'aria<br />
attraverso i fori previsti sullo chassis. Nel caso di installazione all’interno di un rack, assicurarsi che vi siano<br />
almeno 5 cm di spazio libero. Per lo stesso motivo non deve essere installato vicino a fonti di calore come<br />
radiatori o condotti d'aria calda o in posizioni dove sia esposto direttamente all’irradiazione solare, così come<br />
non deve essere installato in locali soggetti a eccessiva polvere, vibrazioni meccaniche o urti.<br />
‣ Non posizionare questa apparecchiatura su alcuna superficie instabile come un tavolo traballante o inclinato. In<br />
caso contrario l’apparecchiatura potrebbe cadere con conseguenti lesioni o guasti meccanici.<br />
‣ Non installare questa apparecchiatura in alcun luogo dove possa essere esposta a umidità o acqua. Non<br />
bagnarla con un getto d’acqua diretto per evitare la possibilità di incendio, scosse elettriche o guasto<br />
meccanico.<br />
‣ Se all’interno dell’apparecchiatura dovesse penetrare acqua o qualche altro materiale estraneo cessarne<br />
l’utilizzo al fine di evitare la possibilità di incendio e scosse elettriche. In questo caso contattare il rivenditore, o<br />
l’installatore autorizzato.<br />
‣ Non posare sul dispositivo oggetti pesanti o che generino calore, dato che ciò può danneggiare il mobile o far<br />
aumentare la temperatura interna, causando anomalie di funzionamento.<br />
‣ Le feritoie e le aperture del monitor servono per la ventilazione e non devono essere ostruite o coperte.<br />
‣ Non usare questa apparecchiatura in ambienti con presenza di fumo, vapore, umidità, polvere, o vibrazioni<br />
intense.<br />
‣ Non mettere in funzione il dispositivo immediatamente dopo il trasporto da un luogo freddo ad un luogo caldo e<br />
viceversa. Attendere mediamente tre ore: questo intervallo di tempo è necessario al dispositivo per adattarsi al<br />
nuovo ambiente (temperatura, umidità, ecc... ).<br />
‣ Il monitor è dotato di una base in plastica con piedini in gomma e può essere posizionato su una superficie<br />
orizzontale come una scrivania o un tavolo. Accertarsi che l’apparecchio sia fissato in maniera solida ed<br />
affidabile e non poggi su supporti o superfici instabili; un’eventuale caduta potrebbe causare seri danni a<br />
persone e all’apparecchiatura stessa.<br />
‣ Ricordarsi di regolare i comandi di luminosità e contrasto per ottenere la migliore immagine.<br />
‣ Il monitor può essere anche installato a parete mediante una staffa (non fornita a corredo).<br />
1.3.4 PULIZIA DEL DISPOSITIVO<br />
‣ Usare un panno asciutto e strofinare leggermente per eliminare polvere e sporcizia.<br />
‣ Nel caso in cui la sporcizia non fosse eliminabile con un panno asciutto, compiere l’operazione con un panno<br />
inumidito con detergente neutro.<br />
‣ Non usare liquidi volatili come benzina, alcool, solventi ecc. o panni trattati chimicamente per pulire il dispositivo<br />
al fine di evitare deformazioni, deterioramenti o graffi della finitura della vernice.<br />
1.3.5 PRIVACY E COPYRIGHT<br />
‣ Il monitor LCD <strong>Sch</strong>.<strong>1092</strong>/<strong>407</strong> è un dispositivo per sistemi TVCC. La registrazione delle immagini è subordinata<br />
alle leggi vigenti nel paese di utilizzo. È inoltre vietata la registrazione di immagini protette da Copyright.<br />
‣ Gli utenti del prodotto sono responsabili per il controllo ed il rispetto di tutte le norme e gli statuti locali relativi al<br />
monitoraggio e alla registrazione di segnali video. Il produttore NON potrà essere ritenuto responsabile per un<br />
utilizzo di questo prodotto che non sia in conformità con le norme in vigore. Per maggiori informazioni<br />
consultare l’indirizzo web http://www.garanteprivacy.it<br />
DS<strong>1092</strong>-060 4
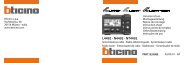
2 COMANDI E REGOLAZIONI<br />
6 7 8<br />
2 4 5 1 5 3<br />
2.1 CONTROLLI DIRETTI<br />
CONNETTORE D’ALIMENTAZIONE (DC) [6]<br />
Connettere il cavo d’alimentazione dell’adattatore in dotazione nel rispettivo connettore DC.<br />
TASTO ACCENSIONE/SPEGNIMENTO [1]<br />
Consente l’accensione/spegnimento del monitor. L’illuminazione del led verde (2) indica lo stato d’accensione.<br />
NOTA BENE<br />
‣ Se dopo aver premuto il tasto (1) sul monitor dovesse apparire il seguente messaggio:<br />
NO SIGNAL<br />
con accensione del led rosso (2), significa che non è disponibile alcun segnale video.<br />
TASTO REGOLAZIONE AUTOMATICA (AUTO) [3]<br />
Consente la regolazione automatica di tutte le impostazioni video.<br />
TASTO MENU [4]<br />
Consente l’accesso e l’uscita dal menu OSD (On Screen Display).<br />
TASTI DI REGOLAZIONE (UP-DOWN) [5]<br />
Consentono la regolazione delle funzioni di controllo.<br />
Premere il tasto “UP” o “DOWN” per diminuire o aumentare il valore del parametro.<br />
INGRESSO VIDEO VGA [7]<br />
Questo cavo permette la connessione VGA all’apparato da collegare.<br />
INGRESSO AUDIO [8]<br />
Questo ingresso a jack permette la connessione di un segnale audio.<br />
DS<strong>1092</strong>-060 5
2.2 CONTROLLI CON MENU OSD<br />
Tramite la pressione del tasto (4) è possibile accedere ai menù e sottomenù d’impostazione, definendo le funzioni di<br />
controllo.<br />
Premendo il tasto (4), apparirà la seguente videata.<br />
1280 X 1024 60HZ<br />
Colori Contrasto 55 - ■■■■■■■█■■■ +<br />
Immagine Luminosità 35 - ■■■■█■■■■■■ +<br />
Funzione Temp. Colore 9300 6500 User<br />
OSD Menu<br />
Vari<br />
Uscita<br />
Uscita<br />
Procedura<br />
‣ Per selezionare i diversi menù e sottomenù d’impostazione utilizzare i tasti “UP” e “DOWN” e premere “MENU” per<br />
confermare.<br />
‣ Effettuare la regolazione mediante la pressione dei tasti “UP” e “DOWN”.<br />
‣ Per uscire dal menù o dai sottomenù premere il tasto “AUTO”.<br />
DS<strong>1092</strong>-060 6
2.2.1 COLORI<br />
Selezionando il primo menu e premendo il tasto “MENU” per confermare apparirà la seguente videata:<br />
1280 X 1024 60HZ<br />
Colori Contrasto 55 - ■■■■■■■█■■■ +<br />
Immagine Luminosità 35 - ■■■■█■■■■■■ +<br />
Funzione Temp. Colore 9300 6500 User<br />
OSD Menu<br />
Vari<br />
Uscita<br />
Uscita<br />
CONTRASTO<br />
Consente di modificare il contrasto tra le parti bianche e quelle nere dell'immagine. Regolando<br />
correttamente il contrasto è possibile ottenere una chiara risoluzione delle gradazioni bianche, nere e<br />
grigie. Premere il tasto “UP” per aumentare ed il tasto “DOWN” per diminuire il valore del parametro.<br />
LUMINOSITÀ<br />
Consente di variare la luminosità dell’immagine in funzione della luce ambientale. Premere il tasto “UP”<br />
per aumentare ed il tasto “DOWN” per diminuire il valore del parametro.<br />
TEMP. COLORE<br />
Consente di regolare l’intensità del colore. Premere i tasti “UP” e “DOWN” per selezionare il valore<br />
desiderato.<br />
REGOLAZ. COLORE<br />
Consente di entrare nel sottomenu di regolazione di ciascun colore.<br />
DS<strong>1092</strong>-060 7
2.2.2 IMMAGINE<br />
Selezionando il secondo menu e premendo il tasto “MENU” per confermare apparirà la seguente videata.<br />
1280 X 1024 60HZ<br />
Colori Posiz - H 55 - ■■■■■■■█■■■ +<br />
Immagine Posiz - V 35 - ■■■■█■■■■■■ +<br />
Funzione Fase 35 - ■■■■█■■■■■■ +<br />
OSD Menu Clock 35 - ■■■■█■■■■■■ +<br />
Vari Nitidezza 1 2 3 4 5<br />
Uscita<br />
Uscita<br />
POSIZ-H<br />
Consente di variare la posizione orizzontale dell’immagine ripresa sullo schermo. Premere il tasto “UP” per<br />
spostare l’immagine verso destra ed il tasto “DOWN” per spostare l’immagine verso sinistra.<br />
POSIZ-V<br />
Consente di variare la posizione verticale dell’immagine ripresa sullo schermo. Premere il tasto “UP” per<br />
spostare l’immagine verso l’alto ed il tasto “DOWN”spostare l’immagine verso il basso.<br />
FASE<br />
Consente di minimizzare le componenti di distorsione e instabilità del video. Premere il tasto “UP” per<br />
aumentare ed il tasto “DOWN” per diminuire il valore del parametro<br />
CLOCK<br />
Consente di minimizzare le componenti di barre o strisce verticali presenti a video. Premere il tasto “UP”<br />
per aumentare ed il tasto “DOWN” per diminuire il valore del parametro<br />
NITIDEZZA<br />
Consente di ottimizzare i parametri di nitidezza dell’immagine. Selezionare un valore tra 1 e 5.<br />
DS<strong>1092</strong>-060 8
2.2.3 FUNZIONI<br />
Selezionando il terzo menu e premendo il tasto “MENU” per confermare apparirà la seguente videata.<br />
1280 X 1024 60HZ<br />
Colori Auto Regol SI NO<br />
Immagine Auto Colore SI NO<br />
Funzione<br />
Uscita<br />
OSD Menu<br />
Vari<br />
Uscita<br />
AUTO REGOL.<br />
Consente di variare automaticamente le regolazioni delle impostazioni video. Premere il tasto “UP” per aumentare<br />
ed il tasto “DOWN” per diminuire il valore del parametro.<br />
AUTO COLORE<br />
Consente di variare automaticamente le regolazioni delle impostazioni dei colori. Premere il tasto “UP” per<br />
aumentare ed il tasto “DOWN” per diminuire il valore del parametro.<br />
DS<strong>1092</strong>-060 9
2.2.4 IMPOSTAZIONI MENU<br />
Selezionando il quarto menu e premendo il tasto “MENU” per confermare apparirà la seguente videata.<br />
1280 X 1024 60HZ<br />
Colori<br />
Lingua<br />
Immagine OSD H Pos 35 - ■■■■█■■■■■■ +<br />
Funzione OSD V Pos 35 - ■■■■█■■■■■■ +<br />
OSD Menu OSD Timer SI NO<br />
Vari<br />
Uscita<br />
Uscita<br />
LINGUA<br />
Consente di selezionare la lingua d’uso del menu OSD. Premere i tasti “UP” e “DOWN” per selezionare la lingua da<br />
utilizzare.<br />
OSD H Pos.<br />
Consente di posizionare orizzontalmente la finestra del menu OSD. Premere il tasto “UP” per spostare il menu<br />
verso sinistra ed il tasto “DOWN” per spostare il menu verso destra.<br />
OSD V Pos.<br />
Consente di posizionare verticalmente la finestra del menu OSD. Premere il tasto “UP” per spostare il menu verso<br />
l’alto ed il tasto “DOWN” per spostare il menu verso il basso.<br />
OSD Timer<br />
Consente di determinare se il menu OSD deve scomparire automaticamente (valore “ON”) o rimanere a schermo<br />
(valore “OFF”) sino a che non viene premuto il tasto “AUTO”. Premere i tasti “UP” e “DOWN” per selezionare<br />
l’opzione desiderata.<br />
DS<strong>1092</strong>-060 10
2.2.5 VARI<br />
Selezionando il quinto menu e premendo il tasto “MENU” per confermare apparirà la seguente videata.<br />
1280 X 1024 60HZ<br />
Colori Risoluzione 640 X 400 720 X 400<br />
Immagine Reset SI NO<br />
Funzione Volume 35 - ■■■■█■■■■■■ +<br />
OSD Menu<br />
Uscita<br />
Vari<br />
Uscita<br />
RISOLUZIONE<br />
Menu non applicabile. La risoluzione utilizzata viene determinata dal dispositivo collegato. Le risoluzioni compatibili<br />
con questo monitor sono: 640x480, 800x600, 1024x768 e 1280x1024.<br />
RESET<br />
Consente di caricare i valori di fabbrica del monitor.<br />
VOLUME<br />
Consente di regolare il livello audio.<br />
Premere il tasto “UP” per aumentare ed il tasto “DOWN” per diminuire il valore del parametro.<br />
DS<strong>1092</strong>-060 11
3 QUALITÀ DEI MONITOR LCD E PIXEL<br />
I monitor TFT (thin-film transistor, con transistor a pellicola sottile) a matrice attiva utilizzano una tecnologia ad alta<br />
precisione, conforme agli standard Urmet, in grado di garantire prestazioni esenti da disturbi.<br />
Tuttavia, lo schermo potrebbe presentare piccole imperfezioni di carattere estetico, come ad esempio punti neri o<br />
brillanti. Si tratta di una accezione comune, connessa con la natura specifica della tecnologia TFT, che determina<br />
l’eventuale presenza di discontinuità sullo schermo e non specifica di Urmet.<br />
Le imperfezioni sono provocate da uno o più pixel o sub-pixel difettosi.<br />
‣ Un pixel è costituito da un sub-pixel rosso, uno verde e uno blu.<br />
‣ Un pixel intero difettoso è sempre acceso (un punto luminoso su uno sfondo scuro), oppure è sempre spento (un<br />
punto scuro su uno sfondo luminoso).<br />
‣ Un sub-pixel difettoso (dot defect) è meno visibile di quanto non sia un pixel intero difettoso, ed è visibile solo su<br />
uno sfondo specifico.<br />
Urmet assicura che i suoi monitor LCD sono conformi agli standard di qualità vigenti, e garantisce dunque non più di:<br />
‣ 2 punti (dot) luminosi.<br />
‣ 1 punto scuro.<br />
‣ 3 punti luminosi e scuri in totale.<br />
Urmet si aspetta, col tempo, di continuare a migliorare la qualità dei display a cristalli liquidi con un numero sempre<br />
inferiore di imperfezioni estetiche.<br />
La presente comunicazione informa il Cliente Urmet relativamente allo standard qualitativo dei display LCD al fine di<br />
rendere un servizio il più trasparente possibile.<br />
4 SPECIFICHE PRODOTTO<br />
LCD Display: .............................................................................................................................................................17” TFT<br />
Tempo di risposta:..........................................................................................................................................................8 ms<br />
Risoluzione massima: ........................................................................................................................................1280 x 1024<br />
Pixel: ................................................................................................................................................................0.264 x 0.264<br />
Visualizzazione colori:......................................................................................................................................... 16.7 milioni<br />
Rapporto di contrasto:.................................................................................................................................................. 500:1<br />
Luminosità:............................................................................................................................................................ 400 cd/m 2<br />
Frequenza orizzontale:........................................................................................................................................31÷65 kHz<br />
Velocità di refresh verticale: ................................................................................................................................. 56÷75 Hz<br />
Angolo di visuale: .......................................................................................................................... …………140° orizzontale<br />
.............................................................................................................................................................……….120° verticale<br />
Ingressi audio:................................................................................................................................................................Jack<br />
Adattatore di alimentazione:....................................................................................... AC Input: 100/240 V ~ 1.0A, 50/60Hz<br />
................................................................................................................................................................DC Output: 12V/4A<br />
Temperatura di funzionamento: .........................................................................................................................0°C÷+40°C<br />
Temperatura di immagazzinamento:.............................................................................................................. -25°C÷+60°C<br />
Controlli pannello frontale:....................................................................................... On/Off - Menù OSD - Tasti di selezione<br />
Comandi OSD: ......................................................Impostazioni di visualizzazione - Impostazioni varie - Impostazioni OSD<br />
Umidità:................................................................................................................10%/90% Senza formazione di condensa<br />
Dimensioni (lung. x larg. x prof.):...........................................................................................................380 x 380 x 190 mm<br />
Peso netto: ..................................................................................................................................................................5.8 Kg<br />
Uscite audio: ....................................................................................................................................... 2 altoparlanti – 2,5 W<br />
NOTA BENE<br />
Le caratteristiche tecniche possono essere soggette a variazione senza alcun preavviso.<br />
DS<strong>1092</strong>-060 12
ENGLISH<br />
TABLE OF CONTENTS<br />
1 General information ............................................................................................................................. 14<br />
1.1 Product description and type of use .......................................................................................... 14<br />
1.1.1 General features ................................................................................................................................14<br />
1.2 Opening the box......................................................................................................................... 14<br />
1.2.1 Contents of the box ............................................................................................................................ 14<br />
1.3 Warnings.................................................................................................................................... 14<br />
1.3.1 Power ................................................................................................................................................. 14<br />
1.3.2 Safety precautions ............................................................................................................................. 14<br />
1.3.3 Installation precautions....................................................................................................................... 15<br />
1.3.4 Cleaning the device............................................................................................................................ 15<br />
1.3.5 Privacy and copyright ......................................................................................................................... 15<br />
2 Controls and settings .......................................................................................................................... 16<br />
2.1 Direct controls ............................................................................................................................ 16<br />
2.2 OSD CCTV menu controls......................................................................................................... 17<br />
2.2.1 Colour................................................................................................................................................. 18<br />
2.2.2 Image setting...................................................................................................................................... 18<br />
2.2.3 Function ............................................................................................................................................. 19<br />
2.2.4 OSD menu ......................................................................................................................................... 19<br />
2.2.5 Misc.................................................................................................................................................... 20<br />
3 LCD monitor quality and pixel ............................................................................................................ 21<br />
4 Product specifications......................................................................................................................... 21<br />
DS<strong>1092</strong>-060 13
1 GENERAL INFORMATION<br />
Dear Customer,<br />
Thank you for having purchased this Urmet product.<br />
This document describes how to install and use the URMET Domus LCD 17” colour monitor ref. <strong>1092</strong>/<strong>407</strong>.<br />
Read this manual which contains information for correct, safe use carefully.<br />
Keep this manual at hand so that you can refer to it when needed.<br />
1.1 PRODUCT DESCRIPTION AND TYPE OF USE<br />
The LCD colour monitor <strong>1092</strong>/<strong>407</strong> presents a very rugged structure. It is designed for continuous operation and can be<br />
used in closed circuit TV systems without risks of excessive fatigue.<br />
The Flat Panel Display has an active matrix, thin-film transistor (TFT), liquid crystal display (LCD).<br />
IMPORTANT NOTE<br />
URMET Domus <strong>Ref</strong>.<strong>1092</strong>/417 is a product intended for use in CCTV systems.<br />
1.1.1 GENERAL FEATURES<br />
‣ 17” display area<br />
‣ Front control panel<br />
‣ VGA input and cable<br />
‣ Audio input on Jack connector<br />
‣ Wide inclination to allow viewing either from a seated position or standing up and when moving from one<br />
position to the other<br />
‣ Multilingual OSD menu for easy setting and optimisation of the display<br />
‣ Compact size<br />
1.2 OPENING THE BOX<br />
Check that the packing and the contents are not visibly damaged. Contact the retailer immediately if parts are either<br />
missing or damaged. Do not attempt to use the device in this case. Send the product back in its original packing if it is<br />
damaged.<br />
1.2.1 CONTENTS OF THE BOX<br />
‣ LCD monitor<br />
‣ Power unit 12VDC; 4A<br />
‣ Power cable<br />
IMPORTANT NOTE<br />
Accessories may be changed without prior notice.<br />
1.3 WARNINGS<br />
1.3.1 POWER<br />
‣ Only use the power unit provided to power the device. Check mains rating before plugging the power unit in.<br />
‣ Do not pull the cable to unplug the device.<br />
1.3.2 SAFETY PRECAUTIONS<br />
‣ Keep the device away from rain and humidity to prevent risk of fire and electrocution. Do not introduce material<br />
(solid or liquid) inside. If this should accidentally occur, disconnect the device from the mains and have it<br />
inspected by qualified personnel.<br />
‣ Never open the device. In all cases, contact a qualified personnel or authorised service centre for repairs.<br />
‣ Keep the device away from children, to prevent accidental damage.<br />
‣ Do not touch the device with wet hands to prevent electrical shock or mechanical damage.<br />
‣ Do not use the device if it should fall or the external casing is damaged. Risk of electrocution if the device is<br />
used in such conditions. Contact the retailer or authorised installer.<br />
‣ It is advisable to disconnect the power wire if the monitor is not used for a certain time.<br />
DS<strong>1092</strong>-060 14
1.3.3 INSTALLATION PRECAUTIONS<br />
‣ To prevent overheating the device, arrange it in a position allowing the flow of air through the slots in the casing.<br />
Ensure at least 5 cm of free space when installing inside a rack. For the same reason, do not install sources of<br />
heat, such as radiators or hot air ducts. Keep away from direct sunlight. Do not install in areas subject to<br />
excessive dust, mechanical vibrations or shocks.<br />
‣ Do not arrange this device on an unstable surface, such as a tottering or slanted table. The device could fall<br />
causing injury or mechanical failures.<br />
‣ Do not install the device in a place where it could be exposed to humidity or water. Do not direct a jet of water<br />
onto the device: risk of fire, electrocution or mechanical failure.<br />
‣ Stop using the device if water or other material should penetrate inside: risk of fire and electrocution. Contact<br />
the retailer or authorised installer.<br />
‣ Slots and openings in the cabinet are provided for ventilation. These openings must not be blocked or covered.<br />
‣ Do not place heavy or heat generating objects on top of the device: this could damage the casing and/or<br />
increase internal temperature causing faults.<br />
‣ Do not cover the device with a cloth while it is running to prevent deforming the external casing and overheating<br />
the internal parts: risk of fire, electrocution and mechanical failure.<br />
‣ Keep magnets and magnetised objects away from the device to prevent faults.<br />
‣ Do not use the device in presence of smoke, vapour, humidity, dust or intense vibrations.<br />
‣ Wait for a while before operating a device immediately after transporting it from a cold place to a warm place<br />
and vice versa. Wait on average for three hours: this will allow the device to adapt to the new ambient<br />
(temperature, humidity, etc.).<br />
‣ The monitor is provided with a plastic base and rubber feet. It can be positioned on a horizontal surface, such<br />
as a desk or a table. Make sure that the device is fastened firmly and that it is not resting on unstable supports<br />
or surfaces. Dropping could cause severe injury and damage the device.<br />
‣ Remember to adjust the brightness and contrast to obtain a perfect image.<br />
‣ The monitor can also be installed on the wall by means of a bracket (not provided).<br />
1.3.4 CLEANING THE DEVICE<br />
‣ Rub delicately with a dry cloth to remove dust and dirt.<br />
‣ Dip the cloth in neutral detergent if dirt cannot be eliminated with a dry cloth alone.<br />
‣ Do not use volatile liquids (such a petrol, alcohol, solvents, etc.) or chemically treated clothes to clean the<br />
device to prevent deformation, deterioration or scratches to the paint finish.<br />
1.3.5 PRIVACY AND COPYRIGHT<br />
‣ The <strong>1092</strong>/<strong>407</strong> LCD monitor is a device for CCTV systems. Recording of images is subject to the laws in force in<br />
your country. Recording of images protected by copyright is forbidden.<br />
‣ Product users shall be responsible for checking and respecting all local rules and regulations concerning<br />
monitoring and recording video signals. The manufacturing SHALL NOT BE LIABLE for use of this product not<br />
in compliance with the laws in force.<br />
DS<strong>1092</strong>-060 15
2 CONTROLS AND SETTINGS<br />
6 7 8<br />
2 4 5 1 5 3<br />
2.1 DIRECT CONTROLS<br />
POWER CONNECTOR (DC) [6]<br />
Plug the power wire of the adapter provided into the respective DC.<br />
ON/OFF BUTTON [1]<br />
This is used to switch the monitor on and off. The green LED (2) lights up when the monitor is on.<br />
IMPORTANT NOTE<br />
‣ If the following message appears on the monitor after pressing the button (1):<br />
NO SIGNAL<br />
and the led (2) becomes red, it means that video signal is missing.<br />
AUTOMATIC ADJUSTMENT BUTTON (AUTO) [3]<br />
Available in “PC” mode only.<br />
ADJUSTMENT BUTTONS (DOWN/- or UP/+) [5]<br />
These are used to select the various input signals and to select control functions.<br />
In “AV” mode, they directly control speaker volume.<br />
Press “DOWN/-” or “UP/+” to decrease or increase the value of the parameter.<br />
OSD MENU BUTTON [4]<br />
This is used to access and quit the OSD (On-Screen Display) menu.<br />
PC SIGNAL INPUT (VGA) [7]<br />
PC input.<br />
PC AUDIO INPUT (PC AUDIO) [8]<br />
Jack socket audio input.<br />
DS<strong>1092</strong>-060 16
2.2 OSD CCTV MENU CONTROLS<br />
Button (4) can be used to access menus and submenus and to define control functions.<br />
Press button (4), the following screen will appear:<br />
Procedure<br />
‣ Use “UP” and “DOWN” and press “MENU” to confirm to select the various menus and submenus.<br />
‣ Use “UP” and “DOWN” to adjust.<br />
‣ Use “AUTO” to exit.<br />
DS<strong>1092</strong>-060 17
2.2.1 COLOUR<br />
Select “COLOR” and press “MENU” to confirm. The following screen will appear containing display settings.<br />
CONTRAST<br />
This setting is used to change the contrast between the black and white areas of the<br />
image. Clear resolution of the white, black and grey scales can be obtained by<br />
correctly setting contrast. Press “UP” or “DOWN” to increase or decrease the<br />
parameter setting.<br />
BRIGHTNESS<br />
This setting is used to change the brightness of the image according to ambient<br />
light. Press “UP” or “DOWN” to increase or decrease the parameter setting.<br />
COLOUR TEMPERATURE<br />
This setting is used to adjust the color temperature. Press “UP” or “DOWN” to select<br />
the desired value.<br />
COLOUR ADJUST<br />
This setting is used to enter in the sub-menu of colour adjustments.<br />
2.2.2 IMAGE SETTING<br />
Select “PICTURE” and press “MENU” to confirm. The following screen will appear containing display settings.<br />
H.POSITION<br />
This setting is used to move picture image left and right. “DOWN” moves the screen image left. “UP”<br />
moves the screen image right.<br />
V.POSITION<br />
This setting is used to move picture image up and down. “DOWN” moves the screen image downside. “UP”<br />
moves the screen image upside.<br />
PHASE<br />
This setting is used to minimize distortions and video instability. Press “UP” or “DOWN” to increase or<br />
decrease the parameter setting.<br />
CLOCK<br />
This setting is used to minimize strips on video. Press “UP” or “DOWN” to increase or decrease the<br />
parameter setting.<br />
SHARPNESS<br />
This setting is used to optimise the sharpness of the mage. Select a value among 1 and 5.<br />
DS<strong>1092</strong>-060 18
2.2.3 FUNCTION<br />
Select “FUNCTION” and press “MENU” to confirm. The following screen containing settings related to image dimensions<br />
and position of the image on the screen will appear.<br />
AUTO ADJUST<br />
This setting is used to automatically adjust the video setup. Press “UP” or “DOWN” to increase or decrease the<br />
parameter setting.<br />
AUTO COLOUR<br />
This setting is used to automatically adjust the colours of the image. Press “UP” or “DOWN” to increase or decrease the<br />
parameter setting.<br />
2.2.4 OSD MENU<br />
Select “OSD MENU” and press “MENU” to confirm. The following screen will appear containing OSD settings.<br />
LANGUAGE<br />
This setting is used to select the language of the controls. Press “UP” or “DOWN” to<br />
select the available options.<br />
OSD H. POS.<br />
This setting is used to change the horizontal position of the OSD panel. Press “UP”<br />
to move the image rightwards. Press “DOWN” to move the image leftwards<br />
OSD V. POS.<br />
This setting is used to change the vertical position of the OSD panel. Press “UP” to<br />
move the image upwards. Press “DOWN” to move the image downwards.<br />
OSD TIMER<br />
This setting can be used to set the time for which the OSD panel appears on the<br />
display (0 to 27 sec). Press “UP” or “DOWN” to increase or decrease the parameter<br />
setting.<br />
DS<strong>1092</strong>-060 19
2.2.5 MISC<br />
Select “MISC” and press “MENU” to confirm. The following screen will appear:<br />
MODE SELECT<br />
This Menu is not applicable. The resolution is defined by the connected device. The compatible resolutions are:<br />
640x480, 800x600, 1024x768 e 1280x1024.<br />
RESET<br />
Loads factory settings.<br />
VOLUME<br />
This setting is used to adjust the audio volume.<br />
Press “UP” or “DOWN” to increase or decrease the parameter setting.<br />
DS<strong>1092</strong>-060 20
3 LCD MONITOR QUALITY AND PIXEL<br />
The TFT monitor uses high-precision technology, manufactured according to Urmet standards, to guarantee trouble-free<br />
performance. Nevertheless, the display may have cosmetic imperfections that appear as small bright or dark spots. This<br />
a common matter related to the specific nature of TFT technology which determines the possible presence of<br />
discontinuity on the screen and is not specific to Urmet products.<br />
These imperfections are caused by one or more defective pixels or sub-pixels.<br />
‣ A pixel consists of one red, one green, and one blue sub-pixel.<br />
‣ A defective whole pixel is always turned on (a bright spot on a dark background), or it is always off (a dark spot on<br />
a bright background). The first is the more visible of the two.<br />
‣ A defective sub-pixel (dot defect) is less visible than a defective whole pixel and is small and only visible on a<br />
specific background.<br />
Urmet guarantees that LCD monitors comply to the current quality standards and consequently no more than:<br />
‣ 2 bright dots.<br />
‣ 1 dark dots.<br />
‣ 3 total bright and dark dots.<br />
Urmet expects that the quality of liquid crystal displays will improve in time with a decrease in the number of<br />
imperfections.<br />
With the present communication Urmet wishes to inform customers of the quality standard of the LCD to ensure a<br />
service as transparent as possible.<br />
4 PRODUCT SPECIFICATIONS<br />
LCD Display: .............................................................................................................................................................17” TFT<br />
Response time: ..............................................................................................................................................................8 ms<br />
Resolution: .........................................................................................................................................................1280 x 1024<br />
Pixels: ..............................................................................................................................................................0.264 x 0.264<br />
Colours:................................................................................................................................................................ 16.7 milion<br />
Contrast ratio:............................................................................................................................................................... 500:1<br />
Brightness: ............................................................................................................................................................ 400 cd/m 2<br />
Horizontal frequency: ..........................................................................................................................................31÷65 kHz<br />
Vertical refresh rate:............................................................................................................................................. 56÷75 Hz<br />
Frame angle: ............................................................................................................................................... (140°) horizontal<br />
........................................................................................................................................................................ (120°) vertical<br />
Audio input: ....................................................................................................................................................................Jack<br />
Power adapter:.........................................................................................................AC Input: 100÷240 V ~ 1.0A, 50/60Hz<br />
...............................................................................................................................................................DC Output: 12V/4.A<br />
Working temperature range:...............................................................................................................................0°C÷+40°C<br />
Storage temperature range: ........................................................................................................................... -25°C÷+60°C<br />
Front panel controls: ............................................................................... On/Off - Volume - OSD Menù – Selection buttons<br />
OSD controls:.............................................................................................View settings – Various settings – OSD settings<br />
Humidity: .......................................................................................................................... 10%÷90% Without condensation<br />
Dimensions (L x W x D):........................................................................................................................380 x 380 x 190 mm<br />
Net weigh: ...................................................................................................................................................................5.8 Kg<br />
Audio outputs: ........................................................................................................................................ 2 speakers – 2.5 W<br />
Important note:<br />
Product specifications may be subject to change without prior notice.<br />
DS<strong>1092</strong>-060 21
DEUTSCH<br />
INHALTSVERZEICHNIS<br />
1 ALLGEMEINE INFORMATIONEN ........................................................................................................ 23<br />
1.1 PRODUKTBESCHREIBUNG - EINSATZART........................................................................... 23<br />
1.1.1 ALLGEMEINE MERKMALE ............................................................................................................... 23<br />
1.2 ÖFFNEN DER VERPACKUNG ................................................................................................. 23<br />
1.2.1 INHALT DER VERPACKUNG............................................................................................................ 23<br />
1.3 WARNHINWEISE ...................................................................................................................... 23<br />
1.3.1 VERSORGUNG ................................................................................................................................. 23<br />
1.3.2 SICHERHEITSMASSNMAHMEN....................................................................................................... 23<br />
1.3.3 VORSICHTSMASSNAHMEN BEI DER INSTALLATION................................................................... 24<br />
1.3.4 REINIGUNG DES GERÄTS............................................................................................................... 24<br />
1.3.5 DATENSCHUTZ UND COPYRIGHT.................................................................................................. 24<br />
2 BESCHREIBUNG DER TEILE .............................................................................................................. 25<br />
2.1 DIREKTE BEDIENUNGEN........................................................................................................ 25<br />
2.2 BEDIENUNGEN ÜBER MENÜ OSD ......................................................................................... 26<br />
2.2.1 FARBE ............................................................................................................................................... 27<br />
2.2.2 BILD ................................................................................................................................................... 28<br />
2.2.3 FUNKTION......................................................................................................................................... 29<br />
2.2.4 OSD MENÜ........................................................................................................................................ 30<br />
2.2.5 MISC .................................................................................................................................................. 31<br />
3 HINWEISE ZU DEFEKTEN PIXELN UND ZUR QUALITÄT DES LCD-MONITORS ........................... 32<br />
4 TECHNISCHE DATEN DES PRODUKTS............................................................................................. 32<br />
DS<strong>1092</strong>-060 22
1 ALLGEMEINE INFORMATIONEN<br />
Lieber Kunde,<br />
wir danken Ihnen für den Kauf dieses Urmet Produkts.<br />
Dieses Dokument beschreibt die Installation und den Gebrauch des des Farbmonitor LCD 17“ URMET Domus S.p.A.<br />
<strong>Mod</strong>ell 10932/<strong>407</strong>.<br />
Bitte lesen Sie sich vor Inbetriebnahme des Geräts die vorliegende Gebrauchsanleitung durch. Sie beschreibt den<br />
sachgemäßen und sicheren Betrieb des Geräts.<br />
Heben Sie diese Gebrauchsanleitung sorgfältig und an einem leicht zugänglichen Ort auf, damit Sie sie bei Bedarf<br />
umgehend konsultieren zu können.<br />
1.1 PRODUKTBESCHREIBUNG - EINSATZART<br />
Der Farbmonitor “LCD” <strong>Typ</strong> <strong>1092</strong>/<strong>407</strong> verfügt über einen sehr robusten Aufbau und ist für Dauerfunktion ausgelegt.<br />
Daher kann er in TV-Anlagen mit geschlossenem Kreis ohne Überlastungsrisiken eingesetzt werden.<br />
Der Flachbildmonitor ist ein Aktivmatrix LCD (liquid crystal display) Bildschirm mit TFT (thin film transistor).<br />
BEACHTEN<br />
Das Produkt URMET Domus S.p.A. <strong>Typ</strong> <strong>1092</strong>/<strong>407</strong> ist für CCTV-Systeme bestimmt.<br />
1.1.1 ALLGEMEINE MERKMALE<br />
‣ Einblendbarer Bereich 17”<br />
‣ Frontale Bedienungen<br />
‣ VGA-Eingang<br />
‣ Audioeingang auf RCA-Anschlüssen<br />
‣ Breiter Neigungswinkel, um die Ansicht aus der sitzenden oder stehenden Position zu gestatten<br />
‣ Mehrsprachiges OSD-Menü, um die Einstellung und die Optimierung der Bildschirmansicht zu vereinfachen<br />
‣ Kompakte Abmessungen<br />
1.2 ÖFFNEN DER VERPACKUNG<br />
Überprüfen, ob die Verpackung und der Inhalt keine erkennbaren <strong>Sch</strong>äden aufweisen. Fehlen Teile oder erweisen diese<br />
sich als beschädigt, unmittelbar den Händler kontaktieren. Sollte das Produkt an den Lieferanten zurückgeschickt<br />
werden, vergewissern Sie sich, dass dies in der Originalverpackung erfolgt.<br />
1.2.1 INHALT DER VERPACKUNG<br />
‣ Farbmonitor LCD<br />
‣ Netzteil 12V DC; 4A<br />
‣ Netzkabel<br />
BEACHTEN<br />
Die Zusammensetzung der in der Lieferung enthaltenen Zubehörteile kann ohne Vorankündigung geämdert werden.<br />
1.3 WARNHINWEISE<br />
1.3.1 VERSORGUNG<br />
‣ Dieses Gerät darf ausschließlich mit dem in der Lieferung enthaltenen Netzteil betrieben werden. Den Wert der<br />
Netzspannung überprüfen, an die das Netzteil angeschlossen werden soll.<br />
‣ Um das Netzkabel aus der Steckdose zu ziehen, den Stecker fassen und vermeiden, am Kabel zu ziehen.<br />
1.3.2 SICHERHEITSMASSNMAHMEN<br />
‣ Um der Gefahr von Bränden und Stromschlägen vorzubeugen, vermeiden, das Gerät Regen oder Feuchtigkeit<br />
auszusetzen und jegliche Gegenstände oder Flüssigkeiten in das Geräteinnere gelangen zu lassen. Sollte dies<br />
dennoch geschehen, das Gerät vom Versorgungsnetz trennen und von Fachpersonal kontrollieren lassen.<br />
‣ Auf keinen Fall darf das Gerät geöffnet werden. Wenden Sie sich wegen jeglicher Reparaturarbeiten an<br />
Fachpersonal oder kontaktieren Sie das autorisierte Kundendienstzentrum.<br />
‣ Das Gerät außerhalb der Reichweite von Kindern aufbewahren, da diese das Gerät versehentlich beschädigen<br />
könnten.<br />
‣ Das Gerät nicht mit nassen Händen berühren, um elektrischen <strong>Sch</strong>lägen und mechanischen <strong>Sch</strong>äden<br />
vorzubeugen.<br />
‣ Sollte das Gerät herunterfallen oder sich das Außengehäuse als beschädigt erweisen, den Gebrauch einstellen.<br />
Bei Weiterverwendung unter diesen Bedingungen kann es zu elektrischen <strong>Sch</strong>lägen kommen. Wenden Sie sich<br />
in diesen Fällen an den Händler oder den autorisierten Installateur.<br />
‣ Es wird empfohlen das Versorgungskabel abzutrennen, sollte der Monitor für einen längeren Zeitraum nicht<br />
benutzt werden.<br />
DS<strong>1092</strong>-060 23
1.3.3 VORSICHTSMASSNAHMEN BEI DER INSTALLATION<br />
‣ Um einer Überhitzung des Geräts vorzubeugen, dieses so aufstellen, dass Luft durch die Lüftungsöffnungen im<br />
Gehäuse strömen kann. Stellen Sie bei Installation in einem Baugruppenträger sicher, dass mindestens 5 cm<br />
Freiraum vorliegen. Aus demselben Grund darf das Gerät nicht in der Nähe von Wärmequellen wie Heizkörpern<br />
oder Warmluftleitungen, an Orten mit direkter Sonneneinstrahlung oder in Räumen mit übermäßiger<br />
Staubbelastung, mechanischen Erschütterungen oder Stoßgefahr aufgestellt werden.<br />
‣ Gerät nicht auf instabilen Oberflächen wie wacklige Tische oder schräge Tischflächen aufstellen. Andernfalls<br />
könnte das Gerät herunterfallen und dadurch Verletzungen verursachen oder mechanische Defekte<br />
davontragen.<br />
‣ Gerät nicht an Orten aufstellen, wo es Feuchtigkeit oder Spritzwasser ausgesetzt sein könnte. Um einer<br />
möglichen Brandentwicklung, Stromschlägen oder mechanischen Defekten vorzubeugen, Gerät nicht mit<br />
Wasser abspritzen.<br />
‣ Sollten Wasser oder andere Fremdkörper in das Gerät eindringen, Gerät außer Betrieb setzen, um eine<br />
mögliche Brandentwicklung oder Stromschläge zu vermeiden. Wenden Sie sich in diesem Fall an Ihren<br />
Fachhändler oder einen autorisierten Installateur.<br />
‣ Die <strong>Sch</strong>litze und Öffnungen im Gehäuse dienen der Belüftung. Diese Öffnungen dürfen nicht versperrt oder<br />
abgedeckt werden. Stecken Sie niemals Gegenstände in die Gehäuseschlitze oder andere Öffnungen.<br />
‣ Stellen Sie auf dem Gerät keine schweren oder Wärme erzeugenden Gegenstände ab, da diese das Gehäuse<br />
beschädigen oder die Innentemperatur erhöhen können, wodurch es zu Funktionsstörungen kommen kann.<br />
‣ Gerät während des Betriebs nicht mit einem Tuch abdecken, um Verformungen des Außengehäuses und eine<br />
Überhitzung der innen liegenden Bauteile mit daraus folgender Brandgefahr, Gefahr von Stromschlägen oder<br />
mechanischen Defekten zu vermeiden.<br />
‣ Keine Magneten oder magnetisierte Gegenstände in die Nähe des Geräts bringen, da dies Funktionsstörungen<br />
verursachen könnte.<br />
‣ Gerät nicht in Umgebungen verwenden, in denen Rauch, Dampf, Feuchtigkeit, Staub oder starke Vibrationen<br />
vorhanden sind.<br />
‣ Gerät nicht unmittelbar nach dem Transport von einem kühlen an einen warmen Ort oder umgekehrt in Betrieb<br />
nehmen. Im Durchschnitt sind drei Stunden abzuwarten: dieser Zeitraum ist erforderlich, damit das Gerät sich<br />
an die neue Umgebung anpassen kann (Temperatur, Feuchtigkeit, etc.).<br />
‣ Der Monitor ist mit einem Kunststoffuntersatz mit Gummifüßen ausgestattet und kann auf einer horizontalen<br />
Fläche wie einem <strong>Sch</strong>reibtisch oder einem normalem Tisch positioniert werden. Sicherstellen, dass das Gerät<br />
fest und zuverlässig befestigt ist und nicht auf instabilen Abstützungen oder Flächen ruht. Ein eventuelles<br />
Herunterfallen könnte zu ernsthaften Personenschäden oder <strong>Sch</strong>äden am Gerät führen.<br />
‣ Nicht vergessen, die Einstellung der Helligkeit und des Kontrasts vorzunehmen, um ein besseres Bild zu<br />
erzielen.<br />
‣ Der Monitor kann auch mittels einer Halterung (nicht im Lieferumfang enthalten) an der Wand installiert werden.<br />
1.3.4 REINIGUNG DES GERÄTS<br />
‣ Um Staub und <strong>Sch</strong>mutz zu entfernen, Gerät mit einem trockenen Tuch abreiben.<br />
‣ Sollte der <strong>Sch</strong>mutz mit einem trockenen Tuch nicht zu entfernen sein, Gerät mit einem feuchten Lappen und<br />
Neutralreiniger abwischen.<br />
‣ Um Verformungen, Beschädigungen oder Kratzer im Lack zu verhindern, keine flüchtigen Flüssigkeiten wie<br />
Benzin, Alkohol, Lösungsmittel etc. oder chemisch behandelte Tücher zur Reinigung des Geräts verwenden.<br />
1.3.5 DATENSCHUTZ UND COPYRIGHT<br />
‣ Der Farbmonitor 17“ des <strong>Typ</strong>s <strong>1092</strong>/<strong>407</strong> ist ein CCTV-Gerät. Die Bildaufzeichnung unterliegt den geltenden<br />
Bestimmungen des Betreiberlandes. Darüber hinaus ist die Aufzeichnung von urheberrechtlich geschützten<br />
Bildern untersagt.<br />
‣ Der Geräteanwender ist für die Kontrolle und Einhaltung aller örtlich in Bezug auf Videoüberwachungen und<br />
Videoaufzeichnungen geltenden Vorschriften und Bestimmungen verantwortlich. Der Hersteller kann nicht für<br />
einen Gebrauch des Geräts haftbar gemacht werden, der nicht mit den geltenden Bestimmungen<br />
übereinstimmt.<br />
DS<strong>1092</strong>-060 24
2 BESCHREIBUNG DER TEILE<br />
6 7 8<br />
2 4 5 1 5 3<br />
2.1 DIREKTE BEDIENUNGEN<br />
VERSORGUNGSSTECKER (DC) [6]<br />
Das Versorgungskabel des in der Lieferung enthaltenen Adapters an den entsprechenden Stecker DC anschließen.<br />
EIN-/AUS-Taste [1]<br />
Gestattet das Ein-/Ausschalten des Monitors. Die grüne LED (2) leuchtet auf, wenn der Monitor eingeschaltet ist.<br />
BEACHTEN<br />
‣ Sollte nach dem Betätigen der Taste (1) auf dem Monitor die folgenden Meldung erscheinen:<br />
KEIN SIGNAL<br />
und die LED (2) leuchte rot, bedeutet dieses dass das Videosignal fehlt.<br />
TASTE AUTOMATISCHE REGELUNG (AUTO) [3]<br />
Nur im <strong>Mod</strong>us “PC” verfügbar.<br />
EINSTELLTASTEN (DOWN/- oder UP/+) [5]<br />
Gestattet die Auswahl der Eingangssignale und die Auswahl der Steuerfunktionen.<br />
Im <strong>Mod</strong>us “AV” gestatten sie die direkte Regelung der Lautsprecherlautstärke.<br />
Die Taste “DOWN/-” or “UP/+”drücken, um den Wert des Parameters zu erhöhen oder zu verringern.<br />
TASTE OSD MENÜ [4]<br />
Gestattet den Zugriff auf das OSD-Menü (On-Screen-Display) und das Verlassen desselben.<br />
EINGANG PC SIGNAL (VGA) [7]<br />
PC-Eingang oder Eingang digitaler Videorecorder.<br />
Audioeingang PC (PC AUDIO) [8]<br />
Audioeingänge auf Jack-Buchsen.<br />
DS<strong>1092</strong>-060 25
2.2 BEDIENUNGEN ÜBER MENÜ OSD<br />
Durch Betätigen der Taste (4) kann auf die Menüs und Untermenüs der Einstellung zugegriffen werden, um die<br />
Steuerfunktionen zu definieren.<br />
Durch Drücken der Taste (4) erscheint die folgende Bildschirmansicht.<br />
1280 X 1024 60HZ<br />
Farbe Kontrast 55 - ■■■■■■■█■■■ +<br />
Bild Helligkeit 35 - ■■■■█■■■■■■ +<br />
Funktion Farbtemperatur 9300 6500 Nutzer<br />
OSD Menu<br />
Misc<br />
Colour Adjust<br />
Ende<br />
Ende<br />
Vorgehensweise<br />
‣ Um die verschiedenen Menüs und Untermenüs der Einstellung auszuwählen, die Tasten “UP” und “DOWN”<br />
verwenden und Zur Bestätigung die Taste “MENU” drücken.<br />
‣ Die Einstellung durch Bestätigen der Tasten “UP” und “DOWN” vornehmen.<br />
‣ Um das Menü oder die Untermenüs zu Verlassen die Taste “AUTO” betätigen.<br />
DS<strong>1092</strong>-060 26
2.2.1 FARBE<br />
Durch Auswahl von “FARBE” und Betätigen der Taste “MENÜ”, erscheint auf dem Bildschirm folgende Ansicht:<br />
1280 X 1024 60HZ<br />
Farbe Kontrast 55 - ■■■■■■■█■■■ +<br />
Bild Helligkeit 35 - ■■■■█■■■■■■ +<br />
Funktion Farbtemperatur 9300 6500 Nutzer<br />
OSD Menu<br />
Misc<br />
Colour Adjust<br />
Ende<br />
Ende<br />
KONTRAST<br />
Gestattet die Änderung des Kontrastes zwischen weißen und schwarzen Bildteilen. Durch korrektes<br />
Einstellen des Kontrastes ist es möglich, eine klare Auflösung der weißen, schwarzen und grauen<br />
Abstufungen zu erhalten. Die Taste “UP” zum Erhöhen oder die Taste “DOWN” zum Verringern des<br />
Parameterwertes betätigen.<br />
HELLIGKEIT<br />
Gestattet die Änderung der Bildhelligkeit abhängig vom Tageslicht. Die Taste “UP” zum Erhöhen oder<br />
die Taste “DOWN” zum Verringern des Parameterwertes betätigen.<br />
FARBTEMPERATUR<br />
Gestattet die Einstellung der Farbtemperatur. Die Taste “UP” zum Erhöhen oder die Taste “DOWN” zum<br />
Verringern des Parameterwertes betätigen.<br />
COLOUR ADJUST<br />
Gestattet den Zugang zum Untermenü der Farbeinstellungen.<br />
DS<strong>1092</strong>-060 27
2.2.2 BILD<br />
Durch Auswahl von “BILD” und Betätigen der Taste “MENÜ”, erscheint auf dem Bildschirm folgende Ansicht:<br />
1280 X 1024 60HZ<br />
Farbe Posit - H 55 - ■■■■■■■█■■■ +<br />
Bild Posit - V 35 - ■■■■█■■■■■■ +<br />
Funzktion Phase 35 - ■■■■█■■■■■■ +<br />
OSD Menu Takt 35 - ■■■■█■■■■■■ +<br />
Misc <strong>Sch</strong>ärfe 1 2 3 4 5<br />
Ende<br />
Ende<br />
H.POSITION<br />
Gestattet die Positionierung des Bildes nach links oder rechts. Die Taste “DOWN” verschiebt das Bild nach<br />
links. Die Taste “UP” verschiebt das Bild nach rechts.<br />
V.POSITION<br />
Gestattet die Positionierung des Bildes nach oben oder unten. Die Taste “DOWN” verschiebt das Bild nach<br />
unten. Die Taste “UP” verschiebt das Bild nach oben.<br />
PHASE<br />
Gestattet die Einstellung der Verzerrung und Instabilität des Videobildes. Die Taste “UP” zum Erhöhen<br />
oder die Taste “DOWN” zum Verringern des Parameterwertes betätigen.<br />
TAKT<br />
Gestattet die Verringerung der Streifenbildung auf der Bildschirmansicht. Die Taste “UP” zum Erhöhen<br />
oder die Taste “DOWN” zum Verringern des Parameterwertes betätigen.<br />
SCHÄRFE<br />
Gestattet die Änderung der <strong>Sch</strong>ärfe des Bildschirmansicht. Auswahl des Wertes zwischen 1 und 5.<br />
DS<strong>1092</strong>-060 28
2.2.3 FUNKTION<br />
Durch Auswahl von “FUNKTION” und Betätigen der Taste “MENÜ”, erscheint auf dem Bildschirm folgende Ansicht:<br />
1280 X 1024 60HZ<br />
Farbe Auto Einstellung JA NEIN<br />
Bild Auto Farbe JA NEIN<br />
Funktion<br />
Ende<br />
OSD Menu<br />
Misc<br />
Ende<br />
AUTO ADJUST<br />
Gestattet die automatische Justierung der Videoeinstellungen. Die Taste “UP” oder die Taste “DOWN” zum Ändern<br />
des Parameterwertes betätigen.<br />
AUTO COLOUR<br />
Gestattet die automatische Justierung der Farbeinstellungen des Bildes. Die Taste “UP” oder die Taste “DOWN”<br />
zum Ändern des Parameterwertes betätigen.<br />
DS<strong>1092</strong>-060 29
2.2.4 OSD MENÜ<br />
Durch Auswahl von “OSD MENÜ” und Betätigen der Taste “MENÜ”, erscheint auf dem Bildschirm folgende Ansicht:<br />
1280 X 1024 60HZ<br />
Farbe<br />
Sprache<br />
Bild OSD H Pos 35 - ■■■■█■■■■■■ +<br />
Funktion OSD V Pos 35 - ■■■■█■■■■■■ +<br />
OSD Menu OSD Timer JA NEIN<br />
Misc<br />
Ende<br />
Ende<br />
SPRACHE<br />
Gestattet die Auswahl der Sprache des OSD-Menüs. Die Taste “UP” oder die Taste “DOWN” zum Ändern der<br />
Sprache betätigen.<br />
OSD H Pos.<br />
Gestattet die Änderung der horizontalen Position des OSD-Menüs. Die Taste “DOWN” verschiebt das Bild nach<br />
links. Die Taste “UP” verschiebt das Bild nach rechts.<br />
OSD V Pos.<br />
Gestattet die Änderung der vertikalen Position des OSD-Menüs. Die Taste “DOWN” verschiebt das Bild nach unten.<br />
Die Taste “UP” verschiebt das Bild nach oben.<br />
OSD Timer<br />
Gestattet die Die Änderung der Anzeigezeit des OSD-Menüs auf dem Bildschirm (von 0 bis 27 sek). Die Taste “UP”<br />
zum Erhöhen oder die Taste “DOWN” zum Verringern des Parameterwertes betätigen..<br />
DS<strong>1092</strong>-060 30
2.2.5 MISC<br />
Durch Auswahl von “MISC” und Betätigen der Taste “MENÜ”, erscheint auf dem Bildschirm folgende Ansicht:<br />
1280 X 1024 60HZ<br />
Farbe Auflösung 640 X 400 720 X 400<br />
Bild Rücksetzen JA NEIN<br />
Funktion Volume 35 - ■■■■█■■■■■■ +<br />
OSD Menu<br />
Ende<br />
Misc<br />
Ende<br />
AUFLÖSUNG<br />
Dieser Wert ist nicht änderbar. Die Auflösung wird automatisch nach dem am Monitor angeschlossenen Geräts<br />
gewählt. Kompatible Auflösungen sind: 640x480, 800x600, 1024x768 e 1280x1024 Pixel.<br />
RÜCKSETZEN<br />
Setzt den Monitor auf die Werkseinstellungen zurück.<br />
VOLUME<br />
Gestattet die Regulierung der Lautstärke.<br />
Die Taste “UP” zum Erhöhen oder die Taste “DOWN” zum Verringern des Parameterwertes betätigen.<br />
DS<strong>1092</strong>-060 31
3 HINWEISE ZU DEFEKTEN PIXELN UND ZUR QUALITÄT DES LCD-MONITORS<br />
Der TFT-Monitor ist mit Hochpräzisiontechnologie ausgestattet und wurde gemäß den Urmet Standards gefertigt, um<br />
einen störungsfreien Betrieb zu gewährleisten. Trotzdem ist es möglich, dass der Monitor leichte Unregelmäßigkeiten<br />
aufweist, die sich in kleinen hellen oder dunklen Punkten auf dem Bildschirm äußern. Es handelt sich um eine normale<br />
Erscheinung, die mit der spezifischen Natur der TFT-Technologie zusammenhängt, die eventuelle Anzeichen von<br />
Diskontinuität auf dem Bildschirm mit sich bringt und nicht für Urmet spezifisch.<br />
Die Unregelmäßigkeiten rühren von einem oder mehreren defekten Pixeln bzw. Subpixel her.<br />
‣ Ein Pixel besteht aus einem roten, einem grünen und einem blauen Subpixel.<br />
‣ Ein defektes Pixel leuchtet entweder ständig (heller Punkt auf dunklem Hintergrund) oder bleibt immer dunkel<br />
(dunkler Punkt auf hellem Hintergrund. Das leuchtende Pixel fällt stärker auf als das dunkle<br />
‣ Ein defektes Subpixel fällt weniger auf als ein defektes Komplettpixel, da es klein und nur auf einem bestimmten<br />
Hintergrund sichtbar ist.<br />
Urmet garantiert, dass seine LCD-Monitor den geltenden Qualitätsstandards entsprechen und garantiert daher nicht<br />
mehr als:<br />
‣ 2 helle Punkte.<br />
‣ 1 dunkler Punkt.<br />
‣ Zusammen 3 helle und dunkle Punkte.<br />
Urmet erwartet, im Laufe der Zeit die Qualität der Flüssigkristallanzeigen weiterhin verbessern zu können, so dass immer<br />
weniger ästhetische Makel vorhanden sein werden.<br />
Diese Mitteilung zur Informierung der Kunden von Urmet bezüglich des Qualitätsstandards der LCD-Displays dient dem<br />
Zweck, den Dienst am Kunden so transparent wie möglich zu gestalten.<br />
4 TECHNISCHE DATEN DES PRODUKTS<br />
LCD Display: .............................................................................................................................................................17” TFT<br />
Ansprechzeit: .................................................................................................................................................................8 ms<br />
Max. Auflösung: .................................................................................................................................................1280 x 1024<br />
Pixel: ................................................................................................................................................................0.264 x 0.264<br />
Farbanzeige: ................................................................................................................................................... 16.7 Millionen<br />
Kontrastverhältnis: ....................................................................................................................................................... 500:1<br />
Helligkeit:............................................................................................................................................................... 400 cd/m 2<br />
Horizontale Frequenz:.........................................................................................................................................31÷65 kHz<br />
Bildwiederholfrequenz:......................................................................................................................................... 56÷75 Hz<br />
Sichtwinkel: ..................................................................................................................................... …………140° horizontal<br />
...............................................................................................................................................................……….120° vertikal<br />
Audioeingang: ................................................................................................................................................................Jack<br />
Versorgungsadapter:............................................................................................. AC Eingang: 100/240 V ~ 1.0A, 50/60Hz<br />
............................................................................................................................................................ DC Ausgang: 12V/4A<br />
Betriebstemperatur:............................................................................................................................................0°C÷+40°C<br />
Lagertemperatur:............................................................................................................................................ -25°C÷+60°C<br />
Bedienungen Frontseite: ..........................................................................................EIN/AUS - Menü OSD - Auswahltasten<br />
OSD Bedienungen: .............................................Anzeigeinstellungen – Verschiedene Einstellungen – OSD Einstellungen<br />
Luftfeuchtigkeit: ......................................................................................................10%/90% Keine Kondenswasserbildung<br />
Abmessungen (Länge x Breite x Tiefe): ................................................................................................380 x 380 x 190 mm<br />
Nettogewicht: ..............................................................................................................................................................5.8 Kg<br />
Audioausgänge: ............................................................................................................................... 2 Lautsprecher – 2,5 W<br />
BEACHTEN<br />
Die technischen Charakteristiken können Änderungen ohne Vorankündigung unterliegen.<br />
DS<strong>1092</strong>-060 32
ESPAÑOL<br />
ÍNDICE<br />
1 Información general ............................................................................................................................. 34<br />
1.1 Utilización y descripción del producto........................................................................................ 34<br />
1.1.1 Características generales................................................................................................................... 34<br />
1.2 Apertura de la caja..................................................................................................................... 34<br />
1.2.1 Contenido del paquete ....................................................................................................................... 34<br />
1.3 Advertencias .............................................................................................................................. 34<br />
1.3.1 Alimentación....................................................................................................................................... 34<br />
1.3.2 Precauciones de seguridad................................................................................................................ 34<br />
1.3.3 Precauciones de instalación............................................................................................................... 35<br />
1.3.4 Limpieza del dispositivo ..................................................................................................................... 35<br />
1.3.5 Privacidad y Copyright ....................................................................................................................... 35<br />
2 Controles y ajustes .............................................................................................................................. 36<br />
2.1 controles..................................................................................................................................... 36<br />
2.2 controles con el menú OSD....................................................................................................... 37<br />
2.2.1 Color................................................................................................................................................... 38<br />
2.2.2 Ajuste de la imagen............................................................................................................................ 39<br />
2.2.3 Función .............................................................................................................................................. 40<br />
2.2.4 Menú OSD ......................................................................................................................................... 41<br />
2.2.5 Varios ................................................................................................................................................. 42<br />
3 Calidad del monitor LCD y píxeles ..................................................................................................... 43<br />
4 Especificaciones del producto ........................................................................................................... 43<br />
DS<strong>1092</strong>-060 33
1 INFORMACIÓN GENERAL<br />
Estimado cliente:<br />
Le agradecemos que haya comprado este producto.<br />
En este documento se describe cómo instalar y utilizar el monitor de color 17” LCD URMET Domus, ref. <strong>1092</strong>/<strong>407</strong>.<br />
Lea con atención este manual, ya que contiene información sobre el uso correcto y seguro de los dispositivos.<br />
Guarde el manual en un lugar fácilmente accesible para poder consultarlo cuando sea necesario.<br />
1.1 UTILIZACIÓN Y DESCRIPCIÓN DEL PRODUCTO<br />
El monitor de color LCD <strong>1092</strong>/<strong>407</strong> presenta una estructura robusta, es ideal para aplicaciones de operación continua y<br />
puede usarse en sistemas CCTV sin temor a que sufra una fatiga excesiva.<br />
La pantalla plana de cristal líquido LCD (Liquid Crystal Display) con matriz activa es de tecnología TFT (Thin-Film<br />
Transistor).<br />
NOTA<br />
El equipo <strong>Ref</strong>. <strong>1092</strong>/417 de URMET Domus es especial para sistemas CCTV.<br />
1.1.1 CARACTERÍSTICAS GENERALES<br />
‣ Pantalla de 17”<br />
‣ Panel de control frontal<br />
‣ Entrada y cable VGA<br />
‣ Entrada de audio por conector jack<br />
‣ Gran ángulo de visión que permite trabajar sentado, incorporado o mientras está desplazándose<br />
‣ Menú OSD multilingüe en pantalla para configurar y optimizar la pantalla fácilmente<br />
‣ Tamaño compacto<br />
1.2 APERTURA DE LA CAJA<br />
Compruebe visualmente que el paquete y su contenido no presentan ningún daño. Si falta algún componente o está<br />
dañado, póngase en contacto con su distribuidor. En este caso, no intente utilizar el dispositivo. Si el producto presenta<br />
daños, devuélvalo en su embalaje original.<br />
1.2.1 CONTENIDO DEL PAQUETE<br />
‣ Monitor LCD<br />
‣ Alimentador 12 VDC, 4 A<br />
‣ Cable de alimentación<br />
NOTA<br />
Los accesorios están sujetos a modificaciones sin previo aviso.<br />
1.3 ADVERTENCIAS<br />
1.3.1 ALIMENTACIÓN<br />
‣ Utilice únicamente el alimentador suministrado con el equipo. Compruebe la tensión eléctrica AC antes de<br />
conectar el alimentador.<br />
‣ Para desconectar el cable de alimentación del dispositivo, no tire del cable sino del conector.<br />
1.3.2 PRECAUCIONES DE SEGURIDAD<br />
‣ Para evitar cualquier riesgo de incendio y descargas eléctricas, no exponga el equipo a la lluvia o a la humedad<br />
ni introduzca dentro ningún material sólido o líquido. Si esto se produjera de manera accidental, desconecte el<br />
equipo de la red eléctrica y haga que lo inspeccione personal cualificado.<br />
‣ No intente en ningún caso abrir el dispositivo o repararlo por su cuenta. En caso de avería, póngase en<br />
contacto con personal cualificado o con el servicio de asistencia técnica.<br />
‣ Mantenga el equipo alejado de los niños, para evitar daños accidentales.<br />
‣ No opere el equipo con las manos húmedas, para evitar descargas eléctricas o daños mecánicos.<br />
‣ No utilice el equipo si se ha caído o si la carcasa externa está dañada, ya que podría producirse una descarga<br />
eléctrica. En este caso, contacte con el distribuidor o instalador autorizado.<br />
‣ Si no va a utilizar el monitor durante un periodo prolongado, se recomienda desconectar el cable de<br />
alimentación.<br />
DS<strong>1092</strong>-060 34
1.3.3 PRECAUCIONES DE INSTALACIÓN<br />
‣ Para que el equipo no se sobrecaliente, colóquelo de tal forma que no se obstruya el paso de aire a través de<br />
las ranuras de la carcasa. Si el equipo se instala en un rack, asegúrese de dejar un espacio libre de al menos<br />
5 cm. Asimismo, no lo instale junto a fuentes de calor, como radiadores o conductos de aire caliente, ni lo<br />
exponga a la luz solar directa. No instale el dispositivo en zonas con mucho polvo, o sometidas a vibraciones<br />
mecánicas o choques.<br />
‣ No coloque el dispositivo sobre una superficie inestable, como una mesa tambaleante o inclinada, ya que<br />
podría caerse y causar lesiones o fallos mecánicos.<br />
‣ No instale el dispositivo en un lugar expuesto a la humedad o al agua. No dirija un chorro de agua directamente<br />
sobre el dispositivo ya que podría producirse un incendio, una descarga eléctrica o un fallo mecánico.<br />
‣ Si entra agua o cualquier otro material extraño dentro del dispositivo, desconéctelo inmediatamente a fin de<br />
evitar cualquier riesgo de incendio o descarga eléctrica. En este caso, contacte con el distribuidor o instalador<br />
autorizado.<br />
‣ Las ranuras y aberturas del monitor sirven para la ventilación y no deben quedar obstruidas o cubiertas.<br />
‣ No coloque objetos pesados o que generen calor sobre el equipo, ya que podrían dañar la carcasa o aumentar<br />
la temperatura interna, causando un mal funcionamiento.<br />
‣ No cubra el equipo con una tela mientras esté funcionando para evitar deformar la carcasa y sobrecalentar las<br />
piezas internas, con el consiguiente riesgo de incendio, descarga eléctrica o fallo mecánico.<br />
‣ No deje imanes u objetos magnéticos cerca del equipo ya que podrían causar fallos.<br />
‣ No utilice este equipo en presencia de humo, vapor, humedad, polvo o vibraciones intensas.<br />
‣ No ponga en funcionamiento el dispositivo inmediatamente después de transportarlo de un lugar frío a otro<br />
caliente o viceversa. Espere unas tres horas para que el dispositivo se adapte al nuevo ambiente (temperatura,<br />
humedad, etc.).<br />
‣ El monitor está equipado con una base de plástico con patas de goma y se puede colocar sobre una superficie<br />
horizontal, como una mesa o escritorio. Asegúrese de que el equipo está firmemente colocado sobre una<br />
superficie estable, ya que podría caer y causar lesiones graves a las personas y al propio equipo.<br />
‣ Recuerde que debe ajustar el brillo y el contraste para obtener una imagen optima.<br />
‣ El monitor también se puede instalar en una pared mediante un soporte de montaje (no incluido en el<br />
embalaje).<br />
1.3.4 LIMPIEZA DEL DISPOSITIVO<br />
‣ Frote delicadamente el dispositivo con un paño seco para quitar el polvo y la suciedad.<br />
‣ Si la suciedad no desaparece con el paño seco, utilice un paño humedecido en detergente neutro.<br />
‣ No utilice líquidos volátiles (como gasolina, alcohol, disolventes, etc.) ni paños tratados químicamente en la<br />
limpieza del equipo para evitar la deformación, deterioro o arañazos en su superficie.<br />
1.3.5 PRIVACIDAD Y COPYRIGHT<br />
‣ El monitor LCD <strong>1092</strong>/<strong>407</strong> es un dispositivo para sistemas CCTV. La grabación de imágenes está sujeta a la<br />
legislación vigente en cada país. Se prohíbe grabar imágenes que estén protegidas por derechos de autor.<br />
‣ Los usuarios del producto son responsables de conocer y cumplir todas las normas y reglamentos locales<br />
relativos a la vigilancia y grabación de señales de vídeo. El fabricante no se hace responsable del uso de este<br />
producto no conforme con la legislación vigente.<br />
DS<strong>1092</strong>-060 35
2 CONTROLES Y AJUSTES<br />
6 7 8<br />
2 4 5 1 5 3<br />
2.1 CONTROLES<br />
CONECTOR DE ALIMENTACIÓN (DC) [6]<br />
Conecte el cable de alimentación al alimentador suministrado en la toma DC correspondiente.<br />
BOTÓN DE APAGADO/ENCENDIDO [1]<br />
Se utiliza para encender o apagar el monitor. El indicador LED (2) se ilumina de color verde cuando el monitor está<br />
encendido.<br />
NOTA<br />
‣ Si en el monitor aparece el siguiente mensaje después de pulsar el botón (1):<br />
NO SIGNAL<br />
y el LED (2) se ilumina de color rojo, significa que no hay señal de vídeo.<br />
BOTÓN DE AJUSTE AUTOMÁTICO (AUTO) [3]<br />
Permite el ajuste automático para todas las configuraciones de vídeo.<br />
BOTONES DE AJUSTE ARRIBA Y ABAJO (DOWN/- y UP/+) [5]<br />
Permiten el ajuste de las funciones de control.<br />
Pulse “DOWN/-” o “UP/+” para disminuir o aumentar el volumen.<br />
BOTÓN DEL MENÚ OSD [4]<br />
Se utiliza para entrar y salir del menú OSD (On-Screen Display) en pantalla.<br />
ENTRADA DE LA SEÑAL DE PC (VGA) [7]<br />
Entrada de la señal de vídeo del PC.<br />
ENTRADA DEL AUDIO DEL PC (PC AUDIO) [8]<br />
Esta toma jack permite la entrada de audio.<br />
DS<strong>1092</strong>-060 36
2.2 CONTROLES CON EL MENÚ OSD<br />
Utilice el botón (4) para entrar en los menús y submenús y definir las funciones de control.<br />
Pulse el botón (4) para que aparezca la siguiente pantalla:<br />
1280 X 1024 60HZ<br />
Color Contraste 55 - ■■■■■■■█■■■ +<br />
Imagen Brillo 35 - ■■■■█■■■■■■ +<br />
Función Temp. Color 9300 6500 Usuar<br />
Menú OSD<br />
Varios<br />
Ajuste del color<br />
Salir<br />
Salir<br />
Procedimiento<br />
‣ Use los botones “UP” y “DOWN”, y pulse “MENU” para confirmar el menú o submenú.<br />
‣ Use los botones “UP” y “DOWN” para ajustar el valor deseado.<br />
‣ Pulse el botón “AUTO” para salir.<br />
DS<strong>1092</strong>-060 37
2.2.1 COLOR<br />
Seleccione “COLOR” y pulse “MENÚ” para confirmar. Aparecerá el siguiente cuadro de diálogo en el que podrá<br />
modificar los ajustes de la pantalla.<br />
1280 X 1024 60HZ<br />
Color Contraste 55 - ■■■■■■■█■■■ +<br />
Imagen Brillo 35 - ■■■■█■■■■■■ +<br />
Función Temp. Color 9300 6500 Usuar<br />
Menú OSD<br />
Varios<br />
Ajuste del color<br />
Salir<br />
Salir<br />
CONTRASTE<br />
Esta opción se utiliza para cambiar el contraste entre las áreas blancas y negras de la imagen. Mediante el ajuste<br />
adecuado del contraste, es posible obtener una resolución clara de la escala de grises, del blanco al negro. Pulse el<br />
botón “UP” o el botón “DOWN” para aumentar o disminuir, respectivamente, el valor del parámetro.<br />
BRILLO<br />
Esta opción permite cambiar el brillo de la imagen en función de la iluminación ambiente. Pulse el botón “UP” o el botón<br />
“DOWN” para aumentar o disminuir, respectivamente, el valor del parámetro.<br />
TEMP. COLOR<br />
Esta opción permite ajustar la temperatura del color. Pulse el botón “UP” o el botón “DOWN” para seleccionar el valor<br />
deseado.<br />
AJUSTE DEL COLOR<br />
Esta opción se utiliza para entrar en el submenú de ajustes del color.<br />
DS<strong>1092</strong>-060 38
2.2.2 AJUSTE DE LA IMAGEN<br />
Seleccione “IMAGEN” y pulse “MENÚ” para confirmar. Aparecerá el siguiente cuadro de diálogo en el que podrá<br />
modificar los ajustes de la pantalla.<br />
1280 X 1024 60HZ<br />
Color Posic - H 55 - ■■■■■■■█■■■ +<br />
Imagen Posic - V 35 - ■■■■█■■■■■■ +<br />
Función Fase 35 - ■■■■█■■■■■■ +<br />
Menú OSD Reloj 35 - ■■■■█■■■■■■ +<br />
Varios Nitidez 1 2 3 4 5<br />
Salir<br />
Salir<br />
POSIC-H<br />
Esta opción se utiliza para mover la imagen horizontalmente, hacia la izquierda o hacia la derecha. Pulse el botón<br />
“DOWN” para mover la imagen hacia la izquierda y el botón “UP” para moverla hacia la derecha.<br />
POSIC-V<br />
Esta opción se utiliza para mover la imagen verticalmente, hacia arriba o hacia abajo. Pulse el botón “DOWN” para<br />
mover la imagen hacia abajo y el botón “UP” para moverla hacia arriba.<br />
FASE<br />
Esta opción se utiliza para reducir las distorsiones y la inestabilidad de la pantalla. Pulse el botón “UP” o el botón<br />
“DOWN” para aumentar o disminuir, respectivamente, el valor del parámetro.<br />
RELOJ<br />
Esta opción se utiliza para reducir al mínimo las barras o rayas verticales en la pantalla. Pulse el botón “UP” o el botón<br />
“DOWN” para aumentar o disminuir, respectivamente, el valor del parámetro.<br />
NITIDEZ<br />
Esta opción permite optimizar la nitidez de la imagen. Seleccione un valor de 1 a 5.<br />
DS<strong>1092</strong>-060 39
2.2.3 FUNCIÓN<br />
Seleccione “FUNCIÓN” y pulse “MENÚ” para confirmar. Aparecerá el siguiente cuadro de diálogo en el que podrá<br />
modificar los ajustes de dimensión y posición de la imagen en la pantalla.<br />
1280 X 1024 60HZ<br />
Color Auto ajuste SÍ NO<br />
Imagen Auto color SÍ NO<br />
Función<br />
Salir<br />
Menú OSD<br />
Varios<br />
Salir<br />
AUTO AJUSTE<br />
Esta opción permite ajustar automáticamente la configuración de vídeo. Pulse el botón “UP” o el botón “DOWN” para<br />
aumentar o disminuir, respectivamente, el valor del parámetro.<br />
AUTO COLOR<br />
Esta opción permite ajustar automáticamente los colores de la imagen. Pulse el botón “UP” o el botón “DOWN” para<br />
aumentar o disminuir, respectivamente, el valor del parámetro.<br />
DS<strong>1092</strong>-060 40
2.2.4 MENÚ OSD<br />
Seleccione “MENÚ OSD” y pulse “MENÚ” para confirmar. Aparecerá el siguiente cuadro de diálogo en el que podrá<br />
modificar los ajustes del menú OSD (On Screen Display).<br />
1280 X 1024 60HZ<br />
Color<br />
Idioma<br />
Imagen Pos-H OSD 35 - ■■■■█■■■■■■ +<br />
Función Pos-V OSD 35 - ■■■■█■■■■■■ +<br />
Menú OSD OSD Temp SÍ NO<br />
Varios<br />
Salir<br />
Salir<br />
IDIOMA<br />
Esta opción permite seleccionar el idioma de los controles. Pulse el botón “UP” o el botón “DOWN” para seleccionar el<br />
valor deseado.<br />
POS-H OSD<br />
Esta opción permite modificar la posición horizontal del menú OSD. Pulse el botón “UP” para mover la imagen hacia la<br />
derecha y el botón “DOWN” para moverla hacia la izquierda.<br />
POS-V OSD<br />
Esta opción permite modificar la posición vertical del menú OSD. Pulse el botón “UP” para mover la imagen hacia arriba<br />
y el botón “DOWN” para moverla hacia abajo.<br />
OSD TEMP<br />
Esta opción se utiliza para definir el tiempo durante el cual el menú OSD se muestra en la pantalla (de 0 a<br />
27 segundos). Pulse el botón “UP” o el botón “DOWN” para aumentar o disminuir, respectivamente, el valor del<br />
parámetro.<br />
DS<strong>1092</strong>-060 41
2.2.5 VARIOS<br />
Seleccione “VARIOS” y pulse “MENÚ” para confirmar. Aparecerá la siguiente pantalla:<br />
1280 X 1024 60HZ<br />
Color Resolución 640 X 400 720 X 400<br />
Imagen Reset SÍ NO<br />
Función Volumen 35 - ■■■■█■■■■■■ +<br />
Menú OSD<br />
Salir<br />
Varios<br />
Salir<br />
RESOLUCIÓN<br />
Menú no aplicable. La resolución la determina el dispositivo conectado. Las resoluciones compatibles son: 640x480,<br />
800x600, 1024x768 y 1280x1024.<br />
RESET<br />
Restablece los valores de fábrica del monitor.<br />
VOLUMEN<br />
Esta opción permite ajustar el volumen de audio.<br />
Pulse el botón “UP” o el botón “DOWN” para aumentar o disminuir, respectivamente, el valor del parámetro.<br />
DS<strong>1092</strong>-060 42
3 CALIDAD DEL MONITOR LCD Y PÍXELES<br />
El monitor TFT utiliza una tecnología de alta precisión, fabricada de acuerdo con los estándares de Urmet, que garantiza<br />
un funcionamiento correcto. Sin embargo, la pantalla puede presentar pequeñas imperfecciones en forma de pequeños<br />
puntos oscuros o brillantes. Son defectos muy comunes relacionados con la naturaleza específica de la tecnología TFT,<br />
que determina la posible presencia de discontinuidades en la pantalla, y que en ningún caso son específicos de los<br />
productos de Urmet.<br />
Estas imperfecciones son causadas por algún píxel o subpíxel defectuoso.<br />
‣ Un píxel es una combinación de un subpíxel rojo, uno verde y uno azul.<br />
‣ Un píxel completo defectuoso estará permanentemente encendido (un punto brillante sobre un fondo oscuro) o<br />
permanentemente apagado (un punto oscuro sobre un fondo brillante). El primer caso es el más perceptible.<br />
‣ Un subpíxel defectuoso es menos visible que un píxel completo defectuoso y es visible solo sobre un fondo<br />
específico.<br />
Urmet garantiza que los monitores LCD cumplen los estándares de calidad vigentes y, por lo tanto, no presentan más de:<br />
‣ 2 puntos brillantes.<br />
‣ 1 punto oscuro.<br />
‣ 3 puntos brillantes y oscuros en total.<br />
Urmet espera que la calidad de las pantallas de cristal líquido mejoren con el tiempo y se reduzca el número de defectos<br />
perceptibles.<br />
Con la presente comunicación, se informa al cliente de Urmet acerca del estándar de calidad de la pantalla LCD con el<br />
fin de prestar un servicio lo más transparente posible.<br />
4 ESPECIFICACIONES DEL PRODUCTO<br />
Pantalla LCD: ............................................................................................................................................................17” TFT<br />
Tiempo de respuesta: ....................................................................................................................................................8 ms<br />
Resolución: ......................................................................................................................................................1.280 x 1.024<br />
Píxel: ................................................................................................................................................................0,264 x 0,264<br />
Colores:............................................................................................................................................................ 16,7 millones<br />
Contraste:..................................................................................................................................................................... 500:1<br />
Brillo: ..................................................................................................................................................................... 400 cd/m 2<br />
Frecuencia horizontal:.........................................................................................................................................31÷65 kHz<br />
Frecuencia vertical de refresco: ........................................................................................................................... 56÷75 Hz<br />
Ángulo de visión:......................................................................................................................................... (140°) horizontal<br />
.............................................................................................................................................. (120°) vertical<br />
Entrada de audio:...........................................................................................................................................................Jack<br />
Alimentador de tensión: ...................................................................................... Entrada AC: 100÷240 V, 1,0 A, 50/60 Hz<br />
........................................................................................................................ Salida DC: 12 V, 4 A<br />
Temperatura de funcionamiento: .................................................................................................................... 0 °C a +40 °C<br />
Temperatura de almacenamiento: ............................................................................................................... -25 °C a +60 °C<br />
Controles del panel frontal: ................................................Encender/Apagar, Volumen, Menú OSD, Botones de selección<br />
Controles OSD: .....................................................................................................Ver ajustes, Varios ajustes, Ajustes OSD<br />
Humedad:............................................................................................................................... 10% a 90% sin condensación<br />
Dimensiones (An. x Al. x Pr.): ...............................................................................................................380 x 380 x 190 mm<br />
Peso neto: ....................................................................................................................................................................5,8 kg<br />
Salidas de audio:......................................................................................................................................2 altavoces, 2,5 W<br />
Nota:<br />
Las especificaciones del producto pueden sufrir variaciones sin previo aviso.<br />
DS<strong>1092</strong>-060 43
DS<strong>1092</strong>-060<br />
FILIALI<br />
20151 MILANO – V. Gallarate 218<br />
Tel. 02.380.111.75 - Fax 02.380.111.80<br />
00043 CIAMPINO (ROMA) V. L.Einaudi 17/19A<br />
Tel. 06.791.07.30 - Fax 06.791.48.97<br />
80013 CASALNUOVO (NA) V. Nazionale delle Puglie 3<br />
Tel. 081.193.661.20 - Fax 081.193.661.04<br />
30030 VIGONOVO (VE) – Via del Lavoro 71<br />
Tel. 049.738.63.00 r.a. - Fax 049.738.63.11<br />
66020 S.GIOVANNI TEATINO (CH) - Via Nenni 17<br />
DS<strong>1092</strong>-060<br />
loc. Sambuceto Tel. 085.44.64.851<br />
Tel. 085.44.64.033 - Fax 085.44.61.862<br />
http://www.urmetdomus.com<br />
e-mail: info@urmetdomus.it 44<br />
Prodotto in Cina su specifica URMET Domus<br />
Made in China to URMET Domus specification<br />
SEDE<br />
URMET DOMUS S.p.A.<br />
10154 TORINO (ITALY)<br />
VIA BOLOGNA 188/C<br />
Telef.<br />
+39.011.24.00.000 (RIC.AUT.)<br />
Fax +39.011.24.00.300 - 323<br />
Area Tecnica<br />
Servizio Clienti +39.011.23.39.810