IATTENZIONE - V-Tech Garage Equipment
IATTENZIONE - V-Tech Garage Equipment
IATTENZIONE - V-Tech Garage Equipment

You also want an ePaper? Increase the reach of your titles
YUMPU automatically turns print PDFs into web optimized ePapers that Google loves.
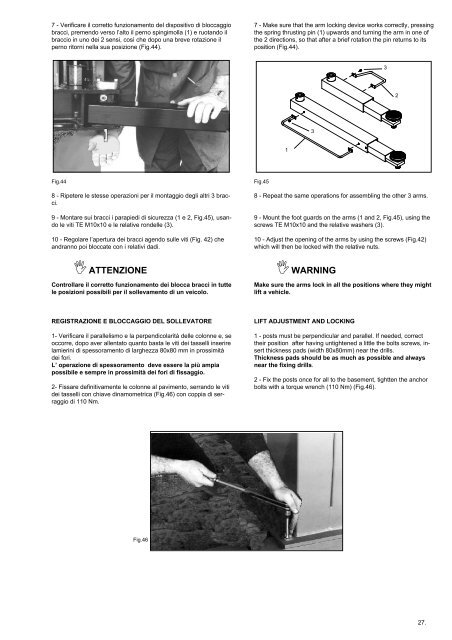
7 - Verificare il corretto funzionamento del dispositivo di bloccaggio<br />
bracci, premendo verso l’alto il perno spingimolla (1) e ruotando il<br />
braccio in uno dei 2 sensi, così che dopo una breve rotazione il<br />
perno ritorni nella sua posizione (Fig.44).<br />
7 - Make sure that the arm locking device works correctly, pressing<br />
the spring thrusting pin (1) upwards and turning the arm in one of<br />
the 2 directions, so that after a brief rotation the pin returns to its<br />
position (Fig.44).<br />
3<br />
2<br />
3<br />
1<br />
Fig.44<br />
8 - Ripetere le stesse operazioni per il montaggio degli altri 3 bracci.<br />
9 - Montare sui bracci i parapiedi di sicurezza (1 e 2, Fig.45), usando<br />
le viti TE M10x10 e le relative rondelle (3).<br />
10 - Regolare l’apertura dei bracci agendo sulle viti (Fig. 42) che<br />
andranno poi bloccate con i relativi dadi.<br />
Fig.45<br />
8 - Repeat the same operations for assembling the other 3 arms.<br />
9 - Mount the foot guards on the arms (1 and 2, Fig.45), using the<br />
screws TE M10x10 and the relative washers (3).<br />
10 - Adjust the opening of the arms by using the screws (Fig.42)<br />
which will then be locked with the relative nuts.<br />
ATTENZIONE<br />
Controllare il corretto funzionamento dei blocca bracci in tutte<br />
le posizioni possibili per il sollevamento di un veicolo.<br />
WARNING<br />
Make sure the arms lock in all the positions where they might<br />
lift a vehicle.<br />
REGISTRAZIONE E BLOCCAGGIO DEL SOLLEVATORE<br />
1- Verificare il parallelismo e la perpendicolarità delle colonne e, se<br />
occorre, dopo aver allentato quanto basta le viti dei tasselli inserire<br />
lamierini di spessoramento di larghezza 80x80 mm in prossimità<br />
dei fori.<br />
L’ operazione di spessoramento deve essere la più ampia<br />
possibile e sempre in prossimità dei fori di fissaggio.<br />
2- Fissare definitivamente le colonne al pavimento, serrando le viti<br />
dei tasselli con chiave dinamometrica (Fig.46) con coppia di serraggio<br />
di 110 Nm.<br />
LIFT ADJUSTMENT AND LOCKING<br />
1 - posts must be perpendicular and parallel. If needed, correct<br />
their position after having untightened a little the bolts screws, insert<br />
thickness pads (width 80x80mm) near the drills.<br />
Thickness pads should be as much as possible and always<br />
near the fixing drills.<br />
2 - Fix the posts once for all to the basement, tightten the anchor<br />
bolts with a torque wrench (110 Nm) (Fig.46).<br />
Fig.46<br />
27.