Sch./ Ref./ Typ/ Ref. 1092/204A Mod. 1092
Sch./ Ref./ Typ/ Ref. 1092/204A Mod. 1092
Sch./ Ref./ Typ/ Ref. 1092/204A Mod. 1092

You also want an ePaper? Increase the reach of your titles
YUMPU automatically turns print PDFs into web optimized ePapers that Google loves.
..<br />
DS<strong>1092</strong>-114A<br />
<strong>Mod</strong>.<br />
<strong>1092</strong><br />
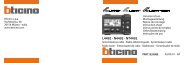
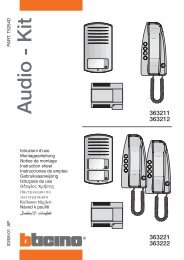
MINITELECAMERA DAY & NIGHT CON LED IR<br />
DAY & NIGHT MINI CAMERA WITH IR LED<br />
MINI-CAMERA DAY & NIGHT AVEC DIODE IR<br />
TAG&NACHT KAMERA MIT IR LED<br />
MINICÁMARA DÍA/NOCHE CON LED IR<br />
<strong>Sch</strong>./ <strong>Ref</strong>./ <strong>Typ</strong>/ <strong>Ref</strong>. <strong>1092</strong>/<strong>204A</strong><br />
MANUALE D’USO<br />
INSTRUCTIONS<br />
MANUEL D’INSTALLATION<br />
GEBRAUCHSANLEITUNG<br />
MANUAL DE USUARIO
ITALIANO<br />
PRECAUZIONI D’USO<br />
Assicurarsi dell’integrità dell’apparecchio dopo averlo tolto dall’imballo.<br />
Prima di effettuare qualsiasi operazione di pulizia o di manutenzione disinserire l’apparecchio dalla<br />
rete di alimentazione elettrica. Non usare prodotti spray per la pulizia dell’apparecchio.<br />
Controllare che la temperatura d’esercizio sia nei limiti indicati e che l’ambiente non sia<br />
particolarmente umido.<br />
In caso di guasto e/o cattivo funzionamento togliere l’alimentazione tramite l’interruttore generale.<br />
Il dispositivo deve essere aperto soltanto da personale tecnico qualificato.<br />
Per le riparazioni rivolgersi solo ad un centro di assistenza tecnica autorizzato.<br />
CARATTERISTICHE TECNICHE<br />
Tipo di sensore:...............................................................................................1/3”Sony CCD- DAY & NIGHT<br />
Elemento sensibile: ................................................................512 pixel (orizzontale) x 582 pixel (verticale)<br />
Ottica: ........................................................................................................................ Varifocal - f4-9mm - F2<br />
Angolo di ripresa:............................................................................................................................~33° ~70°<br />
Sistema di scansione:....................................................... 2:1 interlacciato CCIR - V:50 Hz – H:15.625 KHz<br />
Risoluzione orizzontale:.................................................................................................................... 420 linee<br />
Sincronizzazione: ..................................................................................................................................Interna<br />
Controllo shutter: ...............................................................................................1/50 ~ 1/100.000 sec (AUTO)<br />
Compensazione controluce:................................................................................................................... AUTO<br />
Bilanciamento del bianco: ...................................................................................................................... AUTO<br />
Controllo del guadagno: ......................................................................................................................... AUTO<br />
Luminosità minima:.............................................................0.3 Lux con F2 IR spenti (0 Lux con IR accesi)<br />
Numero unità LED:........................................................................................................................................42<br />
Angolo apertura LED: ............................................................................N°19 LED A 60° / N°23 LED A 45°<br />
Portata massima luce IR: ...................................................................................................................... ~ 30 m<br />
Uscita video: ..............................................................................................Uscita composita 1 Vpp, 75 Ohm<br />
Rapporto S/R:.................................................................................................................... >48 dB (AGC OFF)<br />
Alimentazione: ......................................................................................................................... 12 VDC (10%)<br />
Consumo: ...........................................................................90 mA (con IR spenti) / 480 mA (con IR accesi)<br />
Grado di protezione:.................................................................................................................................. IP66<br />
Temperatura di utilizzo: ...................................................................................................................... -2050°c<br />
Temperatura d’immagazzinamento:.................................................................................................. -4060°c<br />
Peso: ...................................................................................................................................................... 400 gr<br />
Nota Bene<br />
Le caratteristiche tecniche possono essere soggette a variazione senza alcun preavviso.<br />
ACCESSORI A CORREDO<br />
N°1 staffa di sostegno.<br />
N°1 chiave a brugola.<br />
Manuale d’uso.<br />
Nota Bene<br />
La composizione degli accessori a corredo può essere variata senza alcun preavviso.<br />
2 DS<strong>1092</strong>-114A
DIMENSIONI (mm)<br />
84 142<br />
177<br />
79<br />
205<br />
NORME D’INSTALLAZIONE<br />
Evitare di puntare direttamente l’obiettivo contro il sole o contro luci intense, anche se la telecamera è<br />
spenta; il soggetto da riprendere non deve essere in controluce.<br />
Evitare di puntare la telecamera verso oggetti riflettenti.<br />
La presenza di alcuni tipi di luce (ad esempio fluorescente colorata) può falsare i colori.<br />
È opportuno prevedere a monte degli apparecchi un idoneo interruttore di sezionamento e di<br />
protezione.<br />
Prima di collegare l'apparecchio alla rete di alimentazione accertarsi che i dati di targa siano<br />
rispondenti a quelli della rete di distribuzione.<br />
PRECAUZIONI PER L’INSTALLAZIONE<br />
Tenere in considerazione che, benché il dispositivo sia protetto con grado IP66, esistono ambienti<br />
critici (ad esempio le zone marine quali spiagge, porti, moli, ecc.) che possono velocizzare il processo<br />
corrosivo delle parti esterne; così come il posizionamento in luoghi particolarmente polverosi (cave,<br />
miniere, depositi di materiale polveroso, ecc.) può comprometterne il funzionamento ottimale.<br />
Per lo stesso motivo il dispositivo non deve essere installato vicino a fonti di calore come radiatori o<br />
condotti d’aria calda o in posizioni dove sia esposto direttamente all’irradiazione solare così come<br />
non deve essere installato in locali soggetti a eccessiva polvere, vibrazioni meccaniche o urti.<br />
Al fine di prevenire il surriscaldamento del dispositivo, collocarlo in una posizione ben aerata.<br />
Tenere in considerazione la temperatura di funzionamento dell’unità (-20°C ÷ +50°C) prima di<br />
scegliere il luogo per l’installazione. Non installare l’unità sopra un’altra apparecchiatura che emani<br />
calore.<br />
Non mettere in funzione il dispositivo immediatamente dopo il trasporto da un luogo freddo ad un<br />
luogo caldo e viceversa. Attendere mediamente tre ore: questo intervallo di tempo è necessario al<br />
dispositivo per adattarsi al nuovo ambiente (temperatura,umidità,ecc.).<br />
DS<strong>1092</strong>-114A 3
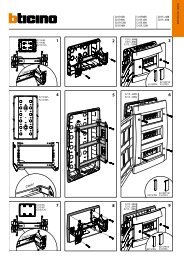
INSTALLAZIONE<br />
1 Prima d’iniziare l’installazione, assicurarsi che tutte le unità da collegare non siano alimentate.<br />
2 Posizionare la staffa in modo tale da riprendere le immagini prescelte, quindi procedere con il<br />
bloccaggio della staffa sul muro o su un’altra superficie piana.<br />
Nota Bene<br />
La staffa non deve essere smontata dalla telecamera al fine di non danneggiare il cavo.<br />
Evitare di svitare completamente la<br />
vite a brugola per la regolazione<br />
orizzontale / verticale della<br />
telecamera.<br />
<br />
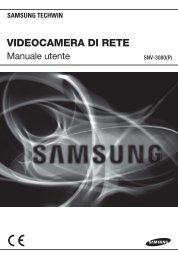
Evitare di ruotare completamente la telecamera sulla staffa per non rischiare di tranciare il cavo al suo<br />
interno.<br />
Max 60°<br />
Max 35°<br />
Max 170°<br />
Max 170°<br />
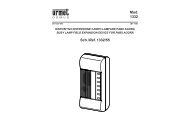
3 Collegare l’uscita video all’utilizzatore previsto.<br />
Alimentatore<br />
Cavo alimentazione<br />
Ingresso video<br />
4 Alimentare la minitelecamera.<br />
Cavo uscita video<br />
4 DS<strong>1092</strong>-114A
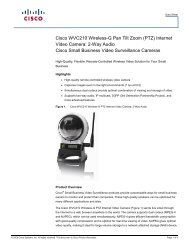
5 Effettuare la regolazione della lente per la ripresa voluta.<br />
Anteriore<br />
N ∞<br />
Ghiera di regolazione della messa a fuoco A<br />
Ghiera di regolazione VARIFOCAL B<br />
T<br />
W<br />
Posteriore<br />
<br />
<br />
Ruotare la ghiera di regolazione (B) in senso orario o antiorario per allontanare o avvicinare la<br />
visione del soggetto.<br />
Ruotare la ghiera di regolazione (A) in senso orario o antiorario per regolare la messa a fuoco<br />
di un soggetto vicino o lontano.<br />
CARATTERISTICHE DI FUNZIONAMENTO<br />
Accensione LED IR<br />
L’apparecchio è dotato di un sensore CDS che provvederà all’accensione dei LED IR quando l’intensità<br />
luminosa è inferiore a circa 10 LUX.<br />
Descrizione funzione DAY & NIGHT<br />
La modalità day & night è automatica.<br />
In condizioni di luminosità superiore a circa 10 LUX la telecamera è in modalità colore.<br />
Bilanciamento automatico del bianco<br />
La telecamera <strong>Sch</strong>.<strong>1092</strong>/<strong>204A</strong> utilizza un circuito di bilanciamento automatico del bianco che tende a<br />
correggere la tonalità dei colori quando le condizioni d’illuminazione variano.<br />
PULIZIA DEL DISPOSITIVO<br />
<br />
<br />
<br />
Usare un panno asciutto e strofinare leggermente per eliminare polvere o sporcizia.<br />
Nel caso la sporcizia non fosse eliminabile con un panno asciutto, compiere l’operazione con un<br />
panno inumidito di detergente neutro.<br />
Non usare liquidi volatili come benzina, alcool, solventi, ecc. o panni trattati chimicamente per pulire il<br />
dispositivo al fine di evitare deformazioni, deterioramenti o graffi nella finitura della superficie.<br />
DS<strong>1092</strong>-114A 5
ENGLISH<br />
PRECAUTIONS<br />
Make sure that the device is intact after removing it from the package.<br />
Disconnect the device from the mains before cleaning or maintenance. Do not use spray products to<br />
clean the device.<br />
Check that the working temperature is within the indicated range and that the environment is not<br />
particularly humid.<br />
Disconnect power by means of the circuit breaker in the event of a failure and/or bad operation.<br />
The device can only be opened by qualified technical personnel.<br />
Exclusively contact an authorised service centre for repairs.<br />
TECHNICAL SPECIFICATIONS<br />
<strong>Typ</strong>e of sensor:..............................................................................................1/3” Sony CCD - DAY & NIGHT<br />
Sensitive element: ................................................................. 512 pixels (horizontal) x 582 pixels (vertical)<br />
Optics: .......................................................................................................................Varifocal - f4-9 mm - F2<br />
Frame angle: ..................................................................................................................................~33° ~70°<br />
Scanning system: .............................................................. 2:1 interlaced - CCIR - V: 50 Hz - H: 15.625 kHz<br />
Horizontal resolution:........................................................................................................................ 420 lines<br />
Synchronisation:...................................................................................................................................Internal<br />
Shutter control: ..................................................................................................1/50 ~ 1/100,000 sec (AUTO)<br />
Back-lighting compensation:................................................................................................................... AUTO<br />
White balancing:..................................................................................................................................... AUTO<br />
Gain control: ........................................................................................................................................... AUTO<br />
Minimum luminosity:......................................................................0.3 Lux with F2 IR Off (0 Lux with IR on)<br />
Number of LEDs: ...........................................................................................................................................42<br />
LED opening angle:...................................................................................... N°19 LED 60° / N°23 LED 45°<br />
IR light maximum range:......................................................................................................................... ~30 m<br />
Video output: ............................................................................................Composite output 1 Vpp, 75 Ohm<br />
S/R ratio:............................................................................................................................ >48 dB (AGC OFF)<br />
Power: ...........................................................................................90 mA (with IR off) / 480 mA (with IR on)<br />
Degree of protection: ................................................................................................................................. IP66<br />
Working temperature range:........................................................................................................... -20 to 50°C<br />
Storage temperature range: ........................................................................................................... -40 to 60°C<br />
Weight: ................................................................................................................................................... 400 gr<br />
Important note:<br />
Product specifications may be subject to change without prior notice.<br />
ACCESSORIES PROVIDED<br />
1 Supporting bracket.<br />
1 Allen wrench.<br />
Instruction manual.<br />
Important note:<br />
Accessories may be changed without prior notice.<br />
6 DS<strong>1092</strong>-114A
DIMENSIONS (mm)<br />
84 142<br />
177<br />
79<br />
205<br />
INSTALLATION SPECIFICATIONS<br />
Avoid pointing the lens directly towards the sun or intense sources of light also when the camera is<br />
off. The subject must not be backlit.<br />
Do not point the camera towards reflecting objects.<br />
Some lighting systems (e.g. coloured fluorescent lights) may false the colours.<br />
Arrange a suitable circuit breaker and fuse upstream of the devices.<br />
Make sure that the rating plate data correspond to the power specifications before connecting the<br />
device to the mains.<br />
INSTALLATION PRECAUTIONS<br />
Though the device has an IP66 protection grade, there are particular environments (such as<br />
seashores, harbours, wharves, etc.) that can accelerate corrosion of external parts. Also installation<br />
in very dusty environments (quarries, mines, dusty materials, etc.) can compromise the optimal<br />
operation.<br />
To prevent device overheating, place it in a well aired position.<br />
For the same reason, the device must not be installed near heat sources as radiators or warm air<br />
ducts, in places where it is directly exposed to sun irradiation or in rooms with excessive dust<br />
accumulation, subject to mechanical vibrations or impacts.<br />
Consider the device operating temperature range (-20°C÷+50°C) before choosing the place for<br />
installation. Do not install the unit over another heating device.<br />
Do not power the device on immediately after moving it from a cold place to a warm one and vice<br />
versa. As a general rule, wait for three hours: the device needs this time to adapt to a new<br />
environment (temperature, humidity, etc.).<br />
DS<strong>1092</strong>-114A 7
INSTALLATION<br />
1. Make sure that no units are powered before starting the installation procedure.<br />
2. Install the mini camera on the bracket and fasten it.<br />
Important note:<br />
The bracket must not be disconnected from the camera body<br />
Watch out for the hex screw: just loosen<br />
it when adjusting the horizontal / vertical<br />
position of the camera. Do not unscrew it<br />
completely.<br />
<br />
Do not rotate the camera body through 360 deg as this may damage the cable running inside the<br />
joint.<br />
Max 60°<br />
Max 35°<br />
Max 170°<br />
Max 170°<br />
3. Position the bracket to frame the required picture and fasten it to the wall or other flat surface.<br />
4. Connect the video output to the utility.<br />
Power unit<br />
Cavo Power alimentazione<br />
wire<br />
5. Power the mini camera.<br />
Ingresso Video input video<br />
Video output wire<br />
8 DS<strong>1092</strong>-114A
6. Adjust the lens to frame the required images.<br />
N<br />
Front<br />
∞<br />
Focus adjustment ring A<br />
VARIFOCAL adjustment ring B<br />
T<br />
W<br />
Back<br />
Turn the VARIFOCAL adjustment ring (B), clockwise or anticlockwise, to move the subject<br />
closer or away.<br />
Turn the focus adjustment ring (A), clockwise or anticlockwise, to adjust focus of nearby or<br />
faraway subjects.<br />
OPERATING FEATURES<br />
IR LED operation<br />
The device is provided with a CDS sensor that switches the IR LEDs on when the light is less than<br />
approximately 10 Lux.<br />
DAY & NIGHT function description<br />
Day & night mode is automatic.<br />
If the light is over 10 LUX, the camera will work in colour.<br />
Automatic white balancing<br />
The <strong>1092</strong>/<strong>204A</strong> camera implements an automatic white balancing circuit which is capable of correcting the<br />
colour tones as environmental light conditions change.<br />
CLEANING THE DEVICE<br />
<br />
<br />
<br />
Rub delicately with a dry cloth to remove dust and dirt.<br />
Dip the cloth in neutral detergent if dirt cannot be eliminated with a dry cloth alone.<br />
Do not use volatile liquids (such as petrol, alcohol, solvents, etc.) or chemically treated clothes to<br />
clean the device to prevent deformation, deterioration or scratches to the paint finish.<br />
DS<strong>1092</strong>-114A 9
PRECAUTIONS D'UTILISATION<br />
<br />
<br />
<br />
<br />
<br />
<br />
<br />
FRANÇAIS<br />
Après avoir retiré l’emballage, s’assurer de l’état intact de l’appareil.<br />
Avant de procéder à toute opération de nettoyage ou de maintenance, débrancher l’appareil du<br />
secteur. Ne pas utiliser de produits en spray pour le nettoyage de l’appareil.<br />
Vérifier que la température de fonctionnement est conforme aux limites indiquées et que<br />
l'environnement ne présente pas une humidité excessive.<br />
Si la caméra est installée à l'extérieur, il est préférable de la placer dans une endroit protégé, à l'abri<br />
des agents atmosphériques les plus intenses (fortes pluies ou températures élevées).<br />
En cas de panne et/ou de fonctionnement irrégulier, couper l’alimentation à l’aide de l’interrupteur<br />
général.<br />
Seul un personnel technique qualifié peut ouvrir le dispositif.<br />
Pour les réparations, s’adresser uniquement à un centre après-vente agréé par le constructeur<br />
CARACTERISTIQUES TECHNIQUES<br />
<strong>Typ</strong>e de capteur :..........................................................................................1/3” Sony CCD - DAY & NIGHT<br />
Elément sensible :.................................................................512 pixels (horizontal) x 582 pixels (vertical)<br />
Optique :....................................................................................................................Vari focal - f 4-9 mm F2<br />
Angle de filmage :...........................................................................................................................~33° ÷ ~70°<br />
Système de balayage :............................................................2:1 interfacé CCIR - V:50 Hz – H:15.625 KHz<br />
Résolution horizontale :.................................................................................................................. 420 lignes<br />
Synchronisation :.................................................................................................................................Interne<br />
Commande de l'obturateur :..............................................................................1/50 ~ 1/100.000 sec (AUTO)<br />
Compensation contre-jour :....................................................................................................................AUTO<br />
Equilibrage du blanc :.............................................................................................................................AUTO<br />
Contrôle du gain :.................................................................................................................................AUTO<br />
Luminosité minimum :.......................................................0.3 Lux F2 avec IR éteint (0 Lux avec IR allumé)<br />
Nombre de diodes :.....................................................................................................................................42<br />
Angle d'ouverture diode :............................................................................ N°19 LED 60° / N°23 LED 45°<br />
Portée maximum lumière IR :................................................................................................................~ 30 m<br />
Sortie vidéo :............................................................................................Sortie composite 1 Vpp, 75 Ohms<br />
Rapport S/R :.....................................................................................................................>48 dB (AGC OFF)<br />
Alimentation :...........................................................................................................................12 VCC (±10%)<br />
Consommation :............................................................90 mA (avec IR éteint) / 480 mA (avec IR allumé)<br />
Degré de protection :...............................................................................................................................IP66<br />
Température de fonctionnement :......................................................................................................-20÷50°C<br />
Température de stockage :...............................................................................................................-40÷60°C<br />
Poids :...................................................................................................................................................400 gr<br />
* Note Importante:<br />
Les spécifications du produit peuvent changer sans préavis.<br />
ACCESSOIRES DE SERIE<br />
• N°1 étrier de support.<br />
• N°1 clé à six pans.<br />
• Manuel d’installation.<br />
* Note Importante:<br />
Les accessoires fournis peuvent être modifiés sans préavis.<br />
10 DS<strong>1092</strong>-114A
DIMENSIONS (mm)<br />
84 142<br />
177<br />
79<br />
205<br />
NORMES D’INSTALLATION<br />
Eviter de diriger directement l'objectif vers le soleil ou des sources lumineuses intenses, et ce même<br />
si la caméra est éteinte ; le sujet à filmer ne doit pas être à contre-jour.<br />
Eviter d'orienter la caméra vers des sujets réfléchissants.<br />
La présence de certains types de lumière (par exemple, fluorescente colorée) peut altérer les<br />
couleurs.<br />
Il est conseillé de prévoir un interrupteur de sectionnement et de protection en amont de l’appareil.<br />
Avant de brancher l’appareil au secteur, s’assurer que ses caractéristiques nominales correspondent<br />
bien à celles du réseau d’alimentation.<br />
PRECAUTIONS D’INSTALLATION<br />
Pour éviter la surchauffe, placez cette caméra dans un endroit aéré.<br />
Bien que la caméra ait un indice de protection IP66, certains environnements peuvent accélerer la<br />
corrosion et le vieillissement ( eau de mer, piscines chlorées,etc.). Des environnements poussiéreux<br />
peuvent également altérer les images.<br />
Pour la même raison, ne pas installer près de sources de chaleur actives (radiateurs), ou exposé<br />
directement aux rayonnements solaires. Evitez également les endroits poussiéreux, soumis à des<br />
vibrations excessives ou à des chocs répétés.<br />
Ne perdez pas de vue les conditions environnementales pour un bon fonctionnement (-10°C÷+50°C)<br />
AVANT l’installation.<br />
Ne mettez jamais en route le dôme si vous le déplacez d’un endroit froid à un endroit chaud. Laissez<br />
le s’adapter aux nouvelles conditions (température, humidité) pendant au moins trois heures.<br />
DS<strong>1092</strong>-114A 11
INSTALLATION<br />
1. Ne pas alimenter la camera pendant la phase d’installation.<br />
2. Vous pouvez desserrer les deux vis hexagonales (clé Allen fournie) pour orienter la caméra.<br />
Note importante:<br />
NE DECONNECTEZ PAS LA CAMERA ET LE SUPPORT SOUS PEINE DE DETERIORATION<br />
Précaution : desserrez simplement cette vis<br />
hexagonale pour orienter la camera. Ne la<br />
desserrez pas complètement !!<br />
<br />
Ne pas faire tourner le corps de caméra de plus de 360 degrés afin de ne pas endommager le câble<br />
à l’intérieur (joints).<br />
Max 60°<br />
Max 35°<br />
Max 170°<br />
Max 170°<br />
3. Positionnez le support de façon à obtenir le cadrage voulu et fixez le sur un support plat et exempt<br />
de vibrations.<br />
4. Connectez la sortie vidéo au moniteur.<br />
5. Alimentez la caméra une fois fixée pour la suite des réglages.<br />
12 DS<strong>1092</strong>-114A
6. Réglage de l’objectif pour obtenir l’image voulue.<br />
N<br />
Avant<br />
∞<br />
Bague de réglage FocusA<br />
Bague de réglage VARIFOCALB<br />
T<br />
W<br />
Arrière<br />
‣ Tournez la bague de VARIFOCAL (B), dans le sens des aiguilles d’une montre ou en sens<br />
inverse afin de rapprocher ou d’éloigner le sujet.<br />
‣ Tournez la bague de FOCUS (A), dans le sens des aiguilles d’une montre ou en sens<br />
inverse afin d’obtenir une image nette.<br />
CARACTERISTIQUES<br />
Fonctionnement IR LED<br />
La camera est équipée d’un capteur CDS qui active les LEDs IR lorsque le niveau d’éclairage est inférieur<br />
à 10 Lux.<br />
Description de la fonction DAY & NIGHT<br />
Lorsque la caméra est en mode nuit, (LEDs allumées), l'image sera affichée en noir/blanc.<br />
Equilibrage automatique du blanc<br />
La caméra utilise un circuit d'équilibrage automatique du blanc, en mesure de rectifier le ton des couleurs<br />
au fur et à mesure que les conditions d'éclairage changent.<br />
Nettoyage de la caméra :<br />
<br />
<br />
Frotter doucement avec un chiffon doux pour enlever la poussière.<br />
N’utilisez pas de liquides volatils, de solvants, de chiffons pré-imprégnés ou de<br />
lingettes traitées pour nettoyer la caméra.<br />
DS<strong>1092</strong>-114A 13
DEUTSCH<br />
VORSICHTSMASSNAHMEN<br />
Nach dem Auspacken des Gerätes muss sichergestellt werden, dass es sich in einwandfreiem<br />
Zustand befindet.<br />
Vor dem Ausführen jeglicher Reinigungs- oder Wartungsarbeiten, das Gerät vom<br />
Stromversorgungsnetz trennen. Für die Reinigung des Geräts keine Sprays verwenden.<br />
Wenn extern installiert, ist die Positionierung in einer geschützten Umgebung vorzuziehen, d.h., nicht<br />
in direktem Kontakt mit großen Witterungseinflüssen (Regenfälle oder erhöhte Temperaturen).<br />
Bei Defekten und/oder mangelnder Funktionstüchtigkeit, die Versorgung über den Hauptschalter<br />
abschalten.<br />
Das Gerät darf nur von qualifiziertem technischem Personal geöffnet werden.<br />
Für Reparaturen wenden Sie sich bitte nur an ein autorisiertes Zentrum des technischen<br />
Kundendiensts.<br />
TECHNISCHE EIGENSCHAFTEN<br />
Sensorart: ................................................................................................... 1/3” Sony CCD – TAG & NACHT<br />
Fühlglied: ..................................................................................512 Pixel (Horizontal) x 582 Pixel (Vertikal)<br />
Optik: .........................................................................................................................Varifokal - f4-9 mm - F2<br />
Aufnahmewinkel: ............................................................................................................................~33° ~70°<br />
Scannersystem:.............................................................. 2:1 Verflochten - CCIR - V: 50 Hz - H: 15.625 kHz<br />
Horizontale Auflösung: ............................................................................................................. 420 TV-Linien<br />
Synchronisierung:....................................................................................................................................Intern<br />
Steuerung Shutter: ............................................................................................1/50 ~ 1/100,000 sec (AUTO)<br />
Gegenlichtkompensation: ....................................................................................................................... AUTO<br />
Weißabgleich:......................................................................................................................................... AUTO<br />
Steuerung der Verstärkung: ................................................................................................................... AUTO<br />
Mindest-Beleuchtungsstärke: .........................................................0.3 Lux with F2 IR Off (0 Lux mit IR Ein)<br />
Anzahl LED-Einheiten: ..................................................................................................................................42<br />
Öffnungswinkel LED:......................................................................................19 LED´s 60° / 23 LED´s 45°<br />
Max. Reichweite IR-Licht:....................................................................................................................... ~30 m<br />
Videoausgang:.......................................................................... Mehrteiliger Videoausgang 1 Vpp, 75 Ohm<br />
Verhältnis S/R:...................................................................................................................>48 dB (AGC AUS)<br />
Versorgung: ........................................................................................................................... 12 VDC ( 10 %)<br />
Verbrauch: .......................................... 90 mA (bei ausgeschalteten IR) / 480 mA (bei eingeschalteten IR)<br />
Grad des <strong>Sch</strong>utzes:................................................................................................................................... IP66<br />
Betriebstemperatur:........................................................................................................................-10 to 50°C<br />
Lagertemperatur: ............................................................................................................................-40 to 60°C<br />
Gewicht:................................................................................................................................................... 400 g<br />
Beachten:<br />
Produkteigenschaften können ohne vorherige Ankündigung geändert werden.<br />
IN DER LIEFERUNG ENTHALTENES ZUBEHÖR<br />
1 Kamera mit 420 TV-Linien, 4-9mm Objektiv und IR-LED´s<br />
1 Halterung<br />
1 Innensechskantschlüssel<br />
Gebrauchsanleitung<br />
Beachten:<br />
Zubehör kann ohne vorherige Ankündigung geändert werden.<br />
14 DS<strong>1092</strong>-114A
ABMESSSUNGEN (mm)<br />
84 142<br />
177<br />
79<br />
205<br />
INSTALLATIONSBESTIMMUNGEN<br />
Vermeiden Sie es, das Objektiv direkt gegen die Sonne oder intensive Lichteinstrahlung zu richten,<br />
auch bei ausgeschalteter Kamera. Der aufzunehmende Gegenstand darf sich nicht im Gegenlicht<br />
befinden.<br />
Vermeiden Sie es, die Kamera auf reflektierende Gegenstände.<br />
Einige Lichtarten (z.B. fluoreszierendes farbiges Licht) können die Farben verfälschen.<br />
Es ist von Vorteil dem Gerät einen geeigneten Trenn – und <strong>Sch</strong>utzschalter vorzuschalten.<br />
Bevor das Gerät an das Versorgungsnetz angeschlossen wird, ist sicherzustellen, dass die<br />
Kenndaten denen des Verteilernetzes entsprechen.<br />
VORSICHTSMASSNAHMEN BEI DER INSTALLATION<br />
Das Gerät besitzt einen <strong>Sch</strong>utzgrad IP66, das Klima kann aber auch in einigen Bereichen (wie z. B.<br />
Werften, Meeresstrände, usw.) eine Korrosion an externen Teilen des Gerätes auslösen. Auch die<br />
Installation in staubigen Bereichen (Steinbrüche, Minen, usw..) kann den optimalen Betrieb<br />
beeinträchtigen.<br />
Zum <strong>Sch</strong>utz der Überhitzung bitte das Gerät in gut klimatisierten Bereichen montieren.<br />
Das Gerät nicht in Umgebungen verwenden, in denen Rauch, Dampf, Staub oder starke Vibrationen<br />
vorhanden sind.<br />
Achten Sie auf die Betriebstemperatur (-10°C÷+50°C) des Gerätes, bevor Sie den geeigneten Ort der<br />
Installation auswählen. Installieren Sie das Gerät daher nicht in der Nähe von Wärmequellen.<br />
Gerät nicht unmittelbar nach dem Transport von einem kühlen an einen warmen Ort oder umgekehrt<br />
in Betrieb nehmen. Im Durchschnitt sind drei Stunden abzuwarten: dieser Zeitraum ist erforderlich,<br />
damit das Gerät sich an die neue Umgebung anpassen kann (Temperatur, Feuchtigkeit, etc.).<br />
DS<strong>1092</strong>-114A 15
INSTALLATION<br />
1 Vor der Installation sicherstellen, dass alle anzuschließenden Einheiten von der Versorgung<br />
getrennt sind.<br />
2 Montieren Sie die Minikamera an der Halterung und befestigen Sie die <strong>Sch</strong>raube.<br />
Beachten:<br />
Der Halter muss nicht vom Kamerakörper getrennt werden.<br />
Achten auf die Inbussschraube<br />
diese könnte verloren gehen, wenn<br />
die Kamera gedreht wird. Daher<br />
bitte die <strong>Sch</strong>raube nicht komplett<br />
rausschrauben.<br />
<br />
Bitte den Kamerakörper nicht um 360° drehen, da sonst das innen liegende Kabel beschädigt wird.<br />
Max 60°<br />
Max 35°<br />
Max 170°<br />
Max 170°<br />
3 Positionieren Sie die Halterung in der gewünschten Position für den gewollten Bildausschnitt und<br />
befestigen Sie die Halterung an der Wand, Decke oder auf einer anderen flachen Oberfläche.<br />
4 Verbinden Sie den Videoausgang mit den Geräten.<br />
Netzgerät<br />
Cavo Spannungsversorgung<br />
alimentazione<br />
Videoausgang<br />
Ingresso Videoeingang video<br />
16 DS<strong>1092</strong>-114A
5 <strong>Sch</strong>alten Sie die Versorgungsspannung ein.<br />
6 Einstellung des Objektivs für die gewünschte Aufnahme vornehmen.<br />
N<br />
Vorne<br />
∞<br />
<strong>Sch</strong>ärfe-Einstellring A<br />
VARIFOKAL-Einstellring B<br />
T<br />
W<br />
<br />
Hinten<br />
Drehen Sie den Varifokal-Einstellring (B), im oder gegen den Uhrzeigersinn, um das Objekt<br />
näher oder weiter entfernt zu betrachten.<br />
Drehen Sie den <strong>Sch</strong>ärfe-Einstellring (A), im oder gegen den Uhrzeigersinn, um das Objekt um<br />
nahe oder ferne Objekte scharf zu stellen.<br />
FUNKTIONSWEISE<br />
Einschalten der IR-LED<br />
Das Gerät ist mit einem CDS-Sensor ausgestattet, der für das Einschalten der IR-LED sorgt, wenn die<br />
Lichtintensität unter ca. 10 LUX liegt.<br />
Funktionsbeschreibung TAG & NACHT<br />
Die Umschaltung des Tag & Nacht <strong>Mod</strong>us erfolgt automatisch.<br />
Sind die Lichtverhältnisse über 10 LUX stellt die Kamera die Videobilder in Farbe dar.<br />
Sind die Lichtverhältnisse unter 10 LUX schaltet die Kamera auf <strong>Sch</strong>warz/Weiß Darstellung um.<br />
Automatischer Weißabgleich<br />
Die Kamera <strong>1092</strong>/<strong>204A</strong> verwendet einen automatischen Stromkreis zum Weißabgleich, der in der Lage ist,<br />
die Farbtöne zu korrigieren, wenn die Lichtbedingungen variieren.<br />
REINIGUNG DES GERÄTES<br />
Um Staub und <strong>Sch</strong>mutz zu entfernen, Gerät mit einem trockenen Tuch abreiben.<br />
Sollte der <strong>Sch</strong>mutz mit einem trockenen Tuch nicht zu entfernen sein, Gerät mit einem feuchten<br />
Lappen und Neutralreiniger abwischen.<br />
Um Verformungen, Beschädigungen oder Kratzer im Lack zu verhindern, keine flüchtigen<br />
Flüssigkeiten wie Benzin, Alkohol, Lösungsmittel etc. oder chemisch behandelte Tücher zur<br />
Reinigung des Geräts verwenden.<br />
DS<strong>1092</strong>-114A 17
ESPAÑOL<br />
PRECAUCIONES<br />
Asegúrese de que el equipo está intacto después de sacarlo del embalaje.<br />
Desconecte el equipo de la tensión eléctrica antes de limpiarlo o realizar tareas de mantenimiento.<br />
No utilice aerosoles para limpiar el equipo.<br />
Compruebe que la temperatura de funcionamiento se encuentra dentro del rango indicado y que el<br />
ambiente no sea excesivamente húmedo.<br />
En caso de fallo o funcionamiento defectuoso, desconecte la alimentación eléctrica por medio del<br />
interruptor general.<br />
El equipo sólo puede ser abierto por personal técnico cualificado.<br />
Para su reparación, póngase en contacto exclusivamente con un centro de servicio técnico<br />
autorizado.<br />
ESPECIFICACIONES TÉCNICAS<br />
Tipo de sensor:........................................................................................... CCD de 1/3" SONY, DÍA/NOCHE<br />
Elemento sensible: .............................................................512 píxeles (horizontal) x 582 píxeles (vertical)<br />
Óptica: .......................................................................................................................Varifocal, f4 a 9 mm, F2<br />
Ángulo de visión: ...................................................................................................................33° a 70°, aprox.<br />
Sistema de entrelazado:........................................................2:1 entrelazado CCIR, V: 50 Hz, H: 15.625 Hz<br />
Resolución horizontal: .................................................................................................................... 420 líneas<br />
Sincronización: ......................................................................................................................................Interna<br />
Control de obturación: ...........................................................................................1/50 a 1/100.000 s (AUTO)<br />
Compensación por contraluz:................................................................................................................. AUTO<br />
Balance de blancos: ............................................................................................................................... AUTO<br />
Control de ganancia: .............................................................................................................................. AUTO<br />
Luminosidad mínima: ........................ 0,3 lux con F2, LEDs IR apagados; 0 lux con LEDs IR encendidos<br />
Número de LEDs:..........................................................................................................................................42<br />
Ángulo de apertura de los LEDs: ...................................................................... 19 LEDs 60°; 23 LEDs 45°<br />
Cobertura máxima con iluminación IR: ........................................................................................30 m, aprox.<br />
Salida de vídeo:..............................................................................................Vídeo compuesto 1 Vpp, 75 Ω<br />
Relación señal ruido: ........................................................................................................... >48 dB (sin AGC)<br />
Alimentación eléctrica:..................................................... 90 mA (IR desactivados), 480 mA (IR activados)<br />
Grado de protección:................................................................................................................................. IP66<br />
Temperatura de funcionamiento: ............................................................................................ -20 °C a +50 °C<br />
Temperatura de almacenamiento: .......................................................................................... -40 °C a +60 °C<br />
Peso: ....................................................................................................................................................... 400 g<br />
Nota:<br />
Las especificaciones del producto pueden sufrir variaciones sin previo aviso.<br />
ACCESORIOS SUMINISTRADOS<br />
1 soporte.<br />
1 llave Allen.<br />
Manual de usuario.<br />
Nota:<br />
Los accesorios están sujetos a modificaciones sin previo aviso.<br />
18 DS<strong>1092</strong>-114A
DIMENSIONES (mm)<br />
84 142<br />
177<br />
79<br />
205<br />
NORMAS DE INSTALACIÓN<br />
Evite dirigir el objetivo hacia la luz directa del sol o fuentes de luz intensa, incluso cuando la cámara<br />
esté apagada. El sujeto no debe estar a contraluz.<br />
Evite dirigir la cámara hacia objetos reflectantes.<br />
Algunos sistemas de iluminación (por ejemplo, las luces fluorescentes de color) pueden distorsionar<br />
los colores.<br />
Coloque un interruptor automático y un fusible adecuados antes de los equipos.<br />
Asegúrese de que los datos de la etiqueta de características se correspondan con las<br />
especificaciones de alimentación eléctrica antes de conectar el equipo a la red eléctrica.<br />
PRECAUCIONES DE INSTALACIÓN<br />
A pesar del grado de protección IP66 del equipo, el funcionamiento bajo ciertas condiciones (como<br />
en paseos marítimos y puertos) puede acelerar la corrosión de las piezas externas. Además, es<br />
posible que el funcionamiento no sea óptimo en lugares polvorientos, como canteras, minas o<br />
almacenes de material de obra.<br />
Instale el equipo en un lugar bien ventilado para evitar cualquier sobrecalentamiento.<br />
Por el mismo motivo, no instale el equipo cerca de fuentes de calor (como radiadores o salidas de<br />
aire caliente), en lugares expuestos a la luz solar directa, ambientes con excesivo polvo o zonas<br />
sometidas a vibraciones mecánicas o choques.<br />
Tenga en cuenta el rango de temperaturas de funcionamiento del equipo (de -20 °C a +50 °C)<br />
cuando elija el lugar de instalación. No instale el equipo encima de otro equipo que genere calor.<br />
No ponga en funcionamiento el equipo inmediatamente después de transportarlo de un lugar frío a<br />
otro caliente o viceversa. Como norma general, espere unas tres horas para que el equipo se adapte<br />
al nuevo ambiente (temperatura, humedad, etc.).<br />
DS<strong>1092</strong>-114A 19
INSTALACIÓN<br />
1. Antes de empezar el procedimiento de instalación, asegúrese de que ninguna unidad esté<br />
alimentada eléctricamente.<br />
2. Instale la minicámara en el soporte y fíjela.<br />
Nota:<br />
No separe el soporte de la cámara<br />
No desatornillar completamente el<br />
tornillo hexagonal; aflójelo un poco<br />
para ajustar la posición horizontal /<br />
vertical de la cámara.<br />
<br />
No gire la cámara 360 grados, ya que podría dañarse el cableado interno.<br />
Max 60°<br />
Max 35°<br />
Max 170°<br />
Max 170°<br />
3. Coloque el soporte de modo que pueda tomar las imágenes deseadas y atorníllelo a la pared o a<br />
una superficie plana.<br />
4. Conecte la salida de vídeo al equipo previsto.<br />
Alimentador<br />
Cable de alimentación<br />
Cable de salida de vídeo<br />
deo Entrada de vídeo<br />
20 DS<strong>1092</strong>-114A
5. Encienda la minicámara.<br />
6. Ajuste la óptica para tomar la imagen deseada.<br />
N<br />
Frontal<br />
∞<br />
Anillo de ajuste de enfoque A<br />
Anillo de ajuste de VARIFOCAL B<br />
T<br />
W<br />
Posterior<br />
<br />
<br />
Gire el anillo de ajuste VARIFOCAL (B) en sentido horario o antihorario, para acercar o alejar el<br />
objeto.<br />
Gire el anillo de ajuste de enfoque (A) en sentido horario o antihorario, para acercar o alejar el<br />
punto de enfoque.<br />
CARACTERÍSTICAS DE FUNCIONAMIENTO<br />
Funcionamiento con LEDs infrarrojos<br />
Este equipo está equipado con un sensor CDS que enciende automáticamente los LEDs infrarrojos si la<br />
iluminación es inferior a 10 lux.<br />
Descripción de la función Día/Noche<br />
El modo Día/Noche es automático.<br />
Si la iluminación supera los 10 lux, la cámara pasará a modo en color.<br />
Balance automático de blancos<br />
La cámara <strong>1092</strong>/<strong>204A</strong> incluye una electrónica de balance automático de blancos para corregir los tonos de<br />
color conforme cambian las condiciones ambientales de luz.<br />
LIMPIEZA DEL EQUIPO<br />
<br />
<br />
<br />
Frote delicadamente el dispositivo con un paño seco para quitar el polvo y la suciedad.<br />
Si la suciedad no desaparece con el paño seco, utilice un paño humedecido en detergente neutro.<br />
No utilice líquidos volátiles (como gasolina, alcohol, disolventes, etc.) ni paños tratados<br />
químicamente en la limpieza del dispositivo para evitar la deformación, deterioro o arañazos en su<br />
superficie.<br />
DS<strong>1092</strong>-114A 21
22 DS<strong>1092</strong>-114A
DS<strong>1092</strong>-114A 23
DS<strong>1092</strong>-114A<br />
Prodotto in Cina su specifica URMET Domus<br />
Made in China to URMET Domus specification<br />
FILIALI<br />
SEDE<br />
20151 MILANO – V.Gallarate 218<br />
Tel. 02.380.111.75 - Fax 02.380.111.80<br />
URMET DOMUS S.p.A.<br />
00043 CIAMPINO (ROMA) V.L.Einaudi 17/19A<br />
10154 TORINO (ITALY)<br />
Tel. 06.791.07.30 - Fax 06.791.48.97<br />
VIA BOLOGNA 188/C<br />
80013 CASALNUOVO (NA) V.Nazionale delle Puglie 3<br />
Telef.<br />
+39 011.24.00.000 (RIC.AUT.)<br />
Tel. 081.193.661.20 - Fax 081.193.661.04<br />
Fax +39 011.24.00.300 - 323<br />
30030 VIGONOVO (VE) – V.del Lavoro 71<br />
Area Tecnica<br />
Tel. 049.738.63.00 r.a. - Fax 049.738.63.11<br />
Servizio Clienti +39 011.23.39.810<br />
66020 24 S.GIOVANNI TEATINO (CH) – V.Nenni 17<br />
http://www.urmetdomus.com<br />
DS<strong>1092</strong>-114A<br />
loc. Sambuceto Tel. 085.44.64.851<br />
e-mail: info@urmetdomus.it<br />
Tel. 085.44.64.033 - Fax 085.44.61.862