
Create successful ePaper yourself
Turn your PDF publications into a flip-book with our unique Google optimized e-Paper software.
I<br />
T<br />
A<br />
L<br />
I<br />
A<br />
N<br />
O<br />
E<br />
N<br />
G<br />
L<br />
I<br />
S<br />
H<br />
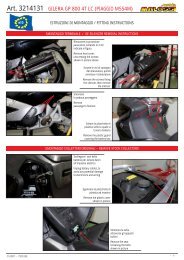
pistone come indicato in Fig. 5.<br />
• Inserire il primo segmento cromato di compressione con l’apertura sfasato rispetto al secondo<br />
segmento con la stampigliatura N rivolta verso la parte superiore del pistone come indicato<br />
in Fig. 5.<br />
• Posizionare i segmenti come indicato in Fig. 5.<br />
• Montare nel pistone uno dei due fermi spinotto, avendo cura di controllare che sia inserito<br />
perfettamente nella propria sede.<br />
• Inserire il pistone sulla biella e fissarlo con il nuovo spinotto avendo avuto cura di oliarlo<br />
preventivamente.<br />
• Inserire il secondo fermo spinotto controllando che sia posizionato correttamente nella propria<br />
sede.<br />
• Fit one of the two pin retainers in the piston, ensuring that it is perfectly inserted in its seat.<br />
• Insert the piston pin and piston on the connecting rod. It must be oiled prior to this procedure.<br />
• Insert the second pin retainer, ensuring that it is perfectly inserted in its seat.<br />
• Using the special ring gripper pliers, insert the new Malossi cylinder after it has been oiled. A hook<br />
serving to lift the chain itself should advance towards the chain passage found in the cylinder.<br />
Then the cylinder is lowered down to the engine block, ensuring that there is nothing blocking the<br />
cylinder from resting perfectly on the base of the crankcase.<br />
• Fit the chain guide shoe, checking to ensure that it is perfectly positioned in its seat.<br />
• Fit the new head gasket and the two locating bushes.<br />
• Insert the head on the studs and use a hook to extract the timing chain.<br />
• Tighten the cylinder head bolts and nuts in two stages, adhering to the tightening sequence<br />
piston comme le montre la Fig. 5.<br />
F<br />
• Montez le premier segment de compression chromé avec l’ouverture désaxée par rapport au<br />
R second segment avec l’estampillage N tourné vers la partie supérieure du piston comme le montre<br />
A la Fig. 5.<br />
N • Positionnez les segments comme montré dans la Fig. 5.<br />
Ç • Montez un des deux arrêts d’axe de piston dans le piston et vérifiez qu’il soit parfaitement inséré<br />
A dans son emplacement.<br />
I<br />
• Insérez le piston préalablement huilé sur la bielle et fixez le avec le nouvel axe de piston.<br />
• Insérez le second arrêt d’axe de piston en contrôlant qu’il soit positionné correctement dans son<br />
S<br />
emplacement.<br />
• A l’aide d’une pince serre-segments, insérez le nouveau cylindre Malossi préalablement huilé tout<br />
- 22 -