BA Supertronic 2-3-4 SE Umschlag 1109.cdr - Rothenberger
BA Supertronic 2-3-4 SE Umschlag 1109.cdr - Rothenberger
BA Supertronic 2-3-4 SE Umschlag 1109.cdr - Rothenberger

You also want an ePaper? Increase the reach of your titles
YUMPU automatically turns print PDFs into web optimized ePapers that Google loves.
Contents Page<br />
1 Safety notes 20<br />
1.1 Correct use 20<br />
1.2 General safety rules 20<br />
1.3 Safety information 22<br />
2 Technical data 23<br />
3 Functions of the thread-tapping machine 23<br />
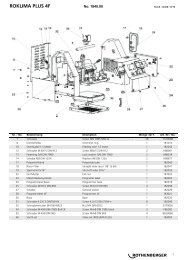
3.1 Overview (Fig. A) 23<br />
3.2 Functional description 24<br />
3.3 Accessories 24<br />
4 Preparations for operation 24<br />
4.1 Transporting the thread-tapping machine 24<br />
4.2 Setting up the machine 24<br />
4.3 Electrical connection 25<br />
4.4 The thread-tapping oil 25<br />
4.5 Checking the thread-tapping oil 26<br />
4.6 Setting the supplied thread-tapping oil quantity 26<br />
4.7 Draining off the oil 26<br />
5 Operation of the thread-tapping machine 27<br />
5.1 Clamping the workpieces (Fig. B) 27<br />
5.2 Cutting the workpiece with the pipe cutter (Fig. C) 27<br />
5.3 Reaming the workpieces (Fig. D) 28<br />
5.4 Removing and installing the thread jaws from and in the thread-<br />
tapping head( Fig. E) 28<br />
5.4.1 Automatic thread-tapping head 28<br />
5.4.2 Standard thread-tapping head 29<br />
5.5 Installing and removing the thread-tapping head into and out of the bed<br />
carriage 29<br />
5.6 Changing the thread size (Fig. F) 29<br />
5.7 Tapping threads (Fig. G) 30<br />
5.8 Setting the thread length (only Automatic thread-tapping head) 31<br />
5.9 Setting the thread depth (only automatic thread-tapping head) 31<br />
5.10 Thread-tapping in 2 work steps 31<br />
5.11 Removing the workpiece 32<br />
5.12 Cleaning after use 32<br />
ENGLISH 19