BA Supertronic 2-3-4 SE Umschlag 1109.cdr - Rothenberger
BA Supertronic 2-3-4 SE Umschlag 1109.cdr - Rothenberger
BA Supertronic 2-3-4 SE Umschlag 1109.cdr - Rothenberger

Create successful ePaper yourself
Turn your PDF publications into a flip-book with our unique Google optimized e-Paper software.
5 Operation of the thread-tapping machine<br />
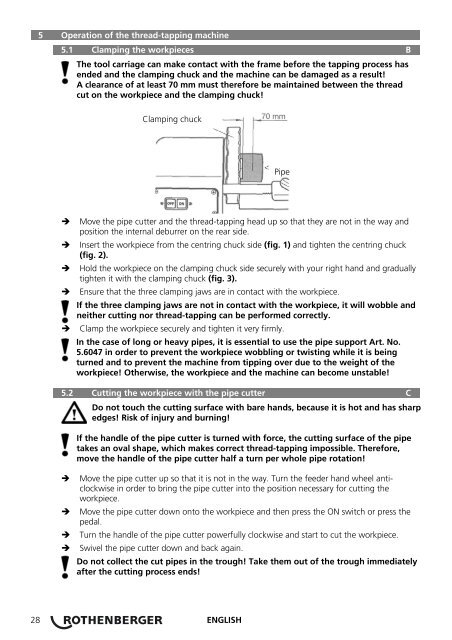
5.1 Clamping the workpieces B<br />
The tool carriage can make contact with the frame before the tapping process has<br />
ended and the clamping chuck and the machine can be damaged as a result!<br />
A clearance of at least 70 mm must therefore be maintained between the thread<br />
cut on the workpiece and the clamping chuck!<br />
Clamping chuck<br />
� Move the pipe cutter and the thread-tapping head up so that they are not in the way and<br />
position the internal deburrer on the rear side.<br />
� Insert the workpiece from the centring chuck side (fig. 1) and tighten the centring chuck<br />
(fig. 2).<br />
� Hold the workpiece on the clamping chuck side securely with your right hand and gradually<br />
tighten it with the clamping chuck (fig. 3).<br />
� Ensure that the three clamping jaws are in contact with the workpiece.<br />
If the three clamping jaws are not in contact with the workpiece, it will wobble and<br />
neither cutting nor thread-tapping can be performed correctly.<br />
� Clamp the workpiece securely and tighten it very firmly.<br />
In the case of long or heavy pipes, it is essential to use the pipe support Art. No.<br />
5.6047 in order to prevent the workpiece wobbling or twisting while it is being<br />
turned and to prevent the machine from tipping over due to the weight of the<br />
workpiece! Otherwise, the workpiece and the machine can become unstable!<br />
5.2 Cutting the workpiece with the pipe cutter C<br />
Do not touch the cutting surface with bare hands, because it is hot and has sharp<br />
edges! Risk of injury and burning!<br />
If the handle of the pipe cutter is turned with force, the cutting surface of the pipe<br />
takes an oval shape, which makes correct thread-tapping impossible. Therefore,<br />
move the handle of the pipe cutter half a turn per whole pipe rotation!<br />
� Move the pipe cutter up so that it is not in the way. Turn the feeder hand wheel anticlockwise<br />
in order to bring the pipe cutter into the position necessary for cutting the<br />
workpiece.<br />
� Move the pipe cutter down onto the workpiece and then press the ON switch or press the<br />
pedal.<br />
� Turn the handle of the pipe cutter powerfully clockwise and start to cut the workpiece.<br />
� Swivel the pipe cutter down and back again.<br />
Do not collect the cut pipes in the trough! Take them out of the trough immediately<br />
after the cutting process ends!<br />
28 ENGLISH<br />
Pipe