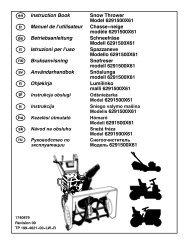
Instruction Book â Snowthrower Model 621401x61NB ... - Technik.sk
Instruction Book â Snowthrower Model 621401x61NB ... - Technik.sk
Instruction Book â Snowthrower Model 621401x61NB ... - Technik.sk
- No tags were found...

You also want an ePaper? Increase the reach of your titles
YUMPU automatically turns print PDFs into web optimized ePapers that Google loves.
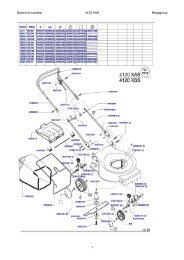
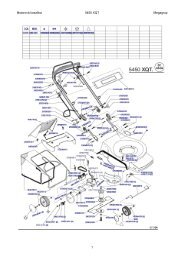
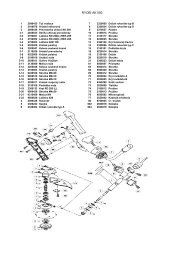
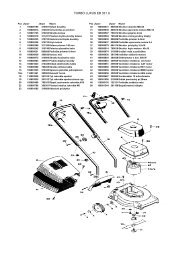
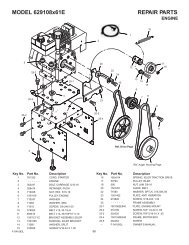
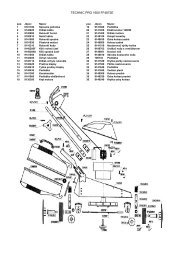
ASSEMBLYRead and follow the assembly and adjustmentinstructions for your snow thrower. All fastenersare in the parts bag. Do not discard any parts ormaterial until the unit is assembled.WARNING: Before doing any assemblyor maintenance to the snowthrower, remove the wire from thespark plug.NOTE: In this instruction book, left and rightdescribe the location of a part from the operator’sposition behind the unit.NOTE: Torque is measured in foot pounds(metric N.m). This measurement describeshow tight a nut or bolt must be. The torque ismeasured with a torque wrench.NOTE: Illustrations are located on page 2and on pages 3 through 6.Tools Required1 Knife1 PliersHow To Remove The Snow ThrowerFrom The Carton1. Locate and remove the container of oil.2. Locate all parts that are packed separatelyand remove from the carton.3. Remove and discard the packing materialfrom around the snow thrower.4. Cut down all four corners of the carton andlay the side panels flat.5. Hold onto the lower handle and pull the snowthrower off the carton.CAUTION: DO NOT back over cables.6. Remove the packing material from handleassembly. Remove the lower insert from theaxle.How To Assemble The Handle1. Remove the packing material from the upperand lower handles.2. (Figure 2) Loosen the knobs (1) on eachside of the handle (2).3. Raise the upper handle (2) to the operatingposition. Hold the upper handle (2) apart toprevent scratching the lower handle.NOTE: Make sure the auger drive cable isnot caught between the upper and lowerhandle.4. Tighten the knobs (1).How To Prepare The EngineWARNING: Follow the enginemanufacturer’s instructions for thetype of fuel and oil to use. Alwaysuse a safety fuel container. Do not smokewhen adding fuel to the fuel tank. Wheninside an enclosure, do not fill the fueltank. Before you add the fuel, stop the engine.Let the engine cool for several minutes.See the engine manufacturer’s instructions forthe type of fuel and oil to use. Before you usethe unit, read the information on safety, operation,maintenance, and storage.1740260NOTE: Engine horsepower ratings may varyby engine adjustments, manufacturing variances,altitude, atmospheric conditions, fueland maintenance.Add Oil To The Engine (Figure 3)NOTE: Engine may already contain someresidual oil. Check frequently when fillingthe crankcase. DO NOT overfill.The snow thrower was shipped with a containerof 5W30 motor oil. This oil must be added to theengine before operating.1. Make sure the unit is level.2. Remove the oil fill cap/dipstick (1) and fillthe crankcase to “FULL” line on dipstick. DONOT overfill.3. Tighten the oil fill cap/dipstick (1) securelyeach time you check the oil level.NOTE: Synthetic oil can assist with startingin extreme cold temperatures. Synthetic5W30 is acceptable for all temperatures. DONOT mix oil with petrol.Add Petrol To The EngineThis engine is certified to operate on petrol. ExhaustEmission Control System: EM (EngineModifications).WARNING: Alcohol blended fuels(called gasohol or those usingethanol or methanol) can attractmoisture which leads to separation andformation of acids during storage. Acidicgas can damage the fuel system of an enginewhile in storage.NOTE: To avoid engine problems, the fuelsystem must be emptied before storage for30 days or longer. Start the engine and let itrun until the fuel lines and carburetor areempty. Use fresh fuel next season. See theStorage section in this manual for additionalinformation.Fill the fuel tank only with a fresh, clean, unleadedregular, unleaded premium, or reformulatedautomotive petrol with a minimum of 85octane. DO NOT use leaded petrol. Make surethat the container you pour the petrol from isclean and free from rust or other foreign particles.Never use petrol that may be stale fromlong periods of storage in the container.Before You OperateBefore you operate your new snow thrower,please review the following checklist: Make sure all assembly instructions havebeen completed. Make sure the discharge chute rotates freely. Make sure that no loose parts remain in thecarton.As you learn how to properly use the snowthrower, pay extra attention to the following importantitems. Make sure the engine oil is at the properlevel. For the type engine oil to use, see theEngine Manufacturer’s manual.11GB Make sure gas tank is filled properly withclean, fresh, unleaded petrol with a minimumof 85 octane. Become familiar with the location of allcontrols and understand their function. Before starting the engine, make sure allcontrols operate correctly.OPERATIONNOTE: Illustrations are located on page 2and on pages 3 through 6.CAUTION: Use only attachments and accessoriesapproved by the manufacturer of thesnow thrower (such as tire chains, electricstart kits, etc.).Know Your Snow Thrower (Figure 1)Read this <strong>Instruction</strong> <strong>Book</strong> and safety rules beforeoperation the snow thrower. Compare theillustration with your snow thrower to familiarizeyourself with the location of various controls andadjustments.How To ControlThe Discharge Of The SnowWARNING: Never direct the dischargeof snow toward bystanders.WARNING: Always stop the enginebefore unclogging the dischargechute or the auger housing and beforeleaving the snow thrower.1. (Figure 1) Turn the crank assembly (2) tochange the discharge direction of the snow.2. (Figure 6) Loosen the wing knob (1) on thechute deflector (2).3. Move the chute deflector (2) up for moredistance or down for less distance.4. Tighten the wing knob (1).How To Throw Snow (Figure 1)1. Engage the auger drive lever (5).2. To stop throwing snow, release the augerdrive lever (5).WARNING: The operation of anysnow thrower can result in foreignobjects being thrown into the eyes,which can result in severe eye damage.Always wear safety glasses or eye shieldswhile operating the snow thrower. We recommendstandard safety glasses or use awide vision safety ma<strong>sk</strong> over your glasses.How To Stop Discharging Snow(Figure 1)1. To stop discharging snow, release the augerdrive lever (5).NOTE: If the snow thrower continues toslowly move forward, see “How To AdjustThe Auger Control Cable” in the MaintenanceSection.2. To stop the engine, push the stop switch (8)to the off position.CAUTION: To stop the engine, do not movethe choke control to CHOKE position. Backfireor engine damage can occur.