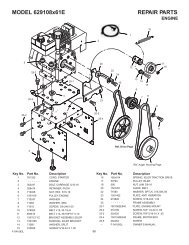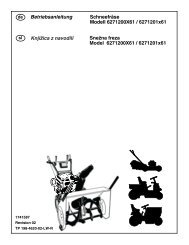
Instruction Book â Snowthrower Model 621401x61NB ... - Technik.sk
Instruction Book â Snowthrower Model 621401x61NB ... - Technik.sk
Instruction Book â Snowthrower Model 621401x61NB ... - Technik.sk
- No tags were found...

Create successful ePaper yourself
Turn your PDF publications into a flip-book with our unique Google optimized e-Paper software.
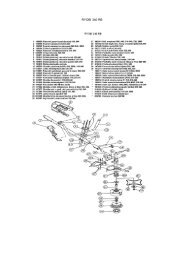
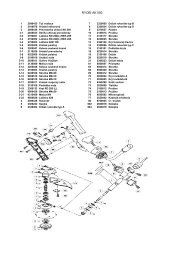
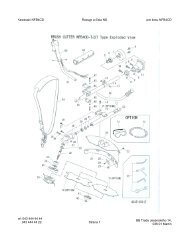
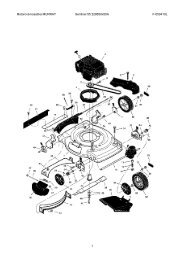
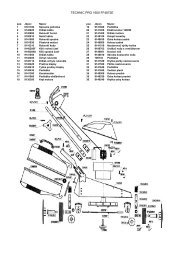
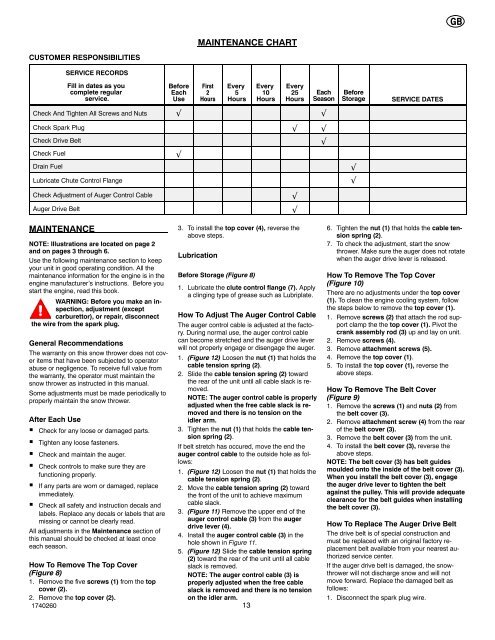
GBMAINTENANCE CHARTCUSTOMER RESPONSIBILITIESSERVICE RECORDSFill in dates as youcomplete regularservice.BeforeEachUseFirst2HoursEvery5HoursEvery10HoursEvery25HoursEachSeasonCheck And Tighten All Screws and Nuts √ √Check Spark Plug √ √Check Drive BeltCheck FuelDrain FuelLubricate Chute Control FlangeCheck Adjustment of Auger Control CableAuger Drive Belt√√√√BeforeStorage√√SERVICE DATESMAINTENANCENOTE: Illustrations are located on page 2and on pages 3 through 6.Use the following maintenance section to keepyour unit in good operating condition. All themaintenance information for the engine is in theengine manufacturer’s instructions. Before youstart the engine, read this book.WARNING: Before you make an inspection,adjustment (exceptcarburettor), or repair, disconnectthe wire from the spark plug.General RecommendationsThe warranty on this snow thrower does not coveritems that have been subjected to operatorabuse or negligence. To receive full value fromthe warranty, the operator must maintain thesnow thrower as instructed in this manual.Some adjustments must be made periodically toproperly maintain the snow thrower.After Each Use Check for any loose or damaged parts. Tighten any loose fasteners. Check and maintain the auger. Check controls to make sure they arefunctioning properly. If any parts are worn or damaged, replaceimmediately. Check all safety and instruction decals andlabels. Replace any decals or labels that aremissing or cannot be clearly read.All adjustments in the Maintenance section ofthis manual should be checked at least onceeach season.How To Remove The Top Cover(Figure 8)1. Remove the five screws (1) from the topcover (2).2. Remove the top cover (2).17402603. To install the top cover (4), reverse theabove steps.LubricationBefore Storage (Figure 8)1. Lubricate the clute control flange (7). Applya clinging type of grease such as Lubriplate.How To Adjust The Auger Control CableThe auger control cable is adjusted at the factory.During normal use, the auger control cablecan become stretched and the auger drive leverwill not properly engage or disengage the auger.1. (Figure 12) Loosen the nut (1) that holds thecable tension spring (2).2. Slide the cable tension spring (2) towardthe rear of the unit until all cable slack is removed.NOTE: The auger control cable is properlyadjusted when the free cable slack is removedand there is no tension on theidler arm.3. Tighten the nut (1) that holds the cable tensionspring (2).If belt stretch has occured, move the end theauger control cable to the outside hole as follows:1. (Figure 12) Loosen the nut (1) that holds thecable tension spring (2).2. Move the cable tension spring (2) towardthe front of the unit to achieve maximumcable slack.3. (Figure 11) Remove the upper end of theauger control cable (3) from the augerdrive lever (4).4. Install the auger control cable (3) in thehole shown in Figure 11.5. (Figure 12) Slide the cable tension spring(2) toward the rear of the unit until all cableslack is removed.NOTE: The auger control cable (3) isproperly adjusted when the free cableslack is removed and there is no tensionon the idler arm.136. Tighten the nut (1) that holds the cable tensionspring (2).7. To check the adjustment, start the snowthrower. Make sure the auger does not rotatewhen the auger drive lever is released.How To Remove The Top Cover(Figure 10)There are no adjustments under the top cover(1). To clean the engine cooling system, followthe steps below to remove the top cover (1).1. Remove screws (2) that attach the rod supportclamp the the top cover (1). Pivot thecrank assembly rod (3) up and lay on unit.2. Remove screws (4).3. Remove attachment screws (5).4. Remove the top cover (1).5. To install the top cover (1), reverse theabove steps.How To Remove The Belt Cover(Figure 9)1. Remove the screws (1) and nuts (2) fromthe belt cover (3).2. Remove attachment screw (4) from the rearof the belt cover (3).3. Remove the belt cover (3) from the unit.4. To install the belt cover (3), reverse theabove steps.NOTE: The belt cover (3) has belt guidesmoulded onto the inside of the belt cover (3).When you install the belt cover (3), engagethe auger drive lever to tighten the beltagainst the pulley. This will provide adequateclearance for the belt guides when installingthe belt cover (3).How To Replace The Auger Drive BeltThe drive belt is of special construction andmust be replaced with an original factory replacementbelt available from your nearest authorizedservice center.If the auger drive belt is damaged, the snowthrowerwill not discharge snow and will notmove forward. Replace the damaged belt asfollows:1. Disconnect the spark plug wire.