D - Crawford Garageporte
D - Crawford Garageporte
D - Crawford Garageporte

You also want an ePaper? Increase the reach of your titles
YUMPU automatically turns print PDFs into web optimized ePapers that Google loves.
Installation precautions<br />
Installation must be performed by qualified service<br />
technician.<br />
Work on an electrical installation must only be carried out by<br />
authorised personnel.<br />
The load capacity and suitability of the substructure of the<br />
building in which the door operator will be installed must be<br />
inspected and approved by a competent person.<br />
The door operator must be fully and securely attached at all<br />
fastening points. All fastening materials must be selected<br />
according to the nature of the substructure and they must be<br />
able to withstand a pull of 800 N.<br />
In the event of non-conformance to these<br />
requirements, there is the risk of personal injury and<br />
material damage due to falling operator or an uncontrolled<br />
movement of the door.<br />
When drilling the fastening holes, do not damage the<br />
building's structural integrity, electrical cables and water or<br />
other pipes. After lifting up the door operator to the ceiling,<br />
support it by appropriate means to prevent it falling down until<br />
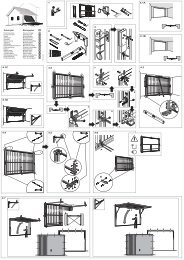
it is completely fastened. See illustration on page 124.<br />
Please observe appropriate industrial safety regulations and<br />
keep children away during installation.<br />
Safety features of the door operator<br />
system<br />
The door operator has the following safety features.<br />
Do not remove or alter their functionality.<br />
• Emergency release / unlocking<br />
• Automatic overload cut-out in the functions "ON" and "OFF"<br />
• Emergency Stop connection for example of a switch<br />
(optional) to a wicket door mounted in the garage door.<br />
• Connection for safety rail, photo cell or optosensor<br />
Safety checks<br />
Check overload cut-out<br />
The automatic overload cut-out is a clamped and safety<br />
mechanism to prevent accidents due to a moving door.<br />
To test the door from outside, stop door from outside with<br />
both hands at waist level.<br />
Closing:<br />
The door must stop automatically and reverse shortly after<br />
coming in contact with an obstruction.<br />
Opening:<br />
The door must stop automatically and reverse shortly after<br />
coming in contact with an obstruction.<br />
After an overload cut-out, the door operator light will flash until<br />
the next pulse or radio command.<br />
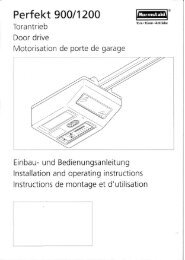
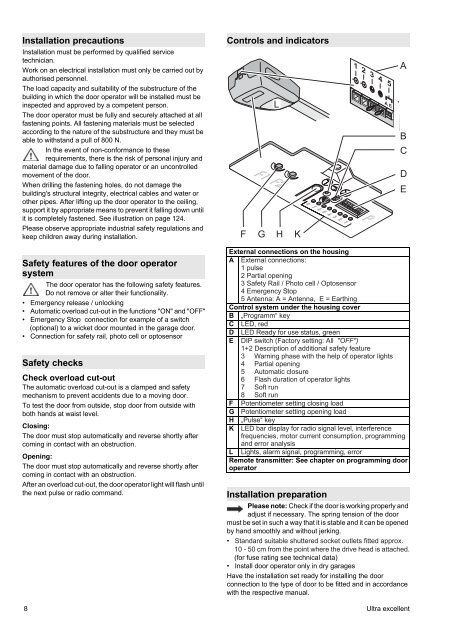
Controls and indicators<br />
F1 F2 1<br />
8 7 6 5 4 3 2<br />
External connections on the housing<br />
A External connections:<br />
1 pulse<br />
2 Partial opening<br />
3 Safety Rail / Photo cell / Optosensor<br />
4 Emergency Stop<br />
5 Antenna: A = Antenna, E = Earthing<br />
Control system under the housing cover<br />
B „Programm“ key<br />
C LED, red<br />
D LED Ready for use status, green<br />
E DIP switch (Factory setting: All "OFF")<br />
1+2 Description of additional safety feature<br />
3 Warning phase with the help of operator lights<br />
4 Partial opening<br />
5 Automatic closure<br />
6 Flash duration of operator lights<br />
7 Soft run<br />
8 Soft run<br />
F Potentiometer setting closing load<br />
G Potentiometer setting opening load<br />
H „Pulse“ key<br />
K LED bar display for radio signal level, interference<br />
frequencies, motor current consumption, programming<br />
and error analysis<br />
L Lights, alarm signal, programming, error<br />
Remote transmitter: See chapter on programming door<br />
operator<br />
Installation preparation<br />
Please note: Check if the door is working properly and<br />
adjust if necessary. The spring tension of the door<br />
must be set in such a way that it is stable and it can be opened<br />
by hand smoothly and without jerking.<br />
• Standard suitable shuttered socket outlets fitted approx.<br />
10 - 50 cm from the point where the drive head is attached.<br />
(for fuse rating see technical data)<br />
• Install door operator only in dry garages<br />
Have the installation set ready for installing the door<br />
connection to the type of door to be fitted and in accordance<br />
with the respective manual.<br />
8 Ultra excellent<br />
L<br />
F G H K<br />
1 2 3<br />
P<br />
4 5<br />
AE<br />
A<br />
B<br />
C<br />
D<br />
E