Amiko Alien 2 User Manual - Freeviewshop.co.nz
Amiko Alien 2 User Manual - Freeviewshop.co.nz
Amiko Alien 2 User Manual - Freeviewshop.co.nz

Create successful ePaper yourself
Turn your PDF publications into a flip-book with our unique Google optimized e-Paper software.
Contents<br />
1 Safety Precautions ............................................................................................... 4<br />
2 INTRODUCTION ..................................................................................................... 5<br />
3 FEATURES .............................................................................................................. 6<br />
4 Quick Start Guide.................................................................................................. 7<br />
4.1 Front Panel ............................................................................................................................... 7<br />
4.2 Rear Panel ................................................................................................................................ 8<br />
4.3 Connections ............................................................................................................................. 8<br />
4.4 Powering On/Off ................................................................................................................... 11<br />
4.5 Remote Control ..................................................................................................................... 12<br />
4.6 Easy Install ............................................................................................................................. 14<br />
4.7 SCAN CHANNEL ..................................................................................................................... 16<br />
5 Basic Operations ................................................................................................. 16<br />
5.1 Changing channels ............................................................................................................... 16<br />
5.2 Volume/Mute/Audio ............................................................................................................. 16<br />
5.3 Setting audio options ........................................................................................................... 16<br />
5.4 Display Resolution ................................................................................................................ 16<br />
5.5 Info bar ................................................................................................................................... 17<br />
5.6 Sleep timer ............................................................................................................................. 17<br />
5.7 TV/SAT .................................................................................................................................... 17<br />
5.8 Pause ...................................................................................................................................... 17<br />
5.9 Zoom ...................................................................................................................................... 17<br />
5.10 NVOD ................................................................................................................................... 18<br />
5.11 Teletext ................................................................................................................................. 18<br />
5.12 Subtitle ................................................................................................................................ 18<br />
5.13 Quick bar.............................................................................................................................. 19<br />
5.14 Manage of USB memory ..................................................................................................... 19<br />
5.15 Change Satellite .................................................................................................................. 19<br />
5.16 Change Favourites group ................................................................................................... 19<br />
5.17 Re<strong>co</strong>rding ............................................................................................................................ 19<br />
5.18 Play the re<strong>co</strong>rded file when it re<strong>co</strong>rding ........................................................................... 21<br />
5.19 Timeshift .............................................................................................................................. 21<br />
5.20 Unmount USB Disk .............................................................................................................. 21<br />
5.21 HBBTV .................................................................................................................................. 21<br />
6 Channel ................................................................................................................ 22<br />
6.1 TV/Radio list .......................................................................................................................... 22<br />
6.2 Managing Channels .............................................................................................................. 24<br />
7 EPG ....................................................................................................................... 27
Contents<br />
7.1 Changing Group .................................................................................................................... 27<br />
7.2 Find channel .......................................................................................................................... 28<br />
7.3 EPG now/next list .................................................................................................................. 28<br />
7.4 Switch EPG between now/next ............................................................................................ 28<br />
7.5 Schedule list .......................................................................................................................... 28<br />
7.6 Setting timer .......................................................................................................................... 28<br />
7.7 Adding a new timer ............................................................................................................... 29<br />
7.8 Editing a timer affair ............................................................................................................. 29<br />
7.9 Deleting timer affairs ............................................................................................................ 29<br />
8 Installation .......................................................................................................... 29<br />
8.1 Search Satellite Channels (fixed antennal) ......................................................................... 29<br />
8.2 Search Cable Channels (fixed antennal) .............................................................................. 33<br />
8.3 Search Terrestrial Channels (fixed antennal) ...................................................................... 33<br />
9 System ................................................................................................................. 34<br />
9.1 Basic Setting .......................................................................................................................... 34<br />
9.2 PVR/HDD Setting ................................................................................................................... 38<br />
9.3 Net Setting ............................................................................................................................. 40<br />
9.4 Upgrade ................................................................................................................................. 42<br />
10 Conditional Access ............................................................................................ 43<br />
11 Online................................................................................................................. 43<br />
11.1 Message ............................................................................................................................... 43<br />
11.2 Weather Forecast ................................................................................................................. 44<br />
11.3 FAQ ....................................................................................................................................... 45<br />
11.4 <strong>User</strong> <strong>Manual</strong> ......................................................................................................................... 45<br />
11.5 E-book .................................................................................................................................. 46<br />
11.6 Config ................................................................................................................................... 47<br />
12 File List ............................................................................................................... 48<br />
12.1 Switch File list ...................................................................................................................... 48<br />
12.2 Sort files/Sort folder ........................................................................................................... 48<br />
12.3 Delete files/Delete folder ................................................................................................... 48<br />
12.4 Play Re<strong>co</strong>rd File/Music/Movie ............................................................................................ 48<br />
12.5 Play Picture .......................................................................................................................... 49<br />
12.6 Online Subtitle .................................................................................................................... 49<br />
12.7 Setting Subtitle ................................................................................................................... 50<br />
13 Plug In ................................................................................................................ 51<br />
13.1 Using the calculating .......................................................................................................... 51<br />
14 Networking ....................................................................................................... 51<br />
2
Contents<br />
14.1 Youtube ................................................................................................................................ 51<br />
14.2 Shoutcast ............................................................................................................................. 52<br />
14.3 Picasa ................................................................................................................................... 53<br />
14.4 RSS ........................................................................................................................................ 54<br />
14.5 Opera ................................................................................................................................... 55<br />
14.6 FTP Client ............................................................................................................................. 55<br />
14.7 Kartina TV ............................................................................................................................ 58<br />
15 Portal ................................................................................................................. 59<br />
15.1 Setting Language ................................................................................................................ 59<br />
15.2 Add App ............................................................................................................................... 59<br />
15.3 Remove App ........................................................................................................................ 60<br />
15.4 Move App ............................................................................................................................. 60<br />
15.5 Run APP ................................................................................................................................ 60<br />
15.6 Navigation Menu................................................................................................................. 60<br />
16 Trouble Shooting .............................................................................................. 61<br />
17 Specifications .................................................................................................... 62<br />
3
About<br />
1 Safety Precautions<br />
The lightning flash with<br />
arrowhead symbol, within an<br />
equilateral triangle, is intended<br />
to alert the user to "dangerous<br />
voltage" and to prevent from a<br />
risk of electric shock.<br />
CAUTION:<br />
Warning:<br />
To reduce the risk of electric<br />
shock, don't open the cabinet.<br />
Refer servicing to qualified<br />
personnel only.<br />
The exclamation point within<br />
an equilateral triangle is<br />
intended to<br />
alert the user to important<br />
operating and maintenance<br />
(servicing).<br />
WARNING: Do not use this STB where <strong>co</strong>ntact with or immersion in water is a possibility. Do not use<br />
near flower vase, washbowls, kitchen sinks, laundry tubs, swimming pools, etc.<br />
WARNING: Do not put the candle or lamp stand on the cabinet; otherwise, there is the danger of<br />
fire.<br />
WARNING: The unit should be <strong>co</strong>nnected to a power supply only of the type described in the<br />
operating instructions or as marked on the unit. If you are not sure of the type of power supply (for<br />
example, 120 or 230 V) to your home, <strong>co</strong>nsult your local dealer or local power <strong>co</strong>mpany.<br />
WARNING: This product install diodes. Do not open the cabinet or touch any parts in the inner<br />
mechanism. Consult your local dealer for technical service if the opening is required.<br />
Note: To ensure proper use of this product, please read this <strong>User</strong> manual carefully and retain for<br />
further reference.<br />
Note: This product install diodes. Do not open the cabinet to avoid the unit direct exposure to<br />
radiation.<br />
Unit Cleaning: After the unit power is turned off, you can clean the cabinet, panel and remote<br />
<strong>co</strong>ntrol with a soft cloth lightly moistened with a mild detergent solution.<br />
Attachments: Never add any attachments and/or equipment without the manufacturer <strong>co</strong>nsent; as<br />
such additions may result in the risk of fire, electric shock, or other personal injury.<br />
Locating: Slots and openings in the cabinet are provided for ventilation to protect it from<br />
overheating. Do not block these openings or allow them to be blocked by placing the STB on a bed,<br />
sofa, or other similar surface, nor should it be placed over a radiator or heat register.<br />
Power-Cord Protection: Place the power-supply <strong>co</strong>rd out of the way, where it will not be walked on.<br />
Please take special attentions to <strong>co</strong>rds at plugs, <strong>co</strong>nvenience receptacles, and the point where they<br />
exit from the unit.<br />
Object and Liquid Entry: Never put objects of any kind into this STB through openings, as they may<br />
touch dangerous voltage points or short-out parts that <strong>co</strong>uld result in a fire or electric shock. Never<br />
spill any liquid on the STB.<br />
4
About<br />
Note: Moisture may be formed on the lens In the following <strong>co</strong>nditions:<br />
when the unit is suddenly moved from a <strong>co</strong>ld environment or an air-<strong>co</strong>ndition room to a warm<br />
place.<br />
immediately after a heater has been turned on.<br />
in a steamy or very humid room.<br />
If the moisture forms inside the unit, it may not operate properly. To <strong>co</strong>rrect this problem, turn on the<br />
power and wait about two hours for the moisture to evaporate.<br />
Parts Replacement: When the unit parts need to be replaced, user should make sure the service<br />
technician use the replacement parts specified by the manufacturer or having the same<br />
characteristics as the original part. Unauthorized replacement may put the unit In the risk of fire,<br />
electric shock or other hazards.<br />
Safety Check: After all the maintenances and repairs are done, user is required to request the service<br />
technician to <strong>co</strong>nduct the overall safety check to ensure the machine is In the proper <strong>co</strong>ndition.<br />
2 INTRODUCTION<br />
Thank you for purchasing the HD Receiver.<br />
This HD Receiver is fully <strong>co</strong>mpliant with the international DVB standard and thus transmits digital images,<br />
sounds, information guides and teletext directly to your TV through the broadcasting.<br />
Now you can <strong>co</strong>mfortably see and receive digitally transmitted music, news, movie and sports broadcasts in<br />
your office or at your home.<br />
In service search section, both the automatic service search method and the manual search mode are provided.<br />
You can save up to Endless TV and Radio services and work around with the favorite, Lock, Delete, Move and<br />
Sort functions.<br />
The menu is very modern and supports multiple languages. All functions can be carried out using the remote<br />
<strong>co</strong>ntrol and some of the functions can also be carried out using the front panel. The HD Receiver is easy to use<br />
and adaptable for future advances. Please be aware that new software may change the functions of the HD<br />
Receiver.<br />
If you have any difficulties <strong>co</strong>ncerning the operation of your HD Receiver, please refer to the relevant section of<br />
this manual, including the ‘Troubleshooting’. This <strong>Manual</strong> will provide you with useful information on using the<br />
HD Receiver.<br />
5
About<br />
3 FEATURES<br />
MPEG-Fully DVB-S / DVB-S2 HD <strong>co</strong>mpliant<br />
DVB-T/DVB-C (optional)<br />
Endless channels (TV and Radio) programmable<br />
Multilingual menu text support<br />
Channel list editing<br />
Favourite channel list editing<br />
True-<strong>co</strong>lor On-Screen Display (OSD)<br />
Full Picture In Graphic (PIG) function<br />
Electronic Program Guide (EPG) for on screen channel information<br />
Subtitle supported<br />
Teletext supported by software emulation<br />
Parental lock facility by channel and program event<br />
Program and Channel information transfer from receiver to receiver<br />
S/PDIF for digital audio or Dolby digital bit stream output<br />
DiSEqC 1.0, 1.1, 1.2 and USALS<br />
HDMI HD Video/Audio Output<br />
USB 2.0 Host<br />
VFD Display for service information<br />
RTC (Real-Time-Clock)<br />
Time Shift<br />
Video Re<strong>co</strong>rding<br />
Re<strong>co</strong>rding one channel and Time Shifting another channel (optional)<br />
Conax Embedded Card Reader<br />
FullHD 1080p output via HDMI<br />
AVI, MKV, MPG, TS, WMA, WMV, M2TS, FLV, DAT, ASF, MP3 playback<br />
YouTube, Shoutcast Radio, Picasa, Kartina TV, YouPorn and Portal Compatible<br />
Weather forecast & RSS Reader Functions<br />
Software Upgrade support via USB, RS232 or Internet<br />
Endless possibility with Plug-In support<br />
Message, FAQ and <strong>User</strong> <strong>Manual</strong> support<br />
Download files from FTP server<br />
Base on LINUX<br />
6
Basic Operations<br />
4 Quick Start Guide<br />
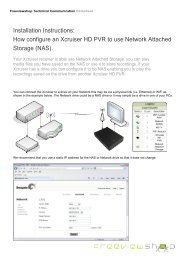
4.1 Front Panel<br />
Open the hand flap on the front panel.<br />
Hold Smartcard horizontally with the electronic chip facing upwards. Then insert the Smartcard into the slot.<br />
7
Basic Operations<br />
4.2 Rear Panel<br />
4.3 Connections<br />
This section describes how to <strong>co</strong>nnect your product to match your particular devices setup and to gain<br />
optimum signal quality. The product provides various interfaces to <strong>co</strong>nnect to the TV, VCR or other devices.<br />
Select the most appropriate depending on the device you have.<br />
Warning: Connect all <strong>co</strong>mponents before plugging any power <strong>co</strong>rds into the wall outlet.<br />
Always turn off the product, TV and other <strong>co</strong>mponents before you <strong>co</strong>nnect or dis<strong>co</strong>nnect any<br />
cables.<br />
Note: If you en<strong>co</strong>unter any problems setting up your product, please <strong>co</strong>ntact your local retailer helpline.<br />
8
Basic Operations<br />
4.3.1 Connecting the Antenna<br />
1. Connect one or two satellite <strong>co</strong>axial cable from the wall to LNB IN.<br />
2. Connect a cable/terrestrial <strong>co</strong>axial cable to AERIAL IN.<br />
Note: Cable and terrestrial can't <strong>co</strong>ncurrence.<br />
4.3.2 Connecting the TV<br />
1. TV with the HDMI <strong>co</strong>nnector:<br />
For the best picture quality, <strong>co</strong>nnect the product and TV using an HDMI cable.<br />
2. TV with the SCART <strong>co</strong>nnector:<br />
For good picture quality, <strong>co</strong>nnect the product and TV using a SCART cable.<br />
3. TV with the AV <strong>co</strong>nnector:<br />
Note:<br />
To output video and audio, <strong>co</strong>nnect the product and TV using an AV cable.<br />
1. When using the digital audio system, <strong>co</strong>nnect the product and the digital audio system using an S/PIF<br />
cable for audio.<br />
2. Connecting your TV directly to the audio/video output of the product will assure a more vivid picture<br />
9
Basic Operations<br />
and enhance your viewing enjoyment.<br />
4.3.3 Connecting the Network<br />
1. Connecting to the LAN:<br />
Connect one end of the Ethernet cable to the product and the other end to the LAN router.<br />
2. Connecting to the Wi-Fi (Wireless LAN):<br />
You can <strong>co</strong>nnect the network via the Wi-Fi access point or DSL/cable modem.<br />
a. Plug in the wireless USB dongle to the USB port.(Separate purchase required)<br />
b. Set the options for the Wi-Fi.<br />
Network Name (SSID): Select the network name of your Wi-Fi access point from the list.<br />
Security Type (WEP): This product supports WEP 40/128bit ASCII and WEP 40/128bit HEX. The security<br />
type of the Wi-Fi and the product shall be set the same.<br />
Password: When using the security type, you must set the password. Enter the same password in the<br />
Wi-Fi setting menu.<br />
3. Connecting to the 3G:<br />
Note:<br />
Connect the network via the 3G card. Plug in the USB that has 3G card.<br />
1. Make sure the distance between the Wi-Fi access point and the product is not too far away. This may<br />
lower the quality of service.<br />
2. It is re<strong>co</strong>mmended to purchase a wireless USB dongle distributed by RT73, RT8192cu, RT3070, RT2870,<br />
RT2070, RT8712u, ZD1211b, ZD1211. Other products may not function or respond.<br />
3. We re<strong>co</strong>mmend the network <strong>co</strong>nnection over a direct LAN.<br />
10
Basic Operations<br />
4.4 Powering On/Off<br />
1. Connect the power <strong>co</strong>rd of the product to a wall outlet.<br />
2. Turn on the power switch of the rear panel.<br />
3. Power on/off by pressing the [ POWER] button on the remote <strong>co</strong>ntrol or [ POWER] button on the front<br />
panel.<br />
? Frequently Asked Question<br />
Q: The power of my STB has been turned on and not in Standby mode, but the TV screen showed<br />
nothing:<br />
A: Make sure the TV set has been set to the <strong>co</strong>rrect video input (not the TV channels). For example, if you<br />
have <strong>co</strong>nnected the unit with the Video1 input of the TV set, the TV set has to be switched to Video1.<br />
Q: The power of my STB has been turn on and not in Standby mode, but the TV screen showed nothing<br />
except popup window with “No Signal” information.<br />
A: That means the channel, which you select, is no signal. Check <strong>co</strong>nnection of signal cable or <strong>co</strong>ntact<br />
operator.<br />
11
Basic Operations<br />
4.5 Remote Control<br />
You can power on/off the receiver, operate on screen menu, and use a<br />
variety of hot key function.<br />
POWER<br />
To switch your receiver on from standby or standby to on.<br />
MUTE<br />
Used to enable or disable the audio<br />
NUMERIC KEYS<br />
Used to select channels or enter programming parameters<br />
TV / RADIO<br />
Receiver switches between TV and Radio mode.<br />
(ZOOM)<br />
Press key select zoom times, from X1 to X16.<br />
(RECALL)<br />
Return to the previous menu or status.<br />
AUDIO<br />
Audio channels setup, to select audio mode; Left, Right , Stereo, Mono.<br />
TV/SAT<br />
Receiver switches between TV and receive mode.<br />
INFO<br />
To display channel status or various program information.<br />
EPG<br />
Display the Programs guide on screen when available.<br />
MENU<br />
Displays the Main Menu on the screen, or return to the previous menu<br />
or status.<br />
EXIT<br />
Cancel the user selection and return to the viewing mode from a menu.<br />
OK<br />
To select menu option, or to updated on entry.<br />
◄,►KEY<br />
To adjust volume level, or to move cursor left or right in the menu.<br />
▼,▲KEY<br />
To change channels, or to move cursor up or down in the menu.<br />
P+ / P-<br />
To move up the cursor to the next or previous page in the menu or<br />
channel list.<br />
V+ / V-<br />
To adjust volume level.<br />
PORTAL<br />
To display the navigation menu in Opera.<br />
●RECORD<br />
12
Basic Operations<br />
To start the re<strong>co</strong>rding.<br />
TXT<br />
Shows teletext or subtitle information of the current channel supports.<br />
OPTION<br />
Shows NVOD information of the current channel supports.<br />
Blue Button<br />
Into the multi-screen function in full screen.<br />
(FIND)<br />
Use to prompt find channels sort by character.<br />
SLEEP<br />
Press timer key you can setup up the Standby time.<br />
V.FORMAT<br />
Press V.FORMAT button to switch the display mode among "Auto", "480",<br />
"576”,” 720”,” 1080I" and "1080P".<br />
FAV(FAVORITE)<br />
To set receiver to the favorite server mode,<br />
display the favorite channel.<br />
SAT<br />
Display the satellite list at normal picture.<br />
FOLDER<br />
Press this button to enter the Re<strong>co</strong>rd Manager menu directly.<br />
Time Shift<br />
Press this button to display Time Shift info bar.<br />
Play<br />
To play the MP3, JPEG, or Re<strong>co</strong>rd files. And to display Time Shift info bar.<br />
Stop<br />
To stop the Time Shift, re<strong>co</strong>rding, or MP3/JPEG player.<br />
PAUSE<br />
Used to select the freeze function.<br />
Press once to freeze the screen picture.<br />
/ (PAGE- / PAGE+)<br />
To start Fast Backward / Forward function.<br />
/<br />
Switch to previous / next file when play more files<br />
USB<br />
To remove the USB Hard Disk safely.<br />
/ (PREV / NEXT)<br />
Jump to beginning / end of the file in play mode<br />
PLAYMODE<br />
switch playing mode to order, single cycle and circulation list.<br />
F1<br />
To display quickbar menu in full screen.<br />
F2/F3<br />
Reserved buttons.<br />
13
Networking<br />
4.6 Easy Install<br />
This menu to help you set basic function quickly.<br />
When the STB is first used, there will show the Easy<br />
Install menu.<br />
When you used the Factory Reset function in<br />
System/Basic Setting/Factory Default menu, it<br />
also will show the Easy Install menu after reboot.<br />
Note: If the software has default channel list, the STB<br />
will play the first channel in the list.<br />
4.6.1 Language Setting<br />
Language setting allows you to select the main<br />
language.<br />
Select the appropriate language with the [▲, ▼] and<br />
[◄, ►] buttons.<br />
In this menu:<br />
Press [P+] button to save it and go to the time Setting<br />
menu.<br />
4.6.2 Time Setting<br />
Time setting allows you to set the system's time. It will<br />
display on front panel with LCD, and info bar.<br />
In this menu:<br />
Press [P+] button to go to the Network Setting menu.<br />
Press [P -] button to go to the Language Setting menu.<br />
1. Auto update: Press [ok] button, then press [▲, ▼]<br />
buttons, at last press [ok] button Or [◄, ►] buttons<br />
select an option.<br />
a. ON: Get the time from the channel info that you<br />
will watch.<br />
Note: Now the date and time does not edit.<br />
b. OFF: You need manual set the date and time.<br />
Note: Now you can't edit the GMT offset option.<br />
2. YY/MM/DD: Press number key to set the date.<br />
3. Time: Press number key to set the time.<br />
4. GMT Offset: Press [ok] button, then press [▲, ▼]<br />
buttons, at last press [ok] button. Or [◄, ►] buttons to<br />
select appropriate option.<br />
5. Summer Time: Press [ok] button, then press [▲, ▼]<br />
buttons, at last press [ok] button Or [◄, ►]buttons to<br />
select ON or OFF.<br />
4.6.3 Network Setting<br />
Network Setting allow you setting for <strong>co</strong>nnect internet.<br />
If you <strong>co</strong>nnect the LAN and it has DHCP service. At DHCP<br />
14
Networking<br />
option, press [ok] button, then press [▲▼ , ] buttons, at<br />
last press [ok] button. Or press [◄, ►] buttons to select<br />
ON . If not DHCP service, you need select OFF, you need<br />
<strong>co</strong>nfig the network by manual.<br />
In this menu:<br />
Press [P+] button to go to the Video Setting menu.<br />
Press [P-] button to go to the Time Setting menu.<br />
4.6.4 Video Setting<br />
Video setting allow you setting for display format and<br />
resolution.<br />
1. TV Standard: Press [◄, ►] buttons to switch video<br />
resolution circularly by the sequence “480<br />
576 720 1080i1080p Auto”. Or press<br />
[ok] button, and select it with [▲, ▼] buttons, then<br />
press [ok] button to <strong>co</strong>nfirm.<br />
Note:<br />
1) Auto means system will set the video output<br />
resolution ac<strong>co</strong>rding to the program, it’s playing,<br />
different resolution programs switching perhaps<br />
will makes TV screen flickering.<br />
2) When you <strong>co</strong>nnect with A/V or SCART, the<br />
TV has output that only you change to resolution<br />
the TV supports.<br />
2. Screen ratio: Press [◄, ►] button to switch video<br />
details<br />
resolution circularly by the sequence “ 4:3<br />
16:9 Auto. Or press [ok] button, and select it<br />
with [▲, ▼] buttons, then press [ok] button to<br />
<strong>co</strong>nfirm.<br />
4:3: Auto - Letterbox - Centre<br />
16:9: Auto - Pillar Box - Zoom<br />
Auto: The display format follow the channel<br />
3. Conversion: Press [◄, ►] buttons to switch the<br />
manner circularly by the sequence<br />
“ LETTER_BOX PAN_SCAN COMBINED<br />
IGNORE. Or press [ok] button, and select it with [▲,<br />
▼] buttons, then press [ok] button to <strong>co</strong>nfirm.<br />
In this menu:<br />
Press [P+] button to go to the Network Setting menu.<br />
Press [P -] button to go to the Password Setting menu.<br />
4.6.5 Password Setting<br />
Password Setting Change the system password, the<br />
default password is 0000.<br />
In this menu:<br />
Press [P+] button to go to the <strong>co</strong>nfig Setting menu.<br />
Press [P -] button to go to the video Setting menu.<br />
4.6.6 Config Setting<br />
<strong>co</strong>nfig Setting allow you <strong>co</strong>nfig sth about online.<br />
Message auto play: Press [◄, ►] buttons to switch it<br />
between Enable and Disable.<br />
Enable : Allow the message auto play in full screen<br />
when it play video.<br />
Disable: The message can't auto play in full screen<br />
when it play video.<br />
15
Networking<br />
Software Upgrade Notify: Press[◄, ►] buttons to<br />
switch it between Enable and Disable.<br />
Resource Transfer Mode: Press [◄, ►] buttons to<br />
switch it between HTTP and FTP.<br />
4.7 SCAN CHANNEL<br />
Go to menu/Install/Satellite Install/Satellite, select an<br />
appropriate satellite and then press [red] button to scan<br />
channels.<br />
Note: If don't scan channels, please <strong>co</strong>ntact the local<br />
satellite antenna supply.<br />
5 Basic Operations<br />
5.1 Changing channels<br />
You can change the channels in several ways.<br />
Press the [▲, ▼] buttons in the full screen.<br />
Enter the channel number directly with number<br />
buttons.<br />
Go to the TV List or Organizing Channel and<br />
select a channel.<br />
Note:<br />
Press the [TV/RADIO] button to switch between TV<br />
and radio channels.<br />
Press the [RECALL] button to return to the previous<br />
ten channels.<br />
5.2 Volume/Mute/Audio<br />
To adjust the audio volume, press the [ , ] or [V+, V-]<br />
buttons.<br />
To mute the audio temporarily, press the [MUTE] button.<br />
5.3 Setting audio options<br />
Audio options are available only when the programme<br />
supports multiple audio languages.<br />
Press the [AUDIO] button to change the audio language<br />
and direction.<br />
Each time you press the [◄, ►] buttons, the value<br />
changes.<br />
Note: The mute function remains set while you change<br />
channels.<br />
5.4 Display Resolution<br />
Press the [V.Format] button to set the resolution of the<br />
screen.<br />
16
Networking<br />
Each time you press this button, the value changes.<br />
480 576 720 1080i1080p Auto<br />
Note: When you <strong>co</strong>nnect with A/V or SCART, the TV has<br />
output that only you change to resolution the TV<br />
supports.<br />
5.5 Info bar<br />
The info bar is display informations about the channel of<br />
the time whenever you change channels. Press the<br />
[INFO] button while it hide. Press the [EXIT] button to<br />
hide.<br />
Note: It not displayed when not channels.<br />
audio.<br />
: This i<strong>co</strong>n highlight, the channel has Teletext.<br />
: This i<strong>co</strong>n highlight, the channel has EPG.<br />
: This i<strong>co</strong>n highlight, the channel has multilingual in<br />
: This i<strong>co</strong>n highlight, the channel has subtitle.<br />
: This i<strong>co</strong>n highlight, the channel is Scrambled.<br />
: This i<strong>co</strong>n highlight, the channel is HBBTV.<br />
: This i<strong>co</strong>n highlight, the channel is added favourite<br />
channel.<br />
: This i<strong>co</strong>n highlight, the channel is HD.<br />
5.6 Sleep timer<br />
Press the [SLEEP] button to set the automatic turn off<br />
time.<br />
Each time you press this button, the value changes.<br />
OFF - 120 - 90 - 60 - 30 - 20 - 10 minutes<br />
5.7 TV/SAT<br />
Press [TV/SAT] key can switch between TV mode and<br />
STB mode<br />
5.8 Pause<br />
1. In playing mode, press [ PAUSE] button, the<br />
picture will be paused, but the sound of the<br />
channel will still <strong>co</strong>ntinues.<br />
2. Press [PLAY] button, the screen’s picture will skip<br />
over to the current playing picture, and the sound<br />
of the channel will <strong>co</strong>rresponding playing.<br />
5.9 Zoom<br />
The [ZOOM] button allows you to magnify a certain area<br />
on the images.<br />
Each time you press this button, the enlarge value<br />
changes.<br />
x1, x4, x9, x16<br />
Using[◄, ►] & [▲▼ , ] buttons to move the image center<br />
area you want to see. And press [EXIT] button to exit.<br />
17
Networking<br />
5.10 NVOD<br />
Press [OPTION] button in full screen, it display NVOD<br />
menu if it has NVOD. Or it will show "no option channel".<br />
5.11 Teletext<br />
Teletext is a free service broadcast which gives the latest<br />
information on news, weather and many other topics.<br />
You can use interactive services in teletext mode.<br />
All teletext supporting channels have the TTX i<strong>co</strong>n<br />
display highlight on the info bar.<br />
1. Press [TTX] button and select TTX.<br />
2. Press [▲, ▼] button to select the language.<br />
3. Press [ok] button.<br />
4. Using[◄, ►] & [▲▼ , ]buttons to switch information.<br />
5.12 Subtitle<br />
All subtitle supporting channels have the subtitle i<strong>co</strong>n<br />
display highlight on the info bar.<br />
1. Press [TTX] button and select subtitle.<br />
2. Press [▲, ▼] button to select the language.<br />
3. Press [ok] button.<br />
18
Networking<br />
5.13 Quick bar<br />
Press [F1] button to display the menu. It show weather<br />
message, time and state of NET and USB, and has<br />
shortcut to enter to "weather" menu. It also has<br />
message box and manage of USB memory.<br />
Message box is show the system message, like notify of<br />
the new software.<br />
5.14 Manage of USB memory<br />
1. Press [yellow] button to Add New Folder, Copy, Cut,<br />
Paste, Rename and Delete functions<br />
2. Press [blue] button to sort the files or folders by<br />
Name, Size or Time.<br />
5.15 Change Satellite<br />
1. Press [SAT] button.<br />
2. Press [▲, ▼] buttons to select Satellite.<br />
3. Press [ok] button.<br />
5.16 Change Favourites group<br />
1. Press [FAV] button.<br />
2. Press [◄, ►] buttons to select one favourites<br />
group.<br />
3. Press [▲, ▼] buttons to select channel.<br />
5.17 Re<strong>co</strong>rding<br />
In full screen:<br />
19
Networking<br />
1. Press [REC] button to start re<strong>co</strong>rding.<br />
2. Press [REC] button again to pause re<strong>co</strong>rding.<br />
3. Press [PLAY MODED] button to enter into Re<strong>co</strong>rd<br />
menu.<br />
4. Press [▲, ▼] buttons to select an option.<br />
5. Press [ok] button to enter into Re<strong>co</strong>rd Edit menu.<br />
6. Press [◄, ►] buttons to change the duration.<br />
7. Press [STOP] button to stop re<strong>co</strong>rding.<br />
Note:<br />
1. Now it support two re<strong>co</strong>rdings.<br />
2. You can re<strong>co</strong>rd radio programmes also.<br />
3. The re<strong>co</strong>rd banner will be display whenever<br />
pressing [INFO] button.<br />
4. You also can change the re<strong>co</strong>rding duration in<br />
menu > System > PVR/HDD Setting > Re<strong>co</strong>rd<br />
setting > Duration.<br />
5. When a new scheduled re<strong>co</strong>rding starts while a<br />
re<strong>co</strong>rding is already in progress, the re<strong>co</strong>rd banner<br />
will be displayed for a few se<strong>co</strong>nds to information<br />
that the re<strong>co</strong>rding has been started. If you are<br />
watching the channel being re<strong>co</strong>rded, a re<strong>co</strong>rd<br />
notice will pop – up 6 se<strong>co</strong>nds before the<br />
scheduled re<strong>co</strong>rding starts, and the channel will<br />
switch to the scheduled programme automatically<br />
at the start time.<br />
6. Press the [POWER] button while re<strong>co</strong>rding will not<br />
stop the re<strong>co</strong>rding, a information displayed for<br />
re<strong>co</strong>rd will stop after 6 se<strong>co</strong>nds before and standby.<br />
If you select NO it will don’t standby and still<br />
re<strong>co</strong>rding.<br />
7. Ensure that there is enough free space before<br />
re<strong>co</strong>rding. If the free space on the hard disk drive is<br />
insufficient, re<strong>co</strong>rding will stop. Re<strong>co</strong>rding one hour<br />
of programme may require up to 2 or 3 GB of hard<br />
disk space. The space for re<strong>co</strong>rding a 1 hour<br />
programme may differ depending on the<br />
preogramme.<br />
8. To view the re<strong>co</strong>rded programme list, go to menu ><br />
File list > Re<strong>co</strong>rd menu.<br />
20
Networking<br />
5.18 Play the re<strong>co</strong>rded file<br />
when it re<strong>co</strong>rding<br />
1. Press [PLAY] button to start play the re<strong>co</strong>rded file.<br />
2. Press [PAUSE] button to pause play.<br />
3. Press [◄, ►] buttons to jump the playing place.<br />
4. Press [PAGE-, PAGE+] button to play fast.<br />
5. Press [PREV/NEXT] button to jump the head/end<br />
of the file.<br />
6. Press [STOP] button to stop play.<br />
5.19 Timeshift<br />
Timeshift is a aptotic big re<strong>co</strong>rding. When is full, it will<br />
lost the head file to still re<strong>co</strong>rding. When Timeshift is<br />
enable :<br />
1. Press [PLAY] button to play the file.<br />
2. Press [PAUSE] button to pause play.<br />
3. Press [◄, ►] buttons to jump the playing place.<br />
4. Press [PAGE-, PAGE+] buttons to play fast.<br />
5. Press [PREV/NEXT] button to jump the head/end<br />
of the file.<br />
6. Press [STOP] button to stop play.<br />
Note: If you change channel, the path or the time, it will<br />
restart.<br />
5.20 Unmount USB Disk<br />
1. Press [PLAY MODE] button.<br />
2. Press [▲, ▼] buttons to select the disk.<br />
3. Press [ok] button.<br />
4. Select YES and press [ok] button<br />
5.21 HBBTV<br />
When info bar has i<strong>co</strong>n, it mean this channel has<br />
HBBTV service. First make sure the service is ON in<br />
System/Basic Setting/Miscellaneous Setting/HBBTV<br />
menu. In these channels, when the message display,<br />
press [red] button to enter into the <strong>co</strong>rrelative internet<br />
point<br />
21
Networking<br />
6 Channel<br />
6.1 TV/Radio list<br />
The channel list will help you find the channel you want<br />
to watch or edit quickly and easily.<br />
You can access the channel list in several ways.<br />
In full screen, press [ok] button the list will show in<br />
mid.<br />
Note: Can only operate for one channel.<br />
6.1.1 Changing Channels<br />
Select the channel you want to watch and press the [ok]<br />
button. The displayed channel will change.<br />
1. : Locked channel, : Scrambled channel (CAS<br />
i<strong>co</strong>ns)<br />
2. Press the [ok] or [Exit] button to exit.<br />
3. Press [TV/Radio] button to switch between TV and<br />
Radio list.<br />
4. Press [P+/P-] button to skip to the next page.<br />
6.1.2 Changing group<br />
You can display the list of the selected channel group.<br />
(All, FAV, Satellite, A-Z, Provider, CAS, HD, Broadcaster.)<br />
1. Press [▲, ▼] buttons.<br />
2. Select a channel group.<br />
6.1.3 Display channel detail<br />
information<br />
You can display the information menu to know the<br />
information,service, satellite, TP, vid/aud pid, Pcr/pmt<br />
pid, service id, Frame Status, Provider ,CAS about the<br />
channel.<br />
1. Press [▲, ▼] buttons.<br />
2. Select a channel.<br />
3. Press [INFO] button. And press again to cancel.<br />
22
Networking<br />
6.1.4 Sorting channels<br />
Sort the list by:<br />
Number, A-Z, Free+CAS, CAS+Free, TP<br />
1. Press [blue] button.<br />
2. Press [▲, ▼] buttons to select an option.<br />
3. Press [ok] button.<br />
6.1.5 Watch EPG<br />
1. Press [green] button to display the EPG now.<br />
2. Press [ok] or [EXIT] button to exit.<br />
6.1.6 Adding favourite channel<br />
1. Press [yellow] button.<br />
2. Select FAV and press [ok] button.<br />
3. Select FAV groups that you want.<br />
4. Press [EXIT] to save and exit.<br />
Note: Do it again to cancel the favourite channel<br />
6.1.7 Skipped channel/Cancel skip<br />
channel<br />
You can't watch this channels with [▲▼ , ] button in full<br />
screen.<br />
1. Press [yellow] button.<br />
2. Press [▲▼ , ] buttons select skip.<br />
3. Press [ok] button.<br />
4. Press [►] button.<br />
5. Press [▲▼ , ] buttons.<br />
6. Select YES and Press [ok] button to set the<br />
highlight channel.<br />
7. Select NO and Press [ok] button to cancel set the<br />
highlight channel.<br />
6.1.8 Locking/Deleting/Renaming<br />
1. Press [yellow] button.<br />
2. Select an option.<br />
Lock: Select ON or OFF, and Press [ok] to<br />
23
Networking<br />
save and exit.<br />
Delete: Press [ok] button, and Press [ok] to<br />
save and exit.<br />
Rename: Press [ok] button and enter the<br />
name in the keyword, then press [red] to save<br />
and exit.<br />
Note: Cancel lock need input password.(If you not<br />
change the password is 0000)<br />
6.1.9 Find channel<br />
Find channel in currently group.<br />
1. Press [FIND] button.<br />
2. Input channel name to keyword.<br />
3. Press [red] to <strong>co</strong>nfirm.<br />
Note:<br />
1. Press [green] button to move cursor preceding.<br />
2. Press [yellow] button to move cursor next.<br />
3. Press [blue] button to clear the keyword.<br />
6.2 Managing Channels<br />
6.2.1 Organizing Channel<br />
Go to MENU/Channel/Organizing Channel menu will<br />
help you to manage the channels.<br />
Note:<br />
1. Press [TV/Radio] button to switch between TV and<br />
Radio list.<br />
2. Press [P+/P-] button to skip to the next page.<br />
24
Networking<br />
6.2.1.1 Changing group<br />
You can display the list of the selected channel group.<br />
All, FAV, Satellite, A-Z, Provider, CAS, HD,<br />
Broadcaster.<br />
1. Press [red] button.<br />
2. Press [▲, ▼] buttons, select a channel group.<br />
3. Press [ok] button.<br />
6.2.1.2 Selecting channel<br />
You can using [ok] button to select one by one, or select<br />
channel quickly by option menu,<br />
Select All, Unselect All, Select Others, Select TP,<br />
Provider<br />
1. Press [green] button.<br />
2. Press [▲, ▼] buttons, select a channel group.<br />
3. Press [ok] button.<br />
6.2.1.3 Moving channel<br />
You can move the order that you select channels.<br />
1. Press [►] button.<br />
2. Select Move and press [ok] button.<br />
3. Press [▲, ▼] buttons to move.<br />
4. Press [ok] button.<br />
6.2.1.4 Locking/Deleting/Renaming/Skiping<br />
1. Press [►] button.<br />
2. Select an option.<br />
Lock: Press [ok] to save and exit.<br />
Delete: Press [ok] button.<br />
Rename: Press [ok] button and enter the<br />
name in the keyword, then press [red] to save and exit.<br />
Skiping: Press [ok] button.<br />
25
Networking<br />
6.2.1.5 Display channel detail information<br />
You can display the information menu to know the<br />
information,<br />
service, satellite, TP, vid/aud pid, Pcr/pmt pid, service<br />
id, Frame Status, Provider CAS about the channel.<br />
1. Press [▲, ▼] buttons to select a channel.<br />
2. Press [INFO] button. And press again to cancel.<br />
6.2.1.6 Find channel<br />
Find channel in currently group.<br />
1. Press [FIND] button.<br />
2. Input channel name to keyword.<br />
3. Press [red] to <strong>co</strong>nfirm.<br />
Note:<br />
1. Press [green] button to move cursor preceding.<br />
2. Press [yellow] button to move cursor next.<br />
3. Press [blue] button to clear the keyword.<br />
4. Press [white] button to switch the input mode.<br />
6.2.2 Organizing Favourites<br />
Go to MENU/Channel/Organizing Favourites menu to<br />
add favourites channel to the favourite group.<br />
Note:<br />
1. Press [TV/Radio] button to switch between TV and<br />
Radio list.<br />
2. Press [P+/P-] button to skip to the next page.<br />
6.2.2.1 Adding favourite channels/Cancel favourite<br />
channels<br />
1. Select channels with [ok] or option<br />
2. Press [►] / [◄] button.<br />
3. Select Add FAV/Remove.<br />
4. Press [ok] button.<br />
26
Networking<br />
Note:<br />
1. When you cancel favourite channels, you can only<br />
using [ok] to select.<br />
2. All favourite channels in the right <strong>co</strong>lumn.<br />
6.2.2.2 Renaming for FAV group<br />
1. Press [►] or [◄] button.<br />
2. Select Rename.<br />
3. Press [ok] button to input the name in keyword.<br />
4. Press [red] button.<br />
Note:<br />
1. Press [green] button to move cursor preceding.<br />
2. Press [yellow] button to move cursor next.<br />
3. Press [blue] button to clear the keyword.<br />
6.2.2.3 Moving favourite channels<br />
1. Press [◄] button.<br />
2. Select Move and Press [ok] button.<br />
3. Press [▲, ▼] buttons.<br />
4. Press [ok] button.<br />
6.2.2.4 Changing favourite group<br />
1. Press [FAV] button.<br />
2. Press [▲, ▼] buttons to select a group.<br />
3. Press [ok] button.<br />
7 EPG<br />
The EPG(Electronic Programme Guide) displays the<br />
detailed programme information of each channel, in<br />
time and date order. You can customize your own<br />
programme guide to list the channels or programmes of<br />
interest to you and schedule your viewing using the<br />
programme information.<br />
Note:<br />
1. Press [INFO] button to view detailed information of<br />
the chosen programme.<br />
2. Press [P+/P-] button to skip to the next page.<br />
3. Press [TV/Radio] button to switch between TV and<br />
Radio list.<br />
7.1 Changing Group<br />
You can display the list of the selected channel group.<br />
All, FAV, Satellite, A-Z, Provider, CAS, HD.<br />
1. Press [red] button ant then press [▲, ▼] buttons.<br />
2. Select a channel group.<br />
3. Press [ok] button.<br />
27
Networking<br />
7.2 Find channel<br />
Find channel in currently group.<br />
1. Press [FIND] button.<br />
2. Input channel name to keyword.<br />
3. Press [red] to <strong>co</strong>nfirm.<br />
Note:<br />
1. Press [green] button to move cursor preceding.<br />
2. Press [yellow] button to move cursor next.<br />
3. Press [blue] button to clear the keyword.<br />
4. Press [white] button to switch the input mode.<br />
7.3 EPG now/next list<br />
The list show now/next EPG for the current channel.<br />
7.4 Switch EPG between<br />
now/next<br />
There are two ways to switch EPG now and next list.<br />
Press [◄, ►] buttons to switch the list EPG<br />
between now and next.<br />
1. Press [green] button.<br />
buttons.<br />
2. Select EPG Now or EPG Next with [▲, ▼]<br />
3. Press [ok] button.<br />
7.5 Schedule list<br />
The schedule list show a week EPG for the current<br />
channel.<br />
1. Press [green] button, and press [▲, ▼] buttons to<br />
select EPG Schedule, at last press [ok] button.<br />
2. Press [◄, ►] buttons to switch date.<br />
3. Press [▲, ▼] buttons to switch the EPG affair.<br />
4. Press [blue] button to change channel.<br />
7.6 Setting timer<br />
There are two ways to go to the timer menu.<br />
28
Networking<br />
Go to menu/channel menu, then select Organizing<br />
Timer or in EPG menu press [yellow] button.<br />
7.7 Adding a new timer<br />
1. Press [yellow] button to go to Timer menu.<br />
2. Set options<br />
3. Press [red] button to rename for the affair.<br />
4. Press [EXIT] and select YES to save and exit.<br />
Note:<br />
1. You can't set the affair time before system time.<br />
2. You also press [REC] button to add timer affair<br />
about the EPG in EPG Now/Next/Schedule menu.<br />
3. You can't add timer affair more then eight.<br />
Subjoin:<br />
1. Number: Display the order of current item.<br />
2. Service : Show the channel, if you want change,<br />
press [ok] key.<br />
3. Event name: Show event default name, you also<br />
press [red] key to rename it.<br />
4. Start date: Show start date of event, you can press<br />
number keys to change it.<br />
5. Start time: Show start time of event, you can press<br />
number keys to change it.<br />
6. End date: Show end date of event, you can press<br />
number keys to change it.<br />
7. Stop time: Show end time of event, you can press<br />
number keys to change it.<br />
8. Repeat: Show the event transact times, press [◄,<br />
►] keys to switch among once, everyday, a week,<br />
workday, weekend.<br />
9. Timer mode: Type of the event, it has change<br />
service and HDD re<strong>co</strong>rd.<br />
7.8 Editing a timer affair<br />
1. Press [green] button to go to Timer menu.<br />
2. Set options<br />
3. Press [red] button to rename for the affair.<br />
4. Press [EXIT] and select YES to save and exit.<br />
7.9 Deleting timer affairs<br />
1. Press [ok] button to select one or more.<br />
2. Press [red] button to delete.<br />
8 Installation<br />
Installation menu allows you to <strong>co</strong>nfigure your antenna<br />
and search the available TV and radio channels. You can<br />
<strong>co</strong>nfigure the fixed antenna, SCD antenna or motor<br />
antenna with this receiver.<br />
8.1 Search Satellite Channels<br />
(fixed antennal)<br />
Go to menu/Install/Satellite Install, you can search<br />
channels by selecting the switch type and setting the<br />
required satellite.<br />
Note: If the antenna is not properly set, channel search<br />
cannot be activated which means you cannot watch any<br />
of the programmes on air.<br />
8.1.1 LNB Only<br />
You can either <strong>co</strong>nnect to an antenna with a single LNB<br />
switch using an RF cable.<br />
29
Networking<br />
You can either <strong>co</strong>nnect to two antenna with a single LNB<br />
switch using an RF cable.<br />
8.1.2 DiSEqC<br />
You can either <strong>co</strong>nnect to several antennas with a LNB<br />
switch using RF cable.<br />
8.1.3 Using LNB Switch Only<br />
You can search only channels of one or two satellite<br />
using the fixed antenna.<br />
1. Check that your antenna <strong>co</strong>nnection and the<br />
selected antenna type are <strong>co</strong>rrect.<br />
2. Select a satellite figure and press the [green]<br />
button.<br />
Satellite: Select the satellite.<br />
Tuner Select: Choose Tuner 1 or Tuner 2<br />
Connection Type: Choose Separated or Loop<br />
Through.<br />
Note: Only choose Tuner 2, this item can edit.<br />
LNB: Select the LNB frequency.<br />
22kHZ: Select On when using a 22kHZ tone<br />
switch box.<br />
DiSEqC: Select the DiSEqC switch,<br />
Power: Select the be<strong>co</strong>ming value.<br />
3. Press [red] button.<br />
Mode:<br />
30
Networking<br />
1. All: Scan all type channels it can find.<br />
2. FTA: Scan free channels.<br />
3. ALL_TV: Scan all TV channels.<br />
4. FTA_TV: Scan free TV channels.<br />
5. ALL_RADIO: Scan all radio.<br />
6. FTA_ RADIO: Scan free radio.<br />
Net: Select NIT ON to receive the latest<br />
transponder information.<br />
4. Press [ok] button to scan.<br />
5. When the search has <strong>co</strong>mpleted, select save and<br />
press [ok] button to save the found channels and<br />
exit.<br />
Note: Press [EXIT] button to stop the channel search.<br />
8.1.4 Blind Scan channels<br />
This function is scan channels but don't need manual<br />
add TP in transponder list. First, it automatic add<br />
transponders that has single, then scan channels belong<br />
those transponders.<br />
1. Go to satellite list.<br />
2. Press [▲, ▼] buttons to select one satellite.<br />
3. Press [red] button.<br />
4. Press [◄, ►] buttons to select ON.<br />
5. Press [◄, ►] buttons to select Mode among All,<br />
FTA, aLL TV, FTA_TV, ALL_RADIO and FTA_RADIO.<br />
All: Scan all type channels it can find.<br />
FTA: Scan free channels.<br />
ALL_TV: Scan all TV channels.<br />
FTA_TV: Scan free TV channels.<br />
ALL_RADIO: Scan all radio.<br />
FTA_ RADIO: Scan free radio.<br />
6. Press [◄, ►] buttons to select Net between NIT<br />
OFF and NIT ON.<br />
NIT ON: To receive the latest transponder<br />
information.<br />
7. Press [◄, ►] buttons to select Polarization among<br />
Auto, H and V.<br />
Auto: Scan channels that the polarization is H<br />
and V.<br />
H: Scan channels that the polarization is H.<br />
V: Scan channels that the polarization is V.<br />
8. Press [ok] button to scan.<br />
8.1.5 Settin Transponder<br />
The available transponder for each satellite is<br />
automatically listed. You can enter the transponder<br />
setting options directly if necessary.<br />
1. Press [yellow] button to go to the Transponder<br />
list.<br />
2. Press [green] button to add a new transponder.<br />
Freq: Enter the frequency of the transponder.<br />
H/V: Select the polarization of the transponder<br />
with H or V.<br />
Sym: Enter the symbol rate of the transponder.<br />
FEC: Select the FEC for the transponder.<br />
changes.<br />
Each time you press [◄, ►] buttons, the value<br />
31
Networking<br />
Auto 1/2 2/3 3/4 4/5 5/6<br />
6/7 7/8 8/9 1/4 1/3 2/5<br />
3/5 9/10.<br />
Mode: Select the mode with DVB-S or<br />
DVB-S2.<br />
Press [ok] button.<br />
3. Press [yellow] button to edit the select<br />
transponder.<br />
4. Press [blue] button to delete the select<br />
transponders.<br />
5. Press [INFO] button to display the search channels<br />
of the transponder.<br />
8.1.6 Search Channels (Motor Antenna)<br />
You can set the position of the satellites when using a<br />
motor antenna for efficient channel search.<br />
1. Check that your antenna <strong>co</strong>nnection and the<br />
selected antenna type are <strong>co</strong>rrect.<br />
2. Select the satellites that the motor antenna is<br />
pointing to.<br />
3. Set the type and location of your motor. (Motor<br />
Setting)<br />
4. Set your antenna position for the selected satellites.<br />
5. Set the operation limit of your motor.<br />
6. Press [red] button to scan, the found channels will<br />
be listed.<br />
7. When the search has <strong>co</strong>mpleted, select save and<br />
Note:<br />
press [ok] button to save and exit.<br />
1. Only channels of one satellite can be searched<br />
when using a motor antenna. Please repeat the<br />
search process to search more satellites.<br />
2. Press [EXIT] button to stop and press [ok] button to<br />
save and exit.<br />
3. Refer to Setting Transponder for details in<br />
transponder setting.<br />
8.1.7 Motor setting<br />
Set the type and location of your motor.<br />
1. In Menu/Install/Satellite/Edit Satellite menu,<br />
press [yellow] button.<br />
2. Select motor type at motor item.<br />
DiSEqC 1.2: General motor antenna using<br />
DiSEqC 1.2.<br />
USALS: Motor antenna using USALS.<br />
3. Select My Longitude and enter the longitude and<br />
direction.<br />
4. Select My Latitude and enter the latitude and<br />
direction.<br />
5. Select Set Limit and set the limit for the Motor.<br />
Select the value is east or west<br />
Select the Move Step or Move Continue to<br />
move the Motor to east or west.<br />
Select the save and press [ok] button to save<br />
it.<br />
Note: When Motor Type is set as DiSEqC 1.2, the menu<br />
is not My Longitude, My Latitude.<br />
32
Networking<br />
8.2 Search Cable Channels<br />
(optional)<br />
Go to menu/Install/Cable Install, you can search<br />
channels by manual or auto.<br />
Note: If the antenna is not properly set, channel search<br />
cannot be activated which means you cannot watch any<br />
of the programmes.<br />
In manual installation:<br />
1. You can press [ok] button to select one or more TP<br />
and press [red] button to scan channels.<br />
2. Press [green] button to add a new transponder.<br />
Freq: Enter the frequency of the transponder<br />
between 70000 and 900000.<br />
Sym: Enter the symbol rate of the<br />
transponderbeween 1000 and 45000.<br />
QAM: Select a QAM for the transponder.<br />
Each time you press [◄, ►] buttons, the value changes.<br />
16 32 64 128 256 . Press [ok] button to<br />
<strong>co</strong>nfirm.<br />
3. Press [yellow] button to edit the select<br />
transponder.<br />
4. Press [blue] button to delete the select<br />
transponders.<br />
5. Press [INFO] button to display the search channels<br />
of the transponder.<br />
In auto installation:<br />
Press [ok] button to enter and it auto scanning channels.<br />
8.3 Search Terrestrial Channels<br />
(optional)<br />
Go to menu/Install/Terrestrial Install, you can search<br />
channels by manual or auto.<br />
Note:<br />
1. If the antenna is not properly set, channel search<br />
cannot be activated which means you cannot watch any<br />
of the programmes.<br />
2. Cable install menu and terrestrial install menu can't<br />
display at the same time.<br />
First:<br />
In <strong>co</strong>nfig menu:<br />
Press [◄, ►] buttons to select a properly region among<br />
Australia, German and UK.<br />
In manual installation:<br />
6. You can press [ok] button to select one or more TP<br />
and press [red] button to scan channels.<br />
7. Press [green] button to add a new transponder.<br />
Freq: Enter the frequency of the transponder<br />
between 50000 and 900000.<br />
Band Width: Press [◄, ►] buttons to select a<br />
value among 6 MHz, 7 MHz and 8 MHz.<br />
Channel No: Input channel number between<br />
0 and 200.<br />
Press [ok] button to <strong>co</strong>nfirm.<br />
8. Press [yellow] button to edit the select<br />
transponder.<br />
33
Networking<br />
9. Press [blue] button to delete the select<br />
transponders.<br />
10. Press [INFO] button to display the search channels<br />
of the transponder.<br />
In auto installation:<br />
Press [ok] button to enter and it auto scanning channels.<br />
9 System<br />
Go to menu/system, you can view the information of<br />
the system, Basic Setting, PVR/HDD Setting, Net<br />
Setting, Upgrade.<br />
Note: Press [EXIT] button to exit.<br />
9.1 Basic Setting<br />
Go to Menu/System/ Basic Setting, in this menu, there<br />
has Language Setting, Time Setting, Parental Control,<br />
A/V Output, Factory Default, Miscellaneous Setting,<br />
Tuner Configuration, Conditional Access, Contact,<br />
System Information.<br />
9.1.1 Setting language<br />
1. Menu Language: Press [ok] button, then press [▲,<br />
▼] buttons to select on option, at last press [ok]<br />
button. Or [◄, ►] buttons select an OSD menu<br />
language.<br />
2. Audio Language: Press [ok] button, then press [▲,<br />
▼] buttons to select on option, at last press [ok]<br />
button. Or [◄, ►] buttons select an audio<br />
language.<br />
Note: Some channels have more than one audio<br />
language for choosing, by this function you can set<br />
the first audio for this channel. If the playing<br />
channel has the same audio as the “First Audio” you<br />
set, system will play this audio language as default.<br />
If the channel hasn’t the suited audio language,<br />
then the default language of current channel will<br />
be played automatically. The selections of audio<br />
languages include: English, French, German,<br />
Russian, Arabic, Portuguese, Turkish, Spanish,<br />
Polish, Italian and so on.<br />
3. Audio Priority: Press [ok] button, then press [▲,<br />
▼] buttons to select on option, at last press [ok]<br />
button. Or [◄, ►] buttons select Dolby Digital or<br />
Language.<br />
Dolby Digital: Dolby audio track will be played if<br />
the current channel has dolby audio track.<br />
Language: Don’t priority play dolby audio track at<br />
the channel that has dolby audio track.<br />
4. EPG Language: Press [ok] button, then press [▲,<br />
▼] buttons to select on option, at last press [ok]<br />
button. Or [◄, ►] buttons select EPG language.<br />
5. Subtitle Language: Press [ok] button, then press<br />
[▲, ▼] buttons to select on option, at last press<br />
[ok] button. Or [◄, ►] buttons select the subtitle<br />
language. It is an item for changing the language of<br />
the Subtitle. As long as the services support it, the<br />
Subtitle language is changeable by subtitle menu<br />
34
Networking<br />
on full screen. The supported language can be<br />
changed without any notice.<br />
6. Teletext Language: Press [ok] button, then press<br />
[▲, ▼] buttons to select on option, at last press<br />
[ok] button. Or [◄, ►] buttons select the TXT<br />
language. As long as the services support it, the<br />
Teletext language is changeable by teletext menu<br />
on full screen. The supported language can be<br />
changed without any notice.<br />
7. Subtitle display: Press [ok] button, then press [▲,<br />
▼] button to select on option, at last press [ok]<br />
button. Or [◄, ►] buttons select Auto or <strong>Manual</strong>.<br />
Auto: it will automatically display subtitle in has<br />
subtitle stream,<br />
<strong>Manual</strong>: It need press [yellow] key and select<br />
subtitle to display.<br />
8. Online Language: Press [ok] button, then press<br />
[▲, ▼] buttons to select on option, at last press<br />
[ok] button. Or [◄, ►] buttons select online menu<br />
language.<br />
Note: the Weather Forecast, FAQ, <strong>User</strong> <strong>Manual</strong><br />
language will change with the option.<br />
9.1.2 Time Setting<br />
1. Auto update: Press [ok] button, then press [▲, ▼]<br />
buttons to select on option, at last press [ok]<br />
button. Or [◄, ►] buttons select an option<br />
a. ON: Get the time from the channel info that<br />
you will watch.<br />
option.<br />
Note: Now the date and time does not edit.<br />
b. OFF: You need manual set the date and time.<br />
Note: Now you can't edit the GMT offset<br />
2. YY/MM/DD: Press number key to set the date.<br />
3. Time: Press number key to set the time.<br />
4. GMT Offset: Press [ok] button, then press [▲,<br />
▼] buttons to select on option, at last press [ok]<br />
button. Or press [◄, ►] buttons to select<br />
appropriate option.<br />
5. Summer Time: Press [ok] button, then press [▲, ▼]<br />
buttons to select on option, at last press [ok]<br />
button. Or press [◄, ►] buttons to select ON or<br />
OFF.<br />
6. Wake up/sleep: Config the STB turn ON and OFF. If<br />
these are setting ON, the STB will turn on/off at the<br />
wake up time/sleep time. If set wake up channel,<br />
it turn on at the channel, or it at the last channel<br />
before STB turn off.<br />
9.1.3 Parental Control<br />
In this menu, you can set a password for anyone who<br />
wishes to operate the STB. And you can also set the<br />
password for the lock channels. (How to set the lock<br />
channel please refer to LOCK) Here will show you how to<br />
setting and how to revising the password.<br />
1. Parental Lock: Press [ok] button, then press [▲, ▼]<br />
buttons to select on option, at last press [ok] button.<br />
Or press [◄, ►] buttons to select ON or OFF.<br />
ON: You must input the password to enter into<br />
menu<br />
OFF: Not need password to enter into menu.<br />
2. Censorship Classification: Press [ok] button, then<br />
press [▲, ▼] buttons to select on option, at last press<br />
35
Networking<br />
[ok] button. Or press [◄, ►] buttons to select an<br />
option.<br />
View all: Play channels not need password.<br />
7, 12, 15, 18: those option determining that<br />
different stream, whether have to input password.<br />
Lock all: Play channels need input password.<br />
3. Time Control: Press [ok] button, then press [▲, ▼]<br />
buttons to select on option, at last press [ok] button.<br />
Or press [◄, ►] buttons to select ON or OFF<br />
On: Play channels not need password only in Allow<br />
time.<br />
OFF: Play channels not need password at any time.<br />
4. Allow time: Setting the start and end time to play<br />
channels that not need password.<br />
Note: This option you can’t edit when Time Control<br />
is “OFF”<br />
5. Change password and Confirm password: using<br />
to change password.<br />
9.1.4 A/V Output<br />
In this menu, you can set TV_Scart, Screen ratio,<br />
Conversion, TV Standard, SPDIF, Dolby Digital HDMI.<br />
1. TV_Scart: Press [◄, ►] buttons to switch video<br />
output by RGB or CVBS with SCART cable.<br />
RGB:<br />
CVBS:<br />
2. Screen ratio: Press [◄, ►] buttons to switch video<br />
resolution circularly by the sequence “4:3<br />
16:9 Auto”. Or press [ok] button, and select it<br />
with [▲, ▼] buttons, then press [ok] button to<br />
<strong>co</strong>nfirm.<br />
4:3: Auto - Letterbox - Centre<br />
16:9: Auto - Pillar Box - Zoom<br />
Auto: The display format follow the channel<br />
details<br />
3. Conversion: Press [◄, ►] buttons to switch the<br />
manner circularly by the sequence<br />
“LETTER_BOX PAN_SCAN COMBINED<br />
IGNORE”. Or press [ok] button, and select it with<br />
[▲, ▼] buttons, then press [ok] button to <strong>co</strong>nfirm.<br />
4. TV Standard: Press [ok] button, then press [▲, ▼]<br />
buttons to select on option, at last press [ok]<br />
button. Or press [◄,►] buttons to select an option.<br />
480 576 720 1080i1080p Auto<br />
Note:<br />
a. Auto means system will set the video output<br />
resolution ac<strong>co</strong>rding to the program it’s<br />
playing, different resolution programs<br />
switching perhaps will makes TV screen<br />
flickering.<br />
b. When you <strong>co</strong>nnect with A/V or SCART, the TV<br />
has output that only you change to resolution<br />
the TV supports.<br />
5. SPDIF: Press [ok] button, then press [▲, ▼]<br />
buttons to select on option, at last press [ok]<br />
button. Or press [◄, ►] buttons to select Auto or<br />
PCM.<br />
Auto: The play audio track is the stream has.<br />
PCM: It will make Dolby track to PCM track and<br />
then play it, at the channel has Dolby track<br />
6. Dolby Digital HDMI: Press [ok] button, then press<br />
[▲, ▼] buttons to select on option, at last press [ok]<br />
button. Or press [◄, ►] buttons to select ON or OFF.<br />
Note: When you <strong>co</strong>nnect with HDMI, if select ON<br />
and the TV don’t play the Dolby track, it is not audio<br />
output at the channels that has Dolby track.<br />
7. Browser Screen Size: Press [ok] button and select<br />
YES to enter into. The default is to adjust top. You can<br />
use [▲, ▼] buttons to adjust top. Then press [ok]<br />
button to adjust bottom, and use [▲, ▼] buttons to<br />
adjust . The order is top -> bottom -> left -> right. Left<br />
and right use [◄, ►] buttons to adjust.<br />
36
Networking<br />
9.1.5 Factory Default<br />
This menu is operating for database.<br />
1. Load From Factory Default: Press [ok] button, it<br />
display a warn information, select "YES" to <strong>co</strong>me<br />
back factory default.<br />
Note: If you do Save As Factory Default before, it<br />
will be back the database that you save.<br />
2. Factory Reset: Press [ok] button, it display a warn<br />
information, select "YES" to <strong>co</strong>me back factory<br />
default.<br />
3. Save As Factory Default: Press [ok] button, it<br />
display a warn information, select "YES" to save the<br />
current database as factory default.<br />
4. Delete All Channel: Press [ok] button, it display a<br />
warn information, select "YES" to delete all<br />
channels.<br />
? Frequently Asked Question<br />
Q: IF I incautiously delete all channels, what should I do?<br />
A: There are two ways to restore:<br />
To re-search all channels in “Installation” function.<br />
Use “Default Value” function to restore all channels in<br />
“Tools” function<br />
9.1.6 Miscellaneous Setting<br />
1. Banner display time: Press [ok] button, then press<br />
[▲, ▼] buttons to select on option, at last press [ok]<br />
button. Or press [◄, ►] buttons to select option. It<br />
<strong>co</strong>ntrols the info bar display time. The options have<br />
sec1-sec20.<br />
2. Osd transparency: Press [ok] button, then press<br />
[▲, ▼] buttons to select on option, at last press [ok]<br />
button. Or press [◄, ►] buttons to select option.<br />
3. Standby mode: Press [ok] button, then press [▲,<br />
▼] buttons to select on option, at last press [ok]<br />
button. Or press [◄, ►] buttons to select TRUE or<br />
FALSE.<br />
TRUE: When standby, only the front panel work, it<br />
save electricity.<br />
FALSE: When standby, it just stop output video and<br />
audio, this case can’t save electricity.<br />
4. Remote mode: Press [ok] button, then press [▲, ▼]<br />
buttons to select on option, at last press [ok]<br />
button. Or press [◄, ►] buttons to select RC1,RC2<br />
or RC1&2.<br />
RC1: The remote mode must use RC1, or STB can't<br />
receive the <strong>co</strong>ntrol signal.<br />
RC2 : The remote mode must use RC2, or STB can't<br />
receive the <strong>co</strong>ntrol signal.<br />
RC1&2: The remote mode no matter what, the STB<br />
can receive the <strong>co</strong>ntrol signal.<br />
5. HBBTv: It <strong>co</strong>ntrol HBBTv function. Press [◄, ►]<br />
buttons to change it between ON and OFF.<br />
ON: You can press [red] button to into the web at<br />
has HBBTv function channel.<br />
OFF: The HBBTv function can’t use.<br />
37
Networking<br />
9.1.7 Tuner Configuration<br />
This menu <strong>co</strong>ntrol Cable and Terrestrial tuner. Press [ok]<br />
button, then press [▲, ▼] buttons to select on option,<br />
at last press [ok] button. Or press [◄,►] buttons to<br />
select Cable or Terrestrial.<br />
Cable: The Install menu will display Cable Install menu,<br />
then you can scan cable channels.<br />
Terrestrial: The install menu will display Terrestrial<br />
Install menu, then you can scan Terrestrial channels.<br />
9.1.8 Conditional Access<br />
In this menu, Press [ok] button, then press [▲, ▼]<br />
buttons to select on option, at last press [ok] button. Or<br />
press [◄,►] buttons to select Disable or Enable.<br />
Disable: the Conax block can not work.<br />
Enable: the Conax block can work.<br />
9.1.9 Contact<br />
This menu is note the message of provider. There are<br />
Name, Telephone and website. At those options, press<br />
[ok] button to enter into <strong>co</strong>ntact rename menu and<br />
input relevant messages.<br />
9.1.10 System Information<br />
This menu is show the message about the STB. There are<br />
STBID, System Version, Dbase Version, Kernel<br />
Version, U-Boot Version and Last Update.<br />
9.2 PVR/HDD Setting<br />
In this menu, it has HDD Format, USB Speed Testing,<br />
38
Networking<br />
Re<strong>co</strong>rd Setting, Timeshift Setting and Youtuble<br />
Re<strong>co</strong>rd Setting.<br />
9.2.1 HDD Format<br />
The menu show the message about the USB disk.<br />
Format Disk:<br />
1. Press [red] button and press [▲, ▼] buttons to<br />
select a format for the disk, then press [ok] button<br />
to start. This case can hold subarea<br />
2. Press [green] button to enter into the menu:<br />
a. [green] button: Add a new subarea.<br />
b. [yellow] button: Delete a subarea.<br />
c. [red] button: Save and partition the disk.<br />
d. [blue] button: Format disk.<br />
Note: Format disk will lost the disk data.<br />
9.2.2 USB Speed Testing<br />
This menu use to test the write and read speed of the<br />
USB. You can press [red] button to test again. And the<br />
right <strong>co</strong>lumn show current speed can do what.<br />
9.2.3 Re<strong>co</strong>rd Setting<br />
This menu include Re<strong>co</strong>rd Path, Duration and Extend<br />
Re<strong>co</strong>rd Time.<br />
Re<strong>co</strong>rd Path: Press [ok] button to change the re<strong>co</strong>rd<br />
path.<br />
Duration: Press [◄, ►] buttons to change the Duration<br />
of each time.<br />
Extend Re<strong>co</strong>rd Time: Press [◄, ►] buttons to change<br />
the extend time for re<strong>co</strong>rd. It will add the time at each<br />
begin and end.<br />
9.2.4 TimeShift Setting<br />
This menu include Enable, TimeShift Path and Time.<br />
Enable: Press [ok] button to select ON and OFF.<br />
TimeShift Path: Press [ok] button to change the<br />
TimeShift path.<br />
Time: Press [◄, ►] buttons to change the TimeShift<br />
time.<br />
39
Networking<br />
9.2.5 Youtuble Re<strong>co</strong>rd Setting<br />
This menu include Enable and Re<strong>co</strong>rd Path.<br />
Enable: Press [ok] button to select ON and OFF.<br />
Re<strong>co</strong>rd Path: Press [ok] button to change the re<strong>co</strong>rd<br />
path.<br />
9.3 Net Setting<br />
9.3.1 Configuring Wi-Fi (wireless)<br />
1. Select Wireless on Default Network Type item.<br />
2. Press [red] button the wireless LAN network list will<br />
appear, Select you Wi-Fi network and press [ok]<br />
button, at last input password.<br />
Wireless: The network name.<br />
Access Point Configuration: Press [◄, ►]<br />
buttons to select WEP, WPA2-PSK or<br />
WPA-PSK.<br />
Security Setup/Encryption: Press [◄, ►]<br />
buttons to select an option.<br />
Password: Press [ok] button to input the<br />
password.<br />
Key Number: Press [◄, ►] buttons to select 1,<br />
2, 3 and 4.<br />
Note:<br />
1. Only the Access Point Configuration select<br />
WEP, the Key Number can display for use.<br />
2. When Access Point Configuration select WEP,<br />
Security Setup has open and shared two<br />
options. And Access Point Configuration<br />
select WPA-PSK or WPA2-PSK, Encryption<br />
has TKIP and AES two options.<br />
3. Press [red] button to <strong>co</strong>nnect.<br />
9.3.2 Configuring LAN<br />
1. Select Wired on Default Network Type item.<br />
2. You can <strong>co</strong>nfigure the Ethernet setting options.<br />
DHCP: Apply the options ac<strong>co</strong>rding to the<br />
DHCP.<br />
<strong>Manual</strong>: Enter the options manually.<br />
3. Press [EXIT] button to save and exit.<br />
40
Networking<br />
9.3.3 Dynamic Setting<br />
Go to menu/system/IP <strong>co</strong>nfig menu, press [green]<br />
button enter into setting DDNS menu.<br />
Dynamic Start: Press [ , ] buttons to select ON or<br />
OFF.<br />
<strong>User</strong>: Press [ok] button to input the user name.<br />
Password: Press [ok] button to input the password.<br />
Host: Press [ok] button to input the host domain<br />
name.<br />
Update Interval (Sec): Use number buttons to<br />
input the time.<br />
9.3.4 FTP Password<br />
This menu use to change the FTP password.<br />
<strong>User</strong> name: Display the user name, it can’t be<br />
edited.<br />
Old Password: Press [ok] button to input old<br />
password.<br />
Change password: Press [ok] button to input new<br />
password.<br />
Confirm password: Press [ok] button to input new<br />
password again.<br />
Press [red] button to save.<br />
9.3.5 Network hard disk<br />
Setting those options, you can use network hard disk.<br />
Network hard disk name: Press [◄, ►] buttons to<br />
select an option as the name.<br />
Service type: Press [◄, ►] buttons to select NFS<br />
or CIFS.<br />
Share folder: Press [ok] button to input the share<br />
folder name.<br />
Server IP: Use number buttons to input the server<br />
IP that the share folder belong.<br />
<strong>User</strong> Name: Press [ok] button to input the name.<br />
Password: Press [ok] button to input the password.<br />
Status: Press [◄, ►] buttons to select Active or<br />
Inactive.<br />
Note:<br />
1. The <strong>User</strong> Name and Password can use, only when<br />
you select the Service type is CIFS. It say, you must<br />
have <strong>User</strong> Name and Password can use the<br />
network hard disk in this case.<br />
2. Only select status is active, the network hard disk<br />
can display in the file list.<br />
9.3.6 3G Network<br />
In this menu, it has Access Point Name, Number, <strong>User</strong><br />
Name, Password, Mode and status. Except status, their<br />
are all offer by service provider.<br />
41
Networking<br />
9.4 Upgrade<br />
9.4.1 Upgrade from USB<br />
1. Upgrade Type: Press [ok] button, then press [▲, ▼]<br />
buttons to select on option, at last press [ok] button.<br />
Or press [◄, ►] buttons to select an option.<br />
App, App + Plugin, App + Database + Plugin,<br />
Database, App + Database.<br />
2. Folder: Press [ok] button to select <strong>co</strong>rrelative<br />
software.<br />
3. Press [red] button to upgrade.<br />
9.4.2 Upgrade from online<br />
Go to menu/online/upgrade software menu.<br />
1. Press [◄, ►] buttons to switch between software<br />
list and database list.<br />
2. Press [▲, ▼] buttons to select a software or<br />
database.<br />
3. Press [ok] button to display the log.<br />
4. Press [red] button to download and upgrade.<br />
Note: Don’t power off when upgrade software.<br />
9.4.3 Backup system to HDD<br />
1. Type: Press [ok] button, then press [▲, ▼] buttons<br />
to select on option, at last press [ok] button. Or<br />
press [◄, ►] buttons to select an option.<br />
App, Plug In, App + Plugin, App + Database + Plugin,<br />
Database, App + Database.<br />
2. Path: Press [ok] button to select the path for save<br />
file.<br />
3. Name: Press [ok] button to rename for the file.<br />
4. Press [red] button to backup.<br />
9.4.4 Database Transformer<br />
1. Path: Press [ok] button to select the path for file<br />
2. Press [red] button to output the files.<br />
3. Press [green] button to load the files.<br />
Note: The output file can be maked over at PC, then load<br />
42
Networking<br />
in STB.<br />
10 Conditional Access<br />
Receiver provide two CA slot for user to use. Receiver has<br />
build in smart card module with CONAX system. By<br />
using cards in this system provided by operators, it is<br />
possible to watch many scrambled channels <strong>co</strong>ded in<br />
this system. This menu shows detailed information<br />
about card inserted into card reader module. It allows<br />
inserted ac<strong>co</strong>rding to help messages visible on the<br />
bottom of the screen.<br />
Note: If it not work or error, please <strong>co</strong>ntact the provider.<br />
11 Online<br />
The services of the menu all from online server.<br />
11.1 Message<br />
11.1.1 Display message<br />
1. Select the message that you want display with [▲,<br />
▼] buttons.<br />
2. Press [ok] button to display the detail message.<br />
3. Press [ok] button again, or press [EXIT] button to<br />
cancel display.<br />
11.1.2 Sort message<br />
43
Networking<br />
1. Press [red] button<br />
2. Press [▲, ▼] buttons to select an option.<br />
Status, Address, Subject, timer<br />
3. Press [ok] button.<br />
11.1.3 Delete message<br />
1. Press [green] button to delete the selected<br />
message.<br />
2. Press [yellow] button to delete all message of the<br />
list.<br />
11.2 Weather Forecast<br />
11.2.1 Add City<br />
1. Press [green] button to enter into Add City menu.<br />
2. Input the city name that you want, and press [red]<br />
button to <strong>co</strong>nfirm.<br />
Note:<br />
1. You can only add five cities at most.<br />
2. Press [▲, ▼] buttons to change city.<br />
11.2.2 Delete City<br />
Press [yellow] button to delete the current city.<br />
11.2.3 Update the information<br />
Press [red] button to update the information of current<br />
city.<br />
11.2.4 Change Units<br />
Press [blue] button to change the units.<br />
44
Networking<br />
11.2.5 Switch Date<br />
Press [◄, ►] buttons to switch date.<br />
Note: It only display four dates weather in a city.<br />
11.3 FAQ<br />
11.3.1 Play the demo video<br />
1. Press [◄, ►] buttons to switch frame.<br />
2. Press [▲, ▼] buttons to change item.<br />
3. Press [PLAY] or [ok] button to download and play<br />
the demo video.<br />
11.3.2 Zoom the video<br />
When play the video:<br />
1. Press [ZOOM] button to zoom it of 1, 4, 9 or 16<br />
times.<br />
2. Press [◄, ►] and [▲, ▼] buttons to move the<br />
zoom place.<br />
11.4 <strong>User</strong> <strong>Manual</strong><br />
11.4.1 Resource transfer mode is HTTP<br />
1. Press [◄, ►] and [▲, ▼] buttons to switch item.<br />
2. Press [ok] button at right <strong>co</strong>lumn the picture, it<br />
begins to download and play the picture.<br />
11.4.2 Resource transfer mode is FTP<br />
When you enter the <strong>User</strong> <strong>Manual</strong> menu, it begins to<br />
download the entire manual.<br />
1. Press [◄, ►] and [▲, ▼] buttons to switch item.<br />
2. Press [ok] button at right <strong>co</strong>lumn the picture, it<br />
begins to play the picture.<br />
11.4.3 <strong>Manual</strong> playing<br />
Press [◄, ►] button.<br />
Press [▲, ▼] button.<br />
Press [P+, P-] button.<br />
11.4.4 Auto playing<br />
Press [PLAY] button.<br />
45
Networking<br />
11.4.5 Zoom the picture<br />
When play the picture:<br />
1. Press [ZOOM] button to zoom it of 1, 4, 9 or 16<br />
times.<br />
2. Press [◄, ►] and [▲, ▼] buttons to move the<br />
zoom place.<br />
Note: Press [EXIT] button to cancel play.<br />
11.5 E-book<br />
11.5.1 Resource transfer mode is HTTP<br />
1. Press [◄, ►] and [▲, ▼] buttons to switch item.<br />
2. Press [ok] button at right <strong>co</strong>lumn, it begins to<br />
download the e-book list.<br />
3. Press [ok] button at right <strong>co</strong>lumn, it begins to<br />
download and play the picture.<br />
11.5.2 Resource transfer mode is FTP<br />
1. Press [◄, ►] and [▲, ▼] buttons to switch item.<br />
2. Press [ok] button at right <strong>co</strong>lumn, it begins to<br />
download the entire e-book.<br />
3. Press [ok] button at right <strong>co</strong>lumn the picture, it<br />
begins to play the picture.<br />
11.5.3 <strong>Manual</strong> playing<br />
Press [◄, ►]buttons.<br />
Press [▲, ▼] buttons.<br />
Press [P+, P-] buttons.<br />
11.5.4 Auto playing<br />
Press [PLAY] button.<br />
11.5.5 Zoom the picture<br />
When play the picture:<br />
1. Press [ZOOM] button to zoom it of 1, 4, 9 or 16<br />
46
Networking<br />
times.<br />
2. Press [◄, ►] and [▲, ▼] buttons to move the<br />
zoom place.<br />
Note: Press [EXIT] button to cancel play.<br />
11.6 Config<br />
This menu use to register online server and <strong>co</strong>nfig<br />
online.<br />
11.6.1 Register<br />
1. Name: Press [ok] button to enter into Name<br />
Modification menu, and input the name.<br />
2. Telephone: Press [ok] button to enter into<br />
Telephone Modification menu, and input the<br />
Telephone.<br />
3. Address: Press [ok] button to enter into Address<br />
Modification menu, and input the Address.<br />
4. E-mail: Press [ok] button to enter into E-mail<br />
Modification menu, and input the E-mail.<br />
5. Language: Press [ok] button and then using [▲, ▼]<br />
buttons to select, at last press [ok] button to<br />
<strong>co</strong>nfirm.<br />
6. <strong>User</strong>: It shows the STB ID.<br />
7. Press [red] button to save and register.<br />
11.6.2 Clear online data<br />
Press [yellow] button and select YES, then press [ok]<br />
button to <strong>co</strong>nfirm.<br />
Note: After do this the STB will reboot.<br />
11.6.3 Setup online service<br />
Press [green] button to enter into the menu.<br />
Message Auto Play: Press [ok] button, then press<br />
[▲▼ , ] buttons to select on option, at last press [ok]<br />
video.<br />
button. Or press [◄, ►]buttons to select an option.<br />
Enable: The message can display at bottom of<br />
Disable: Can’t display message when play video.<br />
Software Upgrade Notify: Press [ok] button, then<br />
gives.<br />
press [▲, ▼] buttons to select on option, at last<br />
press [ok] button. Or press [◄, ►] buttons to select<br />
an option.<br />
Enable: It give a message when the new version<br />
Disable: Not message when the new version gives.<br />
Resource Transfer Mode: Press [ok] button, then<br />
press [▲, ▼] buttons to select on option, at last<br />
press [ok] button. Or press [◄, ►] buttons to select<br />
HTTP or FTP.<br />
47
Networking<br />
12 File List<br />
Enter into this menu has two ways.<br />
Go to menu/File list.<br />
In full screen, Press [FOLDER] button.<br />
12.1 Switch File list<br />
There are two ways to switch file list.<br />
1. Go to menu/File list menu, press [◄, ►] buttons<br />
to select one i<strong>co</strong>n, then press [ok] button to enter<br />
into the list.<br />
2. In one list press [red] button, then press [▲, ▼]<br />
buttons to select an option, at last press [ok]<br />
button to switch.<br />
Music, Re<strong>co</strong>rd, Picture, Movie, Software, All<br />
Note: Each list only display <strong>co</strong>rrelative files. All list can<br />
display else list files.<br />
12.2 Sort files/Sort folder<br />
In the list, press [green] button, then press [▲, ▼]<br />
buttons to select an option, at last press [ok] button.<br />
Name, Type, Size, Modify date.<br />
12.3 Delete files/Delete folder<br />
Delete files: In the list, select files with [blue] button,<br />
then press [yellow] button, at last select YES.<br />
Delete folder: In the list, select one folder with [▲, ▼]<br />
buttons, then press [yellow] button, at last select YES.<br />
Note:<br />
1. You can delete one folder once. If the folder is<br />
storage re<strong>co</strong>rd file or timeshift file, it can’t be deleted.<br />
2. When in the software list, the [blue] button to use<br />
to upgrade.<br />
12.4 Play Re<strong>co</strong>rd<br />
File/Music/Movie<br />
1. In the list, select one or more files use [blue]<br />
button.<br />
2. Press [PLAY] or [ok] button to playing.<br />
48
Networking<br />
3. Press [PAUSE] button to pause play.<br />
4. Press [◄, ►] buttons to jump the playing place.<br />
5. Press [PAGE-, PAGE+] buttons to play fast.<br />
6. Press [PREV/NEXT] button to jump the head/end<br />
of the file.<br />
7. Press [PLAY MODE] button to select one mode.<br />
files, then exit.<br />
: Order and play the all selected<br />
: Circular play current file.<br />
: Circular play all selected files.<br />
8. Press [STOP] or [EXIT] button to stop play.<br />
12.5 Play Picture<br />
1. In the list, select one or more files use [blue]<br />
button.<br />
2. Press [PLAY] or [ok] button to playing.<br />
then exit.<br />
: Turn picture by deasil.<br />
: Turn picture by anticlockwise.<br />
: Play next picture.<br />
: Play anterior picture.<br />
: Order and auto play the all selected pictures,<br />
3. Press [STOP] or [EXIT] button to stop play.<br />
12.6 Online Subtitle<br />
When play a movie file, the info bar hide:<br />
1. Press [blue] button to search and display movie<br />
information from online server.<br />
2. Press [red] button to input the new movie name to<br />
search the movie information.<br />
3. Press [green] button to enter into Search Subtitle<br />
From Internet menu.<br />
File Name: Press [ok] button to input the movie<br />
name that you want search.<br />
Language: Press [◄, ►] buttons to select the<br />
language.<br />
4. Press [red] button to search and display the list.<br />
5. Press [▲, ▼] buttons to select a subtitle.<br />
6. Press [ok] button to download.<br />
Note: if the subtitle is belong the current play movie, it<br />
will be display.<br />
49
Networking<br />
12.7 Setting Subtitle<br />
When play a movie file, the info bar hide, press [yellow]<br />
button to enter into Subtitle menu:<br />
Subtitle: press [ok] button, and then press [▲, ▼]<br />
buttons to select ON or OFF, at last press [ok] button. Or<br />
press [◄, ►] buttons to select ON or OFF.<br />
ON: Allow to display the downloaded subtitle.<br />
OFF: Can’t display subtitle.<br />
Note: if it select OFF, the other options can’t edit.<br />
Adjust Time: Press [ok] button and use [▲, ▼] buttons<br />
to adjust time, making it synchronous.<br />
En<strong>co</strong>de: Press [ok] button, and then press [▲, ▼]<br />
buttons to select one option, at last press [ok] button.<br />
Or press [◄, ►] buttons to select one option.<br />
ANSI, UTF-8, UTF-16 Little-Endian, UTF-16<br />
Big-Endian, Big5, GB2312, Turkey(ISO), Arabic(ISO),<br />
Arabic(Windows), Latin2<br />
Language: Press [ok] button, and then press [▲, ▼]<br />
buttons to select a language, at last press [ok] button.<br />
Or press [◄, ►] buttons to select a language.<br />
Site: Press [ok] button, and then use [▲, ▼] buttons to<br />
move the display subtitle place.<br />
Size: using number buttons to input the size.<br />
Note: The size between 30% and 200%.<br />
50
Networking<br />
13 Plug In<br />
This menu is allows user install software by self. It<br />
supports the number of software by the hardware. It<br />
only has a calculating at first.<br />
13.1 Using the calculating<br />
1. Press [ok] button to start the function.<br />
2. Press [green] button to enter into menu.<br />
3. Press number buttons to input.<br />
4. Press <strong>co</strong>lor and [INFO] buttons to input operator.<br />
5. Press [EPG] button to clear the input.<br />
14 Networking<br />
This menu is some internet applications. There are<br />
Youtube, Shoutcast, Picasa, RSS, Opera, Portal,<br />
kartina TV, YouPorn.<br />
14.1 Youtube<br />
Youtube can play stream media in www.youtube.<strong>co</strong>m.<br />
14.1.1 Play the video<br />
1. Press [ok] button to <strong>co</strong>nnect and display the list.<br />
2. Press [red] button to display the featured video list.<br />
3. Press [▲, ▼] buttons to select a video.<br />
4. Press [ok] button to downloading and playing on<br />
top left <strong>co</strong>rner.<br />
5. Press [ok] button again to playing in mid of screen.<br />
6. Press [ZOOM] button, the video will play in full<br />
screen.<br />
7. Press [PAUSE] button to pause the video.<br />
8. Press [PLAY] button to <strong>co</strong>ntinue play video.<br />
9. Press [STOP] button to stop the video.<br />
51
Networking<br />
14.1.2 Sort for the list<br />
1. Press [green] button.<br />
2. Press [▲, ▼] buttons to select Site or Duration.<br />
so on.<br />
Site: it includes Germany, Worldwide, Poland and<br />
Duration: it includes All Time, This Week, This<br />
Month and so on<br />
14.1.3 Change group<br />
1. Press [yellow] button.<br />
2. Press [▲, ▼] buttons to select an option.<br />
Game, News, Tech, Movie and so on.<br />
3. Press [ok] button.<br />
14.1.4 Display the top video<br />
1. Press [blue] button.<br />
2. Press [▲, ▼] buttons to select an option.<br />
Top favoufites, Top rated, Most views, Most<br />
recent and so on.<br />
3. Press [ok] button.<br />
14.1.5 Display the relate videos<br />
Press [F1] button to display the relate videos about the<br />
highlight video.<br />
14.1.6 Download the video<br />
1. Go to the System->PVR/HDD Setting->Youtube<br />
Re<strong>co</strong>rd Setting menu to set the path of the file save.<br />
2. Press [RECORD] button to start downloading the<br />
video file.<br />
3. Press [FOLDER] button to enter into the<br />
downloading list.<br />
14.2 Shoutcast<br />
This menu is radio in www.shoutcast.<strong>co</strong>m.<br />
14.2.1 Play the radio<br />
Press [ok] button to downloaded and then play it.<br />
52
Networking<br />
14.2.2 Select Genre<br />
1. Press [red] button.<br />
2. Press [▲, ▼] buttons to select an option.<br />
3. Press [ok] button.<br />
14.2.3 Add to Favorites<br />
1. Press [▲, ▼] buttons to select.<br />
2. Press [yellow] button<br />
Note: Press [green] button to switch favorites list.<br />
14.2.4 Find radio<br />
1. Press [FIND] button<br />
2. Input the keyword.<br />
3. Press [red] button to <strong>co</strong>nfirm and find<br />
14.3 Picasa<br />
This menu is picture in www.picasa.<strong>co</strong>m<br />
14.3.1 Display the picture<br />
1. Press [▲, ▼] and [◄, ►] buttons to select one<br />
picture.<br />
2. Press [ok] button<br />
3. Press [◄, ►] buttons to display the anterior or next<br />
picture.<br />
53
Networking<br />
14.3.2 Display the user’s album<br />
Press [green] button to show the user’s album of the<br />
highlight picture.<br />
14.3.3 Display the album<br />
Press [yellow] button to display the album of the<br />
highlight picture.<br />
14.4 RSS<br />
This menu is display RSS web.<br />
14.4.1 Add new subscription<br />
Press [red] button to enter into Subscription menu, and<br />
then input the URL, at last press [red] button to <strong>co</strong>nfirm<br />
and save.<br />
14.4.2 Delete subscription<br />
Press [green] button and then select YES, at last press<br />
[ok] button.<br />
14.4.3 Edit<br />
1. Press [yellow] button.<br />
2. Press [▲, ▼] buttons to select Name or URL.<br />
3. Press [ok] button to input the name or URL, then<br />
press [red] button to <strong>co</strong>nfirm and save.<br />
14.4.4 Display Subscription<br />
1. Press [ok] button to display the news list.<br />
2. Press [▲, ▼] buttons to select a news.<br />
54
Networking<br />
3. Press [ok] button to display detail information.<br />
4. If it has several pages, press [P+/P-] buttons to<br />
display anterior or next page.<br />
14.4.5 Sort the news list<br />
1. In the list, press [red] button.<br />
2. Press [▲, ▼] buttons to select Date or Title.<br />
3. Press [ok] button.<br />
14.5 Opera<br />
This menu is a Browser that called opera. You can use it<br />
like IE.<br />
14.6 FTP Client<br />
This menu use to download file from FTP server<br />
14.6.1 Switch Group<br />
When the cursor is on the left <strong>co</strong>lumn:<br />
1. Press [red] button.<br />
2. Press [▲, ▼] buttons to select Browse Server,<br />
Downloading List or Downloaded List.<br />
3. Press [ok] button.<br />
14.6.2 Option<br />
When the cursor is on the left <strong>co</strong>lumn:<br />
1. Press [green] button.<br />
2. Press [▲, ▼] buttons to select Select All, Unselect<br />
All or Select Others.<br />
3. Press [ok] button.<br />
55
Networking<br />
14.6.3 Setting downloading files<br />
number at the same time<br />
When the cursor is on the left <strong>co</strong>lumn:<br />
1. Press [yellow] button.<br />
2. Press [▲, ▼] buttons to select 1, 2 or 3.<br />
3. Press [ok] button.<br />
14.6.4 Display the information about<br />
the downloading / downloaded file<br />
In the Downloading List or Downloaded List, there are<br />
two ways to display the information.<br />
When the cursor is on the left <strong>co</strong>lumn:<br />
※ Press [INFO] button.<br />
Note: Press [INFO] or [EXIT] button to cancel display.<br />
※ Press [►] button, and then press [▲, ▼] buttons to<br />
select info, at last press [ok] button.<br />
Note: Press [ok] or [EXIT] button to cancel display<br />
14.6.5 Add/Edit server<br />
Go to menu/download menu<br />
1. Press [►] button.<br />
2. Press [▲, ▼] buttons to select Add.<br />
3. Press [ok] button to enter into the menu:<br />
Server Name: Press [ok] button to enter into<br />
Server Name menu, and then input the name.<br />
FTP Server URL: Press [ok] button to enter<br />
into Server URL menu, and then input the<br />
URL.<br />
Anonymous FTP: Press [◄, ►] button to<br />
select NO or YES.<br />
<strong>User</strong> Name: Press [ok] button to enter into<br />
<strong>User</strong> Name menu, and then input the name.<br />
Password: Press [ok] button to enter into<br />
Password menu, and then input the password.<br />
Server Description: Press [ok] button to enter<br />
into Server Description menu, and then input<br />
the description.<br />
Press [green] button to test <strong>co</strong>nnect FTP<br />
server.<br />
Press [red] button to add the server.<br />
Note: When Anonymous FTP select NO, the <strong>User</strong> Name<br />
and Password can’t edit.<br />
56
Networking<br />
14.6.6 Delete Servers<br />
1. Press [ok] and [▲, ▼] buttons to select servers.<br />
2. Press [►] button.<br />
3. Press [▲, ▼] buttons to select Delete, and select<br />
YES.<br />
14.6.7 Connect Server<br />
1. Press [▲, ▼] buttons to select server.<br />
2. Press [►] button.<br />
3. Press [ok] button to <strong>co</strong>nnect the server, and then<br />
enter into the File List.<br />
14.6.8 Refresh File List<br />
1. Connect server.<br />
2. Press [►] button.<br />
3. Press [▲, ▼] buttons to select Refresh, and then<br />
press [ok] button.<br />
14.6.9 Add Downloading File<br />
1. Connect server.<br />
2. Press [▲, ▼] buttons to select a file.<br />
3. Press [►] button.<br />
4. Press [▲, ▼] buttons to select Download, and<br />
then press [ok] button.<br />
Source File URL: Display the source file URL.<br />
Rename: Press [ok] button to enter into Rename<br />
menu, and then input the name.<br />
Save to: Press [ok] button to select the folder to<br />
storage the downloading file.<br />
Press [red] button to <strong>co</strong>nfirm and start<br />
downloading.<br />
14.6.10 Stop Downloading<br />
In the Downloading List:<br />
1. Select the downloading files.<br />
2. Press [►] button.<br />
3. Press [▲, ▼] buttons to select Stop.<br />
4. Press [ok] button.<br />
57
Networking<br />
14.6.11 Make Stopping Download files<br />
to Start<br />
In the Downloading List:<br />
1. Select the stopping files.<br />
2. Press [►] button.<br />
3. Press [▲, ▼] buttons to select Start.<br />
4. Press [ok] button.<br />
14.6.12 Delete files<br />
In the Downloading List or Downloaded List:<br />
1. Select the files that you want delete.<br />
2. Press [►] button.<br />
3. Press [▲, ▼] buttons to select Delete.<br />
4. Press [ok] button, then select YES.<br />
14.7 Kartina TV<br />
This menu is play video on “www.kartina.tv.”<br />
1. Press [red] button to display channel list.<br />
2. Press [green] button to display the channel EPG list.<br />
3. Press [yellow] button to display the VOD list<br />
.<br />
14.7.1 Login<br />
1. Press [menu] button.<br />
2. Input <strong>User</strong> Name and Password.<br />
3. Press [green] button to save and login.<br />
14.7.2 Play Video<br />
1. Press [▲, ▼] buttons to choose an channel.<br />
2. Press [ok] button to play it.<br />
3. Press [ok] button again to play it in full screen.<br />
14.7.3 Switch Group/Service<br />
1. Press [folder] button to display the group menu.<br />
2. Press [▲, ▼] buttons to choose a group/Service.<br />
58
Networking<br />
3. Press [ok] button to <strong>co</strong>nfirm.<br />
14.7.4 Switch Date/Type<br />
Press [◄, ►] buttons to switch date/type.<br />
14.7.5 Display the information at VOD<br />
list.<br />
Press [INFO] button to display the information about the<br />
video.<br />
15 Portal<br />
15.1 Setting Language<br />
1. Press [ok] button to enter into Spark Portal menu.<br />
2. Press [ ►] button to select Setting.<br />
3. Press [◄, ►] and [ok] buttons to select one or<br />
more language.<br />
4. Press [◄, ►] and [▲, ▼] buttons to select OK<br />
button .<br />
5. Press [ok] button to affirm and exit.<br />
15.2 Add App<br />
1. Press [ok] button to enter Spark App Store.<br />
2. Press [◄, ►] and [▲, ▼] buttons to select one<br />
point.<br />
3. Press [ok] button to enter.<br />
4. Press [◄, ►] buttons to select Add to portal.<br />
59
Networking<br />
15.3 Remove App<br />
In Spark App Store menu:<br />
1. Press [◄, ►] and [▲▼ , ] buttons to select one<br />
point that you are added.<br />
portal.<br />
2. Press [ok] button to enter.<br />
3. Press [▲, ▼]<br />
buttons to select Remove from<br />
In Spark Portal menu:<br />
1. Press [◄, ►] and [▲▼ , ] buttons to select one<br />
point.<br />
portal.<br />
2. Press [blue] button to enter.<br />
3. Press [▲, ▼]<br />
buttons to select Remove from<br />
15.4 Move App<br />
In Spark Portal menu:<br />
1. Press [◄, ►] and [▲▼ , ] buttons to select one point.<br />
2. Press [yellow] button.<br />
3. Press [◄, ►] and [▲, ▼] buttons to move it.<br />
4. Press [ok] button to <strong>co</strong>nfirm.<br />
Note: App Store and Setting can't move.<br />
15.5 Run APP<br />
In Spark App Store menu:<br />
1. Press [◄, ►] and [▲▼ , ] buttons to select one point.<br />
2. Press [ok] button to enter.<br />
3. If you are adding, press [▲, ▼] buttons to select Run. Or<br />
you must press Add to portal first, and then select Run.<br />
4. Press [ok] button.<br />
In Spark Portal menu:<br />
1. Press [◄, ►] and [▲▼ , ] buttons to select one point.<br />
2. Press [ok] button.<br />
15.6 Navigation Menu<br />
1. Press [MENU] button to display the navigation menu.<br />
2. Press i<strong>co</strong>n to display the default internet point.<br />
3. Press i<strong>co</strong>n to display a browser, you can use it like<br />
IE.<br />
4. Press i<strong>co</strong>n to make browser to display front<br />
internet point that you linked.<br />
5. Press i<strong>co</strong>n to make browser to display next<br />
internet point that you linked.<br />
6. Press i<strong>co</strong>n to refresh the information.<br />
7. Press i<strong>co</strong>n to startup/cancel soft keyboard.<br />
8. Press i<strong>co</strong>n to startup/cancel mouse.<br />
9. Press i<strong>co</strong>n to exit spark portal.<br />
10. Press i<strong>co</strong>n to display the help information.<br />
60
Addenda<br />
16 Trouble Shooting<br />
If you suspect there is a fault with your receiver, please check the following trouble shooting guide<br />
before calling authorized service agent.<br />
Warning! Under no circumstances attempt to repair the receiver yourself. Tampering with the receiver may result in<br />
fatal electric shock and will invalidate your warranty.<br />
Symptom Possible cause<br />
Settings you made in the<br />
menu have not change<br />
No signal The level of signal is weak<br />
Receiver is on but no picture<br />
or sound except the following<br />
messages (NO TV program)<br />
Receiver not responding to<br />
remote <strong>co</strong>ntrol unit<br />
The receiver lost power before being able to enter into standby mode<br />
Some of the Settings saved by user can be deleted partly or fully<br />
LNB is out of order<br />
The cable from the LNB or Terrestrial is in<strong>co</strong>rrectly Connected (short circuit or<br />
open circuit)<br />
The position of dish is aligned in<strong>co</strong>rrectly<br />
Channel is not available<br />
Channel is scramble<br />
RCU batteries are dead or inserted in<strong>co</strong>rrectly<br />
The RCU is pointing toward wrong direction<br />
Poor picture Quality The level of Signal strength is low<br />
No sound The cable is <strong>co</strong>nnected in<strong>co</strong>rrectly<br />
The Volume level is low<br />
Muting function is active<br />
No display on the LED Display The power <strong>co</strong>rd is not plugged in <strong>co</strong>rrectly.<br />
No picture on the screen Receiver is in Standby mode<br />
RCA Jack or cable is not <strong>co</strong>nnected firmly to the video output port of<br />
television<br />
In<strong>co</strong>rrect channel or video output is selected on television<br />
Brightness level of your TV set is in<strong>co</strong>rrectly defined<br />
61
Addenda<br />
17 Specifications<br />
SYSTEM RESOURCES<br />
Main Processor 450M Hz based CPU<br />
Flash Memory Nor flash:8MB X 1 ; Nand flash:512MB X 1<br />
DDR SDRAM DDR2 128MB x 2<br />
Tuner/Front-end(Optional)<br />
Tuner Type DVB-S / DVB-S2<br />
Input Connector F-type, Connector, Female<br />
Loop Through F-type, Connector, Female<br />
Signal Level -65 to -25 dBm<br />
LNB Power & Polarization Vertical: +13V/+14V<br />
Horizontal: +18V/+19V<br />
Current: Max. 500mA<br />
Overload Protection<br />
22KHz Tone Frequency: 22±1KHz<br />
DiSEqC Control Amplitude: 0.6±0.2V<br />
Demodulation QPSK, 8PSK<br />
Version 1.0, 1.1 1.2, USALS Available<br />
Input Symbol Rate 2-45 Mbps, Convolution Code Rate<br />
POWER SUPPLY<br />
1/2, 2/3, 3/4, 5/6,7/8,1/4,1/3,2/5,3/5,4/5,8/9,9/10 and Auto<br />
Input Voltage Free Voltage (100~240V AC, 50/60Hz)<br />
Power Consumption 20W MAX<br />
MPEG TS A/V De<strong>co</strong>ding<br />
Transport Stream MPEG-2, H.264<br />
Input Rate Max.120Mbit/s<br />
Aspect Radio 4:3, 16:9, Letter Box<br />
Video De<strong>co</strong>ding MPEG-2, MP@ML, MPEG-4 part 10/H264<br />
Video Resolution 720*480P/I, 720*576P/I, 1280*720p,1920*1080i, 1920*1080p<br />
Audio De<strong>co</strong>ding MEPG-1 layer I/II, Mpeg2 layerII, Dolby digital<br />
Audio Mode Left / Right / Stereo/ Mono<br />
Sampling Rate 32, 44.1 and 48KHz<br />
A/V & DATA INPUT/OUTPUT<br />
TV-SCART<br />
RCA A/V<br />
Video CVBS/RGB output<br />
Audio L/R output<br />
Video CVBS output<br />
Audio L/R output<br />
S/PDIF Coaxial, Digital Audio or Dolby Digital Bit Stream Output<br />
RS-232C<br />
Transfer rate 115.2Kbps<br />
9 pin D-sub Type<br />
RJ-45 10M/100M<br />
62
Addenda<br />
USB USB 2.0 slot Compatible for Host<br />
HDMI<br />
PHYSICAL SPECIFICATION<br />
VER1.2<br />
Type A<br />
Size[W*H*D] 300mm*64mm*231mm<br />
Net Weight 1.56KG<br />
Operation Temperature 0 ~+45<br />
Storage Temperature -10 ~+70<br />
Storage Humidity 5%~95% RH (Non-Condensing)<br />
63