als PDF herunterladen - Foliatec
als PDF herunterladen - Foliatec
als PDF herunterladen - Foliatec

Sie wollen auch ein ePaper? Erhöhen Sie die Reichweite Ihrer Titel.
YUMPU macht aus Druck-PDFs automatisch weboptimierte ePaper, die Google liebt.
62<br />
WORKSHOPS<br />
WORKShOPS<br />
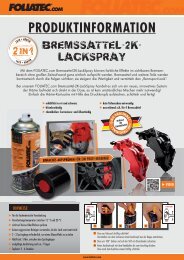
WORKSHOP II: SPRÜh fOLIE<br />
1<br />
2<br />
3<br />
4<br />
5<br />
6<br />
WORKSHOP II: SPRAY fILm<br />
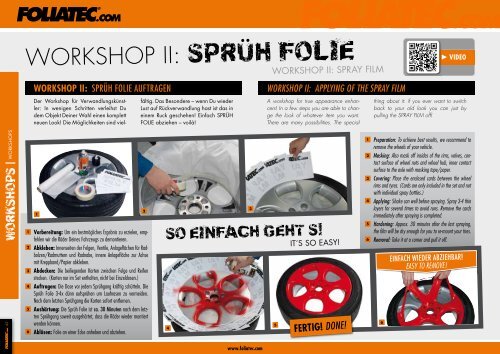
WORKSHOP II: SPRÜH FOLIE AUFTRAGEN WORKSHOP II: APPLYING OF THE SPRAY FILM<br />
Der Workshop für Verwandlungskünstler:<br />
In wenigen Schritten verleihst Du<br />
dem Objekt Deiner Wahl einen komplett<br />
neuen Look! Die möglichkeiten sind viel-<br />
1<br />
Vorbereitung: Um ein bestmögliches Ergebnis zu erzielen, empfehlen<br />
wir die Räder Deines Fahrzeugs zu demontieren.<br />
Abkleben: Innenseiten der Felgen, Ventile, Anlageflächen für Radbolzen/Radmuttern<br />
und Radnabe, innere Anlagefläche zur Achse<br />
mit Kreppband/Papier abkleben.<br />
Abdecken: Die beiliegenden Karten zwischen Felge und Reifen<br />
stecken. (Karten nur im Set enthalten, nicht bei Einzeldosen.)<br />
Auftragen: Die Dose vor jedem Sprühgang kräftig schütteln. Die<br />
Sprüh Folie 3-4x dünn aufsprühen um Laufnasen zu vermeiden.<br />
Nach dem letzten Sprühgang die Karten sofort entfernen.<br />
Aushärtung: Die Sprüh Folie ist ca. 30 Minuten nach dem letzten<br />
Sprühgang soweit ausgehärtet, dass die Räder wieder montiert<br />
werden können.<br />
Ablösen: Folie an einer Ecke anheben und abziehen.<br />
fältig. Das Besondere – wenn Du wieder<br />
Lust auf Rückverwandlung hast ist das in<br />
einem Ruck geschehen! Einfach SPRÜH<br />
fOLIE abziehen – voilà!<br />
2<br />
A workshop for true appearance enhancers!<br />
In a few steps you are able to change<br />
the look of whatever item you want.<br />
There are many possibilities. The special<br />
SO EInfACh GEhT S!<br />
4<br />
3<br />
www.foliatec.com<br />
5<br />
IT´S SO EASY!<br />
FERTIG! DONE!<br />
1<br />
2<br />
3<br />
4<br />
5<br />
6<br />
VIDEO<br />
thing about it: if you ever want to switch<br />
back to your old look you can just by<br />
pulling the SPRAY FILM off!<br />
Preparation: to achieve best results, we recommend to<br />
remove the wheels of your vehicle.<br />
Masking: <strong>als</strong>o mask off insides of the rims, valves, contact<br />
surface of wheel nuts and wheel hub, inner contact<br />
surface to the axle with masking tape/paper.<br />
Covering: Place the enclosed cards between the wheel<br />
rims and tyres. (Cards are only included in the set and not<br />
with individual spray bottles.)<br />
Applying: shake can well before spraying. spray 3-4 thin<br />
layers for several times to avoid runs. remove the cards<br />
immediately after spraying is completed.<br />
Hardening: approx. 30 minutes after the last spraying,<br />
the film will be dry enough for you to re-mount your tires.<br />
Removal: take it at a corner and pull it off.<br />
6<br />
EINFACH WIEDER ABzIEHBAR!<br />
easY to remove!


![DOWNLOAD: Zulassungsbestimmungen [PDF/ 1,5 MB] - Foliatec](https://img.yumpu.com/21056384/1/184x260/download-zulassungsbestimmungen-pdf-15-mb-foliatec.jpg?quality=85)