LCD-Farbmonitore, VMC-17LCD-PW, VMC-23LCD-PW ... - Videor
LCD-Farbmonitore, VMC-17LCD-PW, VMC-23LCD-PW ... - Videor
LCD-Farbmonitore, VMC-17LCD-PW, VMC-23LCD-PW ... - Videor

Erfolgreiche ePaper selbst erstellen
Machen Sie aus Ihren PDF Publikationen ein blätterbares Flipbook mit unserer einzigartigen Google optimierten e-Paper Software.
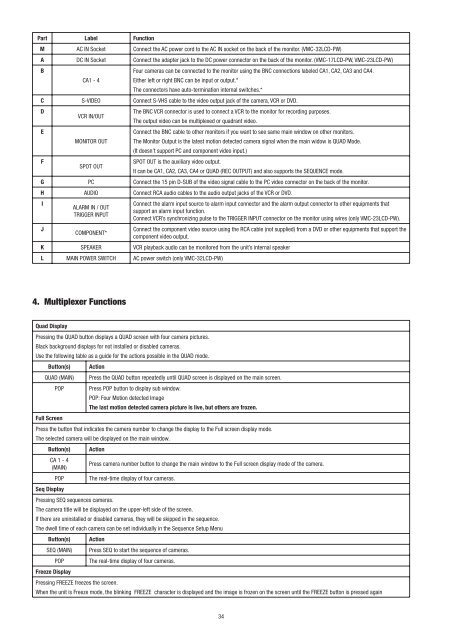
Part Label Function<br />
M AC IN Socket Connect the AC power cord to the AC IN socket on the back of the monitor. (<strong>VMC</strong>-32<strong>LCD</strong>-<strong>PW</strong>)<br />
A DC IN Socket Connect the adapter jack to the DC power connector on the back of the monitor. (<strong>VMC</strong>-17<strong>LCD</strong>-<strong>PW</strong>, <strong>VMC</strong>-23<strong>LCD</strong>-<strong>PW</strong>)<br />
B<br />
CA1 - 4<br />
Four cameras can be connected to the monitor using the BNC connections labeled CA1, CA2, CA3 and CA4.<br />
Either left or right BNC can be input or output.*<br />
The connectors have auto-termination internal switches.*<br />
C S-VIDEO Connect S-VHS cable to the video output jack of the camera, VCR or DVD.<br />
D<br />
E<br />
F<br />
VCR IN/OUT<br />
MONITOR OUT<br />
SPOT OUT<br />
The BNC VCR connector is used to connect a VCR to the monitor for recording purposes.<br />
The output video can be multiplexed or quadrant video.<br />
Connect the BNC cable to other monitors if you want to see same main window on other monitors.<br />
The Monitor Output is the latest motion detected camera signal when the main widow is QUAD Mode.<br />
(It doesn’t support PC and component video input.)<br />
SPOT OUT is the auxiliary video output.<br />
It can be CA1, CA2, CA3, CA4 or QUAD (REC OUTPUT) and also supports the SEQUENCE mode.<br />
G PC Connect the 15 pin D-SUB of the video signal cable to the PC video connector on the back of the monitor.<br />
H AUDIO Connect RCA audio cables to the audio output jacks of the VCR or DVD.<br />
I<br />
J<br />
ALARM IN / OUT<br />
TRIGGER INPUT<br />
COMPONENT*<br />
Connect the alarm input source to alarm input connector and the alarm output connector to other equipments that<br />
support an alarm input function.<br />
Connect VCR’s synchronizing pulse to the TRIGGER INPUT connector on the monitor using wires (only <strong>VMC</strong>-23<strong>LCD</strong>-<strong>PW</strong>).<br />
Connect the component video source using the RCA cable (not supplied) from a DVD or other equipments that support the<br />
component video output.<br />
K SPEAKER VCR playback audio can be monitored from the unit’s internal speaker<br />
L MAIN POWER SWITCH AC power switch (only <strong>VMC</strong>-32<strong>LCD</strong>-<strong>PW</strong>)<br />
4. Multiplexer Functions<br />
Quad Display<br />
Pressing the QUAD button displays a QUAD screen with four camera pictures.<br />
Black background displays for not installed or disabled cameras.<br />
Use the following table as a guide for the actions possible in the QUAD mode.<br />
Button(s) Action<br />
QUAD (MAIN) Press the QUAD button repeatedly until QUAD screen is displayed on the main screen.<br />
Full Screen<br />
POP Press POP button to display sub window.<br />
POP: Four Motion detected Image<br />
The last motion detected camera picture is live, but others are frozen.<br />
Press the button that indicates the camera number to change the display to the Full screen display mode.<br />
The selected camera will be displayed on the main window.<br />
Button(s) Action<br />
CA 1 - 4<br />
(MAIN)<br />
Seq Display<br />
Press camera number button to change the main window to the Full screen display mode of the camera.<br />
POP The real-time display of four cameras.<br />
Pressing SEQ sequences cameras.<br />
The camera title will be displayed on the upper-left side of the screen.<br />
If there are uninstalled or disabled cameras, they will be skipped in the sequence.<br />
The dwell time of each camera can be set individually in the Sequence Setup Menu<br />
Button(s) Action<br />
SEQ (MAIN) Press SEQ to start the sequence of cameras.<br />
Freeze Display<br />
POP The real-time display of four cameras.<br />
Pressing FREEZE freezes the screen.<br />
When the unit is Freeze mode, the blinking FREEZE character is displayed and the image is frozen on the screen until the FREEZE button is pressed again<br />
34