LCD-Farbmonitore, VMC-17LCD-PW, VMC-23LCD-PW ... - Videor
LCD-Farbmonitore, VMC-17LCD-PW, VMC-23LCD-PW ... - Videor
LCD-Farbmonitore, VMC-17LCD-PW, VMC-23LCD-PW ... - Videor

Erfolgreiche ePaper selbst erstellen
Machen Sie aus Ihren PDF Publikationen ein blätterbares Flipbook mit unserer einzigartigen Google optimierten e-Paper Software.
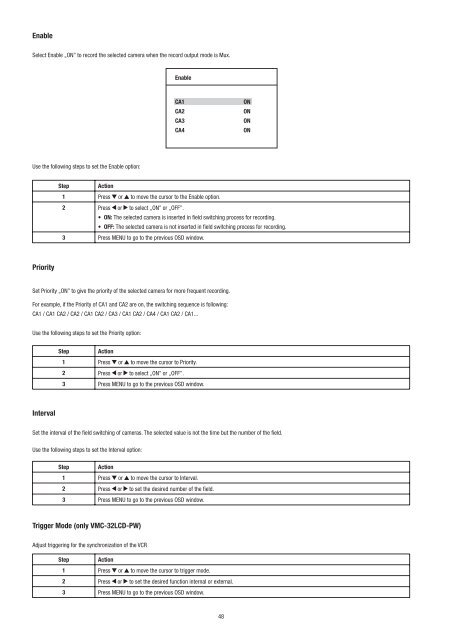
Enable<br />
Select Enable „ON” to record the selected camera when the record output mode is Mux.<br />
Use the following steps to set the Enable option:<br />
Priority<br />
Step Action<br />
Enable<br />
CA1 ON<br />
CA2 ON<br />
CA3 ON<br />
CA4 ON<br />
1 Press or to move the cursor to the Enable option.<br />
2 Press or to select „ON” or „OFF”.<br />
• ON: The selected camera is inserted in field switching process for recording.<br />
• OFF: The selected camera is not inserted in field switching process for recording.<br />
3 Press MENU to go to the previous OSD window.<br />
Set Priority „ON” to give the priority of the selected camera for more frequent recording.<br />
For example, if the Priority of CA1 and CA2 are on, the switching sequence is following:<br />
CA1 / CA1 CA2 / CA2 / CA1 CA2 / CA3 / CA1 CA2 / CA4 / CA1 CA2 / CA1...<br />
Use the following steps to set the Priority option:<br />
Interval<br />
Step Action<br />
1 Press or to move the cursor to Priority.<br />
2 Press or to select „ON” or „OFF”.<br />
3 Press MENU to go to the previous OSD window.<br />
Set the interval of the field switching of cameras. The selected value is not the time but the number of the field.<br />
Use the following steps to set the Interval option:<br />
Step Action<br />
1 Press or to move the cursor to Interval.<br />
2 Press or to set the desired number of the field.<br />
3 Press MENU to go to the previous OSD window.<br />
Trigger Mode (only <strong>VMC</strong>-32<strong>LCD</strong>-<strong>PW</strong>)<br />
Adjust triggering for the synchronization of the VCR<br />
Step Action<br />
1 Press or to move the cursor to trigger mode.<br />
2 Press or to set the desired function internal or external.<br />
3 Press MENU to go to the previous OSD window.<br />
48