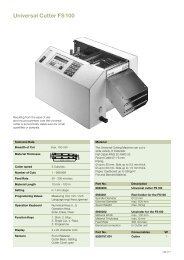
A3 A4 A6 A8 Servicemanual - Cab Produkttechnik GmbH & Co KG
A3 A4 A6 A8 Servicemanual - Cab Produkttechnik GmbH & Co KG
A3 A4 A6 A8 Servicemanual - Cab Produkttechnik GmbH & Co KG

Sie wollen auch ein ePaper? Erhöhen Sie die Reichweite Ihrer Titel.
YUMPU macht aus Druck-PDFs automatisch weboptimierte ePaper, die Google liebt.
Hinweis!<br />
Die Nasen (19) der innersten Kupplungsscheibe<br />
müssen dabei in die Nuten (20) des jeweiligen<br />
Riemenrades (21) greifen.<br />
Zwischen Nasen (19) und Riemenrad muss ein<br />
Abstand von etwa einem Drittel der Nuttiefe A<br />
verbleiben!<br />
7. Ziehen Sie die Gewindestifte (18) an.<br />
8. Schrauben Sie die Rändelmutter (4) mit den 6 Federn<br />
(5) soweit auf, dass die Kupplung unter Druck steht.<br />
Abstand zwischen Nase (19) und Riemenrad (20)<br />
nochmals überprüfen. Prüfen Sie, ob alle 6 Federn<br />
vorhanden sind, da das Fehlen einer Feder die<br />
Kupplungswirkung mindert!<br />
9. Stellen Sie die Kupplung gemäß Abschnitt 5.1 ein und<br />
montieren Sie die Rückwand.<br />
Notice!<br />
Make sure that lugs (19) of the innermost<br />
clutch plate are engaged in the slots (20) of<br />
the belt pulley (21) concerned.<br />
A distance of about one third of the slot depth<br />
(A) must remain between the lugs (19) and the<br />
belt pulley.<br />
7. Tighten the threaded pins (18).<br />
8. Screw up the knurled nut (4) with the six springs (5)<br />
until the clutch is under pressure. Recheck the<br />
distance between the lug (19) and belt pulley (20).<br />
Check that all six springs are present because the<br />
efficiency of the clutch is reduced if a spring is<br />
missing.<br />
9. Set the clutch according to section 5.1, and refit the<br />
rear cover of the printer.<br />
18<br />
19<br />
4<br />
5<br />
20<br />
21<br />
Bild 26 Nabenmontage an den Aufwicklern II Fig. 26 Clutch Hub Assembly on the Rewind Hubs II<br />
4.6 Wechsel der Etikettenlichtschranke<br />
4.6 Replacing the Label Edge Sensor<br />
Hinweis!<br />
Prüfen Sie vor dem Austausch, ob eine<br />
Verschmutzung vorliegt.<br />
Lebensgefahr!<br />
Trennen Sie den Drucker vom Netzanschluss<br />
sonst besteht Lebensgefahr durch<br />
spannungsführende Leiter im Innern des<br />
geöffneten Druckers!<br />
Wechseln Sie die Etikettenlichtschranke wie folgt:<br />
1. Trennen Sie den Drucker vom Netzanschluss!<br />
2. Entnehmen Sie das Material aus dem Drucker.<br />
3. Demontieren Sie die Rückwand.<br />
Notice!<br />
Check for dirt before making the<br />
exchange.<br />
Danger to life and limb!<br />
Disconnect the printer from the mains<br />
connection, otherwise there is a risk to life<br />
and limb from the live wires inside the open<br />
printer.<br />
Replace the label edge sensor as follows:<br />
1. Disconnect the printer from the mains connection.<br />
2. Remove the media from the printer.<br />
3. Remove the rear cover of the printer.<br />
Serviceanleitung / Service Manual / / /<br />
49