SCRUBTEC 545E – 553E - Wapalto-heine.de
SCRUBTEC 545E – 553E - Wapalto-heine.de
SCRUBTEC 545E – 553E - Wapalto-heine.de

Sie wollen auch ein ePaper? Erhöhen Sie die Reichweite Ihrer Titel.
YUMPU macht aus Druck-PDFs automatisch weboptimierte ePaper, die Google liebt.
USER MANUAL<br />
ENGLISH<br />
SQUEEGEE CLEANING<br />
NOTE<br />
The squeegee must be clean and its bla<strong>de</strong>s must be in good conditions in or<strong>de</strong>r to get a good drying.<br />
CAUTION!<br />
It is advisable to wear protective gloves when cleaning the squeegee because there may be sharp <strong>de</strong>bris.<br />
1.<br />
2.<br />
3.<br />
4.<br />
5.<br />
6.<br />
7.<br />
Drive the machine on a level fl oor.<br />
Disconnect the power supply cable (3) from the electrical mains and place it on the hol<strong>de</strong>r (4).<br />
Lower the squeegee (21) with the lever (7).<br />
Loosen the handwheels (22) and remove the squeegee (21).<br />
Disconnect the vacuum hose (11) from the squeegee.<br />
Wash and clean the squeegee (Fig. 2). In particular, clean the compartments (A) and the vacuum hole (B) from dirt and <strong>de</strong>bris.<br />
Check the front bla<strong>de</strong> (C) and the rear bla<strong>de</strong> (D) for integrity, cuts and tears; if necessary replace them (see the procedure in<br />
the following paragraph).<br />
Install the squeegee in the reverse or<strong>de</strong>r of removal.<br />
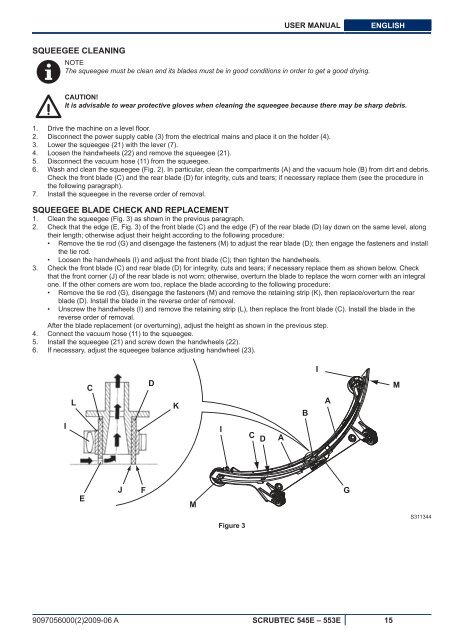
SQUEEGEE BLADE CHECK AND REPLACEMENT<br />
1. Clean the squeegee (Fig. 3) as shown in the previous paragraph.<br />
2. Check that the edge (E, Fig. 3) of the front bla<strong>de</strong> (C) and the edge (F) of the rear bla<strong>de</strong> (D) lay down on the same level, along<br />
their length; otherwise adjust their height according to the following procedure:<br />
• Remove the tie rod (G) and disengage the fasteners (M) to adjust the rear bla<strong>de</strong> (D); then engage the fasteners and install<br />
the tie rod.<br />
• Loosen the handwheels (I) and adjust the front bla<strong>de</strong> (C); then tighten the handwheels.<br />
3. Check the front bla<strong>de</strong> (C) and rear bla<strong>de</strong> (D) for integrity, cuts and tears; if necessary replace them as shown below. Check<br />
that the front corner (J) of the rear bla<strong>de</strong> is not worn; otherwise, overturn the bla<strong>de</strong> to replace the worn corner with an integral<br />
one. If the other corners are worn too, replace the bla<strong>de</strong> according to the following procedure:<br />
• Remove the tie rod (G), disengage the fasteners (M) and remove the retaining strip (K), then replace/overturn the rear<br />
bla<strong>de</strong> (D). Install the bla<strong>de</strong> in the reverse or<strong>de</strong>r of removal.<br />
• Unscrew the handwheels (I) and remove the retaining strip (L), then replace the front bla<strong>de</strong> (C). Install the bla<strong>de</strong> in the<br />
reverse or<strong>de</strong>r of removal.<br />
After the bla<strong>de</strong> replacement (or overturning), adjust the height as shown in the previous step.<br />
4. Connect the vacuum hose (11) to the squeegee.<br />
5. Install the squeegee (21) and screw down the handwheels (22).<br />
6. If necessary, adjust the squeegee balance adjusting handwheel (23).<br />
I<br />
C<br />
D<br />
M<br />
L<br />
K<br />
B<br />
A<br />
I<br />
I<br />
C<br />
D<br />
A<br />
E<br />
J<br />
F<br />
M<br />
G<br />
Figure 3<br />
S311344<br />
9097056000(2)2009-06 A <strong>SCRUBTEC</strong> <strong>545E</strong> <strong>–</strong> <strong>553E</strong> 15