wood-burning stove holzbeheizte saunaöfen - Sauna Supplies
wood-burning stove holzbeheizte saunaöfen - Sauna Supplies
wood-burning stove holzbeheizte saunaöfen - Sauna Supplies
- Keine Tags gefunden...

Erfolgreiche ePaper selbst erstellen
Machen Sie aus Ihren PDF Publikationen ein blätterbares Flipbook mit unserer einzigartigen Google optimierten e-Paper Software.
WOOD-BURNING STOVEHOLZBEHEIZTE SAUNAÖFENENDEInstructions for installation and useGebrauchs- und MontageanleitungHarvia OyPL 1240951 MuurameFinlandwww.harvia.fi21032003W
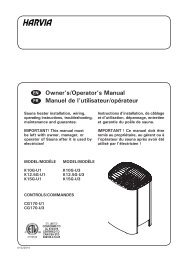
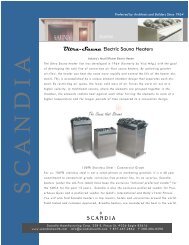
ENHarvia <strong>stove</strong>s, water containers and chimneys have beenmanufactured with skill and solid experience for severaldecades. You can choose a suitable <strong>stove</strong> for a small familyor a large community sauna - our selection provides you withwhat you need. Thank you for choosing a Harvia heater!UsageNote! Read prior to use!The <strong>stove</strong> will emit paint and other vapours during the firstheating. Therefore, it is recommended that the first heatingbe performed outdoors or in a well-ventilated space withsmoke outlets mounted on the heater. The sauna stonesshould not be placed on the <strong>stove</strong> during the first heating.The external casing of Harvia <strong>stove</strong>s has been treatedwith heat-resistant paint which is characterised by the factthat it will reach its final firmness during the first heating ofthe <strong>stove</strong>. Before this, rubbing or sweeping of paintedsurfaces should be avoided.During pre-heating, the paint will first soften and thereforepainted surfaces should not be touched. Due to theproperties of the paint, substances that vaporise from paintedsurfaces may cause smell in the sauna room.When heating the <strong>stove</strong> for the first time, it can be done outof doors or in a well aired sauna room, at the installation siteof the <strong>stove</strong>. Pre-heating is always done without stones. Ifthe <strong>stove</strong> takes place out of doors, in order to cause draught,install the painted connection pipes; smells from connectionpipes will vaporise at the same time.Figure 1.Abbildung 1.Stove adjusting feet(models: 20 Pro/S, 20 ESPro/S, 26 Pro/S and 36)The adjusting feetenable the <strong>stove</strong>´ to beinstalled in a verticalposition on an inclinedfloor.The adjusting feet, which are M10 screws, should beunscrewed to an extent that allows them to be adjustedusing a wrench (17 mm) when the <strong>stove</strong> is in position(Figure 1).Installation siteAllow enough space for the <strong>stove</strong> in view of space requiredby the <strong>stove</strong> itself, safety distances, usage andmaintenance. The person in charge of the fire needs space,in front of the <strong>stove</strong>, at least one meter both in lateraldirection and in depth. The <strong>stove</strong> should be placed farenough from combustible materials.If the <strong>stove</strong> is installed in a niche made of non-flammablematerial (masonry/concrete), sufficient distance must be leftbetween the <strong>stove</strong> and the walls in order for the heat to transferto the environment. A suitable distance is ca. 100 mm.NB! Owing to extreme variations in temperature, thesauna <strong>stove</strong> stones might disintegrate and crumble slightlyduring use. This means that small, loosened fragments ofstone and powdery material get washed onto the floor withthe water that is thrown on the stones to make steam. Theglow from the <strong>stove</strong>’s heat chamber may cause flakes ofmetal to drop to the floor.Light-coloured floors may become dirty from ash,particles of stone, and metallic flakes that have droppedthere from the <strong>stove</strong>. To protect the look of the sauna,ceramic tiles with dark-coloured grouting should be laidunder and around the <strong>stove</strong>. See “Protecting the floor”.Safety distancesThe minimum safety distances of the <strong>stove</strong> to combustiblematerials are as follows:2DEHarvia-<strong>Sauna</strong>öfen, -Kessel und -Rauchabzüge werden schonjahrzehntelang mit gutem Fachwissen und solider Erfahrunghergestellt. In unserer Produktpalette finden sich passende<strong>Sauna</strong>öfen sowohl für kleine Familiensaunas als auch fürgroße Gemeinschaftssaunas. Vielen Dank, daß Sie sich füreinen <strong>Sauna</strong>ofen von Harvia entschieden haben!InbetriebnahmeAchtung! Vor der Verwendung lesen!Der Ofen setzt beim ersten Erhitzen Farb- und andere Dämpfefrei. Es wird daher empfohlen, Rauchabzugsöffnungen amOfen zu montieren und ihn zunächst im Freien oder in einemgut gelüfteten Raum zu erhitzen. Die <strong>Sauna</strong>ofensteine solltenbeim ersten Erhitzen noch nicht auf den Ofen gelegt werden.Der Außenmantel von Harvia-<strong>Sauna</strong>öfen ist mit hitzebeständigerFarbe bemalt. Zu deren Eigenschaften zählt,daß sie ihre endgültige Festigkeit erst während der erstenErwärmung des <strong>Sauna</strong>ofens erhält. Davor sollte beimUmgang mit dem <strong>Sauna</strong>ofen das Scheuern oder Wischender bemalten Flächen vermieden werden.Während des ersten Vorheizens wird die Farbe des<strong>Sauna</strong>ofens zunächst weich, die Malflächen sollten also nichtberührt werden. Die aufgrund der Eigenschaften der Farbe ander Oberfläche verdampfenden Stoffe können einen unangenehmenGeruch in der <strong>Sauna</strong>kabine erzeugen.Beim ersten Mal sollte der <strong>Sauna</strong>ofen daher draußen oder anseinem Installationsort in einer sehr gut belüfteten <strong>Sauna</strong>kabinegeheizt werden. Der <strong>Sauna</strong>ofen wird stets ohne Steine vorgeheizt.Wird der <strong>Sauna</strong>ofen draußen geheizt, müssen die bemaltenAnschlußrohre angesetzt werden, um eine ausreichende Zugluft zuerhalten. Dabei wird gleichzeitig auch der Geruch aus denAnschlußrohren entfernt.Justierbare Füße des<strong>Sauna</strong>ofens(Modelle: 20 Pro/S, 20 ESPro/S, 26 Pro/S und 36)Mit Hilfe derjustierbaren Füße kannder <strong>Sauna</strong>ofen auf einerschrägen Bodenflächelotrecht installiert werden.Die justierbaren Füße, M10 Schrauben, sollten so weitherausgedreht werden, dass sie z.B. mit einemMaulschlüssel (17 mm) justiert werden können, wenn der<strong>Sauna</strong>ofen an seinem Platz steht (Abb. 1).InstallationsortPlanen Sie für den <strong>Sauna</strong>ofen ausreichend Platz ein:berücksichtigen Sie sowohl den vom <strong>Sauna</strong>ofen selbstbeanspruchten Platz, die Sicherheitsabstände, sowie den Platz fürden Betrieb und die Wartungen. Die Person, die die Feuerstellebedient, benötigt vor dem <strong>Sauna</strong>ofen mindestens einenQuadratmeter Platz. Der <strong>Sauna</strong>ofen muß in ausreichendemAbstand zu brennbarem Materialien installiert werden.Wenn der <strong>Sauna</strong>ofen in einer Wandvertiefung ausunbrennbarem Material (Putz/Beton) aufgestellt wird, musszwischen dem <strong>Sauna</strong>ofen und den Wänden ausreichend Platzgelassen werden, damit die Wärme an die Umgebung abgegebenwerden kann. Der passende Luftabstand beträgt ca. 100 mm.Achtung! Aufgrund der starken Temperaturschwankungenkönnen die <strong>Sauna</strong>steine während des Gebrauchs verwitternund zerbröckeln. Die sich dabei von den Steinen lösendenStücke und feines Steinmaterial werden mit demAufgusswasser auf den Boden der <strong>Sauna</strong> geschwemmt. AufGrund des Glühens der Feuerstelle des <strong>Sauna</strong>ofens kannMetall abblättern und auf den Boden fallen.Helle Bodenmaterialien können durch die aus dem <strong>Sauna</strong>ofensickernde Asche, Steinmaterial und abblätterndes Metallverschmutzt werden. Um das Entstehen ästhetischer Mängel zuverhindern, sollten unter dem <strong>Sauna</strong>ofen und in dessen Nähekeramische Bodenbeläge und dunkle Fugenmaterialienverwendet werden. Siehe “Schutz des Fußbodens”.SicherheitsabständeDie Minimum Sicherheitsabstände des <strong>Sauna</strong>ofens zubrennbaren Materialien betragen:
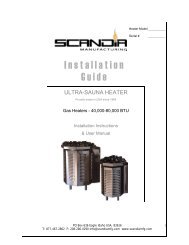
• at the sides and the back of the <strong>stove</strong> 500 mm• in front of the <strong>stove</strong> 500 mm• from the top to the ceiling at least 1200 mm• from <strong>stove</strong> to the floor: see “Protecting the floor”.The safety distances to combustible materials may bedecreased, in accordance with regulations, to one-halfwhen a single light protective cover is used, and to onefourthwhen a double light protective cover is used.Protecting the wallsIf the <strong>wood</strong>en walls near the <strong>stove</strong> are closer than what isrequired by safety distances and the walls are of combustiblematerial (panel, board, log, and so on) the wall surfaces mustbe protected with, for example, light protective cover.Single protective cover may be made of non-combustible,fibre-reinforced concrete plate with thickness of at least 7mm, or of metal plate with thickness of at least 1 mm. Thereshould be enough attachment points to make the structuresolid.When single protective cover is used, safety distance to thesides and back of the heater is 250 mm, measured from thesurface of the <strong>stove</strong>. A gap of about 200 mm should be leftbetween the <strong>stove</strong> and the light protective cover.Double protective cover may be made of the two platesreferred to above. The plates will be attached to thebackground and, if necessary, to each other with screws, forexample. An air gap of at least 30 mm should be left betweenthe surface needing protection and the plate, and the plates,for example by means of pipe collars used as supports. Thecover should be kept clear of both the floor and the ceiling.See figure 2.Single light protective cover is the equivalent of brickworkwhose thickness is at least 55 mm, double light protectivecover is the equivalent of brickwork whose thickness is atleast 110 mm. Thebrickwork has to beopen at sides and atthe distance of atleast 30 mm fromthe surface to beprotected, extend600 mm higherthan the top surfaceof the <strong>stove</strong> and,measured directlysideways, meet therequirement of asafety distance of500 mm.As shown inFigure 3, theprotective sheath ofHarvia heatingchamber providesan easy solution toprotectingcombustible wallmaterials from theheat of the <strong>stove</strong>.Note! Ductinsulation shouldbegin from the topsurface of theprotective sheath!Figure 2.Abbildung 2.ENDE• nach den Seiten des <strong>Sauna</strong>ofens und nach hinten 500 mm• vor dem <strong>Sauna</strong>ofen 500 mm• von der Oberfläche des <strong>Sauna</strong>ofens zur Deckemindestens 1200 mm• Abstand zwischen <strong>Sauna</strong>ofen und Boden: siehe“Schutz des Fußbodens”.Die vorschriftsmäßigen Sicherheitsabstände können auf dieHälfte durch einen einfachen leichten Schutz und auf ein Vierteldurch einen doppelten leichten Schutz reduziert werden.WandverkleidungWenn sich Holzwände näher am <strong>Sauna</strong>ofen befinden, als dieSicherheitsabstände vorschreiben, und aus brennbaremMaterial (Paneel, Brett, Bohlem u.s.w.) bestehen, müssen siez.B. mit einem leichten Schutz geschützt werden. Ein einfacherleichter Schutz kann aus einer mindestens 7 mm dicken, nichtbrennbaren,fiberverstärkten Zementplatte oder einermindestens 1 mm dicken Metallplatte hergestellt werden. DieVerschraubungen des Schutzes müssen dicht beieinanderliegen um einen stabilen Schutz zu gewährleisten.Bei der Nutzung eines einfachen Schutzes beträgt derSicherheitsabstand auf die Seiten und nach hinten (von derAußenfläche gemessen) 250 mm. Der Abstand zwischen<strong>Sauna</strong>ofen und dem Schutz sollte ca. 200 mm betragen.Ein doppelter leichter Schutz kann aus zwei der obenerwähnten Platten angefertigt werden. Die Platten könnenzum Beispiel mit Schrauben an der zu schützenden Flächeund, wenn erforderlich, aneinander befestigt werden.Zwischen der zu schützenden Fläche und der Platte sowiezwischen den Platten sollte ein mindestens 30 mm breiterLuftspalt freigelassen werden, indem man beispielsweiseRohrhalter als Zwischenstütze verwendet. Der Schutz darfauch den Boden und die Decke nicht berühren. SieheAbbildung 2.Ein einfacher leichter Schutz entspricht einer Mauerungvon mindestens 55mm und eindoppelter leichterSchutz einerMauerung vonmindestens 110mm. Die Mauerungmuß an denRändern offen sein,zur zu schützendenFläche einemAbstand vonmindestens 30 mmhaben, mindestens600 mm über dieOberfläche des<strong>Sauna</strong>ofenshinausragen sowiein Seitenrichtungd i eSicherheitsabstandsvorschriftvon 500mm erfüllen.Mit demSchutzmantel derFeuerstelle vonHarvia in Abbildung3 werden diebrennbarenWandmaterialienvor der Wärme des<strong>Sauna</strong>ofensproblemlosgeschützt.Achtung! Derisolierte Teil desAbzugs sollte aufHöhe der oberenFläche desSchutzmantelsbeginnen.3
ENDEFigure 4. Protective bedding of the heating chamber(additional equipment). Note! These instructions complywith the safety distance requirements for combustiblefloor material only if a protective sheath is used.Abbildung 4. Schutzplatte für die Ofenstelle (Zubehör).Achtung! Die Sicherheitsabstandsbestimmung wird nurbei Verwendung zusammen mit einem Schutzmantelerfüllt, wenn der Fußboden aus brennbarem Materialbesteht!Figure 3.Abbildung 3.Blackening of the sauna wallsWooden material in a sauna, such as panels, blackens withage. The blackening process is sped up by sunlight and theheat from the <strong>stove</strong>. If the wall surfaces have beenprocessed with protective panel agents, the blackening ofthe surface of the wall above the <strong>stove</strong> can be seen quitequickly depending on the protective agent used.The blackening is due to the fact that the protective agentshave less resistance to heat than unprocessed <strong>wood</strong> do.This has been proven in practical tests. The micronicmineral aggregate that crumbles from the stones on the<strong>stove</strong> may blacken the wall surface near the <strong>stove</strong>.When following the manufacturer’s approved guidelinesin the installation of the sauna <strong>stove</strong>, the <strong>stove</strong> will not heatup enough to endanger the flammable material in the saunaroom. The maximum temperature allowed in the wall andceiling surfaces of the sauna room is +140 degreesCelsius.<strong>Sauna</strong> <strong>stove</strong>s equipped with CE signs meet all of theregulations for sauna installations. Proper authoritiesmonitor that the regulations are being followed.Protecting the floorIf the <strong>stove</strong> is installed on a floor made of combustible material(<strong>wood</strong>, plastic or equivalent) a slab of concrete should be castto protect the floor from excessive heat. The slab shouldextend, sideways, to the distance of about 300 mm and, infront of the <strong>stove</strong>, to the distance of about 400 mm. If thefloor is made of <strong>wood</strong>, in order to keep it dry the slab shouldbe supported to keep it off the surface of the floor.Instead of the slab of concrete, a protective bedding ofHarvia heating chamber that has the equivalent protectiveproperties can be used together with the protective sheath ofHarvia heating chamber (Figure 4). Ask your supplier for aseparate brochure.If the <strong>stove</strong> is placed on a tiled floor, the poor thermalresistance of the tile glue and grout may cause the tiles toloosen. Hydro insulation materials used under tiles do nottolerate the <strong>stove</strong>’s heat radiation very well and may pushthrough the tile seams. The best option for tiled floors is touse Harvia’s protective bedding or similar heat radiationprotection keeping in mind the safety distance requirementsfor combustible materials.No special protection is required if the <strong>stove</strong> is placed ona specially cast concrete platform with a minimum thicknessof 60 mm, provided that the platform also meets thesideways safety distance requirements.Please note! No electric devices or wires are allowed within4Verfärbung der <strong>Sauna</strong>wändeDie Holzmaterialien in der <strong>Sauna</strong>, wie z.B. dieHolzverkleidungen, verfärben sich mit der Zeit dunkel.Dieser Prozess wird durch das Sonnenlicht und die Hitzedes <strong>Sauna</strong>ofens beschleunigt. Wurden dieWandverkleidungen mit einem speziellen Schutzmittelbehandelt, kann die Verfärbung der Wand über dem Ofen jenach verwendetem Schutzmittel relativ schnell beobachtetwerden. Diese Verfärbungen entstehen dadurch, dass dieSchutzmittel eine geringere Hitzebeständigkeit aufweisenals unbehandeltes Holz. Dies hat sich in Praxistestsherausgestellt.Die Mikromineralstoffe, die sich von denSteinen auf dem Ofen ablösen, können die Wandoberflächein der Nähe des Ofens dunkel verfärben.Wenn Sie bei der Installation des <strong>Sauna</strong>ofens die vomHersteller empfohlenen Richtlinien einhalten, erhitzt sich der<strong>Sauna</strong>ofen nur so weit, dass keine Gefahr für die brennbarenMaterialien der <strong>Sauna</strong>kabine besteht. Die zulässigeHöchsttemperatur für die Wand- und Deckenoberflächen der<strong>Sauna</strong>kabine beträgt +140 Grad Celsius.<strong>Sauna</strong>öfen, die über ein CE-Symbol verfügen, erfüllen alleBestimmungen für <strong>Sauna</strong>anlagen. Die entsprechenden Behördenkontrollieren, ob diese Bestimmungen eingehalten werden.Schutz des FußbodensWird der <strong>Sauna</strong>ofen auf einem Fußboden aus brennbaremMaterial (Holz, Kunststoff oder ähnliches) installiert, muß alsWärmeschutz eine mindestens 60 mm dicke Betonplattegegossen werden. Die Platte muß in Seitenrichtung auf einenAbstand von mindestens 300 mm und nach vorn auf mindestens400 mm hinausreichen. Die Bodenplatte sollte etwas über derFußbodenoberfläche abgestützt werden, damit das Holzmaterialdes Fußbodens trocken bleibt.Die Betonplatte kann durch die Schutzplatte der Harvia-Feuerstelle ersetzt werden, die gleichen vorgeschriebenenSchutzvoraussetzungen, zusammen mit dem Schutzmantel derHarvia-Feuerstelle, erfüllt (Abbildung 4). Fragen Sie Ihren Händlernach der gesonderten Broschüre.Wenn der <strong>Sauna</strong>ofen auf einem gefliesten Boden montiertwird, können sich die Fliesen aufgrund der schlechtenHitzebeständigkeit des Fliesenleims und -mörtels von ihremUntergrund lösen. Auch Materialien zur Wasserabdichtung,die unter den Fliesen zur Anwendung kommen, halten derWärmestrahlung des <strong>Sauna</strong>ofens nicht stand und könnenan den Fugen der Fliesen hervortreten. Am sichersten ist esdaher, auf gefliesten Fußböden z.B. eine HarviaSchutzplatte für die Feuerstelle oder einen anderenentsprechenden Wärmestrahlungsschutz zu verwenden,unter Berücksichtigung der Bestimmungen über dieseitlichen Sicherheitsabstände zu brennbarem Material.
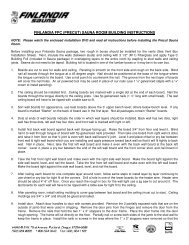
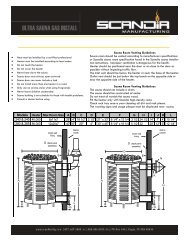
AB1B2B3B4ENthe safety distance area of the <strong>stove</strong>.The local authorities in charge ofapproving of the installations will give moredetailed instructions about fire safetyregulations.Installing the <strong>stove</strong> to a masoned flueThe <strong>stove</strong>s manufactured by Harvia haveone opening for smoke at the back of the<strong>stove</strong> and the other on top of the <strong>stove</strong>, at theback of the stone chamber. The <strong>stove</strong>s aredelivered ex works with connection at theback and a direct pipe for flue connection.If the flue connection is made from the topof the <strong>stove</strong>, the opening for smoke at theback of the <strong>stove</strong> should be covered carefullywith a free blanking plug. When the blankingplug is adjusted in place, the retainingsprings of the plug should be bent, via theabove opening for smoke, enough towardsthe sides so that the plug will not fall fromthe opening at the back. Often a bent pipe,which can be purchased separately, is alsoneeded.For the flue connection, measure anopening in the fireproof wall and make itslightly larger than the connecting pipe. Packthe pipe well in the opening with fireproofmineral wool, for example. A suitable gap tobe left around the pipe is about 1 cm.It is advisable to round off the re-entrantcorners of the flue opening so that flue gaseshave free access to the flue opening. Theconnecting pipe must not be positioned toodeep into the flue. If necessary, the pipe canbe made shorter.First, adjust the flue connecting pipe inplace in the opening for smoke. Make surethat the pipe is solidly packed in place. Movethe <strong>stove</strong> at the flue opening and push the<strong>stove</strong> towards the flue. Press fireproofFigure 5.Abbildung 5.Figure 6.Abbildung 6.mineral wool around the connecting pipe and push the<strong>stove</strong> in place.DEEin vor Ort gegossener Betonuntergrund miteiner Stärke von mindestens 60 mm erfordertkeinen separaten Schutz, wenn der Untergrunddie Bestimmungen über Sicherheitsabständeauch in Seitenrichtung erfüllt.Achtung! Im Bereich der Sicherheitsabstände des<strong>Sauna</strong>ofens dürfen sich keine Elektrogeräte oder -kabel befinden.Nähere Informationen zu Brandschutzbestimmungenerhalten Sie von der lokalen Brandschutzbehörde,die die Installationen genehmigt.Installation des <strong>Sauna</strong>ofens an einengemauerten RauchabzugHarvia-<strong>Sauna</strong>öfen haben eine Rauchöffnung an derRückseite und eine an der Oberseite, im hinteren Teil derSteinkammer. Die <strong>Sauna</strong>öfen werden ab Werk mit derMöglichkeit zur rückseitigen Installation und mit einemgeraden Abzugsanschlußrohr geliefert.Wenn der Abzugsanschluß oberseitig ausgeführtwird, bedecken Sie die Rauchöffnung an der Rückseitesorgfältig mit dem freibleibenden Verschlußdeckel.Wenn der Verschlußdeckel richtig platziert ist, müssendie Federhalterungen durch das Loch der oberenRauchöffnung ausreichend zu den Seiten gebogenwerden, damit der Deckel nicht in die rückseitigeÖffnung fällt. Oft wird auch ein gesondert zubeschaffendes Winkelrohr benötigt.Messen Sie an der Brandmauer für denAbzugsanschluß die Stelle für die Öffnung aus undfertigen Sie das Loch etwas größer an als es zu seinbraucht. Das Abzugsanschlußrohr wird zuletzt in derBrandmaueröffnung z.B. mit feuerfester Mineralwolleverdichtet. Ein geeigneter Dichtungsspalt um das Rohrherum beträgt etwa 1 cm.Die inneren Ecken der Abzugsöffnung solltenabgerundet werden, damit die Rauchgase ungehindertdurch die Abzugsöffnung gelangen. DasAbzugsanschlußrohr darf nicht zu tief in den Abzuggeschoben werden. Wenn erforderlich, muß das Rohrverkürzt werden.Befestigen Sie zunächst das Abzugsanschlußrohran seinem Platz in der Rauchöffnung des <strong>Sauna</strong>ofens.Überprüfen Sie, daß das Rohr dicht und stabil festsitzt.Bringen Sie den <strong>Sauna</strong>ofen an die Stelle derAbzugsöffnung und schieben den <strong>Sauna</strong>ofen inRichtung Abzug. Drücken Sie feuerfesteMineralwolle um das Anschlußrohr und schieben den <strong>Sauna</strong>ofenan seinen Platz.kWA mmB1 mmB2 mmB3 mmB4 mmHarvia1616560n.830n.1000n.1380n. 1570Harvia20 Pro/S, 20 ES Pro/S 18560n.850n.980n.1410n. 1540Harvia26 Pro/S22690n.930n.1070n.1490n. 1630Harvia3630680n.930n.1070n.1490n. 1630Harvia5040890n.1230n.1370- -Pipe container /SchornsteinbehälterFlue/AbzugFigure 7.Abbildung 7.5
6ENEnsure that the flue connection is tight and add, if needed,fireproof mineral wool. If the wool is pressed deeper in thanthe surface of the brickwork (about 1 cm), the wool can becoated with plaster, for example, for not to be seen.The heater may be attached to a brick flue using a brickworkclamp available as an accessory (figure 5). The clamp isslightly larger in diameter than the smoke pipe that comeswith the heater and has a ready-fitted sealing strip on theinside. The clamp is fitted tightly into an opening made atan appropriate height that connects to the flue opening. Thesmoke pipe is attached to the heater, which is positioned insuch a way that the smoke pipe is projected inside theclamp.The purpose of the smoke pipe’s through-leading collar(figure 6), available as an accessory, is to clean around thesmoke pipe after the pipe has been connected to the flueopening in the brickwork. The collar is made from stainlesssteel plate, and there are two parts to it, so that it can be usedfor differently sloping smoke pipes.Figure 7 shows different methods to connect the <strong>stove</strong> tothe flue.Installing a heater with a front water containerThe hot water container which has a fixed mounting (about20 litres), located at the front of the <strong>stove</strong>, is made of highqualitystainless steel. A water tap can be placed on the leftor right side. The other opening on the water containershould be covered with a plug.Note! The sealing of the water tap and the covering plugmust be fitted against the external surface of the containerand not inside the container; otherwise water will leak alongthreads despite sealing.To ensure that the container will serve as well as possible,the following matters should be taken into account:• the <strong>stove</strong> must be heated while the watercontainer is empty;• the water container is meant for heating saunabathing water; no corroding detergents may beused in it;• the water used must meet the demands set forgoodquality household water as to its salt, iron,lime and humus substance content;• if the <strong>stove</strong> is not used for a long time, thecontainer must be emptied to make sure thatthe water would not build up slime or become iced.Note that the water in the hot water container is boiling hot.If it comes into contact with your skin it will cause a burn!When the <strong>wood</strong>en handle on top of the <strong>stove</strong> is turned90º, boiling in the warmwater container is reduced.Stones for the <strong>stove</strong>Massive, cut stones especially designed for <strong>stove</strong>s shouldbe used. We neither recommend light, ceramic stones withpoor heat capacity nor soft steatite.Please note that supracrustal rock found in nature maycontain harmful substances, such as iron pyrite, andtherefore such stones should not be used.Stove stones should be washed to remove all stone dustbefore they are put in the <strong>stove</strong>. Larger stones are placed atthe bottom of the stone chamber so that the more evensurfaces rest on the surfaces of the stone chamber. Smallerstones are placed on top as they will heat even if they arefar away from hot steel surfaces.The humidity of the steam is influenced by the amount ofstones and the temperature. The more there are stones in theDEÜberprüfen Sie die Dichtheit des Abzugsanschlusses undgeben Sie, wenn erforderlich, feuerfeste Mineralwollehinzu. Wird die Dichtungswolle etwas tiefer unter dieMaueroberfläche gedrückt (ca. 1 cm), kann die Wolle z.B.mit Mörtel verdeckt werden.Der <strong>Sauna</strong>ofen kann mit einem als Zubehörteil erhältlichenMaueranschluss mit einem gemauerten Abzug verbunden werden(Abbildung 5). Der Maueranschluss ist vom Durchmesser her etwasgrößer als das mit dem <strong>Sauna</strong>ofen gelieferte Rauchabzugsrohr under ist auf der Innenseite fertig mit einer Dichtung ausgestattet. DerMaueranschluss wird auf passender Höhe fest in einer Öffnungvermauert, die die Verbindung zur Abzugsöffnung herstellt. DasRauchabzugsrohr wird am <strong>Sauna</strong>ofen befestigt und der <strong>Sauna</strong>ofenwird so bewegt, dass sich das Rauchabzugsrohr in denMaueranschluss schiebt.Der als Zubehörteil erhältliche Durchführungskranz desRauchab-zugsrohres (Abbildung 6) wird um das Rauchabzugsrohrgelegt um die Arbeitsspuren zu verdecken, nachdem das Rohr mitder Abzugsöffnung im Mauerwerk verbunden wurde. Der Durchführungskranzist aus rostfreiem Stahlblech und besteht aus 2Teilen, so dass er sich für verschiedene Neigungen desRauchabzugsrohres eignet.In Abbildung 7 sind verschiedene Anschlußarten des<strong>Sauna</strong>ofens an den Abzug dargestellt.Zur Installation des <strong>Sauna</strong>ofens mit vorderemBehälterDer feste Heißwasserbehälter (etwa 20 l) im vorderen Teil des<strong>Sauna</strong>ofens besteht aus hochqualitativem, rostfreiem Stahl.Der Wasserhahn kann entweder an der linken oder an derrechten Seite angebracht werden. Die nicht gebrauchteÖffnung des Wasserbehälters wird mit einem Verschlußdeckelverschlossen.Achtung! Die Dichtungen des Wasserhahns und desVerschlußdeckels müssen gegen die Außenfläche desBehälters angebracht werden - nicht innerhalb des Behälters;da sonst das Wasser trotz der Dichtung am Gewinde entlangaustritt.Damit Ihnen der Behälterteil möglichst viel Nutzen bringt, sindfolgende Aspekte zu beachten:• Der <strong>Sauna</strong>ofen darf nicht geheizt werden, wennder Wasserbehälter leer ist.• Der Wasserbehälter ist zur Erwärmung vonBadewasser gedacht - es dürfen keine ätzendenReinigungsmittel angewendet werden.• Das Gebrauchswasser muß in seinem Salz-,Eisen-, Kalk- und Humusgehalt dieQualitätsanforderungen gutenHaushaltswassers erfüllen.• Wenn der <strong>Sauna</strong>ofen über einen langen Zeitraumnicht benutzt wird, muß der Wasserbehältergeleert werden, damit das Wasser nichtverschleimt und nicht gefriert.Achtung! Vorsicht vor dem kochenden Wasser imHeißwasserbehälter. Kochendes Wasser verursacht beiHautkontakt Brandwunden!Wenn der Holzgriff auf dem Ofen 90 Grad gedreht wird,entfernt sich eine Seite des Wasserbehälters von Seite desSteinkammers. So nimmt das Kochen des Wassers imWasserbehälter ab.<strong>Sauna</strong>ofensteineAls <strong>Sauna</strong>ofensteine sollten speziell für <strong>Sauna</strong>öfen gedachte,bekannte, massive Bruchsteine verwendet werden.Achtung! In der Natur gesammelte Oberflächensteine können z.B.Pyrit oder andere ungeeignete Stoffe enthalten, sie sind daher als<strong>Sauna</strong>ofensteine nicht geeignet.Die <strong>Sauna</strong>steine sollten vor dem Aufschichten im <strong>Sauna</strong>ofen vonSteinstaub befreit werden. Große Steine werden im unteren Teil derSteinkammer so eingesetzt, daß die glatteren Flächen gegen dieFlächen der Steinkammer zeigen. Die kleineren Steine werden imoberen Teil der Steinkammer aufgeschichtet; sie erwärmen sichwegen ihrer kleineren Größe schnell, obwohl sie sich weiter von denheißen Stahlflächen entfernt befinden.Die Feuchtigkeit des Aufgusses wird von der Menge der Steineund von der Temperatur der <strong>Sauna</strong> beeinflußt. Je mehr Steine sich
EN<strong>stove</strong> and the lower the temperature in the sauna room, themore humid the steam.Please note that the <strong>stove</strong> stones must not prevent aircirculation between the body and the casing of the <strong>stove</strong>.Heating up the <strong>stove</strong>Wood is the best material for heating up the <strong>stove</strong>. Materialssuch as chipboard, plastic and coal that have a high thermalvalue should not be used for heating.Draught will be regulated by opening the ash pan.Excessive draught will make the <strong>stove</strong> red heated all over,which will result in a shortened service life for the <strong>stove</strong>.However, the draught should be effective enough toproperly heat up the stones. A heater that is occasionallyheated with more powerful draught will burn off the sootgathered in the smoke duct and the heating properties willimprove.The warming of the sauna room will be dependent on thesize of the room, the power of the <strong>stove</strong> and the materialused for walls.Non-insulated walls (brick, tile, concrete) will increase thedemands on the <strong>stove</strong>’s performance; for each square of thewall surface, 1,2 m 3 must be added to calculate the space.Because log walls are heated slowly, the cubic volyme ofa log sauna should be multiplied by 1,5. A correctly chosen<strong>stove</strong> power will make the sauna room ready for bathing in½ to 1 hour.Water for producing steamPure household water should be used for producing steam. Makesure that the water is of high quality as water with salt, lime, ironor humus substance content may prematurely corrode the <strong>stove</strong>!The water to be thrown on the heated stones should meetthe requirements of clean household water. The factorsessentially affering the quality of water include thefollowing:• humuos content
ENchamber. Check that the holes of the hinge pin align at thetop edge of the door and push the hinge pin through thetop holes upwards from the bottom. Also, align the holesat the bottom edge of the door and drop the hinge pinthrough the bottom holes to its position. The hinge pin willstay on top of the bottom holes by means of a spreader thatis compressed in the pin. See figure 9.MaintenanceThe soot gathered in the smoke canals of the <strong>stove</strong> shouldbe removed through the round soot doors located on thesides of the stone chamber.Heating will cause the stones to disintegrate and thereforethey will have to be reset at least once a year, or even moreoften if the <strong>stove</strong> is much in use. It is advisable to remove,at the same time, loose stone debris found in the stonechamber and replace broken stones.The flue should be swept in regular intervals to ensuregood draught in the flue.The ash pan of the <strong>stove</strong> should be emptied always beforenext heating so that the combustion air that is led throughthe ash pan would cool off the fire grate and lengthen itsservice life. It is advisable to get a metal ash pan, preferablya standing model, for keeping the ashes. Note: as there maybe glowing embers in the removed ashes you should notkeep the ash pan in the vicinity of combustible materials.Air ventilation in the sauna roomGood air ventilation enhances the enjoyable bathingexperience. Traditional air ventilation based on natural aircirculation can be realised when fresh incoming air is ledclose to the floor level near the <strong>stove</strong> and is exhausted asfar from the <strong>stove</strong> as possible, near the ceiling (Figure 10).As the <strong>stove</strong> circulates air in an effective manner thefunction of the outlet is mainly to remove humidity from thesauna room after bathing.Incoming air led close to the floor level is transportedbetween the hot inside and casing of the <strong>stove</strong>. Heated airbreaks upwards via a grate and warms the air in the saunaroom. Because <strong>wood</strong> needs a great deal of air to burn, asuction effect will be created in the heating chamber, whichwill force, together with rising air flows, the air in the saunaroom to circulate.According to the most recent study, the incoming air canbe led above the <strong>stove</strong> at the height of 500 mm where itblends with the air flows from the <strong>stove</strong> and, as a result,there will be a good circulation of air in the sauna room.DEHalten Sie die gelöste Ofentür in der Offen-Stellung in derNähe der Feuerungsöffnung. Überprüfen Sie, dass die Löcherdes Scharnierbolzens am oberen Rand der Luke sichübereinander platzieren und schieben Sie den Scharnierbolzenvon unten nach oben durch die oberen Löcher durch. RichtenSie auch die Löcher am unteren Rand aus und lassen Sie denScharnierbolzen in die Aufnahme fallen. Der Scharnierbolzenbleibt auf der am Bolzen gepressten Verbreiterung an denuntersten Löchern hängen. Siehe Abb. 9.PflegeDer sich im Rauchkanal ansammelnde Ruß muß über die rundenRußluken an den Seiten der Steinkammer entfernt werden.Die <strong>Sauna</strong>ofensteine werden während des Gebrauchsspröde. Aus diesem Grund sollten die Steine mindestenseinmal jährlich neu aufgeschichtet werden, bei starkemGebrauch öfter. Bei dieser Gelegenheit entfernen Sie bitteauch den Gesteinsabfall aus der Steinkammer und ersetzenbeschädigte Steine.Der Rauchabzug muß regelmäßig gefegt werden, damit imAbzug ein guter Luftzug erhalten bleibt.Der Aschekasten des <strong>Sauna</strong>ofens muß vor jedem neuenAnheizen geleert werden, damit die durch den Aschekastengeleitete Brennluft den Rost kühlt und die Lebensdauer desRosts verlängert. Benutzen Sie für die Asche ein Gefäß ausMetall, das vorzugsweise mit Stützen versehen ist. Die zuentfernende Asche kann glühende Funken enthalten,bewahren Sie das Aschegefäß also nicht in der Nähebrennbarer Materialien auf.Durchlüftung der <strong>Sauna</strong>kabineEine gute Durchlüftung der <strong>Sauna</strong>kabine sorgt fürangenehmere Aufgüsse. Ein traditioneller, auf dernatürlichen Luftzirkulation basierender Luftaustauschentsteht, wenn Frischluft in der Nähe des <strong>Sauna</strong>ofens an derFußbodengrenze zugeführt und die Abluft in möglichstweiter Entfernung vom <strong>Sauna</strong>ofen nahe der Deckeabgeführt wird (Abbildung 10).Da schon der <strong>Sauna</strong>ofen selbst eine effektive Luftzirkulationin der <strong>Sauna</strong> bewirkt, dient die Abluftöffnung hauptsächlich derFeuchtigkeitsabführung aus der <strong>Sauna</strong> nach dem <strong>Sauna</strong>bad.Die an der Fußbodengrenze zugeführte Frischluft strömtzwischen dem heißen Inneren des <strong>Sauna</strong>ofens und demMantel entlang. Die erhitzte Luft strömt durch ein Gitterwerknach oben und erwärmt die Luft der <strong>Sauna</strong>kabine. Da Holz zumBrennen reichlich Luft benötigt, entsteht in derFeuerungsöffnung ein Sog, der zusammen mit den steigendenLuftströmungen die Luft in der <strong>Sauna</strong>kabine zirkulieren läßt.Nach neusten Erkenntnissen kann die Frischluft in einerHöhe von 500 mm über dem <strong>Sauna</strong>ofen zugeführt werden,wo sie sich mit den vom <strong>Sauna</strong>ofen aufsteigendenLuftströmungen vermischt und in der <strong>Sauna</strong>kabine einegute Luftzirkulation entsteht.Figure 10.Abbildung 10.Figure 9.Abbildung 9.Door to the heating chamber/FeuerungslukeHandle/GriffEdge of the openingto the heating chamber/Feuerungsöffnung Door's edge/Rand der LukeHoles for thehinge pin/Löcher für denScharnierbolzenHoles for the hinge pin/Löcher für den ScharnierbolzenHinge pin/ScharnierbolzenSpreader/Verbreitung8