LAMItec - dr. hinz
LAMItec - dr. hinz
LAMItec - dr. hinz

Erfolgreiche ePaper selbst erstellen
Machen Sie aus Ihren PDF Publikationen ein blätterbares Flipbook mit unserer einzigartigen Google optimierten e-Paper Software.
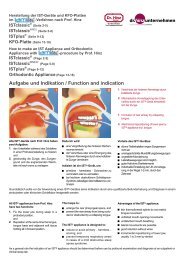
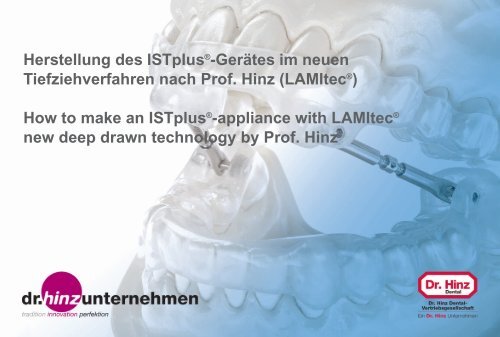
Herstellung des ISTplus ® -Gerätes im neuen<br />
Tiefziehverfahren nach Prof. Hinz (<strong>LAMItec</strong> ® )<br />
How to make an ISTplus ® -appliance with <strong>LAMItec</strong> ®<br />
new deep <strong>dr</strong>awn technology by Prof. Hinz
Das ISTplus ® -Gerät / The ISTplus ® -Appliance<br />
1 Justierbarer Verbindungssteg /<br />
Adjustable connecting element<br />
2 Tiefziehschienen für Ober- und<br />
Unterkiefer / Thermoforming splints<br />
for upper and lower jaw<br />
3<br />
5<br />
1<br />
2<br />
1 Justierbarer Verbindungssteg / Adjustable connecting element<br />
2 Justierschraube / Adjusting screw<br />
3 Stegschraube mit Imbus / Hexagon screw<br />
4 Platzhalter / Maintainer<br />
5 Stegmutter / Nut of connecting element<br />
6 Kunststoffverankerungsteil / Plastic anchor element<br />
1<br />
4<br />
2<br />
2<br />
6<br />
1<br />
Instrumente / Instruments<br />
1<br />
1 Molloplast-Vorpolierer (Detax) /<br />
Monoplast pre-polishing (Detax)<br />
2 Lisko S Polierscheibe, türkis (Erkodent) /<br />
Lisko S buff wheel, turquoise (Erkodent)<br />
3 Hartmetallfräse / Carbidebur<br />
4 HM Schneidfräser, gelb (Scheu) /<br />
HM milling cutter, yellow (Scheu)<br />
5 Spiralbohrer / Screw <strong>dr</strong>ill<br />
2<br />
3<br />
4<br />
5
Vorbereitung / Preparation Die Isolierfolie / Insulating foil<br />
• Arbeitsmodelle dublieren und mit IST-<br />
Bissgabel einartikullieren<br />
• Äquatoren mit Parallelometer bestimmen<br />
• Duplicate working models and mount<br />
with IST-bitefork<br />
• Identify equators with parallelometer<br />
• Zahnzwischenräume und unter sich<br />
gehende Stellen mit Wachs ausblocken<br />
(z. B. mit Hochtemperatur-Wachs)<br />
• Block out below-equator areas, bubbles<br />
etc. (e.g. with high temperature wax)<br />
• Isolierfolie auf dem Modell tiefziehen<br />
• Isolierfolie am Modellrand abschneiden<br />
• Pressure form separating foil on model<br />
• Trim separating foil to model margin<br />
Die LAMIone-Folie / LAMIone-foil<br />
• LAMIone-Folie (0,75 mm) tiefziehen<br />
und am Modellrand abschneiden<br />
• Folie nicht vom Modell abheben<br />
• Pressure form LAMIone-foil and trim to<br />
model margin<br />
• do not separate foil from model<br />
Fixierung der Befestigungsteile im<br />
Unterkieferteil / Fixing of anchorage<br />
elements in the lower jaw<br />
• Kunststoff-Befestigungsteile anrauen<br />
• Befestigungsteile im Bereich der UK-<br />
Molaren fixieren (z. B. Sil-Kitt von Scheu).<br />
Fixierung direkt am Gestänge (nicht am<br />
Befestigungsteil)<br />
• Platzverhältnisse und Bisssperrung im<br />
Artikulator überprüfen<br />
• Roughen acrylic-anchorage elements<br />
• Fixate anchorage elements in the area<br />
of lower molars (e.g. Sil-Putty from Scheu)<br />
Fixation with Sil-Putty directly on<br />
telescope (not on anchorage element)<br />
• Check space conditions and bite<br />
clearance in articulator<br />
6<br />
3
34<br />
• Befestigungsteile im UK mit Acrylat<br />
festsetzen (so wenig Kunststoff wie<br />
möglich verwenden)<br />
• Fixate anchorage element in lower jaw<br />
with acrylic (as little as possible)<br />
Fixierung im OK / Fixing in upper jaw<br />
• Modelle in den Artikulator zurücksetzen<br />
und die OK-Befestigungsteile mit Sil-Kitt<br />
in Position bringen<br />
• OK-Bef.-Teile mit Kunststoff festsetzen<br />
• Put back models in articulator and bring<br />
upper anchorage elements into position<br />
with Sil-Putty<br />
• Fixate upper anchorage elements with<br />
acrylic<br />
Acrylat /<br />
Acrylic<br />
Silkitt /<br />
Sil-Putty<br />
Aufbau der frontalen Aufbisse im<br />
Unterkiefer<br />
• Im UK gegenüber den OK-Befestigungsteilen<br />
einen Aufbiss aus Kunststoff<br />
herstellen<br />
• Form bite plane with acrylic in the lower<br />
opposite of upper anchorage elements<br />
• Isolierung mit Folie bei Herstellung der<br />
Aufbissplateaus: hier kann auch schon<br />
eine ca. 3 mm dicke Folie als Platzhalter<br />
verwendet werden<br />
• Isolation with foil when forming the bite<br />
planes: here a 3mm thick foil can also be<br />
used as space maintainer<br />
• Isolierung mit Folie bei Herstellung der<br />
Aufbissplateaus<br />
• Isolation with foil when forming the bite<br />
planes<br />
• Kunststoff ausarbeiten (Schienen nicht<br />
vom Modell abnehmen)<br />
• Finish acrylic (do not remove splint from<br />
model)
Die LAMItwo-Folie / LAMItwo-foil<br />
• OK-Modell im Granulat des Tiefziehgerätes<br />
einbetten (Umschlagfalten mit<br />
abdecken)<br />
• Embed upper model in fill granulate of<br />
pressure forming machine (also cover<br />
gingival sulcus)<br />
• Vorgetrocknete LAMItwo-Folie einspannen<br />
und mit Haftvermittlertuch<br />
konditionieren<br />
• Mount pre-<strong>dr</strong>ied LAMItwo-foil and<br />
condition with bonding agent-cloth<br />
• LAMItwo-Folie tiefziehen und abkühlen<br />
lassen<br />
• Pressure form LAMItwo-foil and let cool<br />
down<br />
• LAMItwo-Folie grob beschneiden und<br />
das OK-Modell in den Artikulator<br />
zurücksetzen, um den Abstand zu den<br />
Aufbissen im UK (ca. 3 mm notwendig)<br />
zu überprüfen<br />
• Roughly trim LAMItwo-foil and put back<br />
upper model into articulator to check<br />
distance to bite plane in the lower (about<br />
3 mm needed)<br />
• Das UK-Modell in das Granulat einbetten,<br />
die LAMItwo-Folie konditionieren und<br />
tiefziehen (siehe OK-Modell)<br />
• LAMItwo-Folie grob beschneiden und in<br />
den Artikulator zurücksetzen, Okklusion<br />
überprüfen und evtl. einschleifen (Vorsicht:<br />
der harte Teil der LAMItwo-Folie ist nur<br />
ca. 0,8 mm stark)<br />
• Embed lower model in granulate,<br />
condition LAMItwo-foil and pressure form<br />
(see upper model)<br />
• Roughly trim LAMItwo-foil and set back<br />
into articulator, check occlusion and grind<br />
off if necessary (Attention: hard part of<br />
LAMItwo-foil is only about 0.8 mm thick)<br />
5
6<br />
Ausarbeiten / Work out<br />
• Zur Arbeitserleichterung kann der am<br />
Modell angezeichnete Äquator mit einem<br />
Filzstift auf die Folie übertragen werden<br />
• Folien von den Modellen abheben und<br />
wie gewohnt ausarbeiten (am Zahnfleischsaum<br />
orientieren und Schritt für<br />
Schritt an den Äquator herantasten, um<br />
der Schiene einen festen Halt zu geben)<br />
• To make work easier the equator marked<br />
on the model can be copied with a marker<br />
onto the foil<br />
• Lift foils from the models and finish as<br />
normal (orientate yourself by gingival<br />
margin and approach equator to give<br />
splint good grip)<br />
• Die Schraubenlöcher mit einem speziellen<br />
Spiralbohrer freilegen (Vorsicht: Gewinde<br />
nicht beschädigen)<br />
• Schienenränder und evtl. die<br />
eingeschliffenen Aufbisse polieren<br />
• Free screw holes with special spiral burr<br />
(attention: do not harm thread)<br />
• Polish splint margins and eventually ground<br />
off bite planes<br />
Endmontage / final assembly<br />
• Schienen auf den Modellen im Artikulator<br />
zusammenbauen<br />
• Auf die richtige Drehrichtung der Gestänge<br />
achten (gleiche Aktivierungsrichtung)<br />
• Endkontrolle<br />
• Mount splints in articulator<br />
• Mind the correct rotational direction of<br />
telescpoes (same direction of activation)<br />
• Final control
Aktivieren aber wie?<br />
Um eine einheitliche Aktivierungsrichtung<br />
der Verbindungsstege zu<br />
gewährleisten ist es notwendig bei der<br />
Endmontage folgendes zu beachten:<br />
• Die Lasermarkierung muss auf der<br />
rechten Seite nach mesial zeigen und<br />
auf der linken Seite nach distal<br />
• Drehrichtung vom OK zum UK die<br />
Verbindungsstege verkürzen sich<br />
(Protrusion)<br />
• Drehrichtung vom UK zum OK die<br />
Verbindungsstege verlängern sich<br />
(Retrusion)<br />
Activate but how?<br />
To ensure a consistent direction of<br />
activation it is necessary to heed the<br />
following during final assembly:<br />
• The laser mark has to face mesially<br />
on the right side and distally on the<br />
left side<br />
• Rotational direction from upper to<br />
lower jaw connecting rods will shorten<br />
(protrusion)<br />
• Rotational direction from lower to<br />
upper jaw connecting rods will<br />
lengthen (retrusion)<br />
Das fertige ISTplus ® -Gerät<br />
Ready made ISTplus ® -appliance<br />
Reinigungshinweis: Das ISTplus ® Gerät sollte täglich mit der Zahnbürste gereinigt werden.<br />
How to clean: Clean the ISTplus ® appliance every day with tooth brush.<br />
7
©2009 Dr. Hinz Dental-Vertriebsgesellschaft, Mont-Cenis-Str. 5, 44623 Herne<br />
Tel.: +49 (0) 23 23 - 593-420, Fax: +49 (0) 23 23 - 593-429<br />
info@<strong>dr</strong>-<strong>hinz</strong>-dental.de www.<strong>dr</strong>-<strong>hinz</strong>-dental.de<br />
8<br />
9<br />
10