

![[ Die LOKRING Rohrverbindung ] [ The LOKRING tube ... - Artel Klima](https://img.yumpu.com/7108854/15/500x640/-die-lokring-rohrverbindung-the-lokring-tube-artel-klima.jpg)
[ Die LOKRING Rohrverbindung ] [ The LOKRING tube ... - Artel Klima
[ Die LOKRING Rohrverbindung ] [ The LOKRING tube ... - Artel Klima
[ Die LOKRING Rohrverbindung ] [ The LOKRING tube ... - Artel Klima

Erfolgreiche ePaper selbst erstellen
Machen Sie aus Ihren PDF Publikationen ein blätterbares Flipbook mit unserer einzigartigen Google optimierten e-Paper Software.
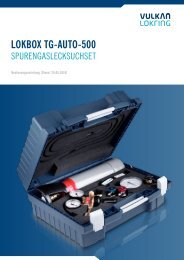
5. <strong>LOKRING</strong>-Reduzierkupplung auf das zweite Rohr aufstecken,<br />
bis dieses am inneren Bund der Kupplung anschlägt (Kapillar-<br />
rohr dabei mitführen).<br />
6. Kapillarrohr 10mm aus der <strong>LOKRING</strong>-Reduzierkupplung<br />
herausziehen und hinter der Kupplung LOKPREP aufgeben.<br />
7. Kapillarrohr bis zur Biegestelle wieder in die <strong>LOKRING</strong>-Redu-<br />
zierkupplung hineinschieben und die Kupplung zur besseren<br />
Verteilung des LOKPREPs auf den Rohrenden um 360°<br />
drehen.<br />
8. Montage mit der Handmontagezange beenden.<br />
5. Put the <strong>LOKRING</strong> reducing connector onto the second <strong>tube</strong> until<br />
it stops at the centre stop (with capillary <strong>tube</strong> inside).<br />
6. Pull the capillary <strong>tube</strong> approximately 10mm out of the <strong>LOKRING</strong><br />
reducing connector and add LOKPREP behind the connector.<br />
LOKPREP<br />
7. Push the capillary <strong>tube</strong> again into the <strong>LOKRING</strong> reducing connector<br />
up to the bend and turn the connector on the <strong>tube</strong> ends through<br />
360° for an even dispersion of the LOKPREP.<br />
8. Finish assembly by means of the manual assembly tool.<br />
15


![[ Die Ein-Ring-Rohrverbindung ] [ The Single Ring ... - Artel Klima](https://img.yumpu.com/8594115/1/184x260/-die-ein-ring-rohrverbindung-the-single-ring-artel-klima.jpg?quality=85)