

![[ Die LOKRING Rohrverbindung ] [ The LOKRING tube ... - Artel Klima](https://img.yumpu.com/7108854/9/500x640/-die-lokring-rohrverbindung-the-lokring-tube-artel-klima.jpg)
[ Die LOKRING Rohrverbindung ] [ The LOKRING tube ... - Artel Klima
[ Die LOKRING Rohrverbindung ] [ The LOKRING tube ... - Artel Klima
[ Die LOKRING Rohrverbindung ] [ The LOKRING tube ... - Artel Klima

Sie wollen auch ein ePaper? Erhöhen Sie die Reichweite Ihrer Titel.
YUMPU macht aus Druck-PDFs automatisch weboptimierte ePaper, die Google liebt.
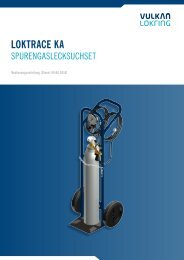
Montage einer 00er <strong>LOKRING</strong>-Kupplung (-Reduzierung)<br />
Assembly of a <strong>LOKRING</strong>-joint 00 (-reduction 00)<br />
1. Vorbereiten der Rohrenden<br />
<strong>Die</strong> zugeschnittenen Rohrenden innen und gegebenenfalls außen<br />
entgraten. Zur Herstellung einer hermetisch dichten Metall/<br />
Metall-Verbindung müssen die zu verbindenden Rohrenden<br />
metallisch blank sein. Farbe, Rost sowie Öle und Fette sind mit<br />
geeigneten Mitteln zu entfernen (Schleifleinen, Schleifvlies, etc.).<br />
Um Längsriefen auf der Oberfläche zu vermeiden, ist das Rohrende<br />
in Drehbewegung - nicht in Längsrichtung - zu säubern.<br />
2. Auftragen von LOKPREP<br />
Auf die Außenwand der gereinigten Rohrenden ist soviel LOK-<br />
PREP aufzugeben, dass sich ein dünner Film über und um<br />
die Rohrlänge ausbreitet, die anschließend in die <strong>LOKRING</strong>-<br />
Kupplung eingeführt wird.<br />
Grundsätzlich ist darauf zu achten, dass kein LOKPREP in das<br />
Rohrinnere gelangt und dort aushärtet.<br />
3. Montage<br />
<strong>Die</strong> Rohre sind bis zum Anschlag in die <strong>LOKRING</strong>-Kupplung<br />
einzuführen. Zur besseren Verteilung des LOKPREPs ist die<br />
Kupplung um 360° zu drehen.<br />
Anschließend ist die Handmontagezange so an der Kupplung<br />
anzusetzen, dass die <strong>LOKRING</strong>e exakt in den Aufnahmen der<br />
Montagebacken liegen. Durch die Betätigung der Zange werden<br />
die <strong>LOKRING</strong>e bis zum Anschlag auf den Stutzen gedrückt.<br />
Richtige Auflage / Correct position<br />
Während der Montage ist darauf zu achten, dass beide Rohre<br />
immer am inneren Anschlag der Kupplung anliegen (Rohre auf<br />
Vorspannung bringen). <strong>Die</strong> Verbindung ist damit fertig montiert<br />
und das Rohrsystem kann nach einer Verweilzeit von ca. 4 Minuten<br />
mit Druck beaufschlagt oder evakuiert werden.<br />
LOKPREP<br />
1. Preparation of the <strong>tube</strong> ends<br />
De-burr the internal and external <strong>tube</strong> ends, if necessary - ensuring<br />
no fillings remain inside the <strong>tube</strong>. In order to produce a hermetically<br />
sealed metal/metal connection, the <strong>tube</strong> ends which are to be connected<br />
have to be hermetically clean. Paint, oil and grease have to<br />
be removed with a suitable medium (sand paper, abrasive mat etc.).<br />
In order to prevent longitudinal grooves the <strong>tube</strong> end has to be<br />
cleaned in a rotary direction not in longitudinal direction.<br />
2. Applying of LOKPREP<br />
Onto the outer wall of the cleaned <strong>tube</strong> endsLOKPREP has to be<br />
applied until there is a thin film on and around the <strong>tube</strong> which is<br />
inserted into the <strong>LOKRING</strong> union joint.<br />
Basically it is important that no LOKPREP flows into the inside of<br />
the <strong>tube</strong> and hardens there.<br />
3. Assembly<br />
<strong>The</strong> <strong>tube</strong>s have to be inserted into the <strong>LOKRING</strong> union joint up to<br />
the limit. For a better distribution of the LOKPREP the joint should<br />
be rotated through 360 degrees.<br />
min. 360°<br />
Afterwards the manual assembly tool has to be applied to the union<br />
joint, so that the <strong>LOKRING</strong>s are seated squarely in the assembly<br />
jaws. By operating the ratchet handle the <strong>LOKRING</strong>s are pressed<br />
onto the connection until they meet at the centre stop.<br />
Falsche Auflage / Wrong position<br />
During assembly it is important that both ends remain completely<br />
within the joint (prestress has to be put onto the <strong>tube</strong>s).<br />
<strong>The</strong> connection is now assembled and the system can be pressured<br />
or it can be evacuated.<br />
9


![[ Die Ein-Ring-Rohrverbindung ] [ The Single Ring ... - Artel Klima](https://img.yumpu.com/8594115/1/184x260/-die-ein-ring-rohrverbindung-the-single-ring-artel-klima.jpg?quality=85)