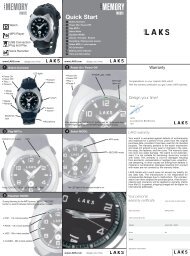
LAKS Memory Date User Manual
LAKS Memory Date User Manual
LAKS Memory Date User Manual

Create successful ePaper yourself
Turn your PDF publications into a flip-book with our unique Google optimized e-Paper software.
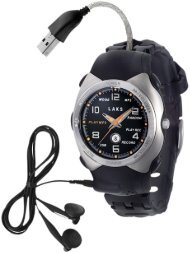
<strong>LAKS</strong> <strong>Memory</strong> USB 2.0<br />
<strong>User</strong>’s <strong>Manual</strong><br />
Version 2.3
Introduction<br />
Thank you for purchasing the <strong>LAKS</strong> <strong>Memory</strong>. The manual explains how to use the<br />
U-Storage software bundled with the device.<br />
Safety Precautions<br />
Please follow the safety precautions carefully before you use the <strong>LAKS</strong> <strong>Memory</strong> and<br />
the application software (the product). Make sure that you use the product correctly<br />
according to the procedures described in this guide.<br />
Warnings This mark indicates topics that could lead to serious<br />
injury of your body or damage of the product if<br />
ignored or handled incorrectly.<br />
_____________________________________________________________________<br />
Warnings<br />
_____________________________________________________________________<br />
� Do not attempt to disassemble or alter any part of the product that is not<br />
described in this guide.<br />
� Do not allow the product to come into contact with water or other liquids. In the<br />
event that water or other liquids enter the interior, immediately unplug the<br />
product from the computer. Continued use of the product may result in fire or<br />
electrical shock. Please consult your product distributor or the closest support<br />
center.<br />
� Do not handle the product to do the plug and unplug operation if your hands are<br />
wet. Otherwise it will cause electrical shock.<br />
� Do not place the product near a heat source or expose them to direct flame or<br />
heat.<br />
� Never place the product close to equipment generating strong electromagnetic<br />
fields. Exposure to strong magnetic fields may cause malfunctions or corrupt<br />
data.<br />
� protect the USB plug from salt water or any corrosive liquid to ensure the<br />
reliable connection.<br />
� make sure the plug is dry before you connect <strong>LAKS</strong> <strong>Memory</strong> to computer in case<br />
the humidity results in short circuit which might damage your computer in
succession.<br />
� Hold the USB plug to disconnect <strong>LAKS</strong> <strong>Memory</strong> from computer. Never unplug<br />
by only holding the watch or wire to avoid the break of the wire. Also do no bend<br />
the wire severely during the plug and unplug operation to prolong the wire life.<br />
� recommend frequent cleaning of accumulated residue inside the plug to prolong<br />
the product life.<br />
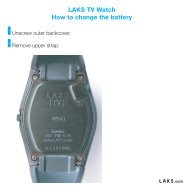
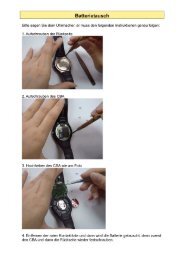
How to Set Time<br />
� Pull out the crown when the second hand arrives at 12 o’clock position.<br />
� Turn the crown in either direction to set hour and minute.<br />
� Push the crown to the normal position to start<br />
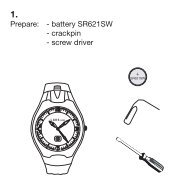
Please follow the procedures as below:<br />
1.Unscrew the case back of the watch<br />
2.Unscrew the CBA<br />
How to change battery
3.Lift the CBA as showed in the picture<br />
4.Remove the red insulator and replace the battery, screw back the CBA first and then<br />
the case back<br />
System Requirements<br />
There are minimum hardware and software requirements that must be satisfied to<br />
ensure the product to function properly.<br />
� Computer Model IBM PC/AT Compatible, Power Macintosh, PowerBook,<br />
iMAC or iBook
� OS Windows 98 Second Edition, Windows Millennium<br />
� Interface USB<br />
� Free Hard Disk Space 3 MB and more<br />
Edition (Windows ME), Windows 2000, Windows XP,<br />
Linux 2.4 or higher, Mac OS 9.0 or higher<br />
� Windows 98 does not support default Mass Storage Driver. You have to<br />
install the driver bundled with the product.<br />
� The product can use the default driver in most of the OS. If you want to run<br />
the application software bundled with the product, install the vendor driver<br />
by the “U-StorageTools2.3.exe” utility. Then, the application software will<br />
work properly.<br />
� The application software only can run with Microsoft Windows OS.<br />
� However, the U-Storage basic functions can be supported in all OS listed<br />
above.<br />
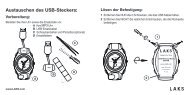
Guide to Components<br />
USB Interface: The interface connects to the USB port of the computer.<br />
LED Display: This LED Display will show the status of the <strong>LAKS</strong> <strong>Memory</strong>.
1. Plug and Play<br />
Once the <strong>LAKS</strong> <strong>Memory</strong> is in operation, the LED will flash<br />
quickly.<br />
Basic Functions<br />
When you plug the device into the USB port of your computer, you will see a<br />
“Removable Disk” icon in the file manager window.<br />
In Macintosh, once you plug the U-Storage into the USB port. You can see the<br />
disk icon in the “Desktop”.<br />
In Linux OS, you can mount the device by the following instruction.<br />
.Execute cd /etc/sysconfig/ ( cat /etc/sysconfig/hwconf | more )<br />
.Check the device information in hwconf,write down the mount point.<br />
.Make a directory in /mnt (ex: mkdir /mnt/usbHD )<br />
.Then, execute mount /dev/sda1 /mnt/usbHD (if mount point was .dev/sda)<br />
2. Read and Write<br />
You can retrieve or store files in the device as a hard disk. The read/write<br />
operation of the device is the same as that of a hard disk.<br />
3. Unplug<br />
You can remove the device after you finish the action with the device. However, in
Windows ME and Windows 2000, please follow the safe removal procedure. You<br />
can find a safe removal icon in your computer’s notification area.<br />
Double click the “safe removal” icon; the “Unplug or Eject Hardware” window<br />
will pop up. You can select the device you want to remove. Then, click the “Stop”<br />
button. After that you can unplug the <strong>LAKS</strong> <strong>Memory</strong> from the USB port of your<br />
computer.<br />
Warning When you want to remove the <strong>LAKS</strong> <strong>Memory</strong>, make sure<br />
the LED is not flashing. When the LED flashes quickly,<br />
there are some traffic on going between the OS and the<br />
<strong>LAKS</strong> <strong>Memory</strong>. Don’t remove the U-Storage at this<br />
moment. Otherwise, it will cause some damages to the<br />
data or even the <strong>LAKS</strong> <strong>Memory</strong> itself.
Warning If you do not follow the safe removal procedure in<br />
Windows ME and Windows 2000 systems, data loss<br />
caused by the “write cache” issue may happen.<br />
In Macintosh systems, you can drag the removable disk icon and put into the trash.<br />
This action will perform the “Eject” function.<br />
In Linux OS, please follow the “umount” command procedure to un-mount the<br />
device.<br />
Partition Type<br />
The Flash <strong>Memory</strong> may be partitioned into three types of disk. We will use the<br />
following terms in this guide,<br />
1. Public Area There is no “Security” function at all. You can do any basic<br />
functions, described in the “Basic Functions” section, in this<br />
area.<br />
2. Security Area This area cannot be viewed without the application software.<br />
Once you do the “Log In” action in the application software,<br />
you will switch view from “Public Area” to “Security Area”.<br />
After successful switch, you can do any basic functions,<br />
described in the “Basic Functions” section, in this area.<br />
� You can only view either “Public Area” or “Security<br />
Area” at the same time in the same disk logic unit<br />
number(LUN).<br />
In the Flash memory, you can select the following partition combinations:<br />
1. Single Public Area Make all the device area accessible by everybody.<br />
2. Security Area Make the device area into two partitions in the<br />
same LUN, Public Area and Security Area.<br />
Everybody can access the Public Area. The<br />
Security Area can be accessed “Only” with a<br />
password.<br />
3. Public Area Plus Security Area Make the device area into three partitions in two
LUNs, Public Area and Security Area in LUN0,<br />
and Public Area in LUN1. You can access these<br />
partitions by the multiple-LUN driver. The<br />
partition status was shown in the following figure.<br />
The partitions in LUN 0 will perform as described<br />
in item 2. The partition in LUN 1 will perform as<br />
described in item1.<br />
Public Security<br />
LUN 0 Area Change View Area<br />
Through<br />
Login & Logout<br />
This figure shows detailed operations of single LUN.<br />
LUN 0<br />
LUN 1<br />
Public<br />
Area<br />
Public<br />
Area<br />
Change View<br />
Through<br />
Login & Logout<br />
This figure shows detailed operations of multiple LUNs.<br />
Security<br />
Area<br />
Function Security Password Disk Logical Unit Disk Letters<br />
Type Number in OS<br />
1. Public Area Only No No 1 (LUN0) 1<br />
2. Security Area Yes Yes 1 (LUN0) 1<br />
3. Public Area Plus Security Area Yes Yes 2 (LUN0 & LUN1) 2
This table describes the functions of the three partition types.<br />
Using the Software<br />
On the Windows Platform<br />
Installing/Uninstalling<br />
the Application Software:<br />
Installing<br />
the software:<br />
If you are installing the application<br />
software onto Windows OS, you must first log on<br />
as the administrator and then install the application software.<br />
P recaution about the USB Interface<br />
� Please connect the device to the USB port of your computer when you install the<br />
application software.<br />
� If you do not connect the device to the USB port and install the application<br />
software in the Microsoft Windows XP and Windows2000, you have to install<br />
the U-Storage driver again as you plug in the device.<br />
� In Windows 98 SE and Win Me, you need to unplug the<br />
U-Storage and plug<br />
again after install the driver.<br />
1.<br />
Find the “U-StorageTools.exe” program.<br />
You can find the program on the CD-ROM.<br />
2. Double-click the [U-StorageTools.exe] icon.<br />
3. Follow the on-screen instructions to proceed.<br />
Uninstalling<br />
the software:<br />
To remove the installed software, you can click the windows [Start] menu and select<br />
[Setting], [Control Panel] and [Add/Remove Programs]. The application software can<br />
also be uninstalled by clicking the [Start] menu and selecting [Programs], [U-Storage],<br />
[Uninstall U-Storage].<br />
Notes:<br />
� The USB driver will be required to install, as the device links the PC by the USB<br />
port at the fist connection. After then, the drive installation is not required.
� Do not cancel the installation during the procedure. The Flash <strong>Memory</strong> may not<br />
operate correctly if the installation is incomplete.<br />
� Read the “Troubleshooting” Section if the installation<br />
cancels itself during the<br />
procedure, if the installation did not proceed as described, or if you feel that the<br />
driver are not properly installed.<br />
Installing<br />
the USB Driver:<br />
For some Windows system, users should log on as the Administrator before<br />
installation. Once you have attached the U-Storage to the computer. The OS will find<br />
the appropriate driver or the “Add New Hardware Wizard” dialog will appear after a<br />
moment. You can do the installation of the Driver manually. Or just find out the<br />
“Setup.exe” program to do the driver installation.<br />
During<br />
the installation procedure, if the “Digital Signature Not Found” message<br />
displays, just click the [Yes] button in the showing window.<br />
Using<br />
U-Storage.exe Program the First Time:<br />
Warning Due to the U-Storage.exe can only handle one <strong>LAKS</strong><br />
<strong>Memory</strong> at the same time. If you will not use the function<br />
of the U-Storage.exe, like “Resize”, “Change Password”,<br />
or “Log In”, etc., you can insert more than two <strong>LAKS</strong><br />
<strong>Memory</strong>es. If you want to use the function of the program,<br />
remove all other <strong>LAKS</strong> <strong>Memory</strong>es. Otherwise, the<br />
U-Storage.exe may not perform properly or even cause<br />
data loss.<br />
After<br />
you install the software and driver correctly, the U-Storage icon will appear at<br />
the notification area automatically.<br />
Or
The display will depend on the status of the device.<br />
�<br />
�<br />
You can use the right button of your mouse to pop up the selection menus as the<br />
following figures. Then, you can select the functions you want.<br />
Or you can double click the icon in the notification window. The U-Storage<br />
manager window will pop up as,<br />
By default, the device is non-security. So, the “Resize” function will be active<br />
when you run this software first time.<br />
U-Storage - Resize:<br />
As described in the “Partition<br />
Type” section, you can do the “Resize” action to your
U-Storage.<br />
Warning The “Resize” action will erase all the data or files<br />
existing in U-Storage. The action is not reversible. You<br />
have to backup all the important files or data. Also, please<br />
close all the active programs and windows on the screen<br />
of your computer.<br />
1.<br />
Click the Resize button in the U-Storage manager window. The following “Resize<br />
Partition” window pop up.<br />
2.<br />
Select the partition type you want.<br />
3. If you select the “Public Area Only” , then click the [OK] button. The<br />
“Confirmation” window will pop up. Please make sure you already backup<br />
all<br />
the important files or data.
4. If you select the “Security Area”, then the following “Security Area Resize”<br />
window will pop up. You can drag the scroll bar in the middle of the window to<br />
set the size of the “Public Area” and “Security Area”. Or you can type in the size<br />
of each Zone you want in the “Size” window. You can set the password for<br />
accessing the security area in the “New Password” window. The maximum size<br />
of the password is 8 characters. You can key in the hint of your new password in<br />
the “Password Hint” window. This hint will be displayed when you click the<br />
“Hint” button in the “Unlock Protect” window. The maximum size of the Hint is<br />
32 characters. After you finished the setting, click the [OK] button. The<br />
“Confirmation” window will pop up. Please make sure you already backup<br />
all<br />
the important files or data.<br />
5.<br />
If you select the “Public Area + Security Area”, then the following<br />
“Public/Security Area Resize” window will pop up. You can drag the<br />
scroll bar in<br />
the window to set the size of each area. First, please set the size of the “Public<br />
Area” of LUN1. The minimum size for each area is 1MB. The maximum size of<br />
the “Public Area” of LUN1 is 1/4 of the total size. Once the size of the “Public<br />
Area” of LUN1 was set, the scroll bar of the “Public Area” and “Security Data<br />
Zone” of LUN0 will be set in the middle automatically. Or you can type in the
size of each Zone you want in the “Size” window. You can set the password for<br />
accessing the security area in the “New Password” window. The maximum size<br />
of the password is 8 characters. You can key in the hint of your new password in<br />
the “Password Hint” window. This hint will be displayed when you click the<br />
“Hint” button in the “Unlock Protect” window. The maximum size of the Hint is<br />
32 characters. After you finish the setting, click the [OK] button. The<br />
“Confirmation” window will pop up. Please make sure you already backup<br />
all<br />
the important files or data.<br />
6.<br />
Once the resizing is finished, the following message will pop up.<br />
7.<br />
After you finish the “Resize”, the “Setup.exe” program will be copied into the
“Public Area” (in LUN 0) automatically. It’s removable. However, it is needed<br />
when you insert your device into another computer. It will install the <strong>LAKS</strong><br />
<strong>Memory</strong> software for you in the computer.<br />
Login<br />
the Security Area:<br />
If you partition the device with security,<br />
you can execute the following “Login”<br />
function to access the security Area.<br />
1. Double click the U-Storage icon in<br />
the notification window or click the [Login]<br />
button in the U-Storage manager window. The “Unlock Protect” window will pop<br />
up.<br />
Warning When you do the login and logout action with the<br />
device, please make sure there is no application or<br />
2. Key in the password in the “Password” area.<br />
program running or document unclosed on the<br />
device. If so, it will cause data loss or damage.<br />
� You can create the password hint in the “Resize” or “Change Password”<br />
functions. Once you create the password hint, you can click on the “Hint”<br />
button in the “Unlock Protect” window to prevent you from forgetting the
�<br />
password. The hint will be shown for three seconds.<br />
If you key in the wrong password, the following message will be shown.<br />
� You have three tries to input the password. After three tries, the following<br />
message will pop up. And you have to unplug and plug the device in order<br />
to do future actions.
� When you do the login or logout action, please make sure you close all the<br />
programs or documents open connection on the device. If there is some<br />
application programs running or documents unclosed on the device, the<br />
following message will pop up. In Win2000, even the “file manager” has<br />
accessed the device it will be treated as “busy”. You have to close the file<br />
manager in order to do the “Login”. However, not all the connection could<br />
be checked in all kind of OS.<br />
3.<br />
Click on the “OK” button.<br />
4. Once the file manager window<br />
contains the “Security Area” pops up, you can do<br />
the operation you want with the Security Area. The file manager window will be<br />
like the following figure. The background is colorful.
Logout<br />
the Security Data Zone:<br />
1. Double click the U-Storage icon in the<br />
notification window or select the [Logout]<br />
button in the U-Storage manager window.<br />
Warning When you do the login and logout action with the<br />
<strong>LAKS</strong> <strong>Memory</strong>, please make sure there is no<br />
applications running or documents unclosed on<br />
the<br />
<strong>LAKS</strong> <strong>Memory</strong>. If so, it will cause data lose or<br />
damage.<br />
� When you do the login or logout action, please make sure you have closed<br />
all the programs or documents on the device. If there are any programs<br />
running or documents unclosed on the device, the following message will<br />
pop up. In Win2000, even the “file manager” has accessed the device it will<br />
be treated as “busy”. You have to close the file manager in order to do the<br />
“Login”. However, not all the connection could be checked in all kind of<br />
OS.<br />
2.<br />
Once the file manager window contains the “Public Area” pop up, you can do the<br />
operation you want with the Public Area.<br />
Change<br />
Password:<br />
<strong>User</strong> can change password<br />
and key in the password hint using the “Change Password”
selection in the U-Storage menu. You can only select this item in “Security AP Zone”.<br />
1. Click the U-Storage menu in the notification window using the right button of<br />
your mouse and select the [Change Password] selection of the U-Storage menu.<br />
The following “Change Password” window will pop up.<br />
2.<br />
Key in your current password in the “Current Password” area.<br />
3. Then, key in your new password and confirm in the “Confirm Password”<br />
area.<br />
� The maximum size of the password is 8 characters.<br />
4. You can key in the hint of your new password in the “Password Hint” window.<br />
This hint will be displayed when you click the “Hint” button in the “Unlock<br />
Protect” window.<br />
Boot Up Function<br />
The BootUp program in “Utility” manager window will build<br />
up the device as a<br />
bootable disk. Before you run the program, please do the following preparations,<br />
1) This program can run under Windows 98 SE, XP, and ME. (The program can’t
e supported in Windows 2000.)<br />
2) Please turn off the anti-virus program<br />
during the procedure.<br />
3) Make sure your Windows system was located in C Disk.<br />
4) This program only deals with one device at the same time.<br />
5) Make sure your U-Storage is in “Public Area” if it is with “Security”<br />
function.<br />
6) If you want to make your device as a bootable USB HDD, you can’t make the<br />
device as a “Security” one. This option is only supported in Windows 98 SE.<br />
Warning If you performed the “Log In” action with your <strong>LAKS</strong><br />
<strong>Memory</strong> and located in “Security Area” and run the BootUp<br />
When<br />
you are ready to process, follow the following procedures, the procedures for<br />
Windows<br />
98 SE and Windows ME:<br />
function, it will do the “Log Out” and erase all the data in<br />
“Public Area”.<br />
Windows XP is different from Windows 98 and ME. This program cannot be run in<br />
Windows 2000.<br />
1). You can click the [Utility] button<br />
in the U-Storage manager window to<br />
execute the BootUp utility.
2). The following window will show up.<br />
3). You can select the type of the boot up method, USB ZIP or USB HDD. The<br />
USB HDD is only for Windows 98.<br />
� If you select “USB HDD”, the computer will get the prompt after<br />
you boot from the U-Storage.<br />
� If you select “USB ZIP”, the computer will get the prompt after you<br />
boot from the U-Storage.<br />
� If your device is with “Security” function, only USB ZIP can be selected.<br />
4). After the selection, click the “OK” button. The following warning message<br />
will be shown. The data in the “Public Area” will be lost. If it is OK, click the<br />
“OK” button to continue the process.
5).<br />
Windows XP:<br />
Warning The program will do the format. The existing data in the<br />
“Public Area”, which you want to make, will be lost.<br />
After the process is completed done, the finish message will be shown.<br />
1). Please make a bootable floppy first. You can insert a floppy into the floppy<br />
drive. Then, click on the icon of 3.5” floppy in the “My Computer” window<br />
by using the right button of the mice. Select the “Format” item.<br />
2). Select the item for build up a bootable floppy in the format options. Then,<br />
click on the “Start” button.<br />
3). Make a directory called XP_Bootable in the root directory<br />
of your computer<br />
system disk.<br />
4). Copy all the files in the floppy to the XP_Bootable directory.<br />
5). Click on the [Utility] button in the U-Storage manager window. Then, select<br />
the USB ZIP. Click on the “OK” button.
6). After the process is completed, the finish message will be shown.<br />
Error Messages:
When this message shows up, the possible reason is your Windows<br />
OS installation is<br />
not<br />
completed. (Please make sure the path \WINDOWS\COMMAND\EBD in<br />
Windows<br />
98, \WINDOWS\COMMAND\EBD in Windows ME, or \XP_Bootable in<br />
Windows<br />
XP is exists)<br />
When<br />
this message shows up, please make sure the capacity of the “Public Area” is<br />
enough.<br />
Notes:<br />
� After you finish the program, you will see different disk property when you<br />
select different disk type. For example, if you select it as “USB HDD”, you will<br />
see the hard disk icon in the file manager window. If you select it as “USB ZIP”,<br />
you will see the removable disk icon in the file manager window.<br />
However, only<br />
Windows 2000 and above can identify the difference. In Windows 98, you just<br />
can see the “Removable<br />
Disk”.<br />
� After you finish the program, the <strong>LAKS</strong> <strong>Memory</strong><br />
contains the files necessary for<br />
�<br />
boot up function. Please don’ t remove any file<br />
in this area. Otherwise it will<br />
cause failure when you do the boot up procedure of your computer.<br />
When you want to use the U-Storage to boot up your computer, please select the<br />
appropriate setting of the BIOS. Please refer to the user manual of the<br />
� Since<br />
the BIOS design of each motherboard is quite different, we cannot<br />
�<br />
motherboard.<br />
guarantee the boot up device is suitable for every computer.<br />
Since Award changed their BIOS spec. In March 2002, the boot up procedure is<br />
different<br />
from before. We cannot identify if the BIOS is new or old. So, this boot<br />
up utility is not suitable for Award’s new BIOS if you use USB ZIP boot up
option.<br />
Recover Disk<br />
Once your device is damaged, you can use this utility to recover the <strong>LAKS</strong> <strong>Memory</strong>.<br />
It will<br />
check if there are too many bad block in device and try to repair it.<br />
1) . After you double click on the RecoverDisk shortcut in start menu, the<br />
following window will pop up.<br />
Warning The “Recover Disk” action will erase all the data or files<br />
existing in <strong>LAKS</strong> <strong>Memory</strong>. The action is not reversible.<br />
You have to backup all the important files or data.<br />
2). There are two steps in Recover Disk, one is scan bad block and the other<br />
is<br />
“Read/Write” testing for each block.<br />
It will take a long time to scan each<br />
block. It will take about 1.5 minutes for each 16 MB.<br />
3). After you click the [Start] button in the window, the Recover process will be<br />
started.<br />
4). Once the job is finished, the complete message will be shown in the middle<br />
Disclaimer<br />
area, or else it will show error message.<br />
We made every effort to ensure that the information and procedure in this guide is
accurate and complete, no liability can be accepted for any errors or omissions. We<br />
reserves<br />
the right to make any changes without further notice to any products herein.<br />
Trademark<br />
Acknowledgments<br />
� IBM is a registered trademark of international Business Machines Corporation.<br />
� iBook<br />
and iMac are trademarks of Apple Computer, Inc.<br />
� Ma cintosh, PowerBook, Power Macintosh are trademarks of Apple Computer,<br />
Inc.<br />
� Microsoft,<br />
Windows, Windows 98, Windows ME, Windows 2000, and Windows<br />
XP are either registered trademarks<br />
of Microsoft Corporation in the United Stats<br />
and/or<br />
other countries.<br />
� Other names and products not mentioned above<br />
may be registered trademarks of<br />
their respective companies.