ISOPRO® Type IPT - Spanelas
ISOPRO® Type IPT - Spanelas
ISOPRO® Type IPT - Spanelas

You also want an ePaper? Increase the reach of your titles
YUMPU automatically turns print PDFs into web optimized ePapers that Google loves.
22<br />
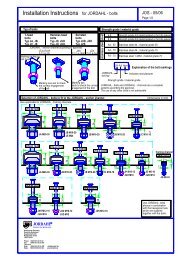
ISOPRO ® <strong>Type</strong> IP & <strong>IPT</strong><br />
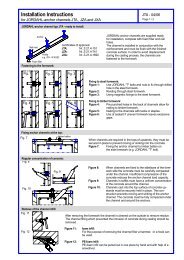
Two-part elements installation instructions<br />
In type IP pre-cast units In type <strong>IPT</strong> pre-cast units<br />
≤100<br />
≥ 100<br />
�<br />
�<br />
�<br />
≤100<br />
�<br />
On-site type IP On-site type <strong>IPT</strong><br />
≥ 100<br />
�<br />
�<br />
www.h-bau.com<br />
�<br />
�<br />
≤100<br />
�<br />
≥ 180* *<strong>IPT</strong> 100 ≥ 215<br />
�<br />
�<br />
≤100<br />
�<br />
≥ 180* *<strong>IPT</strong> 100 ≥ 215<br />
In pre-cast units<br />
Arrange the lower reinforcement layer including the<br />
mesh support as per structural design. Distance to insulation<br />
joint ≤ 100 mm.<br />
Install lower section �. The last transverse rod in the<br />
mesh must be placed as close as possible to the insulation,<br />
observing the required concrete covering.<br />
For IP: the transverse force rod can be under or on top<br />
of the mesh support. The mesh support should be lifted<br />
until it is underneath the tension reinforcement.<br />
Concreting the slab element.<br />
Locate and fix the associated upper section � and,<br />
where required, intermediate section �.<br />
<strong>Type</strong> IP is supplied with suspension reinforcement as standard<br />
On-site<br />
Lay the necessary on-site reinforcement on the floor<br />
side. (See pages 18-21)<br />
Lay the slab element on the timber beams prepared for<br />
it.<br />
Lay the necessary on-site reinforcement on the balcony<br />
side. (See pages 18-21)<br />
Attach the upper section � and, where required, intermediate<br />
section �. Bind the tensioning rods to the onsite<br />
reinforcement.<br />
Note:<br />
For an element height h = 210 to 250 mm fit additional insertion<br />
stirrups Ø 6/200 or stirrup mesh Q188A on the<br />
balcony side.<br />
Important note:<br />
The type identification for lower and upper sections must match (see also colour identification). The direction of installation<br />
(on the balcony side) must be observed.