Creating Multimedia with MatchWare Mediator 8
Creating Multimedia with MatchWare Mediator 8
Creating Multimedia with MatchWare Mediator 8

Create successful ePaper yourself
Turn your PDF publications into a flip-book with our unique Google optimized e-Paper software.
OCR Nationals in ICT. Unit 4: Design and produce multimedia products<br />
<strong>Creating</strong> <strong>Multimedia</strong> <strong>with</strong> <strong>MatchWare</strong> <strong>Mediator</strong> 8<br />
• This lesson is how to use <strong>MatchWare</strong> OpenMind 2 to help design, and <strong>MatchWare</strong><br />
<strong>Mediator</strong> 8 to produce a multimedia product.<br />
• This lesson will fulfil the requirements of Unit 4, Assessment Objectives 1 – 4.<br />
• <strong>MatchWare</strong> <strong>Mediator</strong> 8 is an excellent multimedia tool, <strong>with</strong> an easy to use interface<br />
and easy export to HTML, Flash or CD-ROM.<br />
• <strong>MatchWare</strong> OpenMind 2 is a very effective Mind Mapping design tool, in addition to<br />
being a very good collation tool..<br />
This lesson will use <strong>MatchWare</strong> OpenMind 2 for AO 1-3, and <strong>Mediator</strong> for AO 4.<br />
OCR specifically lists <strong>MatchWare</strong> <strong>Mediator</strong> 8 as an appropriate tool for the creation of multimedia content.<br />
OCR also specifies that “This unit must not be evidenced as a simple website.”<br />
Assessment Objectives:<br />
1. Review several existing multimedia products<br />
2. Design a multimedia product<br />
3. Source and store suitable multimedia<br />
elements<br />
4. Create the multimedia product<br />
Step 1: Getting Started <strong>with</strong> <strong>MatchWare</strong><br />
OpenMind 2<br />
Step 2: Reviewing products<br />
Step 3: Design a product<br />
Step 4: Storing products<br />
Step 5: Getting Started <strong>with</strong> <strong>Mediator</strong><br />
Step 6: <strong>Creating</strong> a product<br />
Step 7: Exporting<br />
1
Step 1: Getting Started <strong>with</strong> <strong>MatchWare</strong> OpenMind 2<br />
Open <strong>MatchWare</strong> OpenMind 2.<br />
In the Welcome screen, select New Document.<br />
You will be asked what format of Mind Map view you would like to start your presentation in.<br />
Mind Map If you have random thought processes, seeing ideas in a spreading, non-linear form.<br />
Top Down: If you require more structure, and develop ideas in levels of priority.<br />
Left Right: If you want your ideas to flow from left to right.<br />
Timeline: If your require time dependent plans. It uses a linear left to right format.<br />
Outline: If you require a table format for chronological, linear ideas.<br />
Choose Mind Map and click Open<br />
You are now ready to begin.<br />
2
Step 2: Reviewing Products<br />
Assessment Objective 1 requires you to review at least three multimedia products.<br />
An appropriate method of review would be to use <strong>MatchWare</strong> OpenMind 2.<br />
For each product, create sub-branches for each review criteria. Use text notes to create content for each criteria (Right click>Insert>Test note>New)<br />
When you are satisfied, export the Mind Map to Word to create a report <strong>with</strong> a contents page, headers and content (File>Export to>Microsoft Word).<br />
3
Step 3: Design a Product<br />
Assessment Objective 2 requires you to produce design documentation for your<br />
multimedia product. <strong>MatchWare</strong> OpenMind 2 allows you to brainstorm ideas as a Mind<br />
Map. It also allows you to produce a site plan of the multimedia product using the branching<br />
Mind Map structure.<br />
The root represents the first page of the product (the Home page), <strong>with</strong> each branch a<br />
choice or option.<br />
You can show links between sections <strong>with</strong> a Branch Connection, using this icon: . Click<br />
the icon, then the two branches in turn to make a connection.<br />
Once you have a site plan you are happy <strong>with</strong>, it can either be used to inform your work <strong>with</strong> <strong>Mediator</strong>,<br />
or exported directly to <strong>Mediator</strong> to form the basic structure of your <strong>Multimedia</strong> product. File>Export<br />
to><strong>MatchWare</strong> <strong>Mediator</strong>>Quick Export<br />
In the dialog that opens, choose 1024x768, and check Using blank pages. This allows you to fully<br />
customise the look and interactivity of your product.<br />
4
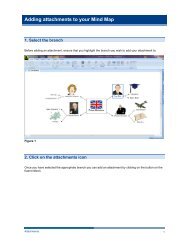
Step 4: Storing products<br />
Assessment Objective 3 requires you to source and store multimedia components for use in your product.<br />
<strong>MatchWare</strong> OpenMind 2 is an effective tool for storing files in an ordered and structured format.<br />
Draw out a Mind Map <strong>with</strong> each branch labelled <strong>with</strong> a component. Attach files to each branch using Right<br />
click>Attach Object. For common files types (text, images, video, sound), select from the list. Otherwise, select<br />
Hyperlink and click on File link to link to any other file type.<br />
All attached files (objects) will appear as a paperclip on the branch.<br />
Mouse over to show the file name, and click to open.<br />
The Mind Map can be exported to HTML or Word, and all attached<br />
objects will be preserved in the export as hyperlinks.<br />
AO 2 and AO3 are about creating evidence of planning.<br />
5
Step 5: Getting Started <strong>with</strong> <strong>Mediator</strong><br />
For AO4: <strong>Creating</strong> a multimedia product, you will use <strong>MatchWare</strong> <strong>Mediator</strong> 8.<br />
Open <strong>Mediator</strong>.<br />
On the Welcome screen, choose:<br />
Create a new document.<br />
The New Document dialog opens.<br />
Check the Standard (CD-ROM, etc), Flash or HTML button.<br />
Standard will create a product that makes use of all <strong>Mediator</strong> 8 features.<br />
Flash will ensure only <strong>Mediator</strong> 8 features that export successfully to Flash will be available.<br />
HTML will ensure only <strong>Mediator</strong> 8 features that export successfully to HTML will be available.<br />
This tutorial assumes you clicked Standard. Click Next.<br />
Another dialog opens. Keep Full screen <strong>with</strong> frame checked. Click Next<br />
Another dialog opens. Check 1024 x 768.<br />
This window size is typical on modern monitors, but if you want to be sure it will fit on almost every monitor, check 800x600, or choose a custom size.<br />
Click Finish.<br />
The workspace will open.<br />
<strong>Mediator</strong> is a very easy to use multimedia tool.<br />
There are only three basic steps to creating your product:<br />
1. Add objects using the Toolbox<br />
2. Create and arrange pages <strong>with</strong> the Page List<br />
3. Create interactivity <strong>with</strong> the Events dialog<br />
You are now ready to start your <strong>Multimedia</strong> product.<br />
6
Step 6: <strong>Creating</strong> a product<br />
Assessment Objective 4 requires you to create a multimedia product. Your product could include: user selected routes, a range of multimedia elements,<br />
hyperlinks, user interaction, multimedia effects (animations, hide/show, transitions, etc).<br />
This lesson will not use a specific context for the product, but will demonstrate how to add multimedia content in general to your product using <strong>Mediator</strong>.<br />
For general advice on using <strong>Mediator</strong>, see the lesson Unit 1: Perfecting your Presentation <strong>with</strong> <strong>Mediator</strong> or Unit 2: <strong>Creating</strong> Websites <strong>with</strong> <strong>Mediator</strong>.<br />
This lesson will create a three page multimedia<br />
product that demonstrates how to add the<br />
multimedia content suggested by OCR.<br />
To the right is the <strong>Mediator</strong> workspace as it will<br />
appear when you open a new document.<br />
Down the left it shows the Page list, Object list, and<br />
Properties dialog. The properties dialog often<br />
appears as a floating window. Drag it to the left to<br />
dock it <strong>with</strong> the page and object lists.<br />
The toolbar across the top allows you to add objects<br />
to the workspace.<br />
The first step is to add two more pages.<br />
Hit Insert.<br />
This opens a<br />
dialog. Name<br />
the new page<br />
(no spaces).<br />
Click OK.<br />
Repeat for a<br />
third page.<br />
7
Step 6: <strong>Creating</strong> a product (cont.)<br />
The three pages will now be listed in the Page list. These can be renamed, and the order changed <strong>with</strong> drag and drop.<br />
To create a user selected route through your product, the simplest method is to create a menu <strong>with</strong> links to each page.<br />
Any object on the workspace can be made into a link to another location. You are going to create a simple menu of three buttons to navigate to the three<br />
pages.<br />
Create three buttons using the button icon. Change the colour and font using the Properties<br />
dialog.<br />
Copy the button set to the other three pages.<br />
Instead of using copy/paste, you can create a Master page, where everything on this page<br />
will be replicated on every other page. To do this, make a new page. Call this Master. Ensure<br />
it is not the first page on the list. Format the Master page (i.e. create the buttons there). Now,<br />
for each other page, highlight the page in the Page list, and click the Top Master tab at the<br />
bottom of the workspace.<br />
This will open a dialog. Highlight Master, and click OK. Repeat for each page.<br />
Check the buttons now appear on every page. You will only be able to edit the buttons on the Master page, and all<br />
changes will be carried over to all pages the Master page is assigned to.<br />
Button Templates<br />
There are also a wide range of button templates available in the <strong>Multimedia</strong> Catalog. Open the catalog by clicking the<br />
tag to the right of the workspace, and either search for “button”, or use the menus. Once you have found a button you<br />
like, drag it onto the workspace. Assign events to the button as normal (see next page).<br />
8
Step 6: <strong>Creating</strong> a product (cont.)<br />
To make the buttons active, on each button: Right click>Events… This will open the<br />
Events dialog. Drag an Event from the right column (Mouse click) into the Active<br />
field (the empty box). Drag an Action from the row across the top (Go to Page).<br />
This will open another dialog. Choose the page you want this button to link to.<br />
Another dialog is revealed. This allows you to choose a transition effect. Use the tabs<br />
to choose a style of transition, and change the speed of the transition <strong>with</strong> the<br />
Duration field. The Speed control gives four options. These describe whether the<br />
transition occurs at a constant speed, accelerates, decelerates, or does all three.<br />
Experiment <strong>with</strong> the different effects.<br />
This will also satisfy the<br />
requirement to use transitions as a multimedia effect.<br />
Click OK, and repeat for each button. To test if the buttons work, click the Run document icon .<br />
As all the pages are currently identical, it is impossible to see these transitions, so you will need to add<br />
more content…<br />
To add video, GIF’s, Flash or WMV’s simply click the appropriate icon on the toolbar and drag out a<br />
frame on the workspace. An Open file dialog will appear. Select the appropriate file, and click OK.<br />
9
Step 6: <strong>Creating</strong> a product (cont.)<br />
To create animation, you need to associate an object to be animated <strong>with</strong> an animation path. Any animations you create will be preserved in your export,<br />
including HTML as <strong>Mediator</strong> exports using dynamic HTML.<br />
To create an animation first create an animation path.<br />
Click the points for your animation to follow. Once you have a rough guide, you can curve the path. Click on the pointer icon. Drag a box over the animation<br />
points to select them, and then click on the curve icon.<br />
The points will curve, and can be adjusted further by dragging the grab handles on<br />
each point. When you have finished, click the green arrow on the Animation Path<br />
Tools.<br />
Create an object to animate (a graphic, a word,<br />
a picture, etc.). Next, on an empty place on the<br />
workspace Right click>Events… (or F9)<br />
The<br />
Events dialog for the entire page opens.<br />
You<br />
can choose from many events that will<br />
start the animation, from clicking on the object,<br />
to the page opening, to moving the mouse, to<br />
hitting a key. Choose one, and drag it into the active field. Next, click the <strong>Multimedia</strong> tab, and drag the Animate icon<br />
into the active field. Another dialog will open. Select the Object to animate and the Animation path (if there is more<br />
than one). Choose duration, and a speed control. Click OK.<br />
Click Run document. The object will animate according to the rules you have set.<br />
10
Step 6: <strong>Creating</strong> a product (cont.)<br />
<strong>Creating</strong> a hyperlink is very similar to the process of making buttons. To hyperlink a word, as you would see on a website follow these steps.<br />
1. Create text. You can use the text icon.<br />
2. Highlight a word.<br />
3. On that word, Right click>Hypertext>Activate<br />
4. On the word again, Right click>Events…<br />
5. Drag Mouse click into the active field, choose the External tab, and drag<br />
in Web link.<br />
6. Another dialog opens, allowing you to specify the URL. Click OK, and then<br />
Close.<br />
11
Step 6: <strong>Creating</strong> a product (cont.)<br />
To make objects appear and disappear, you create an Event using Show and Hide.<br />
To Show an object, select an object and hit F3. This will hide the object.<br />
Hit F3 again to reveal.<br />
Hide the object, and then hit F9 to go to the page events dialog.<br />
If the animation event you did earlier is already in the<br />
active field, drag the Show icon down to make a<br />
longer chain. This chain now reads: When the mouse<br />
moves, animate an object and show another object.<br />
Otherwise, choose an appropriate event to trigger the<br />
Show.<br />
Any object can be made to show or hide any other<br />
object. You can choose the appropriate object in the<br />
dialog that opens when you drag down Show or Hide.<br />
You can create another chain of events in the same active field for what event will trigger the object to be hidden again.<br />
If you want to start the page <strong>with</strong> the object visible, and hide it after a certain action, do not use F3 to hide the object on the workspace first.<br />
These have been the basics for adding multimedia content in <strong>Mediator</strong>. By using combinations of events (e.g. try dragging the Timeline down as<br />
an action. This allows you to assign different events to occur at different times) you can create very complex effects.<br />
F3<br />
12
Step 7: Exporting<br />
This is a very simple process as <strong>Mediator</strong> does most of the work.<br />
Ensure you save your work<br />
Select File>Create Distribution Files>Quick<br />
Select HTML, Flash or CD-ROM in the dialog, then OK.<br />
Each format has advantages and disadvantages. There are other export options you may wish to explore. If an export format does not meet your needs, you<br />
can always try again.<br />
A dialog opens asking if you want to optimise the pictures in your project. This will compress the pictures for faster loading. Merit/Distinction students must<br />
provide evidence of Optimisation (use a screenshot). Click Yes.<br />
At this point <strong>Mediator</strong> starts exporting all your pages.<br />
When the Publish dialog appears <strong>Mediator</strong> is finished exporting your files.<br />
Select the Preview button to open your finalised website in your browser, or Open Folder to view the<br />
files.<br />
All the necessary files are saved in a folder called HTML (which you can rename later). To run the website, open the file index.htm .<br />
Summary. You have:<br />
Reviewed existing multimedia products; Designed a multimedia product; Stored components for your multimedia product; Created your own multimedia<br />
product <strong>with</strong> pages, buttons, hyperlinks, animations, and interactive elements, and exported in a suitable format.<br />
This meets the requirements specified by OCR for the creation of a multimedia product.<br />
13