


You also want an ePaper? Increase the reach of your titles
YUMPU automatically turns print PDFs into web optimized ePapers that Google loves.
ADJUSTING THE WEIDER PRO <strong>335</strong><br />
The weight <strong>bench</strong> is designed to be used with your own weight set (not included). The steps below explain how<br />
the weight <strong>bench</strong> can be adjusted. See EXERCISE GUIDELINES on page 14 for important exercise information<br />
and refer to the accompanying exercise poster to see the correct form for each exercise. Refer also to the exercise<br />
information accompanying your weight set for additional exercises.<br />
Inspect and tighten all parts each time you use the weight <strong>bench</strong>. Replace any worn parts immediately. The<br />
weight <strong>bench</strong> can be cleaned with a damp cloth and a mild, non-abrasive detergent. Do not use solvents.<br />
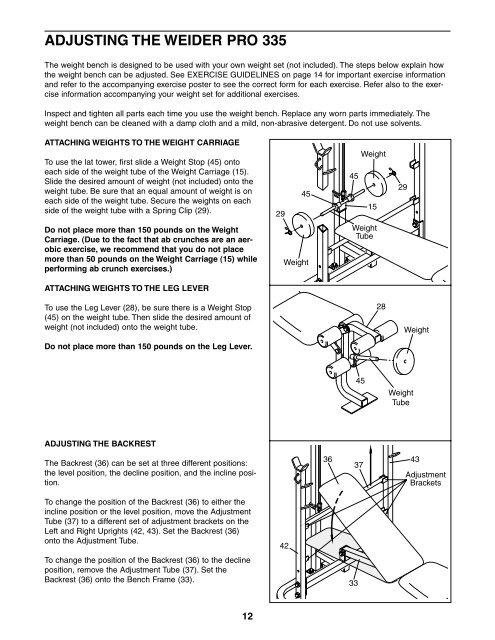
ATTACHING WEIGHTS TO THE WEIGHT CARRIAGE<br />
To use the lat tower, first slide a Weight Stop (45) onto<br />
each side of the weight tube of the Weight Carriage (15).<br />
Slide the desired amount of weight (not included) onto the<br />
weight tube. Be sure that an equal amount of weight is on<br />
each side of the weight tube. Secure the weights on each<br />
side of the weight tube with a Spring Clip (29).<br />
Do not place more than 150 pounds on the Weight<br />
Carriage. (Due to the fact that ab crunches are an aerobic<br />
exercise, we recommend that you do not place<br />
more than 50 pounds on the Weight Carriage (15) while<br />
performing ab crunch exercises.)<br />
ATTACHING WEIGHTS TO THE LEG LEVER<br />
To use the Leg Lever (28), be sure there is a Weight Stop<br />
(45) on the weight tube. Then slide the desired amount of<br />
weight (not included) onto the weight tube.<br />
Do not place more than 150 pounds on the Leg Lever.<br />
ADJUSTING THE BACKREST<br />
The Backrest (36) can be set at three different positions:<br />
the level position, the decline position, and the incline position.<br />
To change the position of the Backrest (36) to either the<br />
incline position or the level position, move the Adjustment<br />
Tube (37) to a different set of adjustment brackets on the<br />
Left and Right Uprights (42, 43). Set the Backrest (36)<br />
onto the Adjustment Tube.<br />
To change the position of the Backrest (36) to the decline<br />
position, remove the Adjustment Tube (37). Set the<br />
Backrest (36) onto the Bench Frame (33).<br />
12<br />
29<br />
Weight<br />
42<br />
45<br />
36<br />
45<br />
Weight<br />
15<br />
Weight<br />
Tube<br />
33<br />
45<br />
37<br />
28<br />
29<br />
Weight<br />
Tube<br />
Weight<br />
43<br />
Adjustment<br />
Brackets


