


Create successful ePaper yourself
Turn your PDF publications into a flip-book with our unique Google optimized e-Paper software.
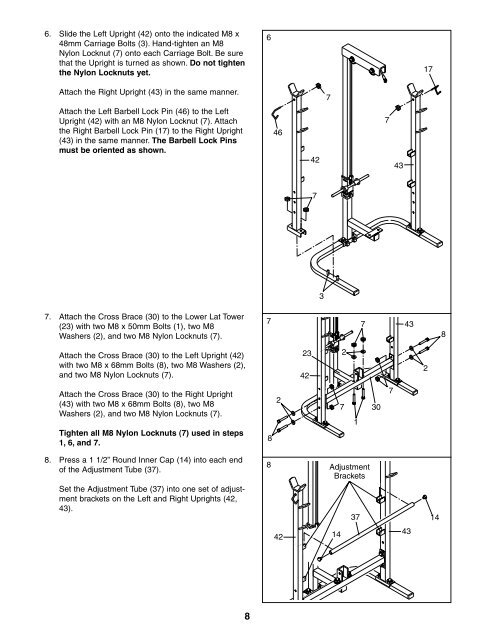
6. Slide the Left Upright (42) onto the indicated M8 x<br />
48mm Carriage Bolts (3). Hand-tighten an M8<br />
Nylon Locknut (7) onto each Carriage Bolt. Be sure<br />
that the Upright is turned as shown. Do not tighten<br />
the Nylon Locknuts yet.<br />
Attach the Right Upright (43) in the same manner.<br />
Attach the Left Barbell Lock Pin (46) to the Left<br />
Upright (42) with an M8 Nylon Locknut (7). Attach<br />
the Right Barbell Lock Pin (17) to the Right Upright<br />
(43) in the same manner. The Barbell Lock Pins<br />
must be oriented as shown.<br />
7. Attach the Cross Brace (30) to the Lower Lat Tower<br />
(23) with two M8 x 50mm Bolts (1), two M8<br />
Washers (2), and two M8 Nylon Locknuts (7).<br />
Attach the Cross Brace (30) to the Left Upright (42)<br />
with two M8 x 68mm Bolts (8), two M8 Washers (2),<br />
and two M8 Nylon Locknuts (7).<br />
Attach the Cross Brace (30) to the Right Upright<br />
(43) with two M8 x 68mm Bolts (8), two M8<br />
Washers (2), and two M8 Nylon Locknuts (7).<br />
Tighten all M8 Nylon Locknuts (7) used in steps<br />
1, 6, and 7.<br />
8. Press a 1 1/2” Round Inner Cap (14) into each end<br />
of the Adjustment Tube (37).<br />
Set the Adjustment Tube (37) into one set of adjustment<br />
brackets on the Left and Right Uprights (42,<br />
43).<br />
8<br />
6<br />
7<br />
8<br />
8<br />
46<br />
2<br />
42<br />
23<br />
42<br />
42<br />
7<br />
3<br />
7<br />
2<br />
7<br />
1<br />
7<br />
Adjustment<br />
Brackets<br />
14<br />
37<br />
30<br />
7<br />
7<br />
43<br />
43<br />
43<br />
17<br />
2<br />
14<br />
8


