


You also want an ePaper? Increase the reach of your titles
YUMPU automatically turns print PDFs into web optimized ePapers that Google loves.
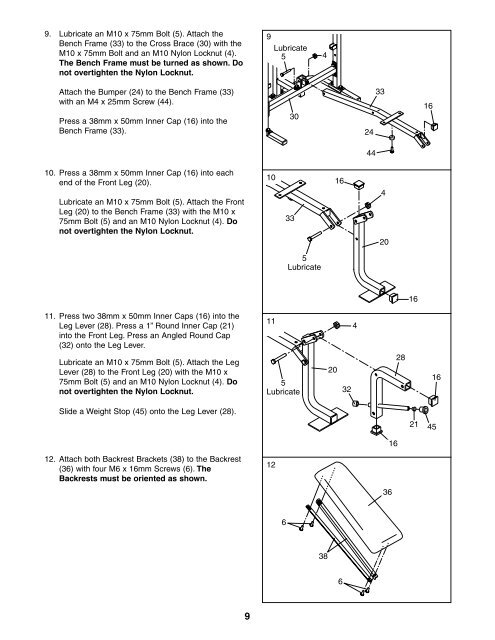
9. Lubricate an M10 x 75mm Bolt (5). Attach the<br />
Bench Frame (33) to the Cross Brace (30) with the<br />
M10 x 75mm Bolt and an M10 Nylon Locknut (4).<br />
The Bench Frame must be turned as shown. Do<br />
not overtighten the Nylon Locknut.<br />
Attach the Bumper (24) to the Bench Frame (33)<br />
with an M4 x 25mm Screw (44).<br />
Press a 38mm x 50mm Inner Cap (16) into the<br />
Bench Frame (33).<br />
10. Press a 38mm x 50mm Inner Cap (16) into each<br />
end of the Front Leg (20).<br />
Lubricate an M10 x 75mm Bolt (5). Attach the Front<br />
Leg (20) to the Bench Frame (33) with the M10 x<br />
75mm Bolt (5) and an M10 Nylon Locknut (4). Do<br />
not overtighten the Nylon Locknut.<br />
11. Press two 38mm x 50mm Inner Caps (16) into the<br />
Leg Lever (28). Press a 1” Round Inner Cap (21)<br />
into the Front Leg. Press an Angled Round Cap<br />
(32) onto the Leg Lever.<br />
Lubricate an M10 x 75mm Bolt (5). Attach the Leg<br />
Lever (28) to the Front Leg (20) with the M10 x<br />
75mm Bolt (5) and an M10 Nylon Locknut (4). Do<br />
not overtighten the Nylon Locknut.<br />
Slide a Weight Stop (45) onto the Leg Lever (28).<br />
12. Attach both Backrest Brackets (38) to the Backrest<br />
(36) with four M6 x 16mm Screws (6). The<br />
Backrests must be oriented as shown.<br />
9<br />
9<br />
10<br />
11<br />
12<br />
Lubricate<br />
5<br />
30<br />
33<br />
5<br />
Lubricate<br />
6<br />
5<br />
Lubricate<br />
4<br />
38<br />
20<br />
16<br />
6<br />
32<br />
4<br />
24<br />
44<br />
33<br />
4<br />
20<br />
16<br />
36<br />
28<br />
16<br />
16<br />
16<br />
21 45


