Registration and Profile Guide (pdf) - EarthExplorer - USGS
Registration and Profile Guide (pdf) - EarthExplorer - USGS
Registration and Profile Guide (pdf) - EarthExplorer - USGS

Create successful ePaper yourself
Turn your PDF publications into a flip-book with our unique Google optimized e-Paper software.
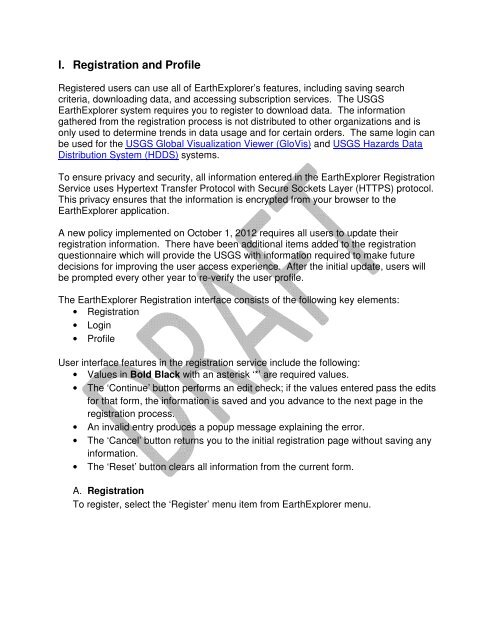
I. <strong>Registration</strong> <strong>and</strong> <strong>Profile</strong><br />
Registered users can use all of <strong>EarthExplorer</strong>’s features, including saving search<br />
criteria, downloading data, <strong>and</strong> accessing subscription services. The <strong>USGS</strong><br />
<strong>EarthExplorer</strong> system requires you to register to download data. The information<br />
gathered from the registration process is not distributed to other organizations <strong>and</strong> is<br />
only used to determine trends in data usage <strong>and</strong> for certain orders. The same login can<br />
be used for the <strong>USGS</strong> Global Visualization Viewer (GloVis) <strong>and</strong> <strong>USGS</strong> Hazards Data<br />
Distribution System (HDDS) systems.<br />
To ensure privacy <strong>and</strong> security, all information entered in the <strong>EarthExplorer</strong> <strong>Registration</strong><br />
Service uses Hypertext Transfer Protocol with Secure Sockets Layer (HTTPS) protocol.<br />
This privacy ensures that the information is encrypted from your browser to the<br />
<strong>EarthExplorer</strong> application.<br />
A new policy implemented on October 1, 2012 requires all users to update their<br />
registration information. There have been additional items added to the registration<br />
questionnaire which will provide the <strong>USGS</strong> with information required to make future<br />
decisions for improving the user access experience. After the initial update, users will<br />
be prompted every other year to re-verify the user profile.<br />
The <strong>EarthExplorer</strong> <strong>Registration</strong> interface consists of the following key elements:<br />
• <strong>Registration</strong><br />
• Login<br />
• <strong>Profile</strong><br />
User interface features in the registration service include the following:<br />
• Values in Bold Black with an asterisk ‘*’ are required values.<br />
• The ‘Continue’ button performs an edit check; if the values entered pass the edits<br />
for that form, the information is saved <strong>and</strong> you advance to the next page in the<br />
registration process.<br />
• An invalid entry produces a popup message explaining the error.<br />
• The ‘Cancel’ button returns you to the initial registration page without saving any<br />
information.<br />
• The ‘Reset’ button clears all information from the current form.<br />
A. <strong>Registration</strong><br />
To register, select the ‘Register’ menu item from <strong>EarthExplorer</strong> menu.
Figure 1 – <strong>Registration</strong><br />
Select ‘Register’<br />
1. <strong>Registration</strong> Login Page<br />
The <strong>Registration</strong> process (Figure 1) requires you to create a username <strong>and</strong><br />
password, select a secret question, <strong>and</strong> type a secret answer. Once registered<br />
with <strong>EarthExplorer</strong>, only the ‘Login’ process is required.
Figure 2 – <strong>Registration</strong> Login<br />
The <strong>Registration</strong> Login page (Figure 2) requires you to type the following values:<br />
• Username (Required) – Type your preferred username.<br />
• Password (Required) – Type a password. The password must be<br />
between 8 <strong>and</strong> 16 characters long <strong>and</strong> contain at least one alphabetic<br />
character <strong>and</strong> one numeric character.<br />
• Confirm Password (Required) – Type the password entered in the<br />
previous password field.<br />
• Cancel – Returns you to the initial registration page without saving any<br />
information<br />
• Continue – Performs a check; if the values entered are valid, the<br />
information is saved <strong>and</strong> you advance to the User Affiliation/Data Usage<br />
form.<br />
1. User Affiliation/Data Usage Information Page<br />
The User Affiliation/Data Usage Information page (Figure 3) allows you to enter<br />
your affiliation <strong>and</strong> identify uses of the data. This information is used to gather<br />
statistics on how the data is used <strong>and</strong> what organizations are using this data.
Figure 3 – User Affiliation/Data Usage Form
The User Affiliation/Data Usage (Figure 3) form identified the affiliation you are<br />
associated with <strong>and</strong> the primary <strong>and</strong> secondary uses of the data. The <strong>USGS</strong><br />
uses this information to determine data usage trends, which provide target<br />
specific user groups.<br />
The User Affiliate/Data Usage page requires you to type the following values:<br />
• *Sector: Indicates the organization affiliation (Required)<br />
U.S. Federal Government<br />
U.S. State/Provincial/Department Government<br />
U.S. Local Government<br />
Tribe/Nation/Indigenous Group<br />
Non-U.S. Federal/National Government<br />
Academic Institution<br />
Non-profit Organization<br />
Private Business<br />
General Public<br />
Other<br />
• Additional Department/Agency: Based on the value selected above,<br />
additional information may be required, such as:<br />
*Department (Required)<br />
*Agency (Required)<br />
• User of remotely sensed data: *Which of the following characterizes you<br />
as a user of remotely sensed data from <strong>USGS</strong>? Select the characteristic<br />
that identifies your role as a user of remote sensed data. (Required)<br />
• Data provider<br />
• Product developer<br />
• Technical user<br />
• End user<br />
• Manager<br />
• Other (please specify)<br />
• *Data Use: Does your work use remotely sensed data from the <strong>USGS</strong><br />
(Y/N) (Required). If yes, select the operational percentage that identifies<br />
the percentage used for operational support.<br />
• *Primary application: Select the primary application for which you have<br />
used remotely sensed data from the <strong>USGS</strong> in the past year? Select one<br />
(1) item from the drop down item box. (Required)
• Secondary use of data: In addition to the primary application, in what other<br />
areas have you used remotely sensed data from <strong>USGS</strong> in the past year?<br />
(Please check all that apply.) (Required)<br />
• Other Application – If none of the secondary values match, enter the other<br />
application use of the data.<br />
• Distribution characteristics: Over the next year, approximately how much<br />
of the remotely sensed data you acquire from <strong>USGS</strong> will you distribute to<br />
others to use as opposed to using it yourself? (Please select only one<br />
answer.) (Required)<br />
• Importance of free <strong>and</strong> open access to data: Over the next year, how<br />
important will free <strong>and</strong> open access to remotely sensed data from <strong>USGS</strong><br />
be to conducting your work? (Please select only one answer.) (Required)<br />
Cancel – Returns you to the initial login page without saving any information.<br />
Continue – Performs validation of the information entered; if the values entered<br />
are valid, the information is saved <strong>and</strong> you advance to the User Affiliation/Data<br />
Usage form.<br />
2. Address page<br />
Type the address information in the Address page (Figure 4). The address<br />
information is used only for contact information; however, some data products<br />
require shipping information to deliver products. Address information is not<br />
shared with any commercial or other government agencies. Please refer to the<br />
<strong>USGS</strong>/DOI Privacy Policy concerning how this information is used.
Figure 4 – Address<br />
The Address page requires you to type the following values:<br />
• *First Name (Required) – First name of the user.<br />
• *Last Name (Required) – Last name of the user.<br />
• Company/Organization – Affiliated company or organization.<br />
• *Address 1 (Required) – Address line 1.<br />
• Address 2 – Address line 2.<br />
• *Country (Required) – Country you are from.<br />
• *City (Required) – City where you reside.<br />
• *State/Province (Required) – State/province where you reside.<br />
• *Zip/Postal Code (Required) – Zip code or postal cod.<br />
• *E-mail (Required) – Email address.<br />
• Alternative E-mail – Additional email address.<br />
• *Telephone (Required) – Primary telephone number.<br />
• Fax – Fax number.
3. Confirmation<br />
The Confirmation page (Figure 5) displays after successful registration. Click<br />
‘Return to the page where I registered’ to return to the page you started the<br />
registration process.<br />
Figure 5 – Confirmation Page<br />
After registering for the first time, you are automatically logged in to<br />
<strong>EarthExplorer</strong>.<br />
B. Login<br />
The Login page allows you to log in to <strong>EarthExplorer</strong>. A registered user can use all<br />
of <strong>EarthExplorer</strong>'s features, including saving search criteria, downloading data, <strong>and</strong><br />
accessing subscription services.<br />
4. Login Process<br />
a. To log in, select the ‘Login’ menu item from the <strong>EarthExplorer</strong> menu<br />
(Figure 6). (Note: After registering the first time, you are automatically<br />
logged in.)
Figure 6 – Login<br />
b. Type the username <strong>and</strong> password <strong>and</strong> then click the ‘Sign In’ button<br />
(Figure 7).<br />
Figure 7 – Login/Password<br />
c. Click the link to receive directions for updating the<br />
password.<br />
d. Once logged in, additional items appear in the main menu bar:<br />
Figure 8 - Menu Bar Items<br />
Select ‘Login’<br />
5. Logout Process<br />
To log out of <strong>EarthExplorer</strong>, click ‘Logout’ in the <strong>EarthExplorer</strong> menu.
C. <strong>Profile</strong><br />
The <strong>Profile</strong> menu allows you to modify your profile information.<br />
6. <strong>Profile</strong> Home<br />
The ‘<strong>Profile</strong> Home’ option allows you to modify your profile information (Figure 9).<br />
You cannot modify your (Username).<br />
a. Change Password – View <strong>and</strong> change a password<br />
b. Contact Address – View <strong>and</strong> modify contact address<br />
c. User Affiliation – View <strong>and</strong> modify your affiliation<br />
Figure 9 – Edit User <strong>Profile</strong><br />
Click the ’Edit’ button to modify the desired information.<br />
7. Interface Options<br />
The ‘Interface Options’ page allows you to modify information associated with the<br />
overall system interface. The following options modify the overall <strong>EarthExplorer</strong><br />
interface:<br />
d. Interface options (Figure 10) – Modifies tool tips, the number of metadata<br />
results per page, allow st<strong>and</strong>ing requests <strong>and</strong> other specific system<br />
options. For some options, only the Application Administrator can modify.
Figure 10 – Interface Options<br />
e. Data Sets page (Figure 11) – Modifies the list of datasets shown in the<br />
Data Sets Component.<br />
Figure 11 – Data Set List<br />
f. Sort Order page (Figure 12) – Modifies the sort order for each dataset.<br />
Figure 12 – Sort Order<br />
g. Metadata View page (Figure 13) – Modifies the detailed metadata view for<br />
each dataset.
Figure 13 – Metadata View<br />
8. Saved Criteria<br />
The ‘Saved Criteria’ option (Figure 14) – Modifies the saved criteria options from<br />
previous searches.<br />
Figure 14 – Saved Criteria<br />
In Figure 14, the search criterion was saved with the name ‘Search_Site_1’. Any<br />
information can be entered when saving the search criteria.<br />
• Selecting the favorite box icon saves the search criteria to your<br />
favorites list<br />
• The load criteria icon loads the search criteria automatically to<br />
<strong>EarthExplorer</strong><br />
• The delete icon removes the search criteria from the saved criteria<br />
9. St<strong>and</strong>ing Request<br />
Click the ‘St<strong>and</strong>ing Request’ (Figure 15) to view a list of entered st<strong>and</strong>ing<br />
requests.
Figure 15 – St<strong>and</strong>ing Request<br />
The St<strong>and</strong>ing Request function notifies you via email when a new acquisition<br />
matches the search criteria for the requested dataset. You can then review<br />
metadata <strong>and</strong> browse for the returned scenes. See Section IV, D, 3, St<strong>and</strong>ing<br />
Request for more details on the St<strong>and</strong>ing Request function.<br />
10. Order Tracking<br />
Click the ‘Order Tracking’ (Figure 16) option to display the list of orders you have<br />
placed.<br />
Figure 16 – Order Tracking<br />
Click the order number to show the order details, the products ordered, <strong>and</strong> the<br />
current status of each item ordered.