

DOG KENNEL 6' X 6' X 4' - Harbor Freight Tools
DOG KENNEL 6' X 6' X 4' - Harbor Freight Tools
DOG KENNEL 6' X 6' X 4' - Harbor Freight Tools

You also want an ePaper? Increase the reach of your titles
YUMPU automatically turns print PDFs into web optimized ePapers that Google loves.
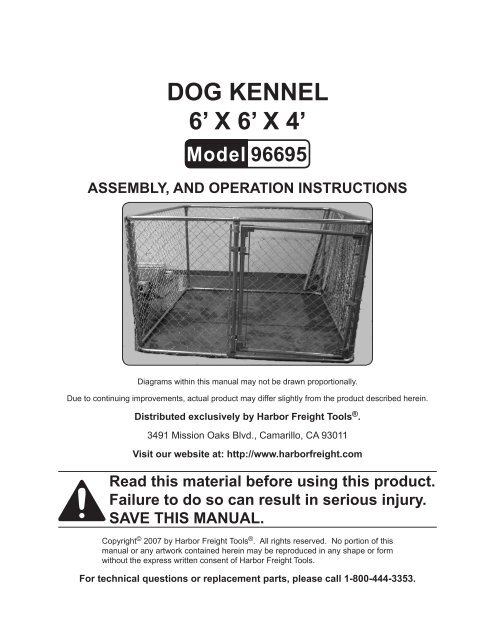
<strong>DOG</strong> <strong>KENNEL</strong><br />
6’ X 6’ X 4’<br />
Model 96695<br />
AssEMbLy, AND OpErAtiON iNstructiONs<br />
Diagrams within this manual may not be drawn proportionally.<br />
Due to continuing improvements, actual product may differ slightly from the product described herein.<br />
Distributed exclusively by <strong>Harbor</strong> <strong>Freight</strong> tools ® .<br />
3491 Mission Oaks Blvd., Camarillo, CA 93011<br />
Visit our website at: http://www.harborfreight.com<br />
read this material before using this product.<br />
Failure to do so can result in serious injury.<br />
sAVE tHis MANuAL.<br />
Copyright © 2007 by <strong>Harbor</strong> <strong>Freight</strong> <strong>Tools</strong> ® . All rights reserved. No portion of this<br />
manual or any artwork contained herein may be reproduced in any shape or form<br />
without the express written consent of <strong>Harbor</strong> <strong>Freight</strong> <strong>Tools</strong>.<br />
For technical questions or replacement parts, please call 1-800-444-3353.
sAVE tHis MANuAL<br />
Keep this manual for the safety warnings and precautions, assembly, operating,<br />
inspection, maintenance and cleaning procedures. Write the product’s serial number<br />
in the back of the manual near the assembly diagram (or month and year of purchase if<br />
product has no number). Keep this manual and the receipt in a safe and dry place for<br />
future reference.<br />
1.<br />
2.<br />
iMpOrtANt sAFEGuArDs<br />
in this manual, on the labeling, and all other information<br />
provided with this product:<br />
this is the safety alert symbol. it is used to alert you to potential<br />
personal injury hazards. Obey all safety messages that follow this<br />
symbol to avoid possible injury or death.<br />
DANGEr<br />
WArNiNG<br />
cAutiON<br />
Notice<br />
cAutiON<br />
DANGEr indicates a hazardous situation<br />
which, if not avoided, will result in death or<br />
serious injury.<br />
WArNiNG indicates a hazardous situation<br />
which, if not avoided, could result in death<br />
or serious injury.<br />
cAutiON, used with the safety alert<br />
symbol, indicates a hazardous situation<br />
which, if not avoided, could result in minor<br />
or moderate injury.<br />
NOticE is used to address practices not<br />
related to personal injury.<br />
cAutiON, without the safety alert symbol,<br />
is used to address practices not related to<br />
personal injury.<br />
rEAD AND uNDErstAND ALL iNstructiONs<br />
When using electrical appliances, safety precautions should always<br />
be followed including the following:<br />
Work Area safety<br />
Keep work area clean, well-lit, and free of obstructions and other debris.<br />
Make sure there is adequate surrounding workspace during assembly.<br />
SKU 96695 For technical questions, please call 1-800-444-3353.<br />
Page 2
1.<br />
2.<br />
3.<br />
4.<br />
5.<br />
6.<br />
7.<br />
8.<br />
9.<br />
10.<br />
11.<br />
12.<br />
General safety<br />
Wear ANSI-approved safety goggles and heavy-duty work gloves during assembly.<br />
Avoid sharp edges during assembly.<br />
Inspect before use; do not assemble or use if parts damaged.<br />
Use for tame animals only.<br />
Follow all local regulations regarding the setup and use of this Dog Kennel.<br />
Keep children away during assembly and use. The Dog Kennel is not a toy; do<br />
not allow children to play in or climb on the Dog Kennel.<br />
More than one person needed for assembly. Because of the weight and size of<br />
the Dog Kennel, two adults are required for assembly.<br />
Do not use as permanent dog shelter. The Dog Kennel is intended for the temporary<br />
sheltering of dogs; it will not protect dogs from adverse weather conditions<br />
such as extreme cold and heat, wind or rain.<br />
Do not shelter too many dogs in one Dog Kennel. While the Dog Kennel can<br />
shelter more than one dog at a time (depending on size), do not overcrowd dogs<br />
since this may lead to fighting and possible animal injury.<br />
Use the right product for the job. There are certain applications for which the<br />
Dog Kennel was designed. Do not modify the Dog Kennel and do not use it for a<br />
purpose for which it was not intended.<br />
When servicing, use only identical replacement parts. Use of any other parts will<br />
void the warranty.<br />
Do not assemble or use this product if under the influence of alcohol or drugs.<br />
Read warning labels on prescriptions to determine if your judgment or reflexes<br />
are impaired while taking drugs. If there is any doubt, do not assemble or use<br />
this Dog Kennel.<br />
The warnings, precautions, and instructions discussed in this instruction manual<br />
cannot cover all possible conditions and situations that may occur. It must be<br />
understood by the operator that common sense and caution are factors which<br />
cannot be built into this product, but must be supplied by the operator.<br />
sAVE tHEsE iNstructiONs.<br />
SKU 96695 For technical questions, please call 1-800-444-3353.<br />
Page 3
Material<br />
spEciFicAtiONs<br />
Overall Dimensions 74” L x 74” W x 48-3/8” H<br />
Interior Dimensions 70” L x 70-1/2” W x 48” H<br />
Weight 76.6 lb.<br />
Galvanized steel posts, rails and hardware. Zinc<br />
plated chain link fabric and aluminum gate corners.<br />
uNpAcKiNG<br />
When unpacking, check to make sure that the item is intact and undamaged. If<br />
any parts are missing or broken, please call <strong>Harbor</strong> <strong>Freight</strong> <strong>Tools</strong> at the number shown<br />
on the cover of this manual as soon as possible.<br />
AssEMbLy<br />
read the ENtirE iMpOrtANt sAFEGuArDs section at the beginning of<br />
this manual including all text under subheadings therein before set up or<br />
use of this product.<br />
Note: For additional information regarding the parts listed in the following pages, refer<br />
to the Assembly Diagram near the end of this manual.<br />
1.<br />
2.<br />
3.<br />
FrAME AssEMbLy<br />
Decide on a large enough area to assemble the Dog Kennel. It should be on a<br />
flat, level surface able to support the weight of the Kennel and the dog(s) sheltered<br />
inside it.<br />
Lay out four Corner Frame Rails (2) and connect the tapered ends to the corner<br />
ends, making a square base. See Figure A, below.<br />
Corner Frame Rail<br />
(2) with corner end<br />
Figure A<br />
Corner Frame Rail<br />
(2) with tapered end<br />
Do the same with the remaining four Corner Frame Rails (2) to create the top<br />
frame. please note: The tapered connections on the base frame should align<br />
with those on the top frame.<br />
SKU 96695 For technical questions, please call 1-800-444-3353.<br />
Page 4
4.<br />
5.<br />
6.<br />
7.<br />
8.<br />
9.<br />
10.<br />
Using the Large Carriage Bolts (6), loosely attach the Brace Clamps (5) over the<br />
corners of the base and top frame. please note: Be sure to keep the bolt heads<br />
on the outside of the Clamps (5).<br />
Place a Corner Support Post (3) into each of the Brace Clamps (5) along the bottom<br />
frame. Finger-tighten the Carriage Bolts (6). Have an assistant keep Posts<br />
supported until secured.<br />
please note: You will have one remaining Support Post (3) to use for the Gate.<br />
With assistance, lift the top frame up and attach the corners to each of the<br />
Support Posts (3). Sliding the Brace Clamps (5) along the corners will aide in<br />
straightening the Kennel frame. Tighten in place by using four Large Carriage<br />
Bolts (6). See Figure b, below.<br />
Brace Clamp (5)<br />
Large Carriage<br />
Bolts (6)<br />
Figure b<br />
Tighten all Carriage Bolts (6) with a wrench (not included).<br />
Select a corner Support Post (3) and using a tape measure (not included), measure<br />
35-1/2” from the Support Post. Mark the sport where the measurement<br />
ends. Attach a Brace Clamp (5) to the marked spot on the bottom frame.<br />
Attach the last Support Post (3) to the bottom Brace Clamp (5). This Support<br />
Post will be the Gate Support Post. Secure a Brace Clamp (5) to the marked<br />
spot on the top frame and connect it to the top of the Gate Support Post.<br />
please note: Make sure the distance between Gate Support Post and corner<br />
Support Post is 35-1/2” before tightening Clamps with Large Carriage Bolts (6)<br />
Once all the Carriage Bolts have been tightened, untie the Large Chain-Link<br />
Fencing (1).<br />
caution! Avoid sharp ends and tangles while untying the roll.<br />
Top Frame<br />
Tension Bar (4)<br />
Clip (7)<br />
SKU 96695 For technical questions, please call 1-800-444-3353.<br />
Chain Link Fencing (1)<br />
Page 5
11.<br />
12.<br />
13.<br />
14.<br />
15.<br />
1.<br />
2.<br />
Insert a Tension Bar (4) through the diamond pattern at the end of the Large<br />
Chain Link Fencing (1). See Figure b, above. please note: It is best if an assistant<br />
holds the Fencing (1) in place while inserting the Tension Bar (4).<br />
Hook a Clip (7) around the middle of the Tension Bar (4) and connect it to the<br />
middle of the Gate Support Post. Use two more Clips (7) to hook the top and<br />
bottom of the Tension Bar (4) to the top and bottom of the Gate Support Post.<br />
Slowly unroll the rest of the Large Chain-Link Fencing (1) around the outside of<br />
the Kennel frame until the fabric reaches the final Support Post.<br />
please note: Do NOT extend the Chain-Link Fencing over the gate area for the<br />
Gate. That space will be filled in with the Small Chain-Link Gate Fencing (8).<br />
For the corners, have an assistant use a screwdriver (not included) to pry or<br />
leverage the Chain-Link Fencing around each corner until all the slack is eliminated.<br />
please note: All slack must be removed because the excess Large Chain-Link<br />
Fencing will need to be cut off. Once the proper amount of Chain-Link Fencing<br />
is determined, use a pair of pliers (not included) to cut the top and bottom loops<br />
of the Chain-Link Fencing. Once these loops are cut, the remaining amount of<br />
fabric can be removed by twisting the wire out in a counterclockwise motion.<br />
Slide the remaining Tension Bar (4) through the end of the Large Chain-Link<br />
Fencing (1). Attach three Clips (7) to the top, middle and bottom of the Tension<br />
Bar (4) and then to the top, middle and bottom of the last Support Post (3).<br />
GAtE AssEMbLy<br />
Insert the Horizontal Gate Posts (9) and Vertical Gate Posts (10) into the Gate<br />
Corners (11). Once all tubing is inserted, tighten by using the Small Carriage<br />
Bolts (17). please note: Make sure all bolt heads are on the outside of the Gate<br />
and do NOT overtighten bolts.<br />
Attach the Small Chain-Link Fencing (8) to the Gate Frame by using the Gate<br />
Rods (12) and the remaining Clips (7) and following the steps for the Large<br />
Chain-Link Fencing. Remember to position the Clips at the top, middle and bottom.<br />
And as with the Large Chain-Link Fencing, be sure to pull tight and remove<br />
any slack.<br />
please note: You may also need to cut off the extra Small Chain-Link Fencing<br />
from the roll. Again, follow the same instructions regarding the Large Chain-Link<br />
Fencing.<br />
SKU 96695 For technical questions, please call 1-800-444-3353.<br />
Page 6
3.<br />
4.<br />
5.<br />
6.<br />
7.<br />
The Kennel Hinges (13) are made of two S-shaped halves. Have an assistant<br />
hold the Gate upright while placing one of the Kennel Hinge (13) halves over the<br />
Gate Hinge Post and around the Gate Frame. please note: Be sure to position<br />
the Kennel Hinge half so the slot in the Hinge faces DOWN. See Figure c,<br />
below.<br />
Gate Hinge<br />
Post<br />
Interlocking<br />
Kennel Hinge<br />
(13) halves<br />
Medium<br />
Carriage<br />
Bolt (16)<br />
Figure c<br />
Slide the Hinge to the top so that there is a 5” space between the Hinge half and<br />
Kennel Frame. please note: As a helpful reference, the top Gate Corner (11)<br />
should be right above the Hinge.<br />
Slide the other half of the Kennel Hinge (13) (with the slot facing UP) into place<br />
so that it locks into the other half. Use a Medium Carriage Bolt (16) to fasten the<br />
Hinge onto the Gate Post. See Figure c, above.<br />
Repeat the above steps with the bottom Kennel Hinge. Again, make sure the<br />
Hinge is 5” above the bottom Kennel Frame and resting on the bottom Gate Corner<br />
(11). Use the other Medium Carriage Bolt (16) to fasten the Hinge in place.<br />
To install the Flip Latch (15), place the Latch halfway up the right Gate Support<br />
Post (3), with the slot end facing UP. See Figure D, on next page. Make sure<br />
the location does not allow any of the Clips (7) to interfere with the Latch’s<br />
operation.<br />
SKU 96695 For technical questions, please call 1-800-444-3353.<br />
Gate<br />
Frame<br />
Clip (7)<br />
Page 7
8.<br />
9.<br />
1.<br />
2.<br />
3.<br />
4.<br />
5.<br />
6.<br />
Fasten the Latch to the Gate Post by tightening the bolts onto the Latch’s U-bolt.<br />
Flip Latch (15)<br />
with slot end<br />
pointed up<br />
Flip Latch<br />
U-bolt<br />
Clip (7)<br />
Make sure that the Flip Latch (15) firmly locks into place and that the Latch slides<br />
up and down easily.<br />
LAciNG WirE sEtup<br />
Gate Post<br />
Attaching the Lacing Wire (14) will fasten the sides of the Fencing to the top and<br />
bottom Kennel Frames, making the Kennel more secure.<br />
please note: Before attaching the Lacing Wire to the bottom Kennel Frame,<br />
place the Kennel onto a box or cement blocks. This will allow easier access<br />
along the bottom frame and easier Lacing Wire application.<br />
Using pliers (not included) wrap the lacing wire from a Lacing Wire Spools (14)<br />
through the first “diamond-shaped” gap at the top of the Fencing. please note: It<br />
may be best to start from the opposite side of the Gate Support Post.<br />
Lace the diamond-shaped gap tight to the top rail. Make sure to pull hard so that<br />
the Fencing is secured tight against the top frame.<br />
Continue lacing the Fencing along the top frame. please note: It may be necessary<br />
to skip one or two diamond-shaped gaps near the corner Support Posts (3).<br />
(The Lacing Spool (14) may be too large to slide between the Fencing and the<br />
Support Posts.)<br />
After cutting the Lacing Wire (14) (or if the spool run out of wire), tie-twist the end<br />
of the Lacing Wire. Then begin lacing the new Wire Spool through the next diamond-shaped<br />
gap.<br />
Continue to lace the top frame until reaching the Gate Latch Post. Cut the Lacing<br />
Wire (14) and twist-tie it at the last diamond-shaped gap.<br />
Repeat the same lacing procedure with the bottom frame. Remember to place<br />
the Kennel on a large box or on cement blocks to allow for easier lacing of the<br />
bottom frame.<br />
SKU 96695 For technical questions, please call 1-800-444-3353.<br />
Flip Latch (15)<br />
Figure D<br />
Page 8
7.<br />
8.<br />
1.<br />
2.<br />
3.<br />
4.<br />
5.<br />
1.<br />
2.<br />
Secure the Small Chain-Link Fencing (8) to the Gate Frame by following the<br />
above steps and using the remaining Lacing Wire (14).<br />
For added security, take some of the remaining Lacing Wire (14) and cut 6 ties,<br />
each about 8” long. Link these small laces through each corner Support Post (3)<br />
and through the closest diamond-shaped gaps. Use one for each top and bottom<br />
corner, making sure to evenly space them. This will help ensure that the fencing<br />
remains tightly linked to the corner Support Posts (3).<br />
WArNiNG<br />
OpErAtiON<br />
read the ENtirE iMpOrtANt sAFEGuArDs section at the beginning of<br />
this manual including all text under subheadings therein before set up or<br />
use of this product.<br />
Make sure to place the Dog Kennel in a open area away from busy streets and/or<br />
homes. While the gate does latch shut, there is no permanent lock. Be sure to<br />
keep the Kennel within view of a responsible adult. (Though unlikely, a dog MAY<br />
knock the latch up, causing the gate to open. Also, children could climb into the<br />
Kennel.)<br />
Before bringing the animal(s) into the Kennel, make sure there are no exposed<br />
sharp edges or parts that may be sticking into the Kennel. Cut off and/or remove<br />
these sharp edges to prevent the animal injuries.<br />
Depending on the amount of time the dog(s) will be sheltered in the Kennel, be<br />
sure to leave an appropriate amount of food and water for the animals. Chew<br />
toys and/or a doggy bed can also be placed in the Kennel.<br />
Depending on the size or amount of the dogs you intend to shelter, you may want<br />
to secure the Kennel in place by using ground stakes (not included). Dogs can<br />
get excited and lean against the fencing walls, which can cause the Kennel to<br />
move if it is not anchored to the ground.<br />
In case of poor weather (rain, cold, or extreme heat) place a cover over the shelter.<br />
please note: The Kennel is for temporary outdoor use only.<br />
iNspEctiON AND MAiNtENANcE<br />
Do not use damaged equipment. Do not use if parts loose or<br />
damaged. Have any problem corrected before further use.<br />
bEFOrE EAcH usE, inspect the general condition of the Kennel. Check for<br />
loose screws, misalignment or binding of moving parts, cracked or broken parts,<br />
damaged electrical wiring, and any other condition that may affect its safe operation.<br />
Regularly check to make sure the Kennel’s Flip Latch (15) is working properly<br />
and that the Gate remains shut when the Flip Latch is used.<br />
SKU 96695 For technical questions, please call 1-800-444-3353.<br />
Page 9
pLEAsE rEAD tHE FOLLOWiNG cArEFuLLy<br />
THe MANUFACTUReR AND/OR DISTRIBUTOR HAS PROVIDeD THe PARTS LIST AND ASSeMBLY<br />
DIAGRAM IN THIS MANUAL AS A ReFeReNCe TOOL ONLY. NeITHeR THe MANUFACTUReR OR<br />
DISTRIBUTOR MAKeS ANY RePReSeNTATION OR WARRANTY OF ANY KIND TO THe BUYeR THAT<br />
He OR SHe IS qUALIFIeD TO MAKe ANY RePAIRS TO THe PRODUCT, OR THAT He OR SHe IS<br />
qUALIFIeD TO RePLACe ANY PARTS OF THe PRODUCT. IN FACT, THe MANUFACTUReR AND/OR<br />
DISTRIBUTOR exPReSSLY STATeS THAT ALL RePAIRS AND PARTS RePLACeMeNTS SHOULD<br />
Be UNDeRTAKeN BY CeRTIFIeD AND LICeNSeD TeCHNICIANS, AND NOT BY THe BUYeR. THe<br />
BUYeR ASSUMeS ALL RISK AND LIABILITY ARISING OUT OF HIS OR HeR RePAIRS TO THe<br />
ORIGINAL PRODUCT OR RePLACeMeNT PARTS THeReTO, OR ARISING OUT OF HIS OR HeR<br />
INSTALLATION OF RePLACeMeNT PARTS THeReTO.<br />
part Description Q’ty<br />
1 Large Chain-Link Fencing 1<br />
2 Corner Rails 8<br />
3 Support Posts 5<br />
4 Tension Bars 2<br />
5 Brace Clamps (Sets) 10<br />
6 Large Carriage Bolts<br />
8 x 25 mm<br />
pArts List<br />
SKU 96695 For technical questions, please call 1-800-444-3353.<br />
10<br />
7 Clips 12<br />
8 Small Chain-Link Fencing 1<br />
9 Horizontal Gate Posts 2<br />
record product’s serial Number Here:<br />
part Description Q’ty<br />
10 Vertical Gate Posts 2<br />
11 Gate Corners 4<br />
12 Gate Rods 2<br />
13 Kennel Hinges 2<br />
14 Lacing Wire Spools 2<br />
15 Flip Latch 1<br />
16 Medium Carriage Bolts<br />
10 x 45 mm<br />
17 Small Carriage Bolts<br />
6 x 20 mm<br />
Note: If product has no serial number, record month and year of purchase instead.<br />
Note: Some parts are listed and shown for illustration purposes only, and are not available<br />
individually as replacement parts.<br />
2<br />
12<br />
Page 10
17<br />
16<br />
6<br />
7<br />
AssEMbLy DiAGrAM<br />
2 1<br />
4 8 12 3 10 9<br />
SKU 96695 For technical questions, please call 1-800-444-3353.<br />
14<br />
13<br />
5<br />
15<br />
11<br />
Page 11


