E10 manual.indd - Husqvarna Viking
E10 manual.indd - Husqvarna Viking
E10 manual.indd - Husqvarna Viking

You also want an ePaper? Increase the reach of your titles
YUMPU automatically turns print PDFs into web optimized ePapers that Google loves.
<strong>E10</strong><br />
USER’S GUIDE
• Never operate the sewing machine with any air openings blocked.<br />
Keep ventilation openings of the sewing machine and foot controller<br />
free from the accumulation of lint, dust, and loose cloth.<br />
This houshold sewing machine is designed to comply with IEC/EN 60335-2-28 and<br />
UL1594<br />
• Keep ngers away from all moving parts. Special care is required<br />
around the sewing machine needle.<br />
• Always use the proper needle plate. The wrong plate can cause the<br />
needle to break.<br />
IMPORTANT SAFETY<br />
INSTRUCTIONS<br />
When using an electrical appliance, basic safety precautions should always<br />
be followed, including the following:<br />
Read all instructions before using this household sewing machine.<br />
• Do not use bent needles.<br />
• Do not pull or push fabric while stitching. It may de ect the needle<br />
causing it to break.<br />
• Switch the sewing machine off (“0”) when making any adjustment in<br />
the needle area, such as threading needle, changing needle, threading<br />
bobbin, or changing presser foot, etc.<br />
• Always unplug sewing machine from the electrical outlet when<br />
removing covers, lubricating, or when making any other user servicing<br />
adjustments mentioned in the instruction <strong>manual</strong>.<br />
• Never drop or insert any object into any opening.<br />
• Do not use outdoors.<br />
• Do not operate where aerosol (spray) products are being used or<br />
where oxygen is being administrated.<br />
• To disconnect, turn all controls to the off (“0”) position, then remove<br />
plug from outlet.<br />
• Do not unplug by pulling on cord. To unplug, grasp the plug, not the<br />
cord.<br />
DANGER - To reduce the risk of electric<br />
shock:<br />
• A sewing machine should never be left unattended when plugged in.<br />
Always unplug this sewing machine from the electric outlet immediately<br />
after using and before cleaning.<br />
• Always unplug before relamping. Replace bulb with same type rated<br />
10W (110V-120V), 15W (220-240V).<br />
WARNING - To reduce the risk of burns, re,<br />
electric shock, or injury to persons:<br />
• Do not allow to be used as a toy. Close attention is necessary when<br />
this sewing machine is used by or near children and in rm persons.<br />
• Use this sewing machine only for its intended use as described in this<br />
<strong>manual</strong>. Use only attachments recommended by the manufacturer as<br />
contained in this <strong>manual</strong>.<br />
SAVE THESE INSTRUCTIONS<br />
• Never operate this sewing machine if it has a damaged cord or<br />
plug, if it is not working properly, if it has been dropped or damaged,<br />
or dropped into water. Return the sewing machine to the nearest<br />
authorized dealer or service center for examination, repair, electrical or<br />
mechanical adjustment.
Congratulations!<br />
As the owner of a new sewing machine, you will enjoy precision quality stitching on all types of fabrics, from<br />
multiple layers of denim to delicate silks.<br />
Your sewing machine offers the ultimate in simplicity and ease of operation. For your safety and to fully enjoy the<br />
many advantages and ease of operation of your sewing machine, we recommend that you read all the important<br />
safeguards and use and care instructions in this instruction book.<br />
May we suggest that before you start to use your sewing machine, you discover the many features and<br />
advantages by going through this instruction book, step by step, while seated at your sewing machine.<br />
To ensure that you are always provided with the most modern sewing capabilities, the manufacturer reserves the<br />
right to change appearance, design or accessories of this sewing machine when considered necessary.
LIST OF CONTENTS<br />
PRINCIPAL PARTS OF THE MACHINE ....................................................................5<br />
ACCESSORIES.........................................................................................................7<br />
FITTING THE SNAP-IN ACCESSORY BOX .............................................................8<br />
CONNECTING THE MACHINE TO POWER SOURCE ............................................9<br />
Foot control................................................................................................................9<br />
Sewing light ...............................................................................................................9<br />
CHANGING THE BULB ...........................................................................................10<br />
TWO-STEP PRESSER FOOT LEVER/ADJUST PRESSER FOOT PRESSURE ...11<br />
ATTACHING THE PRESSER FOOT SHANK/ANKLE .............................................12<br />
WINDING THE BOBBIN ..........................................................................................13<br />
INSERTING THE BOBBIN ......................................................................................14<br />
INSERTING THE NEEDLE .....................................................................................15<br />
THREADING THE UPPER THREAD ......................................................................16<br />
THREAD TENSION .................................................................................................17<br />
BRINGING UP THE BOBBIN THREAD ..................................................................18<br />
REVERSE SEWING/REMOVING THE FABRIC/CUTTING THE THREAD ............19<br />
MATCHING NEEDLE / FABRIC / THREAD ............................................................20<br />
STRAIGHT STITCHING ..........................................................................................21<br />
ZIGZAG STITCHING ...............................................................................................22<br />
HOW TO SEW BUTTONHOLES .............................................................................23<br />
BLIND HEM .............................................................................................................25<br />
ZIPPERS AND PIPING............................................................................................26<br />
3-STEP ZIG-ZAG ....................................................................................................27<br />
STITCH SELECTION ..............................................................................................28<br />
MAINTENANCE ......................................................................................................29<br />
TROUBLE SHOOTING GUIDE ...............................................................................30<br />
4
PRINCIPAL PARTS OF THE MACHINE<br />
1. Thread tension dial<br />
2. Presser foot pressure<br />
3. Thread take-up lever<br />
4. Thread cutting<br />
5. Presser foot<br />
6. Needle plate<br />
7. Accessories box<br />
8. Bobbin stop<br />
9. Stitch length dial<br />
10. Stitch display<br />
11. Reverse sewing lever<br />
5
12. Spool pin<br />
13. Bobbin winder<br />
14. Hole for second spool pin<br />
15. Hand wheel<br />
16. Stitch selector dial<br />
17. Power switch<br />
18. Main plug socket<br />
19. Bobbin thread guide<br />
20. Upper thread guide<br />
21. Handle<br />
22. Presser foot lever<br />
6
ACCESSORIES<br />
1 2 3 4<br />
1. All purpose foot<br />
2. Zipper foot<br />
3. Satin stitch foot<br />
4. Blind hem foot<br />
5 6 7<br />
5 Buttonhole foot<br />
6. L-screwdriver<br />
7. Seam ripper/ brush<br />
8 9 10 11<br />
8. Oil bottle<br />
9. Second spool pin<br />
10. Spool holders (2x)<br />
11. Pack of needles<br />
12. Seam guide<br />
12 13 14<br />
15<br />
13. Bobbins (3x)<br />
14. Darning plate<br />
15. Felt pad<br />
7
FITTING THE SNAP-IN ACCESSORY BOX<br />
Keep the snap-in accessory box horizontal, and push it in the<br />
direction of the arrow. (1)<br />
To open, lift up at the point of the arrow. (2)<br />
8
CONNECTING THE MACHINE TO POWER SOURCE<br />
Connect the machine to a power source as illustrated. (1)<br />
A polarized plug must be used with the appropriate polarized outlet.<br />
(2)<br />
Attention:<br />
Unplug power cord when machine is not in use.<br />
Foot control<br />
Foot control regulates the sewing speed. (3)<br />
Attention:<br />
Consult a quali ed electrician if in doubt as to how to connect machine to<br />
power source.<br />
1<br />
Unplug power cord when machine is not in use.<br />
The appliance must be used with the foot controller:<br />
For USA and Canada, 110-120V: KD-1902<br />
For Australia and Europe, 220-240V: KD-2902<br />
Sewing light<br />
Press main switch (A) for power and light on. (“ l “)<br />
3<br />
For USA and Canada<br />
For appliance with a polarized plug (one blade is wider than the<br />
other).<br />
To reduce the risk of electric shock, this plug is intended to t in<br />
a polarized outlet only one way. If it does not t fully in the outlet,<br />
reverse the plug. If it still does not t, contact a quali ed electrician<br />
to install the proper outlet. Do not modify the plug in any way.<br />
9
CHANGING THE BULB<br />
Attention:<br />
Disconnect the machine from the power supply by removing the plug from<br />
the main socket!<br />
Replace bulb with same type rated 10 watts (110-120V) or 15 watts<br />
(220-240V).<br />
- Loosen screw (A) as illustrated. (1)<br />
- Remove the cover (B).<br />
- Unscrew the bulb and t new one (C). (2)<br />
- Replace the cover and tighten screw.<br />
Should there be any problem, ask your local dealer for advice.<br />
10
TWO-STEP PRESSER FOOT LEVER<br />
When sewing several layers or thick fabrics, the presser foot can be<br />
raised to extra high for easy positioning of the work. (A)<br />
ADJUST PRESSER FOOT PRESSURE<br />
Tighten presser<br />
adjusting screw<br />
The presser foot pressure of the machine has been pre-set and<br />
usually requires no readjustment for most fabrics (light-or-heavy<br />
weight).<br />
+<br />
Loosen<br />
-<br />
However, if you need to adjust the presser foot pressure, turn the<br />
presser adjusting screw with a coin.<br />
For sewing very thin fabric, loosen the pressure by turning the screw<br />
counter clockwise for less pressure on the fabric, and for heavy<br />
fabric, tighten by turning it clockwise for more pressure on the fabric.<br />
11
ATTACHING THE PRESSER FOOT SHANK/ ANKLE<br />
Attaching the presser foot holder<br />
Raise the presser foot bar (a). (1)<br />
Attach the presser foot shank/ankle (b) as illustrated.<br />
Attaching the presser foot<br />
Lower the presser foot shank/ankle (b) until the cut-out (c) is directly<br />
above the pin on the foot (d). (2)<br />
Raise the lever (e).<br />
Lower the presser foot shank/ankle (b) and the presser foot (f) will<br />
engage automatically.<br />
Removing the presser foot<br />
Raise the presser foot. (3)<br />
Raise the lever (e) and the foot disengages.<br />
Attaching the seam guide<br />
Attach the seam guide (g) in the slot on the shank/ankle as<br />
illustrated.<br />
Adjust according to need for hems, pleats, quilting, etc. (4)<br />
Attention:<br />
Turn power switch to off (“O”) when carrying out any of the above<br />
operations!<br />
12
WINDING THE BOBBIN<br />
Place thread and spool holder onto spool pin (1).<br />
- For smaller spools of thread place spool holder with small side<br />
next to spool (2).<br />
- Wind thread clockwise around bobbin winder tension discs (3).<br />
- Thread bobbin as illustrated and place on spindle (4).<br />
- Push bobbin to right (5).<br />
- Hold thread end (6).<br />
- Step on foot control pedal (7) to wind the bobbin.<br />
- Cut thread (8).<br />
- Press bobbin to left (9) and remove.<br />
Please Note:<br />
When the bobbin winder spindle is in “bobbin winding” position, the<br />
machine will not sew and the hand wheel will not turn.<br />
To start sewing, push the bobbin winder spindle to the left (sewing<br />
position).<br />
13
INSERTING THE BOBBIN<br />
When inserting or removing the bobbin, the foot and needle must be<br />
fully raised.<br />
1. Open the hinged cover.<br />
2. Hold the bobbin case with one hand. Insert the bobbin so that<br />
the thread runs in a clockwise direction (arrow).<br />
3. Put the thread under the tension spring.<br />
4. Hold the bobbin case by the hinged latch.<br />
5. Insert it into the shuttle.<br />
Attention:<br />
Turn power switch to off (“O”).<br />
14
INSERTING THE NEEDLE<br />
Change the needle regularly, especially if it is showing signs of wear<br />
and causing problems.<br />
Insert the needle following the illustrated instructions.<br />
A. Loosen the needle clamp screw and tighten again after inserting<br />
the new needle. (1)<br />
B. The at side of the needle shaft should be towards the back.<br />
C/D.Insert the needle as far up as it will go.<br />
Attention:<br />
Turn power switch to off (“O”).<br />
Needles must be in perfect condition. (2)<br />
Problems can occur with:<br />
A. Bent needles<br />
B. Damaged points<br />
C. Blunt needles<br />
15
THREADING THE UPPER THREAD<br />
Threading is simple but it is important to thread correctly to prevent<br />
sewing problems could result.<br />
- Start by raising the needle to its highest point (1), and also raise<br />
the presser foot to release the tension discs. (2)<br />
Attention:<br />
For safety, it is strongly suggested you turn off the power before threading.<br />
- Lift up the spool pin. Place the spool of thread on the holder<br />
with the thread coming off the spool as shown. For small thread<br />
spools, place small side of spool holder next to spool. (3)<br />
- Draw thread from spool through the upper thread guide. (4)<br />
- Guide thread around thread guide (5) pulling thread through pretension<br />
spring as illustrated.<br />
- Thread tension disks by leading thread down in right channel<br />
and up in left channel (6). During this process it is helpful to hold<br />
the thread between the spool and thread guide (4).<br />
- At the top pull thread from right to left through the slotted eye of<br />
the take-up lever and then down again. (7)<br />
- Place thread behind the thin wire needle clamp guide (8) and<br />
then down to the needle eye and thread from front to back.<br />
- Pull about 6-8 inches of thread under the presser foot to the<br />
back. Trim thread to length with built in thread cutter. (9)<br />
16
THREAD TENSION<br />
Basic thread tension setting: “4”<br />
To increase the tension, turn the dial to the next number up.<br />
To reduce the tension, turn the dial to the next number down.<br />
A. Normal thread tension - upper and bobbin thread join in fabric<br />
B. Upper thread tension too loose - upper thread “loops” on the<br />
underside of fabric<br />
C. Upper thread tension too tight - bobbin thread “loops”on the top<br />
side of the fabric<br />
Note:<br />
The bobbin thread tension does not normally have to be adjusted.<br />
17
BRINGING UP THE BOBBIN THREAD<br />
Hold the upper thread with the left hand. Turn the handwheel<br />
towards you until the needle is raised. (1)<br />
Pull on the upper thread to bring the bobbin thread up through the<br />
stitch plate hole.<br />
Place both threads to the back under the presser foot. (2)<br />
18
REVERSE SEWING<br />
At the end of a seam, press down the reverse sewing lever. Sew a<br />
few reverse stitches to “the tie off” the thread ends.<br />
Release the lever and the machine will sew forwards again. (1/A)<br />
REMOVING THE FABRIC<br />
Turn the handwheel toward you to bring the thread take up lever to<br />
its highest position, raise the presser foot and remove fabric to the<br />
back. (2)<br />
CUTTING THE THREAD<br />
Hold the threads behind the presser foot with both hands, pull them<br />
into the thread cutter (B) and down (3) to cut.<br />
19
MATCHING NEEDLE / FABRIC / THREAD<br />
NEEDLE, FABRIC, THREAD SELECTION GUIDE<br />
NEEDLE SIZE FABRICS THREAD<br />
9-11(65-75) Lightweight fabrics-thin cottons, voile, silk , muslin, interlocks, cotton knits, Light-duty thread in cotton, nylon or polyester.<br />
tricots, jerseys, crepes, woven polyester, shirt & blouse fabrics.<br />
12(80) Medium weight fabrics-cotton, satin, kettlecloth, sailcloth, double knits, Most threads sold are medium size and suitable for these fabrics and<br />
lightweight wool.<br />
needle sizes.<br />
14(90) Medium weight fabrics-cotton duck, wool, heavier knits, terrycloth, denims. Use polyester threads on synthetic materials and cotton on natural<br />
woven fabrics for best results.<br />
16(100) Heavyweight fabrics-canvas, wool, outdoor tent and quilted fabrics,<br />
Always use the same thread on top and bottom.<br />
denims, upholstery material (light to medium).<br />
18(110) Heavy wool, overcoat fabrics, upholstery fabrics, some leathers and vinyls. Heavy duty thread, carpet thread.<br />
(Increase presser foot pressure and top tension.)<br />
IMPORTANT: Match needle size to thread size and weight of fabric<br />
NEEDLE, FABRIC SELECTION<br />
NEEDLES EXPLANATION TYPE OF FABRIC<br />
HA×1<br />
Standard sharp needles.<br />
Natural woven fabrics-wool, cotton, silk, etc.<br />
15×1<br />
Sizes range thin to large. 9 (65) to 18(110)<br />
Qiana. Not recommended for double knits.<br />
15×1/705H(SIN) Semi-ball point needle, scarfed. 9(65) to 18(110) Natural and synthetic woven fabrics, polyester blends.Knits-polyesters,<br />
interlocks, tricot, single and double knits.<br />
Can be used instead of 15×1 for sewing all fabrics.<br />
15×1/705H (SUK) Full ball point needle 9(65) to 18(110) Sweater knits, Lycra, swimsuit fabric, elastic.<br />
130 PCL Leather needles. 12(80) to 18(110) Leather, vinyl, upholstery.<br />
(Leaves smaller hole than standard large needle.)<br />
20
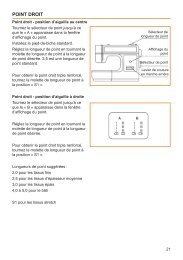
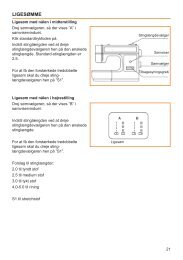
STRAIGHT STITCHING<br />
Stitch length dial<br />
Straight stitching center needle position<br />
Turn the stitch selector dial so that the “A” appears in the stitch<br />
display window.<br />
Snap on the standard presser foot.<br />
Adjust the stitch length by turning the stitch length dial to the desired<br />
stitch length. 2.5 is standard stitch length.<br />
Stitch display<br />
To get the reinforced triple straight stitch, turn the stitch length dial to<br />
position “S1”.<br />
Stitch selection dial<br />
Reverse sewing lever<br />
Straight stitching right needle position<br />
Turn the stitch selector dial so that the “B” appears in the stitch<br />
display window.<br />
Adjust the stitch length by turning the stitch length dial to the desired<br />
stitch length.<br />
Straight stitch<br />
To get the reinforced triple straight stitch, turn the stitch length dial to<br />
position “S1”.<br />
Suggested stitch lengths:<br />
2.0 for lightweight fabrics<br />
2.5 for medium weight fabrics<br />
3.0 for heavy weight fabrics<br />
4.0-5.0 for basting<br />
S1 for stretch fabrics<br />
21
ZIGZAG STITCHING<br />
Turn the stitch selector dial so that the stitch display shows “C”-zigzag.<br />
Turning the stitch selector dial will increase or decrease the zig<br />
zag width.<br />
Snap on the standard foot.<br />
Function of stitch length dial while zigzaging<br />
The density of zigzag stitches increase as the setting of stitch length<br />
dial approaches “0”.<br />
Zigzag stitches are usually sewn at “2.5” or less.<br />
Dense zigzag stitches (close together) are referred to as a satin<br />
stitch.<br />
Stitch length dial<br />
22
HOW TO SEW BUTTONHOLES<br />
Stitch length dial<br />
Preparation<br />
Select buttonhole with the stitch Selection dial.<br />
Snap on The buttonhole foot.<br />
Adjust the stitch length dial between “0.5” - “1”.<br />
The density of the stitch depends on thickness of the fabric.<br />
Note: Always test sew a buttonhole.<br />
To prepare the fabric<br />
Measure the diameter of the button and add 0.3 cm (1/8”) for the<br />
bartacks. If you have a very thick button, add more to the diameter<br />
measurement. Mark the position and length of the buttonhole on the<br />
fabric. Position the fabric so that the needle is on the mark that is<br />
furthest from you. Pull the buttonhole foot towards you as far as it<br />
will go.<br />
Lower the foot.<br />
1. Select buttonhole with the stitch selection dial. Turn the stitch<br />
selection dial to (1) “ “. Sew at moderate speed until you reach<br />
the end mark.<br />
2. Turn the stitch selection dial to (2, 4)“ “ and sew 5-6 bartack<br />
stitches.<br />
3. Turn the stitch selection dial to (3) “ “ and sew the left side of<br />
the buttonhole to the mark at the end which is further from you.<br />
4. Turn the stitch selection dial to (2, 4) “ “ and sew bar tack<br />
stitches.<br />
Remove the fabric from under the foot. Pull the upper thread to the<br />
wrong side of the fabric and knot upper and lower threads. Cut the<br />
center of the buttonhole with the seam ripper, being careful not to<br />
cut the stitches on either side.<br />
23
Tips<br />
- Slightly reduce upper thread tension to produce a satin stitch on<br />
top.<br />
- Place stabilizer underneath for ne and stretchy fabrics.<br />
- It is best to sew a cord for a buttonhole on a stretch or knit<br />
fabrics. The buttonhole colomns should sew over the cord. (5)<br />
24
BLIND HEM<br />
Stitch length dial<br />
For hems, curtains, trousers, skirts, etc.<br />
Select Blind hem for stretch fabrics.<br />
Select Blind hem for woven fabrics.<br />
Snap on Blind hem foot. (1)<br />
Stitch length 1.5-2.5<br />
Note:<br />
It takes practice to sew blind hems.<br />
Always make a sewing test rst.<br />
Fold the fabric as illustrated with the wrong side up. (2)<br />
Place the fabric under the foot. Turn the handwheel forwards by<br />
hand until the needle swings fully to the left. It should just pierce the<br />
fold of the fabric. (3)<br />
Adjust the guide on the foot (4) by turning the knob (5) so that the<br />
guide just rests against the fold.<br />
Sew slowly, by pressing the foot control lightly guiding the fabric<br />
along the edge of the guide.<br />
Wrong side Right side<br />
25
ZIPPERS AND PIPING<br />
Stitch length dial<br />
Set the machine as illustrated. (1)<br />
The zipper foot can be snapped onto the right or left, depending on<br />
which side of the foot you are going to place against the zipper or<br />
piping. (2)<br />
To sew past the zipper pull, lower the needle into the fabric, raise<br />
the presser foot and push the zipper pull behind the presser foot.<br />
Lower the foot and continue to sew.<br />
The zipper foot is also used to sew cord into a bias strip to form a<br />
piping and to sew the piping into a seam. (3)<br />
Set stitch length control between “1” - “4” (according to thickness of<br />
fabric).<br />
26
3-STEP ZIG-ZAG<br />
Stitch length dial<br />
Sewing on lace and elastic, darning, mending, nishing edges.<br />
Set the machine as illustrated. (1)<br />
Patching:<br />
Place the patch in position and stitch around edges.<br />
The stitch length can be shortened to produce very close stitches.<br />
(A)<br />
When mending tears, it is advisable to use a piece of backing fabric<br />
to reinforce. The stitch density can be varied by adjusting the stitch<br />
length. Begin by sewing over the center and then overlap on both<br />
sides. Depending on the type of fabric and damage, sew between 3<br />
and 5 rows. (B)<br />
To nish edges, stitch along the edge of the fabric.<br />
27
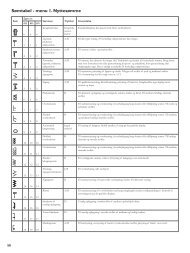
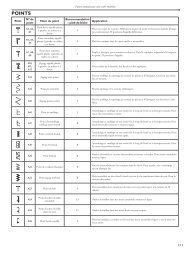
STITCH SELECTION<br />
Stitch length dial<br />
Triple straight stitch: (1)<br />
For reinforced seams.<br />
Turn the stitch length dial to “S1”.<br />
The machine sews two stitches forwards and one stitch backwards.<br />
This gives triple reinforcement.<br />
Stitch length dial<br />
Triple zig-zag: (2)<br />
For hardwearing seams, hems and decorative seams.<br />
Turn the stitch length dial to “S1”.<br />
Triple zig-zag is suitable for rm fabrics like denim, corduroy, etc.<br />
28
MAINTENANCE<br />
Attention:<br />
Disconnect the machine from the electricity supply by removing the plug<br />
from the main socket. When cleaning the machine, it must always be<br />
disconnected from the electricity supply.<br />
Remove the stitch plate<br />
Turn the handwheel until the needle is fully raised. Open the hinged<br />
front cover and unscrew the needle plate screw withe the screw<br />
driver.(1)<br />
Cleaning the feed dog<br />
Remove the bobbin case and use the brush supplied to clean the<br />
whole area.(2)<br />
Cleaning and lubricating the hook (3)<br />
Remove the bobbin case. Snap the two hook retaining arms (a)<br />
outwards. Remove the hook race cover (b) and the hook (c) and<br />
clean with a soft cloth. Lubricate at the points (d) (1-2 drops) with<br />
sewing machine oil. Turn the handwheel until the hook race (e) is in<br />
the left position. Replace the hook (c). Replace the hook race cover<br />
and snap back the two hook retaining arms. Insert he bobbin case<br />
and bobbin and replace the stitch plate.<br />
Important:<br />
Fabric lint and threads must be removed regularly.<br />
Your machine should be serviced at regular intervals at your local dealer.<br />
29
TROUBLE SHOOTING GUIDE<br />
Problem Cause Correction<br />
1. Rethread the machine.<br />
2. Reduce the thread tension. (lower number)<br />
3. Select a larger needle.<br />
4. Remove and reinsert the needle. ( at side towards the back)<br />
5. Remove the spool and wind thread onto spool.<br />
1. The machine is not threaded correctly.<br />
2. The thread tension is too tight.<br />
3. The thread is too thick for the needle.<br />
4. The needle is not inserted correctly.<br />
5. The thread is wound around the spool holder pin.<br />
6. The needle is damaged.<br />
Upper thread<br />
breaks<br />
6. Replace the needle.<br />
1. Remove and reinsert the bobbin case and pull on the thread. The thread should pull easily.<br />
2. Check both bobbin and bobbin case.<br />
3. Loosen lower thread tension as described.<br />
1. The bobbin case is not inserted correctly.<br />
2. The bobbin case is threaded wrong.<br />
Lower thread<br />
breaks<br />
3. The lower thread tension is too tight.<br />
1. Remove and reinsert needle. ( at side towards the back)<br />
2. Insert a new needle.<br />
3. Choose a needle to suit the thread and fabric.<br />
4. Check and attach correctly.<br />
Skipped stitches 1. The needle is not inserted correctly.<br />
2. The needle is damaged.<br />
3. The wrong size or type of needle has been used.<br />
4. The foot is not attached correctly.<br />
1. Insert a new needle<br />
2. Insert the needle correctly. ( at side towards the back)<br />
3. Choose a needle to suit the thread and fabric.<br />
4. Select the correct foot.<br />
Needle breaks 1. The needle is damaged.<br />
2. The needle is not correctly inserted.<br />
3. Wrong needle size for the fabric.<br />
4. The wrong foot is attached.<br />
1. Check the threading.<br />
2. Thread the bobbin case as illustrated.<br />
3. The needle size must suit the fabric and thread.<br />
4. Correct the thread tension.<br />
Loose stitches 1. The machine is not correctly threaded.<br />
2. The bobbin case is not correctly threaded.<br />
3. Needle/ fabric/ thread combination is wrong.<br />
4. Thread tension wrong.<br />
1. Select a ner needle.<br />
2. Shorten the stitch length.<br />
Seams gather<br />
or pucker<br />
3. Loosen the thread tension.<br />
1. Select a better quality thread.<br />
2. Remove bobbin case, thread and insert correctly.<br />
3. Do not pull on the fabric while sewing, let it be moved up by the feed dogs.<br />
1. The needle is too thick for the fabric.<br />
2. The stitch length is incorrectly adjusted.<br />
3. The thread tension is too tight.<br />
1. Poor quality thread.<br />
2. The bobbin case is incorrectly threaded.<br />
3. Fabric has been pulled.<br />
1. The machine must be lubricated.<br />
2. Lint or oil have collected on the hook or needle bar.<br />
3. Poor quality oil has been used.<br />
Uneven stitches,<br />
uneven feed<br />
1. Lubricate as described.<br />
2. Clean the hook and feed dog as described.<br />
3. Only use good quality sewing machine oil.<br />
The machine<br />
is noisy<br />
4. The needle is damaged.<br />
4. Replace the needle.<br />
Thread is caught in the hook. Remove the upper thread and bobbin case, turn the handwheel backwards and forwards by<br />
hand and remove the thread. Lubricate as described.<br />
30<br />
The machine<br />
jams
Please note that on disposal, this product must be<br />
safely recycled in accordance with relevant National<br />
legislation relating to electrical/electronic products.<br />
If in doubt please contact your retailer for guidance
412 97 80 - 26C • English • Inhouse production • © 2005 VSM Group AB • All statements valid at time of printing • Printed in Sweden on environmental-friendly paper •<br />
VSM Group AB • SE-561 84 Huskvarna • SWEDEN<br />
www.husqvarnaviking.com