Broadband Applications & Construction Manual - Public - CommScope
Broadband Applications & Construction Manual - Public - CommScope
Broadband Applications & Construction Manual - Public - CommScope

Create successful ePaper yourself
Turn your PDF publications into a flip-book with our unique Google optimized e-Paper software.
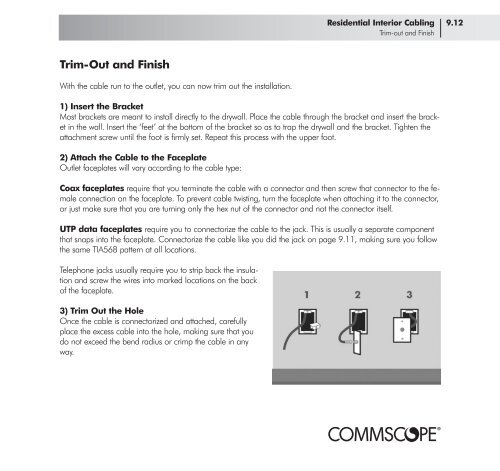
Trim-Out and Finish<br />
With the cable run to the outlet, you can now trim out the installation.<br />
1) Insert the Bracket<br />
Most brackets are meant to install directly to the drywall. Place the cable through the bracket and insert the bracket<br />
in the wall. Insert the ‘feet’ at the bottom of the bracket so as to trap the drywall and the bracket. Tighten the<br />
attachment screw until the foot is firmly set. Repeat this process with the upper foot.<br />
2) Attach the Cable to the Faceplate<br />
Outlet faceplates will vary according to the cable type:<br />
Coax faceplates require that you terminate the cable with a connector and then screw that connector to the female<br />
connection on the faceplate. To prevent cable twisting, turn the faceplate when attaching it to the connector,<br />
or just make sure that you are turning only the hex nut of the connector and not the connector itself.<br />
UTP data faceplates require you to connectorize the cable to the jack. This is usually a separate component<br />
that snaps into the faceplate. Connectorize the cable like you did the jack on page 9.11, making sure you follow<br />
the same TIA568 pattern at all locations.<br />
Telephone jacks usually require you to strip back the insulation<br />
and screw the wires into marked locations on the back<br />
of the faceplate.<br />
3) Trim Out the Hole<br />
Once the cable is connectorized and attached, carefully<br />
place the excess cable into the hole, making sure that you<br />
do not exceed the bend radius or crimp the cable in any<br />
way.<br />
Residential Interior Cabling 9.12<br />
Trim-out and Finish