564 SS GreenSmart™ Fireplace - Lopi
564 SS GreenSmart™ Fireplace - Lopi
564 SS GreenSmart™ Fireplace - Lopi

Create successful ePaper yourself
Turn your PDF publications into a flip-book with our unique Google optimized e-Paper software.
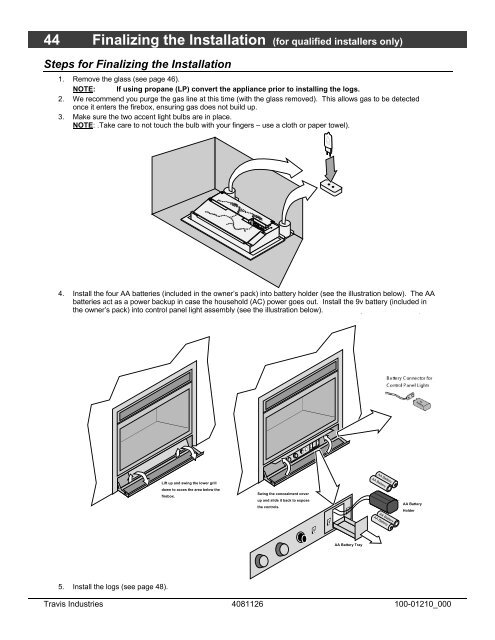
44 Finalizing the Installation (for qualified installers only)<br />
Steps for Finalizing the Installation<br />
1. Remove the glass (see page 46).<br />
NOTE: If using propane (LP) convert the appliance prior to installing the logs.<br />
2. We recommend you purge the gas line at this time (with the glass removed). This allows gas to be detected<br />
once it enters the firebox, ensuring gas does not build up.<br />
3. Make sure the two accent light bulbs are in place.<br />
NOTE: .Take care to not touch the bulb with your fingers – use a cloth or paper towel).<br />
<br />
<br />
4. Install the four AA batteries (included in the owner’s pack) into battery holder (see the illustration below). The AA<br />
batteries act as a power backup in case the household (AC) power goes out. Install the 9v battery (included in<br />
the owner’s pack) into control panel light assembly (see the illustration below). The battery holder is held in place<br />
with Velcro and may be removed for easier access.<br />
5. Install the logs (see page 48).<br />
Lift up and swing the lower grill<br />
down to acces the area below the<br />
firebox.<br />
Swing the concealment cover<br />
up and slide it back to expose<br />
the controls.<br />
AA Battery Tray<br />
Battery Holder for Control<br />
Panel Lights<br />
Travis Industries 4081126 100-01210_000<br />
AA Battery<br />
AA Battery<br />
AA Battery<br />
AA Battery<br />
9v<br />
Battery<br />
AA Battery<br />
Holder