

The Haynes Welding Manual - VolksPage.Net
The Haynes Welding Manual - VolksPage.Net
The Haynes Welding Manual - VolksPage.Net

Create successful ePaper yourself
Turn your PDF publications into a flip-book with our unique Google optimized e-Paper software.
<strong>Welding</strong> with filler rod<br />
Let's say that you need to join two pieces of 1/8-inch-thick metal in a straight<br />
bead from right to left. Position the two pieces such that they are butted together<br />
where they are to be joined, and that you have something blocking or clamping<br />
them in place so they won't move as you weld. Start your weld puddle at the<br />
right end of the seam, and as the puddle develops, use your left hand to insert<br />
the tip of the filler rod into the center of the hot puddle, then pull it out right away.<br />
Set up a rhythm of alternately putting in the rod and taking it out as the bead progresses<br />
to the left. When we describe the puddle, the edge of the puddle closest<br />
to the direction you are traveling is the front edge, while the part of the puddle<br />
you just finished is the rear.<br />
If you have ever done any soldering, you may have a bad habit of heating the<br />
solder with your torch or soldering iron and letting the molten lead drip onto the<br />
joint. This is a bad habit and one you shouldn't bring with you in your welding<br />
practice. <strong>The</strong> molten puddle should melt the filler rod, not the torch. If the rod<br />
sticks, then you are not keeping the puddfe molten enough, or you are adding<br />
filler rod too fast, either of which will result in a low-quality weld.<br />
This skill of making a good bead, with evenly overlapping ovals and good<br />
penetration will take considerable practice, but if you learn two-handed gaswelding<br />
techniques well, any other welding system you pick up later on will be<br />
considerably easier to learn. Most of the welding you will do will be forehand<br />
welding, in which you angle the torch so that the flame is aimed somewhat toward<br />
the direction of the desired weld bead. This preheats the metal as you go<br />
and makes addition of filler rod to the front edge of the puddle easier because it<br />
is truly hot. Sometimes it seems like keeping the proper torch distance, moving<br />
at the right speed, circling or ovaling the tip and dipping the rod in at the right<br />
time is just too much to concentrate on at one time, but you will get the hang of<br />
it. This isn't "brain surgery" and millions have learned before you. After a good<br />
long practice session, begin to examine things around you that are of welded<br />
construction and you'll get an appreciation of the practice it took to lay down<br />
those beautiful beads that look like they were done by some machine instead of<br />
human hands. Indeed there are some kinds of welding that are done with largely<br />
robotic welding machines, but a good weldor can make virtually perfect joints<br />
that are stronger than the parent metal.<br />
We mentioned before that cleanliness is critical in making good welds. <strong>The</strong><br />
two edges to be joined need to be sanded or ground clean to bright metal and<br />
should fit as closely as possible. Small gaps are inevitable<br />
in some kinds of work and can be bridged with filler rod, but<br />
gaps should be kept to a minimum. On thicker materials,<br />
you will find that it is easier to make a clean weld with good<br />
penetration if the edges of the two pieces are beveled before<br />
you weld. This can be done with a file or grinder. Thin<br />
materials have their own idiosyncrasies, mostly to do with<br />
keeping the two edges in alignment. As you progress with<br />
your weld bead, more and more heat travels out into the<br />
parent metal, so that after welding for some distance, the<br />
metal you now encounter is hotter than the metal you<br />
started on, so you may have to adjust the torch away<br />
slightly to compensate for the puddle forming faster.<br />
Another problem with thin materials is that the parent<br />
metal tends to distort with the application of heat. Metal expands<br />
when heated, and two edges that were parallel when<br />
you started welding probably won't stay that way. Usually,<br />
the edges pull away and you have a gap to bridge that wasn't<br />
there when you started. <strong>The</strong> solution is to tack-weld at<br />
intervals before applying too much heat. A tack-weld is<br />
Gas welding/cutting<br />
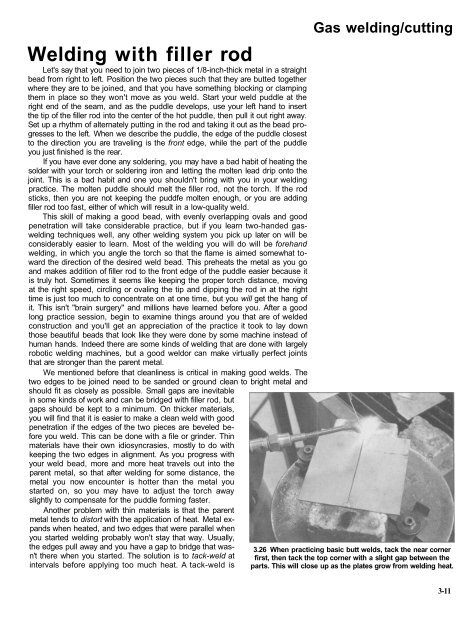
3.26 When practicing basic butt welds, tack the near corner<br />
first, then tack the top corner with a slight gap between the<br />
parts. This will close up as the plates grow from welding heat.<br />
3-11


