

The Haynes Welding Manual - VolksPage.Net
The Haynes Welding Manual - VolksPage.Net
The Haynes Welding Manual - VolksPage.Net

You also want an ePaper? Increase the reach of your titles
YUMPU automatically turns print PDFs into web optimized ePapers that Google loves.
5.52 Instead of a straight butt-weld, panels of thin material are<br />
often joined with spot welds, in which the top panel is punched with<br />
small holes. You MIG-weld around the hole, joining the top panel to<br />
the bottom.<br />
gun. If you are welding thicker materials, or two edges that have irregular<br />
gaps, you can weave the arc back and forth from side to side as<br />
you travel, bridging the distance between the two edges.<br />
Sometimes a start-and-stop technique works well for bridging gaps or filling<br />
holes. You watch the arc and weave from one side to the other, then pause (let<br />
go of the trigger) for a second with the torch in the same spot, allowing the puddle<br />
to solidify, then pull the trigger again, building a new puddle onto the last one.<br />
To fill a hole, just keep making tack-welds around the edge of the hole until you<br />
have made it smaller (see illustration). Let the metal cool, then add an inner row<br />
of tacks inside the first "ring" until you close up the hole with filler metal. This is<br />
often done in filling sheet-metal holes in body work, but any hole larger than a<br />
dime should be filled by welding in a circle of new metal of the same thickness.<br />
<strong>The</strong> beauty of the MIG process is that the torch is a one-hand operation,<br />
which allows you to use your other hand to steady your primary hand and draw a<br />
smooth bead. Also the torch stays the same distance from the weld at all times,<br />
unlike arc welding where the rod is always getting shorter.<br />
MIG welding doesn't require stopping to change electrodes<br />
either, so you can concentrate nicely on what you are doing.<br />
<strong>The</strong> one-handedness of MIG welding tempts some<br />
weldors to operate the torch with one hand while they actually<br />
hold something on the work with their other hand. This<br />
is OK for tack-welding, where you have a body panel you<br />
need to hold in alignment while you tack, but better seams<br />
are made when you hold the torch with both hands. Some<br />
users get used to the lower brightness and spatter of the<br />
MIG process, and are tempted to tack parts together without<br />
using a helmet. Body men in particular are prone to<br />
hold two panels in alignment, put the torch where it needs<br />
to be, close their eyes and make a tack weld for a second.<br />
Although MIG welding does produce less intense light and<br />
spatter than arc welding, you are still subject to both radiation<br />
burns and some spatter. Don't ever take a chance with<br />
your eyesight. One blob of spatter onto your bare eyelid<br />
could be really dangerous! A much better procedure (and<br />
the only one we recommend) would be to use some clamps<br />
or other devices (see the Safety and Shop Equipment chap-<br />
MIG welding<br />
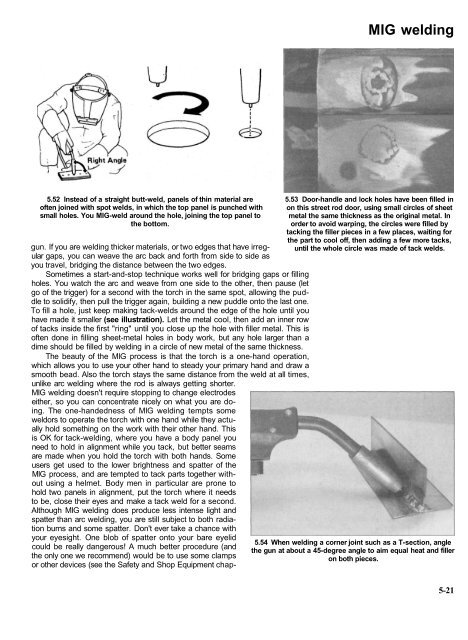
5.53 Door-handle and lock holes have been filled in<br />
on this street rod door, using small circles of sheet<br />
metal the same thickness as the original metal. In<br />
order to avoid warping, the circles were filled by<br />
tacking the filler pieces in a few places, waiting for<br />
the part to cool off, then adding a few more tacks,<br />
until the whole circle was made of tack welds.<br />
5.54 When welding a corner joint such as a T-section, angle<br />
the gun at about a 45-degree angle to aim equal heat and filler<br />
on both pieces.<br />
5-21


