93619 Distance Measure - Harbor Freight Tools
93619 Distance Measure - Harbor Freight Tools
93619 Distance Measure - Harbor Freight Tools
Create successful ePaper yourself
Turn your PDF publications into a flip-book with our unique Google optimized e-Paper software.
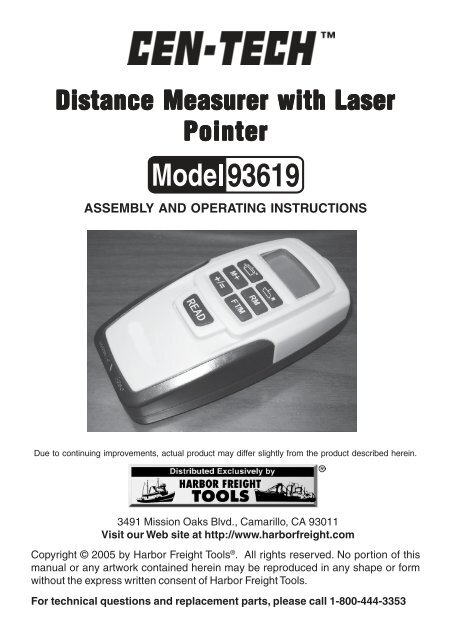
<strong>Distance</strong> <strong>Distance</strong> <strong>Measure</strong>r <strong>Measure</strong>r with with Laser<br />
Laser<br />
Pointer<br />
Pointer<br />
<strong>93619</strong><br />
ASSEMBLY AND OPERATING INSTRUCTIONS<br />
Due to continuing improvements, actual product may differ slightly from the product described herein.<br />
3491 Mission Oaks Blvd., Camarillo, CA 93011<br />
Visit our Web site at http://www.harborfreight.com<br />
Copyright © 2005 by <strong>Harbor</strong> <strong>Freight</strong> <strong>Tools</strong> ® . All rights reserved. No portion of this<br />
manual or any artwork contained herein may be reproduced in any shape or form<br />
without the express written consent of <strong>Harbor</strong> <strong>Freight</strong> <strong>Tools</strong>.<br />
For technical questions and replacement parts, please call 1-800-444-3353
Specifications<br />
Function<br />
Type:<br />
Ultrasonic<br />
metering<br />
with<br />
Laser<br />
locator<br />
light<br />
Recomended Use:<br />
Indoor<br />
rangefinding<br />
2'<br />
to<br />
50'<br />
Length:<br />
999'<br />
11"<br />
<strong>Measure</strong>ment<br />
Range:<br />
units<br />
convertable<br />
from<br />
meters<br />
and<br />
Calculation<br />
Range:<br />
Area:<br />
99999<br />
sq.<br />
ft.<br />
centimeters<br />
to<br />
feet<br />
and<br />
inches<br />
Volume:<br />
999999<br />
cu.<br />
ft.<br />
R esolution:<br />
0 . 4"<br />
P ower<br />
Supply:<br />
( 1)<br />
9V<br />
battery<br />
( included)<br />
Power Consumption:<br />
< 40<br />
mA<br />
Automatic<br />
Display:<br />
Operating<br />
Environment:<br />
temperature<br />
32°<br />
F to<br />
104°<br />
F<br />
relative<br />
humidity<br />
below<br />
48%<br />
Save This Manual<br />
You will need the manual for the safety warnings and<br />
precautions, assembly instructions, operating and<br />
maintenance procedures, parts list and diagram. Keep your<br />
invoice with this manual. Write the invoice number on the<br />
inside of the front cover. Keep the manual and invoice in a<br />
safe and dry place for future reference.<br />
Safety Warnings and Precautions<br />
WARNING: When using tool, basic safety precautions should always be followed<br />
to reduce the risk of personal injury and damage to equipment.<br />
Read all instructions before using this tool!<br />
1. Keep work area clean. Cluttered areas invite injuries.<br />
Display<br />
will<br />
hold<br />
30<br />
seconds<br />
then<br />
shut<br />
off<br />
if<br />
no<br />
further<br />
input<br />
Size: 2-5 / 8"<br />
W x 5-1<br />
/2" L x 1-5<br />
/8" T<br />
2. Observe work area conditions. Do not use machines or power tools in<br />
damp or wet locations. Don’t expose to rain. Keep work area well lit. Do not<br />
use electrically powered tools in the presence of flammable gases or liquids.<br />
3. Keep children away. Children must never be allowed in the work area. Do<br />
not let them handle machines, tools, or extension cords.<br />
4. Store idle equipment. When not in use, tools must be stored in a dry<br />
location to inhibit rust. Always lock up tools and keep out of reach of<br />
children.<br />
5. Use the right tool for the job. Do not attempt to force a small tool or<br />
attachment to do the work of a larger industrial tool. There are certain<br />
applications for which this tool was designed. It will do the job better<br />
and more safely at the rate for which it was intended. Do not modify this<br />
tool and do not use this tool for a purpose for which it was not intended.<br />
SKU <strong>93619</strong> For technical questions please call 1-800-444-3353. Page 2
6. Do not overreach. Keep proper footing and balance at all times. Do not reach<br />
over or across running machines.<br />
7. Maintain tools with care. Keep tools maintained and clean for better and<br />
safer performance. Follow instructions for maintenance.<br />
8. Stay alert. Watch what you are doing, use common sense. Do not operate<br />
any tool when you are tired.<br />
9. Check for damaged parts. Before using any tool, any part that appears<br />
damaged should be carefully checked to determine that it will operate<br />
properly and perform its intended function. Any part that is damaged should be<br />
properly repaired or replaced by a qualified technician. Do not use the tool if<br />
any switch does not turn On and Off properly.<br />
10. Guard against electric shock. Prevent body contact with grounded surfaces<br />
such as pipes, radiators, ranges, and refrigerator enclosures.<br />
11. Replacement parts and accessories. When servicing, use only identical<br />
replacement parts. Use of any other parts will void the warranty.<br />
12. Do not operate tool if under the influence of alcohol or drugs. Read<br />
warning labels on prescriptions to determine if your judgment or reflexes are<br />
impaired while taking drugs. If there is any doubt, do not operate the tool.<br />
13. Maintenance. For your safety, service and maintenance should be performed<br />
regularly by a qualified technician.<br />
14. Risk of eye damage. Do not point the laser at people or animals.<br />
15. Laser Radiation. Do not stare into beam. Never point laser beam at<br />
people or animals.<br />
Warning: The warnings, cautions, and instructions discussed in this instruction<br />
manual cannot cover all possible conditions and situations that may occur. It<br />
must be understood by the operator that common sense and caution are factors<br />
which cannot be built into this product, but must be supplied by the operator.<br />
Unpacking<br />
When unpacking, check to make sure that the product is intact and undamaged.<br />
If any parts are missing or broken, please call <strong>Harbor</strong> <strong>Freight</strong> <strong>Tools</strong> at the number<br />
on the cover of this manual.<br />
SKU <strong>93619</strong> For technical questions please call 1-800-444-3353. Page 3
Components of the <strong>Distance</strong> <strong>Measure</strong>ment Tool<br />
7<br />
8<br />
9<br />
10<br />
11<br />
12<br />
1: Ultrasonic Sensor Aperture<br />
2: Laser Pointer<br />
3: LCD Display. The upper row displays current result. The lower row displays<br />
memory/computing results<br />
4: Area Computation Key. Press this key to enter the area measuring and<br />
computation mode.<br />
5: Memory Read Key. Display the value stored by the Memory Input Key.<br />
6: Foot/Meter conversion Key. Select measurements in SAE (Ft.in.) or in Meters (m).<br />
7: Volume Computation Key. Press this key to enter the Volume Computation mode.<br />
8: Memory Input Key. Input the current reading into memory.<br />
9: Addition Key. Add the measured length, area or volume.<br />
10: ON/Read Key. Press this key to start the tool and read the measured distance.<br />
Press this key again to update measured distance.<br />
11: Measuring Reference Point: Bottom of tool.<br />
12: Battery Compartment.<br />
A: Plus<br />
B: Area / Volume<br />
C: Memory<br />
D: Memory, Computing result<br />
E: Current Measuring result<br />
Display Screen Elements<br />
F: Low Battery Indicator<br />
G: Square Feet<br />
H: Cubic Feet<br />
I: Square Meters<br />
J: Cubic Meters<br />
SKU <strong>93619</strong> For technical questions please call 1-800-444-3353. Page 4<br />
1<br />
2<br />
3<br />
4<br />
5<br />
6
Operation<br />
This tool will quickly and accurately measure distances. It will accumulate several<br />
measurements in memory, and will perform area and volume computations.<br />
In addition to distance measurements, area computations have many uses including<br />
estimating wall covering or paint requirements, room sizes, etc. Volume computations<br />
are useful in planning HVAC, heating and cooling requirements, etc.<br />
<strong>Measure</strong>ments are made using an ultrasonic beam which is targeted with a laser<br />
beam. The laser beam will help you see the measurement which is actually made<br />
with an invisible ultrasonic beam.<br />
Since local conditions, such as temperature, vibration, humidity, etc. may affect the<br />
measurement, you can take several dynamic readings to determine the most<br />
accurate distance.<br />
For the following instructions, please refer to the diagrams on page 4 to<br />
identify components and displays.<br />
<strong>Distance</strong> <strong>Measure</strong>ment:<br />
1. Point the Ultrasonic Sensor Aperture (1) in the direction of the distance to be measured.<br />
2. Press the READ Key (10) to start the tool. NOTE that the laser light will<br />
indicate the place measured. Press the READ Key (10) several times to<br />
determine an accurate reading. The measured distance will be displayed on<br />
the upper line of the Display Screen.<br />
3. By pressing the FT/M Key (6), you can alternate the reading between SAE<br />
and Metric readings.<br />
NOTES:<br />
A. The measured object must not be blocked by any barriers.<br />
B. For precise results, use a large smooth surface for measurements.<br />
C. If the measured surface is soft or irregular, you may place a hard item,<br />
such as a piece of board in front to provide an accurate reflective surface.<br />
D. <strong>Measure</strong>ments cannot be made through glass.<br />
E. The measured distance should be greater than 2 feet and less than 50’.<br />
F. The measured distance is from the bottom of the tool (reference point 11,<br />
page 4).<br />
To Add Sequential <strong>Measure</strong>ments without using Memory:<br />
1. Press the READ Key (10) to make a measurement. The measured value is<br />
shown in the top line of the display.<br />
2. Press the +/= Key (9) to enter the addition mode. The “+” icon (A) will appear<br />
in the Display Screen. The measurement will be repeated in the lower line in<br />
the Display Screen. You may press the +/= Key (9) to cancel this operation.<br />
SKU <strong>93619</strong> For technical questions please call 1-800-444-3353. Page 5
3. Press the READ Key (10) again to make an additional measurement. The new<br />
measurement is displayed in the top line of the Display Screen. You may<br />
make repeated measurements to get an accurate reading.<br />
4. Press the +/= Key (9) again to add the new measurement to the accumulated<br />
total. The new sum will appear in the second line of the display.<br />
5. Continue these steps as needed to add all measurements.<br />
Addition using the Memory Key:<br />
1. Press the READ Key (10) to make an initial measurement. The measured<br />
value will appear in the first line of the display. Press the M+ Key (8) to store<br />
the measurement in memory. “M+” (C) will appear in the Display Screen.<br />
2. Press the READ Key (10) for an additional measurement. The new<br />
measurement will appear in the first line of the display.<br />
3. Press the +/= Key (9) to enter the Addition Mode. The “+” (A) will appear in<br />
the Display Screen. The second measured value will appear in both lines of<br />
the display.<br />
4. Press the RM Key (5) to recall the first measurement for addition. The first<br />
value will be on the lower line of the display. The “M+” icon (C) will disappear,<br />
and the memory will be cleared.<br />
5. Press the +/= Key (9) and the sum of the two measurements will be displayed<br />
in the lower line of the screen display.<br />
Calculating Area:<br />
1. Press the Area Key (4) to enter area mode.<br />
2. The “L” character in the Area / Volume icon (B) will blink indicating that the<br />
tool will first measure length. Press the READ Key (10) to make a length<br />
measurement. The measurement will be displayed in the first line of the<br />
screen.<br />
3. The “W” character of the Area/Volume icon (B) will blink indicating that the tool<br />
will next measure width. Press the READ Key (10) again to take a width<br />
measurement. The width value will be displayed in the top line of the screen.<br />
4. The area will automatically be displayed in the lower line of the screen.<br />
5. Pressing the READ Key (10) will toggle the top line of the display between the<br />
length and width measurements.<br />
6. Leave the Area mode after both length and width measurements have been<br />
taken, by pressing the READ Key (10) and holding it for 2 seconds.<br />
SKU <strong>93619</strong> For technical questions please call 1-800-444-3353. Page 6
Addition of Area using Area Mode<br />
1. After making an area measurement, press the M+ Key (8) to save the<br />
calculated area value. The “M+” icon (C) will appear in the Screen Display. The<br />
area value will be displayed on the second line of the Display Screen.<br />
2. Press the Area Key (4) to begin another area measurement. Follow steps 2<br />
and 3 in the “Calculating Area” section of page 6.<br />
3. After completing the second area calculation, press the +/= Key (9) to enter<br />
the addition mode. A “+” icon (A) will appear in the Display Screen.<br />
4. Press the RM Key (5) to recall the first calculated area. The stored value will<br />
appear on the second line of the Display Screen. The “M+” icon will disappear<br />
and the stored memory will be cleared.<br />
5. Press the “+/=” Key (9). The sum of both areas will appear in the bottom line<br />
of the Screen Display.<br />
6. You may repeat these steps to add additional areas.<br />
Calculating Volume<br />
1. Press the VOLUME Key (7) to prepare to calculate volume of a space.<br />
2. The “L” character of the Area/Volume icon (B) will blink indicating that the next<br />
measurement will be length. Press the READ Key (10) to take a<br />
measurement. The length will be displayed in the top line of the Display<br />
Screen.<br />
3. The “W” character of the Area/Volume icon (B) will blink indicating that the<br />
next measurement will be width. Press the READ Key (10) to take a<br />
measurement. The width will be displayed in the top line of the Display<br />
Screen.<br />
4. The “H” character of the Area/Volume icon (B) will blink indicating that the next<br />
measurement will be height. Press the READ Key (10) to take a<br />
measurement. The height will be displayed in the top line of the Display<br />
Screen.<br />
5. The volume will automatically be calculated and displayed in the lower portion<br />
of the Display Screen.<br />
6. Pressing the READ Key (10) will toggle the top line of the display between the<br />
length width and height measurements.<br />
7. Leave the Volume mode after all measurements have been taken, by pressing<br />
the READ Key (10) and holding it for 2 seconds.<br />
SKU <strong>93619</strong> For technical questions please call 1-800-444-3353. Page 7
Addition of Volume using Volume Mode<br />
1. After making a volume measurement, press the M+ Key (8) to save the<br />
calculated area value. The “M+” icon (C) will appear in the Screen Display. The<br />
volume value will be displayed on the second line of the Display Screen.<br />
2. Press the Volume Key (7) to begin another volume measurement. Follow<br />
steps 2 and 3 in the “Calculating Area” section of page 8.<br />
3. After completing the second volume calculation, press the +/= Key (9) to enter<br />
the addition mode. A “+” icon (A) will appear in the Display Screen.<br />
4. Press the RM Key (5) to recall the first calculated volume. The stored value<br />
will appear on the second line of the Display Screen. The “M+” icon will<br />
disappear and the stored memory will be cleared.<br />
5. Press the “+/=” Key (9). The sum of both volumes will appear in the bottom<br />
line of the Screen Display.<br />
6. You may repeat these steps to add additional volumes.<br />
Temperature Display<br />
1. Press and hold the FT/M Key (6) and at the same time press and release the<br />
READ Key (10). The ambient temperature will appear in the lower portion of<br />
the screen.<br />
2. By pressing the FT/M Key (6) you can toggle between Celsius and Fahrenheit<br />
temperature readings. NOTE: The temperature reading is local to the tool. This<br />
tool will not measure temperature at a distance.<br />
Troubleshooting<br />
Any of the following may cause inaccurate readings:<br />
1. Low battery power. The low battery icon (F) will appear in the Display<br />
Screen. To replace the battery, open the Battery Compartment on the back of<br />
the tool. Remove the old battery and install a fresh new 9VDC battery. Be sure<br />
to match the + and - polarity of the battery with the markings in the Battery<br />
Compartment.<br />
2. <strong>Measure</strong>d distance is our of range. The effective range is 2’ to 50’. If the<br />
measured distance is less or greater than this range, an “err” message will<br />
appear in line one of the Display Screen.<br />
SKU <strong>93619</strong> For technical questions please call 1-800-444-3353. Page 8
3. Calculated result is out of range. If the calculated result is greater than the<br />
values listed in the Specifications chart on page 2, an “err” message will<br />
appear in the second line of the Display Screen.<br />
4. Addition of different parameters. For example if length is attempted to be<br />
added to area, the “+” operation will be ignored, and an “err” message will be<br />
displayed in the lower line of the display.<br />
5. Interference from another ultrasonic or high volume source. Turn off the<br />
tool, and wait for the interference to stop before resuming work.<br />
6. Barriers between the tool and the item to be measured. The ultrasonic<br />
beam must have an unobstructed path to the object to make a precise<br />
measurement.<br />
7. <strong>Measure</strong>d surface not smooth. To obtain an accurate reading, the measured<br />
surface must be relatively hard, smooth, and of one material. You may have to<br />
provide a smooth hard reflector (such as a board or card) in front of the target<br />
surface to obtain a measurement.<br />
8. Temperature, humidity or wind may interfere. If the environment has high<br />
humidity, extreme temperature or high wind, the ultrasonic beam may not<br />
function accurately, especially over long distances. Avoid high wind, and<br />
observe the temperature and humidity ranges suggested in the specification<br />
chart on page 2.<br />
9. <strong>Measure</strong>ment not aligned. When measuring, the ultrasonic beam must<br />
strike the measured surface directly, not at an angle.<br />
1.<br />
SERVICE / MAINTENANCE<br />
Handle the tool with care, and do not drop it.<br />
2. Do not disassemble the tool. Service should be done only by a qualified<br />
service technician.<br />
3. Keep the tool dry and clean.<br />
4. Store the tool in a safe place when not in use.<br />
5. Do not expose the tool to dust and water.<br />
6. Check the battery regularly. Replace the battery promptly when it is worn out.<br />
7. Remove the battery if the tool will be stored for a long time.<br />
NO REPLACEMENT PARTS ARE AVAILABLE FOR THIS PRODUCT.<br />
SKU <strong>93619</strong> For technical questions please call 1-800-444-3353. Page 9


