How to configure the HL2170W to print wireless - Brother Solutions ...
How to configure the HL2170W to print wireless - Brother Solutions ...
How to configure the HL2170W to print wireless - Brother Solutions ...

You also want an ePaper? Increase the reach of your titles
YUMPU automatically turns print PDFs into web optimized ePapers that Google loves.
NOTE: The IP Address will be 0.0.0.0. This is expected.<br />
Continue with <strong>the</strong> next step.<br />
15. The Wireless Network Card on <strong>the</strong> <strong>print</strong>er is now Active on<br />
<strong>the</strong> network.<br />
16. Verify <strong>the</strong> <strong>print</strong>er is now attached <strong>to</strong> <strong>the</strong> <strong>wireless</strong> access<br />
point or <strong>wireless</strong> router.<br />
a. Wait approximately one minute.<br />
b. Press <strong>the</strong> GO but<strong>to</strong>n 3 times <strong>to</strong> <strong>print</strong> <strong>the</strong> settings<br />
pages.<br />
NOTE: 4 Pages should <strong>print</strong> out. If only 3 pages <strong>print</strong> out, verify<br />
on <strong>the</strong> last page <strong>the</strong> Node Type. If <strong>the</strong> Node Type is NOT <strong>the</strong><br />
NC-7400W, <strong>the</strong> <strong>wireless</strong> interface is not enabled. To enable <strong>the</strong><br />
<strong>wireless</strong> interface, press and hold down <strong>the</strong> GO but<strong>to</strong>n until a<br />
page <strong>print</strong>s out. It should take about 20 seconds.<br />
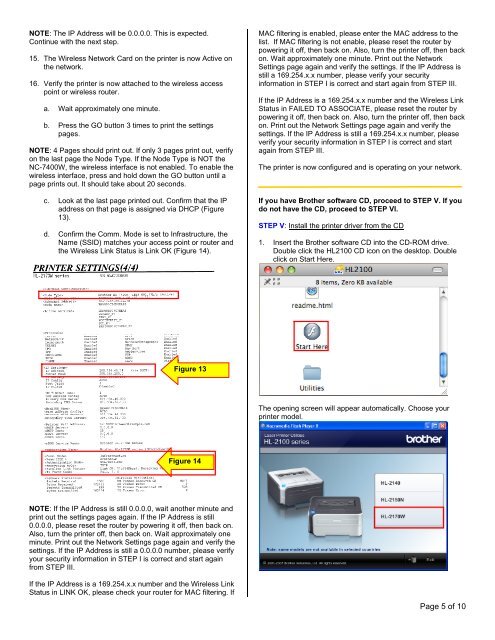
c. Look at <strong>the</strong> last page <strong>print</strong>ed out. Confirm that <strong>the</strong> IP<br />
address on that page is assigned via DHCP (Figure<br />
13).<br />
d. Confirm <strong>the</strong> Comm. Mode is set <strong>to</strong> Infrastructure, <strong>the</strong><br />
Name (SSID) matches your access point or router and<br />
<strong>the</strong> Wireless Link Status is Link OK (Figure 14).<br />
Figure 13<br />
Figure 14<br />
NOTE: If <strong>the</strong> IP Address is still 0.0.0.0, wait ano<strong>the</strong>r minute and<br />
<strong>print</strong> out <strong>the</strong> settings pages again. If <strong>the</strong> IP Address is still<br />
0.0.0.0, please reset <strong>the</strong> router by powering it off, <strong>the</strong>n back on.<br />
Also, turn <strong>the</strong> <strong>print</strong>er off, <strong>the</strong>n back on. Wait approximately one<br />
minute. Print out <strong>the</strong> Network Settings page again and verify <strong>the</strong><br />
settings. If <strong>the</strong> IP Address is still a 0.0.0.0 number, please verify<br />
your security information in STEP I is correct and start again<br />
from STEP III.<br />
If <strong>the</strong> IP Address is a 169.254.x.x number and <strong>the</strong> Wireless Link<br />
Status in LINK OK, please check your router for MAC filtering. If<br />
MAC filtering is enabled, please enter <strong>the</strong> MAC address <strong>to</strong> <strong>the</strong><br />
list. If MAC filtering is not enable, please reset <strong>the</strong> router by<br />
powering it off, <strong>the</strong>n back on. Also, turn <strong>the</strong> <strong>print</strong>er off, <strong>the</strong>n back<br />
on. Wait approximately one minute. Print out <strong>the</strong> Network<br />
Settings page again and verify <strong>the</strong> settings. If <strong>the</strong> IP Address is<br />
still a 169.254.x.x number, please verify your security<br />
information in STEP I is correct and start again from STEP III.<br />
If <strong>the</strong> IP Address is a 169.254.x.x number and <strong>the</strong> Wireless Link<br />
Status in FAILED TO ASSOCIATE, please reset <strong>the</strong> router by<br />
powering it off, <strong>the</strong>n back on. Also, turn <strong>the</strong> <strong>print</strong>er off, <strong>the</strong>n back<br />
on. Print out <strong>the</strong> Network Settings page again and verify <strong>the</strong><br />
settings. If <strong>the</strong> IP Address is still a 169.254.x.x number, please<br />
verify your security information in STEP I is correct and start<br />
again from STEP III.<br />
The <strong>print</strong>er is now <strong>configure</strong>d and is operating on your network.<br />
If you have Bro<strong>the</strong>r software CD, proceed <strong>to</strong> STEP V. If you<br />
do not have <strong>the</strong> CD, proceed <strong>to</strong> STEP VI.<br />
STEP V: Install <strong>the</strong> <strong>print</strong>er driver from <strong>the</strong> CD<br />
1. Insert <strong>the</strong> Bro<strong>the</strong>r software CD in<strong>to</strong> <strong>the</strong> CD-ROM drive.<br />
Double click <strong>the</strong> HL2100 CD icon on <strong>the</strong> desk<strong>to</strong>p. Double<br />
click on Start Here.<br />
The opening screen will appear au<strong>to</strong>matically. Choose your<br />
<strong>print</strong>er model.<br />
Page 5 of 10