

GP450X - GME
GP450X - GME
GP450X - GME

Create successful ePaper yourself
Turn your PDF publications into a flip-book with our unique Google optimized e-Paper software.
ErasING WayPoINts<br />
1 . At the main menu, highlight ErasE and press the ENt key .<br />
The Erase screen appears .<br />
2 . The WayPoINts/marks option is highlighted by default .<br />
Press the ENt key . The ERASE WPTS/MARKS screen is shown<br />
listing your current Waypoints .<br />
3 . To erase individual Waypoints, use the cursor keys to select<br />
the required Waypoint name then press ENt . The Waypoint<br />
properties window appears for the selected Waypoint .<br />
4 . Press the key to select the ErasE option and press ENt .<br />
The Waypoint is immediately erased .<br />
Note: You cannot erase system generated Waypoints such as<br />
CURSOR, MOB or START<br />
5 . To erase ALL the Waypoints in your unit, highlight the all?<br />
option and press ENt . You will be asked to confirm<br />
your selection .<br />
6 . Press the key to select yEs then press ENt . All your<br />
Waypoints will be deleted leaving just the system generated<br />
Waypoints cursor, moB and start .<br />
routEs<br />
Often a trip from one place to another involves several course<br />
changes requiring a series of Waypoints . This sequence of<br />
Waypoints leading you to your destination is called a route .<br />
Your <strong>GP450X</strong> can be programmed to traverse a sequence of<br />
Waypoints, automatically advancing to the next Waypoint as<br />
you progress, so you do not have to repeatedly switch to the<br />
next Waypoint . You can also travel the route in the opposite<br />
direction, using it to return back home again .<br />
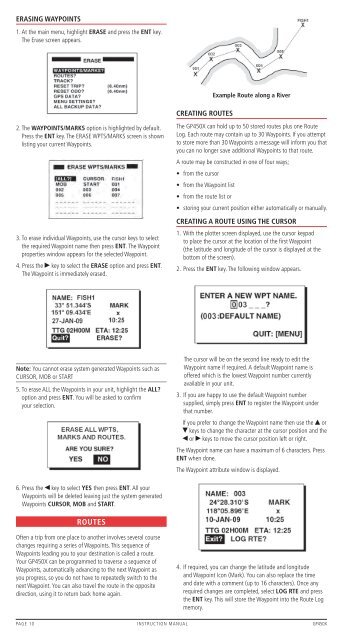
crEatING routEs<br />
Example route along a river<br />
The <strong>GP450X</strong> can hold up to 50 stored routes plus one Route<br />
Log . Each route may contain up to 30 Waypoints . If you attempt<br />
to store more than 30 Waypoints a message will inform you that<br />
you can no longer save additional Waypoints to that route .<br />
A route may be constructed in one of four ways;<br />
• from the cursor<br />
• from the Waypoint list<br />
• from the route list or<br />
• storing your current position either automatically or manually.<br />
crEatING a routE usING thE cursor<br />
1 . With the plotter screen displayed, use the cursor keypad<br />
to place the cursor at the location of the first Waypoint<br />
(the latitude and longitude of the cursor is displayed at the<br />
bottom of the screen) .<br />
2 . Press the ENt key . The following window appears .<br />
The cursor will be on the second line ready to edit the<br />
Waypoint name if required . A default Waypoint name is<br />
offered which is the lowest Waypoint number currently<br />
available in your unit .<br />
3 . If you are happy to use the default Waypoint number<br />
supplied, simply press ENt to register the Waypoint under<br />
that number .<br />
If you prefer to change the Waypoint name then use the or<br />
keys to change the character at the cursor position and the<br />
or keys to move the cursor position left or right .<br />
The Waypoint name can have a maximum of 6 characters . Press<br />
ENt when done .<br />
The Waypoint attribute window is displayed .<br />
4 . If required, you can change the latitude and longitude<br />
and Waypoint Icon (Mark) . You can also replace the time<br />
and date with a comment (up to 16 characters) . Once any<br />
required changes are completed, select loG rtE and press<br />
the ENt key . This will store the Waypoint into the Route Log<br />
memory .<br />
PAGE 10 INSTRUCTION MANUAL <strong>GP450X</strong>


