Xedio Ingest Organizer User's Manual - EVS
Xedio Ingest Organizer User's Manual - EVS
Xedio Ingest Organizer User's Manual - EVS

You also want an ePaper? Increase the reach of your titles
YUMPU automatically turns print PDFs into web optimized ePapers that Google loves.
User <strong>Manual</strong><br />
Version 4.2 - June 2012<br />
<strong>Xedio</strong> <strong>Ingest</strong> <strong>Organizer</strong><br />
From <strong>Xedio</strong> Suite
<strong>Xedio</strong> Suite Version 4.2 - User <strong>Manual</strong> – <strong>Ingest</strong> <strong>Organizer</strong><br />
<strong>EVS</strong> Broadcast Equipment – June 2012<br />
COPYRIGHT<br />
<strong>EVS</strong> Broadcast Equipment – Copyright © 2010-2012. All rights reserved.<br />
DISCLAIMER<br />
Issue 4.2.B<br />
The information in this manual is furnished for informational use only and subject<br />
to change without notice. While every effort has been made to ensure that the<br />
information contained in this user manual is accurate, up-to-date and reliable,<br />
<strong>EVS</strong> Broadcast Equipment cannot be held responsible for inaccuracies or errors<br />
that may appear in this publication.<br />
IMPROVEMENT REQUESTS<br />
Your comments will help us improve the quality of the user documentation. Do not<br />
hesitate to send improvement requests, or report any error or inaccuracy on this<br />
user manual by e-mail to doc@evs.tv.<br />
REGIONAL CONTACTS<br />
You will find the full list of addresses and phone numbers of the <strong>EVS</strong> headquarters<br />
and local offices either at the end of this user manual or on the <strong>EVS</strong> website on<br />
the following page: http://www.evs.tv/contacts.<br />
USER MANUALS ON <strong>EVS</strong> WEBSITE<br />
The latest version of the user manual, if any, and other user manuals on <strong>EVS</strong><br />
products can be found on the <strong>EVS</strong> download center, on the following webpage:<br />
http://www.evs.tv/downloadcenter.<br />
I
Issue 4.2.B<br />
II<br />
<strong>Xedio</strong> Suite Version 4.2 – User <strong>Manual</strong> - <strong>Ingest</strong> <strong>Organizer</strong><br />
<strong>EVS</strong> Broadcast Equipment – June 2012
<strong>Xedio</strong> Suite Version 4.2 - User <strong>Manual</strong> – <strong>Ingest</strong> <strong>Organizer</strong><br />
<strong>EVS</strong> Broadcast Equipment – June 2012<br />
Issue 4.2.B<br />
Table of Contents<br />
TABLE OF CONTENTS ................................................................................................. III<br />
WHAT’S NEW? .............................................................................................................. IV<br />
1. INTRODUCTION ..................................................................................................... 1<br />
2. XEDIO INGEST - SERVER ..................................................................................... 2<br />
3. XEDIO INGEST ORGANIZER - CLIENT................................................................. 3<br />
3.1 USER INTERFACE ...................................................................................................................... 3<br />
3.1.1 Opening <strong>Ingest</strong> <strong>Organizer</strong> ....................................................................................................... 3<br />
3.1.2 Overview of the <strong>Xedio</strong> <strong>Ingest</strong> <strong>Organizer</strong> Window .................................................................... 3<br />
3.2 ENCODER DEVICES................................................................................................................... 6<br />
3.2.1 Overview of the Encoders Tab ................................................................................................ 6<br />
3.2.2 Encoding ................................................................................................................................. 6<br />
3.2.3 Encoder ................................................................................................................................... 9<br />
3.3 VTR DEVICE .............................................................................................................................. 10<br />
3.3.1 Purpose ................................................................................................................................. 10<br />
3.3.2 General Tab and Metadata Tab ............................................................................................ 11<br />
3.3.3 Channel Area ........................................................................................................................ 11<br />
3.3.4 VTR Area .............................................................................................................................. 11<br />
3.4 SCHEDULER ............................................................................................................................. 12<br />
3.4.1 Purpose ................................................................................................................................. 12<br />
3.4.2 Timeline View Settings .......................................................................................................... 12<br />
3.4.3 Timeline Content ................................................................................................................... 14<br />
3.5 RECORDING TC VERSUS MEDIA TC ...................................................................................... 16<br />
III
Issue 4.2.B<br />
IV<br />
<strong>Xedio</strong> Suite Version 4.2 – User <strong>Manual</strong> - <strong>Ingest</strong> <strong>Organizer</strong><br />
<strong>EVS</strong> Broadcast Equipment – June 2012<br />
What’s New?<br />
The following table describes the sections updated to reflect the new and modified<br />
features on <strong>Xedio</strong> <strong>Ingest</strong> <strong>Organizer</strong> from <strong>Xedio</strong> Suite 4.2 (compared to <strong>Xedio</strong> Suite<br />
4.1).<br />
In the user manual, the icon has been added on left margin to highlight<br />
information on new and updated features.<br />
Click the section number (or the description) in the table to jump directly to the<br />
corresponding section.<br />
Section Description<br />
3.2.2 The rule for the selection of the encoded file video ratio<br />
has changed.
<strong>Xedio</strong> Suite Version 4.2 - User <strong>Manual</strong> – <strong>Ingest</strong> <strong>Organizer</strong><br />
<strong>EVS</strong> Broadcast Equipment – June 2012<br />
Issue 4.2.B<br />
1. Introduction<br />
The <strong>Xedio</strong> <strong>Ingest</strong> application allows a user to control encoder channels to digitize<br />
any incoming video into high resolution, low resolution or both simultaneously (a<br />
panel of different codecs is available). The <strong>Xedio</strong> <strong>Ingest</strong> application can control<br />
multiple incoming feeds simultaneously and offers a VGA monitoring feed of the<br />
incoming video as it is being encoded.<br />
As a fully integrated part of the <strong>Xedio</strong> Suite of applications the files are entered<br />
into the database as they are being ingested and can be used by other<br />
applications in the Suite even before the encoding process has been completed.<br />
The <strong>Xedio</strong> <strong>Ingest</strong> is a server/client based system and therefore consists of two<br />
elements:<br />
<strong>Xedio</strong> <strong>Ingest</strong> (server) – Software which runs on the hardware encoder to enable<br />
the control of the ingest process.<br />
<strong>Xedio</strong> <strong>Ingest</strong> <strong>Organizer</strong> (client) – Software which runs on any workstation within<br />
the <strong>Xedio</strong> environment and controls the ingest process of all encoders that are<br />
part of the system.<br />
1
Issue 4.2.B<br />
2<br />
<strong>Xedio</strong> Suite Version 4.2 – User <strong>Manual</strong> - <strong>Ingest</strong> <strong>Organizer</strong><br />
<strong>EVS</strong> Broadcast Equipment – June 2012<br />
2. <strong>Xedio</strong> <strong>Ingest</strong> - Server<br />
The <strong>Xedio</strong> <strong>Ingest</strong> (server) application running on a hardware encoder is usually set<br />
up to auto start when the computer is switched on. If however it is not set up in<br />
this way the program can be started manually. Click on the <strong>Xedio</strong> <strong>Ingest</strong> icon on<br />
the desktop to start the application.<br />
A dialogue box will then appear and ask the user to start the application. At this<br />
point a password can be set up and ticking the check box can set the auto start<br />
option.<br />
When the application is started the message window shows the progress of the<br />
connection to the Client application and displays any problems it may have in the<br />
set up.
<strong>Xedio</strong> Suite Version 4.2 - User <strong>Manual</strong> – <strong>Ingest</strong> <strong>Organizer</strong><br />
<strong>EVS</strong> Broadcast Equipment – June 2012<br />
3.1 USER INTERFACE<br />
3.1.1 OPENING INGEST ORGANIZER<br />
Issue 4.2.B<br />
3. <strong>Xedio</strong> <strong>Ingest</strong><br />
<strong>Organizer</strong> - Client<br />
To start the <strong>Xedio</strong> <strong>Ingest</strong> <strong>Organizer</strong> application, click on the <strong>Xedio</strong><br />
<strong>Ingest</strong> <strong>Organizer</strong> icon on the desktop.<br />
This will display a login screen where you need to enter your username<br />
and password.<br />
3.1.2 OVERVIEW OF THE XEDIO INGEST ORGANIZER WINDOW<br />
The <strong>Xedio</strong> <strong>Ingest</strong> <strong>Organizer</strong> graphical interface consists of several areas<br />
highlighted on the following screenshot and shortly described in the table below.<br />
Note<br />
The color of some user interface elements may vary with the <strong>Xedio</strong> skin<br />
installed.<br />
3
Issue 4.2.B<br />
4<br />
Area Description<br />
<strong>Xedio</strong> Suite Version 4.2 – User <strong>Manual</strong> - <strong>Ingest</strong> <strong>Organizer</strong><br />
<strong>EVS</strong> Broadcast Equipment – June 2012<br />
1. Outlook Area This displays the list of the devices which can be controlled<br />
by the <strong>Ingest</strong> <strong>Organizer</strong>.<br />
The Outlook bar presents at least as many tabs as there are<br />
devices to control.<br />
Each tab provides access to a series of items. Once a<br />
category tab is selected, its specific items are shown as<br />
icons.
<strong>Xedio</strong> Suite Version 4.2 - User <strong>Manual</strong> – <strong>Ingest</strong> <strong>Organizer</strong><br />
<strong>EVS</strong> Broadcast Equipment – June 2012<br />
Area Description<br />
Issue 4.2.B<br />
Select any of these icons to display its relevant interface in<br />
the Work area.<br />
The set up of encoders and VTR devices is made in the<br />
<strong>Xedio</strong> Manager application.<br />
2. Work Area The Work area displays a timeline with the ingests that are<br />
scheduled or took place over a period of time for each of the<br />
controlled devices.<br />
It interactively changes when an item is selected in one<br />
category from the Outlook area.<br />
3. Logbook This lists the processes undertaken by the software and<br />
reports any error encountered during the processes.<br />
5
Issue 4.2.B<br />
3.2 ENCODER DEVICES<br />
3.2.1 OVERVIEW OF THE ENCODERS TAB<br />
6<br />
<strong>Xedio</strong> Suite Version 4.2 – User <strong>Manual</strong> - <strong>Ingest</strong> <strong>Organizer</strong><br />
<strong>EVS</strong> Broadcast Equipment – June 2012<br />
Several items are available in the ‘Encoders’ category. They are detailed below.<br />
3.2.2 ENCODING<br />
PURPOSE<br />
When you click the Encoding button for an encoder device, the following Encoder<br />
window is displayed in the Work area, allowing you to enter data for the encoded<br />
file, to select the method of recording that will be used and to start the recording<br />
process.
<strong>Xedio</strong> Suite Version 4.2 - User <strong>Manual</strong> – <strong>Ingest</strong> <strong>Organizer</strong><br />
<strong>EVS</strong> Broadcast Equipment – June 2012<br />
GENERAL TAB<br />
Issue 4.2.B<br />
To create an output file, enter the relevant data into the fields displayed in the<br />
General tab:<br />
Field Description<br />
Label Name you give to the file that will be encoded<br />
Id Feed Identification given to a feed that could be provided by a<br />
press agency<br />
External Ref Reference which can help to identify the encoded media,<br />
such as a barcode from a VTR tape.<br />
Media Class Class categorizing the media. The classes are defined in<br />
the Class Manager of the <strong>Xedio</strong> Manager application.<br />
Shooting Date Date on which the media has been filmed. To update the<br />
date, click the Shooting Date button and select a date in<br />
the calendar displayed from the drop-down arrow.<br />
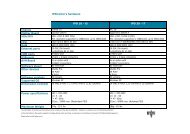
Video Ratio Video ratio of the encoded media.<br />
Possible values:<br />
• if the hi-res encoding profile is HD, the only option<br />
available in the Video Ratio field is Forced 16:9. This<br />
will obviously be the default value in HD.<br />
• if the hi-res encoding profile is SD, the options<br />
available in the Video Ratio field are Auto (it is<br />
automatically detected by the encoder and passed to<br />
<strong>Ingest</strong> <strong>Organizer</strong>), Forced 4:3, Forced 16:9.<br />
Source Original source of the feed.<br />
The default value in SD will be the last one used, per<br />
channel per user.<br />
Routing Free text to describe how the feed was routed to the<br />
system.<br />
Description Optional text to describe the encoded media.<br />
Publish Allows to see the encoded media in the client<br />
workstations database lists.<br />
METADATA TAB<br />
In the Metadata tab, the users can select one of the available metadata profiles by<br />
clicking in the Metadata Profile field. Then, they can enter metadata values for<br />
the encoded media.<br />
7
Issue 4.2.B<br />
8<br />
RECORDING MODE AREA<br />
<strong>Xedio</strong> Suite Version 4.2 – User <strong>Manual</strong> - <strong>Ingest</strong> <strong>Organizer</strong><br />
<strong>EVS</strong> Broadcast Equipment – June 2012<br />
The recording on an encoder from <strong>Xedio</strong> <strong>Ingest</strong> <strong>Organizer</strong> can be started in one of<br />
the three following modes:<br />
• <strong>Manual</strong>: when you click the Start Record button, a dialog box allows you to<br />
enter a record duration. The encoding process starts as soon as you click the<br />
Start with Limits button.<br />
• On Trigger: you can enter a start timecode and a stop timecode. The encoding<br />
process will start and stop at the specified timecodes.<br />
• On Time: you can enter start and stop times and dates for the encoding<br />
process. This option is dimmed when the scheduler interface is available.<br />
STATUS AREA<br />
The Server status shows if the <strong>Xedio</strong> <strong>Ingest</strong> <strong>Organizer</strong> application is connected by<br />
IP to the corresponding <strong>Xedio</strong> <strong>Ingest</strong> Server.<br />
The High and Low Bit rate status show if <strong>Xedio</strong> <strong>Ingest</strong> <strong>Organizer</strong> is<br />
communicating with the encoder software for the specified encoder. Ready is<br />
displayed when the encoder is ready for the recording. During the recording<br />
process, Rec is displayed.<br />
The Connect button allows the user to make the connection manually if the status<br />
currently shows a disconnection.
<strong>Xedio</strong> Suite Version 4.2 - User <strong>Manual</strong> – <strong>Ingest</strong> <strong>Organizer</strong><br />
<strong>EVS</strong> Broadcast Equipment – June 2012<br />
Issue 4.2.B<br />
The Start Record button becomes active to start the encoding process as soon as<br />
the status shows a connected state.<br />
3.2.3 ENCODER<br />
Depending on the encoder type, a Low BitRate Encoder button and/or a High<br />
BitRate Encoder button are available.<br />
When you click one of the Encoder buttons for an encoder device, the following<br />
Encoder window is displayed in the Work area, showing information about the<br />
encoder and a monitoring output of the current encoding file.<br />
Note<br />
The video shown will only be at a rate<br />
• defined by the GOP structure with the CDM[1] encoders (MPEG2 I<br />
frames only will be displayed: about 2 per second) and<br />
• defined by the setup of the system with the CDM[2] encoders.<br />
With the CDM[2], only one monitoring at a time can be performed by a<br />
user.<br />
9
Issue 4.2.B<br />
3.3 VTR DEVICE<br />
3.3.1 PURPOSE<br />
10<br />
<strong>Xedio</strong> Suite Version 4.2 – User <strong>Manual</strong> - <strong>Ingest</strong> <strong>Organizer</strong><br />
<strong>EVS</strong> Broadcast Equipment – June 2012<br />
When you click the Control VTR button from the VTR category tab, the following<br />
VTR window is displayed in the Work area, allowing you to define data for the<br />
recorded file, to control the VTR and mark areas of the tape to be ingested.
<strong>Xedio</strong> Suite Version 4.2 - User <strong>Manual</strong> – <strong>Ingest</strong> <strong>Organizer</strong><br />
<strong>EVS</strong> Broadcast Equipment – June 2012<br />
3.3.2 GENERAL TAB AND METADATA TAB<br />
Issue 4.2.B<br />
These areas have the same fields as the encoder control window. Please refer to<br />
sections ‘General Tab’ on page 7 and ‘Metadata Tab’ on page 7 for a description<br />
of those areas.<br />
3.3.3 CHANNEL AREA<br />
This parameter allows the user to connect to the logical channel that has been<br />
assigned to ingest the media from the tape in the VTR. Choose the channel and<br />
click the Connect button to establish the communication.<br />
3.3.4 VTR AREA<br />
The VTR area provides transport buttons to control the VTR as well as In and Out<br />
buttons to mark sections of the tape to ingest.<br />
The Record Timecode area allows the user to choose between the existing<br />
timecode on the tape or the external source of timecode connected to the encoder<br />
when the encoding is performed.<br />
Each area of tape can be determined and added to a list using the Add In List<br />
button. When the selection from the tape is complete, the ingest is started by<br />
clicking the Start Batch button.<br />
11
Issue 4.2.B<br />
3.4 SCHEDULER<br />
3.4.1 PURPOSE<br />
12<br />
<strong>Xedio</strong> Suite Version 4.2 – User <strong>Manual</strong> - <strong>Ingest</strong> <strong>Organizer</strong><br />
<strong>EVS</strong> Broadcast Equipment – June 2012<br />
The Scheduler tab displays a timeline with all the records already encoded, being<br />
encoded or scheduled to take place within the displayed time window.<br />
Each logical encoder has its own timeline.<br />
The green line is the nowline and reflects the current time. The thin red line<br />
corresponds to the time before which no action can be performed through the<br />
scheduler. <strong>Ingest</strong> media is displayed in the form of blocks in the timeline.<br />
3.4.2 TIMELINE VIEW SETTINGS<br />
TIME SPAN<br />
Clicking the [Time] button displays a contextual menu:<br />
This setting sets the range of time displayed on the timeline. The mouse scroll<br />
button may also be used to change this range and zoom in or out the displayed<br />
range.
<strong>Xedio</strong> Suite Version 4.2 - User <strong>Manual</strong> – <strong>Ingest</strong> <strong>Organizer</strong><br />
<strong>EVS</strong> Broadcast Equipment – June 2012<br />
PARAMETERS<br />
Issue 4.2.B<br />
Clicking the Parameters button displays a contextual menu with the following<br />
options:<br />
Menu Items Meaning<br />
Setup Gives options for the amount of encoders displayed on<br />
screen and the adjustment of the display refresh rates<br />
Goto Now Returns to the current date and time.<br />
Nowline Focus If this option is selected, the timeline for all encoders is<br />
displayed in such a way that the nowline is always<br />
centered and only the range of the displayed period can<br />
be adjusted. If the option is not selected, the display can<br />
be set to show any time period at any date.<br />
Block List Dialog Displays the list of blocks present in the timeline for a<br />
specific period of time:<br />
13
Issue 4.2.B<br />
14<br />
Menu Items Meaning<br />
<strong>Xedio</strong> Suite Version 4.2 – User <strong>Manual</strong> - <strong>Ingest</strong> <strong>Organizer</strong><br />
<strong>EVS</strong> Broadcast Equipment – June 2012<br />
Clip Display Settings Allows to select the information to be displayed in the<br />
encoded block :<br />
Show Thumbnails Shows a thumbnail for the encoding block.<br />
Refresh Refreshes the graphical interface.<br />
About Gives information about the version of <strong>Ingest</strong> Scheduler.<br />
CURRENT DATE<br />
The Current Date field allows to select the date for the timeline display. This is<br />
only available if the Nowline Focus parameter is disabled from the Parameters<br />
menu.<br />
3.4.3 TIMELINE CONTENT<br />
BLOCK STATUS COLORS<br />
The block status is shown by means of different colors as follows:<br />
Block Color Status<br />
A blue block to the right of the nowline is a Scheduled<br />
ingest.<br />
A currently Recording ingest is orange.
<strong>Xedio</strong> Suite Version 4.2 - User <strong>Manual</strong> – <strong>Ingest</strong> <strong>Organizer</strong><br />
<strong>EVS</strong> Broadcast Equipment – June 2012<br />
Block Color Status<br />
BLOCK CONTEXTUAL MENU<br />
Issue 4.2.B<br />
A green block to the left of the nowline is a successfully<br />
Recorded ingest.<br />
A contextual menu is available when you right-click in the timeline:<br />
Menu Item Description<br />
New Records Opens an Edit Mode window allowing you to enter<br />
parameters for a new file to encode.<br />
Modify Records Available when right-clicking on a block.<br />
Opens an Edit Mode window allowing you to update the<br />
parameters of the encoding file.<br />
View records Opens a View Mode window showing you the parameters<br />
of the encoding file.<br />
Play Provides a sub-menu with the Lowbitrate and the<br />
Highbitrate options. Selecting one option opens the<br />
CleanEdit Player window from which you can view the<br />
encoded/encoding block.<br />
BLOCK TOOLTIP<br />
Some of the metadata associated to an ingest can be easily viewed by placing the<br />
pointer over the corresponding block. A tooltip is displayed:<br />
15
Issue 4.2.B<br />
16<br />
<strong>Xedio</strong> Suite Version 4.2 – User <strong>Manual</strong> - <strong>Ingest</strong> <strong>Organizer</strong><br />
<strong>EVS</strong> Broadcast Equipment – June 2012<br />
3.5 RECORDING TC VERSUS MEDIA TC<br />
The <strong>Xedio</strong> <strong>Ingest</strong> server usually pilots two encoders: one in hi-res (EncHi) and one<br />
in lo-res (EncLow).<br />
Each encoder creates one Media file: hi-res media file and lo-res media file.<br />
<strong>Xedio</strong> <strong>Ingest</strong> sends the recording command to both encoders at the same time.<br />
However, according to several parameters, such as the codec, the recording does<br />
not start at the same time on both encoders. So, the TC IN and TC OUT of the two<br />
Media files will differ. This is absolutely normal and there can be up to 10 seconds<br />
between both TC IN or between both TC OUT in some cases.<br />
Once the recording is finished, the <strong>Xedio</strong> <strong>Ingest</strong> analyses the TC IN and the TC<br />
OUT of each Media file and creates a single Media file corresponding to the<br />
material common to both lo-res and hi-res files.<br />
• The Media TC IN will be the highest value between both TC IN.<br />
• The Media TC OUT will be the lowest value between both TC OUT.<br />
This difference can be viewed in a player when TC Intra is displayed.<br />
The recording existed from when the first encoder started until the last encoder<br />
stopped. So, in the scheduler:<br />
• The Recording TC IN value will be the lowest between both TC IN.<br />
• The Media TC OUT value will be the highest between both TC OUT.<br />
In summary, the duration of one recording is always greater than the duration of<br />
the corresponding Media and its Media files. The duration of one Media is always<br />
smaller that the duration of its Media files and the corresponding recording.<br />
Additionally, a clip can be created from a media. It will therefore always have its<br />
TC IN and TC OUT within the Media TC IN and TC OUT limits.<br />
This is explained in the following diagram.
<strong>Xedio</strong> Suite Version 4.2 - User <strong>Manual</strong> – <strong>Ingest</strong> <strong>Organizer</strong><br />
<strong>EVS</strong> Broadcast Equipment – June 2012<br />
Issue 4.2.B<br />
17
<strong>EVS</strong> Broadcast Equipment<br />
Liège Science Park<br />
16, rue Bois St Jean<br />
B-4102 Ougrée<br />
Belgium<br />
Corporate<br />
Headquarters<br />
+32 4 361 7000<br />
North & Latin America<br />
Headquarters<br />
+1 973 575 7811<br />
To learn more about <strong>EVS</strong> go to www.evs.tv<br />
Asia & Pacific<br />
Headquarters<br />
+852 2914 2501<br />
Other regional offices<br />
available on<br />
www.evs.tv/contact