Create successful ePaper yourself
Turn your PDF publications into a flip-book with our unique Google optimized e-Paper software.
<strong>MP</strong>-<strong>201</strong> User’s <strong>Manual</strong><br />
Instant Gratification<br />
Follow these steps to experience some of what the <strong>MP</strong>-<strong>201</strong> Multi-Pedal can do.<br />
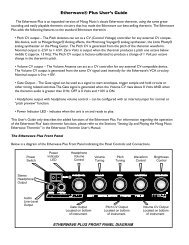
Unpack and set up the Multi-Pedal. Connect the supplied AC adapter to the POW-<br />
ER IN jack on the back of the Multi-Pedal, and then make additional connections as<br />
shown. For CV connections, use a standard 1⁄4“ patch cord. For MIDI connections,<br />
use a standard MIDI DIN cable<br />
For Analog CV Control -<br />
Page 8<br />
1. If you plan to use the Multi-Pedal with a Minimoog Voyager or Little<br />
Phatty setup, plug the other end of the patch cord in the FILTER input<br />
jack. Select a highly resonant patch, and turn the instrument’s FILTER<br />
CUTOFF knob to a low setting.<br />
If you plan to use the Multi-Pedal with a <strong>Moog</strong>erfooger Pedal, set things<br />
up as you normally would with your instrument, and then plug the<br />
other end of the patch cord into one of the following <strong>Moog</strong>erfooger<br />
pedal jacks:<br />
MF-101: Plug into the CUTOFF jack, and set the FILTER CUTOFF<br />
knob to a low setting. Set the resonance fairly high.<br />
MF-102: Plug into the FREQ jack. Set the FREQ knob CCW.<br />
MF-103: Plug into the RATE jack. Set the RATE knob CCW.<br />
MF-104: Plug into the TIME jack. Set the TIME knob CCW.<br />
MF-105: Plug into the RATE jack. Set the RATE knob to 12:00.<br />
MF-107: Plug into the FREQ jack. Set the FREQ knob CCW.<br />
2. Adjust your monitoring (amp or headphones) for a comfortable<br />
listening level.