Create successful ePaper yourself
Turn your PDF publications into a flip-book with our unique Google optimized e-Paper software.
CHANGING THE CASSETTE<br />
To Remove Used<br />
Cassette<br />
To Attach New<br />
Cassette<br />
ALARMS & TROUBLESHOOTING<br />
The <strong>CADD</strong>-<strong>Legacy</strong> ®<br />
1 pump signals with audible alarms and message<br />
that appear on the display when a condition requires your attention.<br />
Res Vol Low<br />
Three beeps<br />
Reservoir Volume Empty<br />
Two-tone alarm<br />
Low Bat<br />
Three two-tone beeps<br />
every fi ve minutes<br />
Battery Depleted<br />
Two-tone alarm<br />
Battery Removed<br />
Pump Won’t Run<br />
Two-tone alarm<br />
High Pressure<br />
Two-tone alarm<br />
1. Stop the pump.<br />
2. Close all tubing clamps.<br />
3. Disconnect tubing from patient.<br />
4. Use coin to unlatch used cassette.<br />
5. Remove and discard used cassette.<br />
1. Close all tubing clamps.<br />
2. Insert new cassette hooks into pump’s hinge pins.<br />
3. Place pump with cassette on fi rm surface and<br />
push down on top of pump so cassette fi ts<br />
tightly against the pump.<br />
4. Insert a coin into the lock, push in and turn until<br />
the line on the lock lines up with the arrow on<br />
the side of the pump.<br />
5. Gently twist and pull on cassette to make sure it<br />
is attached properly.<br />
6. Press ENTER/CLEAR to reset reservoir volume,<br />
if appropriate.<br />
7. If the Air Detector is in use, make a small loop<br />
of tubing underneath the air detector and hold<br />
it with your thumb. Place the tubing over the<br />
groove in the air detector and tuck it under the<br />
catch. Seat the tubing into the groove by gently<br />
pulling the tube upward until it is under the<br />
retention nubs and fl at in the groove.<br />
WARNING: Attach the cassette (the part of the<br />
Medication Cassette reservoir or <strong>CADD</strong> ®<br />
administration set that attaches to the pump)<br />
properly. An improperly attached or detached<br />
cassette could result in unregulated gravity infusion<br />
of medication from the fl uid container or a refl ux of<br />
blood. If you are using a <strong>CADD</strong> ®<br />
administration set<br />
or Medication Cassette reservoir that does not have<br />
the fl ow stop feature (catalog number does not start<br />
with 21-73xx): You must use a <strong>CADD</strong> ®<br />
extension<br />
set with an integral anti-siphon valve or a <strong>CADD</strong> ®<br />
administration set with either and integral or add<br />
on anti-siphon valve to protect against unregulated<br />
gravity infusion that can result from an improperly<br />
attached cassette.<br />
Level of fl uid in the reservoir is low.<br />
Prepare to install new reservoir.<br />
Reservoir volume has reached 0.0 ml.<br />
Press NEXT or STOP/START to silence<br />
alarm. Install a new reservoir, if appropriate.<br />
Batteries are low, but pump is operable.<br />
Change batteries soon.<br />
Batteries are depleted and cannot operate<br />
pump; install new batteries immediately.<br />
With AC adapter attached, batteries have<br />
been removed while pump was running,<br />
or you tried to start pump with depleted<br />
batteries. Install new batteries.<br />
High pressure is being caused by an<br />
occlusion in the fl uid path between<br />
the pump and the patient. Remove the<br />
occlusion to resume operation. Or press<br />
STOP/START or NEXT to stop the pump<br />
and silence the alarm for two minutes, then<br />
remove occlusion and restart pump.<br />
ALARMS & TROUBLESHOOTING CONTINUED<br />
The <strong>CADD</strong>-<strong>Legacy</strong> ®<br />
1 pump signals with audible alarms and messages<br />
that appear on the display when a condition requires your attention.<br />
Upstream Occlusion<br />
Two-tone alarm<br />
Screen Displays<br />
Current Pump Status<br />
Two-beep (long-short)<br />
alarm<br />
Air In Line Detected<br />
Two-tone alarm<br />
Stopped<br />
Three beeps every<br />
fi ve minutes<br />
Value Not Saved<br />
Error<br />
Two-tone alarm<br />
No Message Displayed<br />
Two-tone alarm<br />
No Disposable,<br />
Clamp Tubing<br />
Two-beep<br />
(long-short) alarm<br />
Service Due<br />
Two-tone alarm<br />
Fluid is not fl owing from the reservoir to<br />
the pump. Check for a kink or air bubble in<br />
the tubing between the reservoir and pump.<br />
Remove the occlusion to resume operation.<br />
Or press STOP/START or NEXT to stop the<br />
pump and silence alarm for two minutes, then<br />
remove the occlusion and restart the pump.<br />
The cassette is not aligned with the pump,<br />
or is damaged, or a malfunction of the<br />
pump sensor(s) is occurring. Reposition the<br />
pump to silence the alarm. If repositioning<br />
the pump does not silence the alarm within<br />
two minutes, the pump will display “No<br />
Disposable, Clamp Tubing.”<br />
Air in fl uid path. Press NEXT or STOP/<br />
START to silence alarm. Make sure tubing is<br />
threaded in air detector properly. If the fl uid<br />
path contains air, close clamps, disconnect<br />
from patient and prime fl uid path.<br />
Pump is stopped. Start pump, if appropriate.<br />
A value was not saved by pressing ENTER/<br />
CLEAR. Press NEXT to resume programming.<br />
An error has occurred. Remove pump<br />
from service.<br />
The pump was running when batteries were<br />
removed or the batteries were removed<br />
within 15 seconds after stopping the pump.<br />
Batteries must be reinstalled.<br />
IMPORTANT: Always stop the pump before<br />
removing batteries.<br />
The disposable was removed, or the cassette<br />
is not aligned with the pump or is damaged,<br />
or a malfunction of the pump sensor(s) is<br />
occurring. Clamp the tubing immediately.<br />
Press STOP/START or NEXT to silence alarm.<br />
The pump is due for service.<br />
WARNING: This <strong>Quick</strong> <strong>Reference</strong> Card should be used by clinicians only.<br />
Do not permit patients to have access to this card, as the information would<br />
allow access to all programming and operating functions.<br />
Assistance with the <strong>CADD</strong>-<strong>Legacy</strong> ®<br />
1 pump is available to clinicians<br />
24-hours-a-day by calling (800) 426-2448 in the U.S.A. and Canada.<br />
<strong>CADD</strong>, <strong>CADD</strong>-<strong>Legacy</strong>, the Medication Cassette Reservoir design, and the Smiths Medical<br />
design mark are trademarks of the Smiths Medical family of companies. The symbol ® indicates<br />
the trademark is registered in the U.S. Patent and Trademark Offi ce and certain other<br />
countries. ©2007 Smiths Medical family of companies. All rights reserved. 5/07 19872<br />
B<br />
C<br />
D<br />
E<br />
F<br />
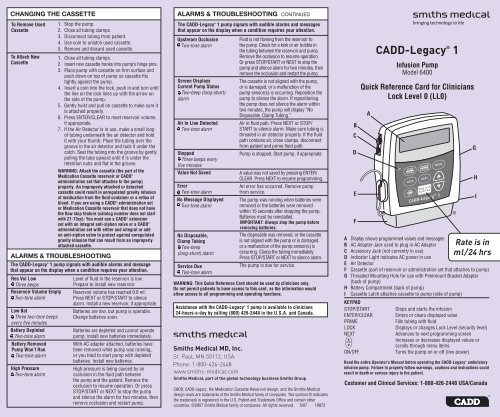
<strong>CADD</strong>-<strong>Legacy</strong> ®<br />
Infusion Pump<br />
Model 6400<br />
1<br />
<strong>Quick</strong> <strong>Reference</strong> Card for Clinicians<br />
Lock Level 0 (LL0)<br />
A<br />
A Display shows programmed values and messages<br />
B AC Adapter Jack used to plug in AC Adapter<br />
C Accessory Jack (not currently in use)<br />
D Indicator Light indicates AC power in use<br />
E Air Detector<br />
F Cassette (part of reservoir or administration set that attaches to pump)<br />
G Threaded Mounting Hole for use with Polemount Bracket Adapter<br />
(back of pump)<br />
H Battery Compartment (back of pump)<br />
I Cassette Latch attaches cassette to pump (side of pump)<br />
KEYPAD<br />
STOP/START Stops and starts the infusion<br />
ENTER/CLEAR Enters or clears displayed value<br />
PRIME Fills tubing with fl uid<br />
LOCK Displays or changes Lock Level (security level)<br />
NEXT<br />
´<br />
Î<br />
Advances to next programming screen<br />
Increases or decreases displayed values or<br />
scrolls through menu items<br />
ON/OFF Turns the pump on or off (low power)<br />
Read the entire Operator’s Manual before operating the <strong>CADD</strong>-<strong>Legacy</strong> ®<br />
ambulatory<br />
infusion pump. Failure to properly follow warnings, cautions and instructions could<br />
result in death or serious injury to the patient.<br />
Customer and Clinical Services: 1-800-426-2448 USA/Canada<br />
®<br />
®<br />
G<br />
H<br />
Rate is in<br />
ml/24 hrs<br />
I
PROGRAMMING / SET-UP SEQUENCE PUMP OPERATIONS PUMP OPERATIONS CONTINUED<br />
Batteries must be installed; pump must be stopped and in LL0.<br />
NOTE: Value Not Saved is displayed if a value is scrolled and ENTER/<br />
CLEAR is not pressed. Press NEXT to continue programming.<br />
WARNING: If the pump is dropped or hit, inspect it for damage. Do not use a<br />
pump that is damaged or is not functioning properly.<br />
Main Screen Press NEXT.<br />
Enter Reservoir 1. Press ´orÎ to select desired reservoir volume.<br />
Volume<br />
2. Press ENTER/CLEAR.<br />
3. Press NEXT.<br />
Enter Continuous 4. Press ´orÎ to select desired Continuous<br />
Rate in ml/24 hrs Rate in ml/24 hours.<br />
5. Press ENTER/CLEAR.<br />
6. Press NEXT.<br />
Change the<br />
Lock Level<br />
Stop the Pump<br />
Start the Pump<br />
1. Stop the pump.<br />
2. Press LOCK.<br />
3. Press ´orÎ until desired lock level appears.<br />
4. Press LOCK or ENTER/CLEAR.<br />
5. Press ´orÎ until the lock level code appears.<br />
6. Press LOCK or ENTER/CLEAR.<br />
1. Press and hold STOP/START until<br />
(– – – – – – – – – – – –) appears on the display.<br />
2. Release STOP/START key. STOPPED will<br />
appear on the display when the pump is stopped.<br />
BIOMED<br />
FUNCTIONS<br />
To Access<br />
To Turn Air Detector<br />
ON-HIGH, ON-LOW<br />
or OFF<br />
Pump must be stopped and in LL0.<br />
1. Press LOCK.<br />
2. Press LOCK or ENTER/CLEAR.<br />
3. Press ´orÎ until the biomed code appears.<br />
4. Press LOCK or ENTER/CLEAR.<br />
5. Press NEXT to go through settings.<br />
6. Press NEXT until AIR DETECTOR appears.<br />
7. Press ´orÎ until desired setting appears.<br />
8. Press ENTER/CLEAR.<br />
9. Press NEXT.<br />
WARNING: When the air detector is turned off, the<br />
pump will not detect air in the fl uid path. Periodically<br />
inspect the fl uid path and remove any air to prevent<br />
WARNING: This pump delivers medication at<br />
air embolism.<br />
a continuous rate in milliliters per 24 hours<br />
(ml/24 hrs). Programming the pump at a delivery<br />
rate other than what is prescribed will cause<br />
over- or under-delivery of medication.<br />
Prime the Fluid Path<br />
To Turn Upstream<br />
Sensor ON/OFF<br />
10. Press NEXT until UPSTREAM SENSOR appears.<br />
11. Press ´orÎ until desired setting appears.<br />
12. Press ENTER/CLEAR.<br />
Clear Milliliters 7. Press ENTER/CLEAR to clear the given value.<br />
13. Press NEXT.<br />
Given<br />
The display will show 0.00.<br />
WARNING: When the upstream occlusion sensor<br />
8. Press NEXT.<br />
is turned off, the pump will not detect occlusions<br />
upstream (between pump and reservoir).Periodically<br />
Verify Air Detector<br />
Status<br />
9. Verify the setting is correct. (To change<br />
setting, see Biomed Functions section.)<br />
10. Press NEXT.<br />
inspect the reservoir for decreasing reservoir volume<br />
and inspect the fl uid path for kinks, a closed clamp,<br />
or other upstream occlusions. Upstream occlusions<br />
could result in under- or non-delivery of medications.<br />
Verify Upstream<br />
Sensor Status<br />
Verify Programming<br />
11. Verify the setting is correct. (To change<br />
setting, see Biomed Functions section.)<br />
12. Press NEXT.<br />
13. Press NEXT repeatedly to review program.<br />
Reset the Reservoir<br />
Volume<br />
To Exit Biomed<br />
Functions<br />
14. Press NEXT until NEXT FOR BIOMED, ENTER<br />
FOR MAIN appears.<br />
15.Press ENTER/CLEAR to return to main screen.<br />
Or press NEXT to continue in Biomed settings loop.<br />
Turn the Pump On<br />
Turn the Pump Off<br />
Change the Batteries<br />
1. Press and hold STOP/START until<br />
(– – – – – – – – – – – –) disappears from the display.<br />
2. Release STOP/START key. RUN will appear on<br />
the display when the pump is running.<br />
Pump must be stopped and in LL0 or LL1.<br />
WARNING: Do not prime the fl uid path with the tubing<br />
connected to a patient as this could result in over<br />
delivery of medication or air embolism.<br />
1. Press and hold PRIME until the word PRIME<br />
appears on the display, along with<br />
(– – – – – – – – – – – –).<br />
2. Release the PRIME key.<br />
3. Press and hold PRIME. Priming appears on the<br />
display. Continue priming until the fl uid path is<br />
free of air.<br />
4. Press NEXT to return to the main screen.<br />
1. Stop the pump.<br />
2. Press NEXT to display the Reservoir Volume screen.<br />
3. Press ENTER/CLEAR to reset the value to<br />
previously programmed amount.<br />
1. Press and hold ON/OFF until pump beeps and<br />
powers up.<br />
1. Press and hold ON/OFF until (•••• •••• ••••)<br />
appears on the display.<br />
2. Release ON/OFF key.<br />
3. The screen will go blank as the pump goes into<br />
a lower power state.<br />
1. Stop the pump.<br />
2. Push down and hold the arrow button on the<br />
battery door while sliding the door off. Remove<br />
and discard old batteries.<br />
IMPORTANT: Always stop pump before removing<br />
batteries.<br />
3. Install new batteries, matching polarities shown<br />
on pump. Replace battery door and close.<br />
4. Start the pump.<br />
WARNING: If a gap is present anywhere between<br />
the battery door and the pump housing, the door is<br />
not properly latched. If the battery door becomes<br />
detached or loose, the batteries will not be<br />
properly secured which could result in loss of power<br />
or non-delivery of medication.<br />
WARNING: Do not use rechargeable NiCad or nickel<br />
metal hydride (NiMH) batteries. Do not use carbon<br />
zinc (“heavy duty”) batteries.<br />
PROGRAMMING SCREENS<br />
Main Screen Displays status of pump (STOPPED or RUN)<br />
Reservoir Volume Volume of fl uid in reservoir<br />
Continuous Rate Continuous rate of infusion in ml/24 hrs<br />
Given Total amount of medication delivered since<br />
display was last cleared<br />
Air Detector Indicates if air detector is turned on or off and<br />
(status only) high or low sensitivity level<br />
Upstream Sensor Indicates if turned on or off<br />
(status only)


