

Operating Instructions for Digital Mass Flow Meter and Controller Model: DMS
Operating Instructions for Digital Mass Flow Meter and Controller Model: DMS
Operating Instructions for Digital Mass Flow Meter and Controller Model: DMS

Create successful ePaper yourself
Turn your PDF publications into a flip-book with our unique Google optimized e-Paper software.
Kobold Messring GmbH Chapter 2 Installation<br />
Installing the Instrument—Plumbing<br />
® ®<br />
<strong>DMS</strong> instruments are supplied with compression, VCO , VCR , or<br />
female NPT process connections. To ensure a successful installation, inlet<br />
<strong>and</strong> outlet tubing should be in a clean state prior to plumbing the instrument<br />
into the system. The shipping caps covering the inlet/outlet fittings<br />
should not be removed until immediately be<strong>for</strong>e installation.<br />
Follow the installation instructions that are applicable to your instrument’s<br />
process connection. Ensure that the tubing is free from burrs, or sharp rims<br />
that may result from cutting.<br />
CAUTION: Be<strong>for</strong>e use, all plumbing should be checked carefully <strong>for</strong><br />
leaks, especially at the connecting fittings. All instruments are leaktested<br />
prior to shipping. It is not a requirement to leak test your instrument.<br />
Do not use liquid leak detectors to search <strong>for</strong> leaks<br />
inside or outside the <strong>DMS</strong>. Instead, monitor pressure decay.<br />
Compression Fittings<br />
1. Position the instrument with the flow direction arrow pointing in<br />
the direction of flow.<br />
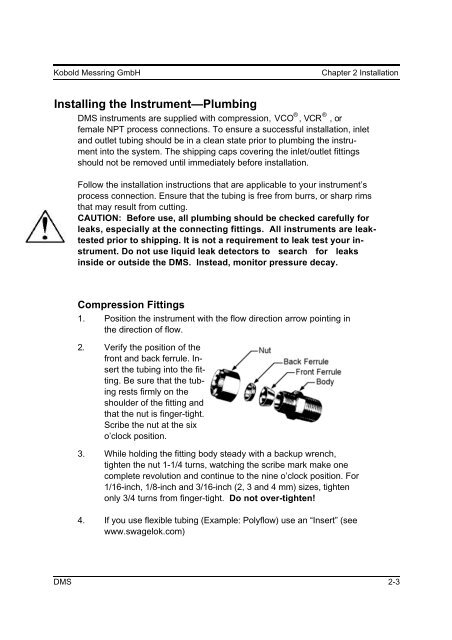
2. Verify the position of the<br />
front <strong>and</strong> back ferrule. Insert<br />
the tubing into the fitting.<br />
Be sure that the tubing<br />
rests firmly on the<br />
shoulder of the fitting <strong>and</strong><br />
that the nut is finger-tight.<br />
Scribe the nut at the six<br />
o’clock position.<br />
3. While holding the fitting body steady with a backup wrench,<br />
tighten the nut 1-1/4 turns, watching the scribe mark make one<br />
complete revolution <strong>and</strong> continue to the nine o’clock position. For<br />
1/16-inch, 1/8-inch <strong>and</strong> 3/16-inch (2, 3 <strong>and</strong> 4 mm) sizes, tighten<br />
only 3/4 turns from finger-tight. Do . not over-tighten!<br />
4. If you use flexible tubing (Example: Polyflow) use an “Insert” (see<br />
www.swagelok.com)<br />
<strong>DMS</strong> 2-3