
You also want an ePaper? Increase the reach of your titles
YUMPU automatically turns print PDFs into web optimized ePapers that Google loves.
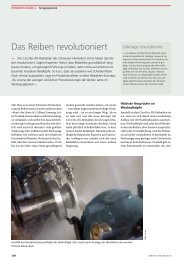
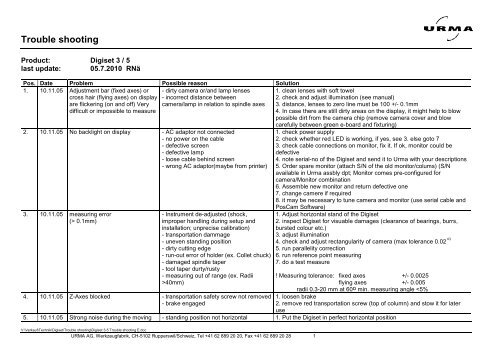
<strong>Trouble</strong> <strong>shooting</strong><br />
Product: Digiset 3 / 5<br />
last update: 05.7.2010 RNä<br />
Pos. Date Problem Possible reason Solution<br />
1. 10.11.05 Adjustment bar (fixed axes) or<br />
cross hair (flying axes) on display<br />
are flickering (on and off) Very<br />
difficult or impossible to measure<br />
2. 10.11.05 No backlight on display<br />
3. 10.11.05 measuring error<br />
(> 0.1mm)<br />
- dirty camera or/and lamp lenses<br />
- incorrect distance between<br />
camera/lamp in relation to spindle axes<br />
- AC adaptor not connected<br />
- no power on the cable<br />
- defective screen<br />
- defective lamp<br />
- loose cable behind screen<br />
- wrong AC adaptor(maybe from printer)<br />
- Instrument de-adjusted (shock,<br />
improper handling during setup and<br />
installation; unprecise calibration)<br />
- transportation dammage<br />
- uneven standing position<br />
- dirty cutting edge<br />
- run-out error of holder (ex. Collet chuck)<br />
- damaged spindle taper<br />
- tool taper durty/rusty<br />
- measuring out of range (ex. Radii<br />
>40mm)<br />
4. 10.11.05 Z-Axes blocked - transportation safety screw not removed<br />
- brake engaged<br />
V:\Verkauf\Technik\Digiset\<strong>Trouble</strong> <strong>shooting</strong>\Digiset 3-5 <strong>Trouble</strong> <strong>shooting</strong> E.doc<br />
URMA <strong>AG</strong>, Werkzeugfabrik, CH-5102 Rupperswil/Schweiz, Tel +41 62 889 20 20, Fax +41 62 889 20 28 1<br />
1. clean lenses with soft towel<br />
2. check and adjust illumination (see manual)<br />
3. distance, lenses to zero line must be 100 +/- 0.1mm<br />
4. In case there are still dirty areas on the display, it might help to blow<br />
possible dirt from the camera chip (remove camera cover and blow<br />
carefully between green e-board and fixturing)<br />
1. check power supply<br />
2. check whether red LED is working, if yes, see 3. else goto 7<br />
3. check cable connections on monitor, fix it. If ok, monitor could be<br />
defective<br />
4. note serial-no of the Digiset and send it to <strong>Urma</strong> with your descriptions<br />
5. Order spare monitor (attach S/N of the old monitor/colums) (S/N<br />
available in <strong>Urma</strong> assbly dpt; Monitor comes pre-configured for<br />
camera/Monitor combination<br />
6. Assemble new monitor and return defective one<br />
7. change camere if required<br />
8. it may be necessary to tune camera and monitor (use serial cable and<br />
PosCam Software)<br />
1. Adjust horizontal stand of the Digiset<br />
2. inspect Digiset for visuable damages (clearance of bearings, burrs,<br />
bursted colour etc.)<br />
3. adjust illumination<br />
4. check and adjust rectangularity of camera (max tolerance 0.02 o)<br />
5. run parallelity correction<br />
6. run reference point measuring<br />
7. do a test measure<br />
! Measuring tolerance: fixed axes +/- 0.0025<br />
flying axes +/- 0.005<br />
radii 0.3-20 mm at 60o min. measuring angle
<strong>Trouble</strong> <strong>shooting</strong><br />
of the Z-axes - counterweight blocked 2. check guides and and guide covers<br />
6. 10.11.05 Printer does not answer - cable not connected<br />
- printer switched off<br />
- wrong interface configuration<br />
7. 10.11.05 Wrong label format<br />
8. 20.01.06 After exchanging the monitor<br />
none or one axes don’t show any<br />
value even after overrun<br />
reference points (by moving the<br />
measuring arm up and down and<br />
left to right<br />
9. 30.3.06 X-axes counts in wrong direction<br />
Minus values instead of positive<br />
10. 4.5.06 Illumination cannot be adjusted.<br />
Cross hair is flickering.<br />
11. 4.5.06 Left half of the screen gets black<br />
automatically after some time of<br />
working and can be restarted<br />
after a certain time (1-2 hours)<br />
(especially during summer time)<br />
12. 4.5.06 Screen remains black at low<br />
surrounding temperatur (nor or<br />
almost invisible lines and<br />
contours are shown)<br />
13. 6.9.06 Digi 5: looses reference points<br />
after power off<br />
- no labels in printer<br />
- wrong default format<br />
- printer not suitable<br />
- printer driver not available<br />
- the configuration of the glassscales are<br />
not adequate<br />
- Glassscale configuration wrong<br />
- tool reference wrong<br />
- lense of camera or lamp is scratched<br />
(improper handling with tools)<br />
- Max allowed working temperatur of<br />
40 0 C has been exceeded<br />
- Minimal working temperatur is fallen<br />
below of about 10 0 C<br />
- Counter not set correctly<br />
- wrong counter direction<br />
- wrong base<br />
V:\Verkauf\Technik\Digiset\<strong>Trouble</strong> <strong>shooting</strong>\Digiset 3-5 <strong>Trouble</strong> <strong>shooting</strong> E.doc<br />
URMA <strong>AG</strong>, Werkzeugfabrik, CH-5102 Rupperswil/Schweiz, Tel +41 62 889 20 20, Fax +41 62 889 20 28 2<br />
1. Check interface settings in setup (parallel, serial or USB (Digi 5) are<br />
according to printer settings<br />
1. select suitable format (1-5) in setup; run test print<br />
2. check whether printer is suitable for Digiset<br />
3. Load new software/driver release<br />
1. Setup F5 (Digi3) or Counter (Digi 5) select Axes 1 or 2 (X or Z)<br />
2. change the field for type of scale to “coded” or “once” (Digiset 5 and<br />
later models Digi 3 must be on “coded”)<br />
1. Setup Counter Axes 1 (X)<br />
2. change counter direction into – (minus) (note that codification must be<br />
set to „coded“ for Digiset 5 and later models Digiset 3).<br />
3. check tool reference and correct counter direction<br />
1. replace damaged part(s)<br />
2. Lamp/Camera position must be kept within close tolerances (100 mm<br />
+/- 0.1 from spindle center line to the front of the camera/lamp; see<br />
description in manual); we recommend to measure the actual position of<br />
camera/lamp before disassembling)<br />
3. Check illumination after changing<br />
1. Check position of the Digiset (direct insolation; behind a machine that<br />
absorbes a lot of heat) remove the presetter.<br />
2. Power-Off Digiset whenever it is not in use (especially in case of high<br />
surrounding temperatur)<br />
1. Remove the instrument or heat the surrounding<br />
1. Setup Counter Counter X for X (or 2 for Z)<br />
- check whether counter is set to „coded“ (older scales must be set to<br />
„single“)<br />
- check counter direction + or –<br />
- check whether Base is set to –<br />
- replace screen in case of inconsistant behaviour
<strong>Trouble</strong> <strong>shooting</strong><br />
14. 27.9.06 Digi 5 shows the messages<br />
„Initializing“, then “ Start<br />
program“, but system holds<br />
15. 12.6.07 Digi 5: Illumination lines cannot<br />
be adjusted. Even by means of<br />
the potentiometer the lines<br />
remain below the tolerance field.<br />
16. 03.5.10 Software-Update stops during<br />
the data transfer (mainly if USB-<br />
Serial adaptors are used with<br />
Laptops)<br />
17. 05.07.10 Digi 3: in the upper left part, the<br />
display shows an additional value<br />
window, which could be<br />
disturbing in some cases.<br />
- Operating System dammaged - Re-Install OS Software<br />
- hold down both left and rigth mouth buttons while you switch power<br />
on. (this way it remains in BIOS and you are enabled to upload the<br />
- defect lamp (LED dammaged)<br />
- dirty camera and lamp lenses<br />
- USB-Serial Adaptor does not work<br />
propberly<br />
V:\Verkauf\Technik\Digiset\<strong>Trouble</strong> <strong>shooting</strong>\Digiset 3-5 <strong>Trouble</strong> <strong>shooting</strong> E.doc<br />
URMA <strong>AG</strong>, Werkzeugfabrik, CH-5102 Rupperswil/Schweiz, Tel +41 62 889 20 20, Fax +41 62 889 20 28 3<br />
Software again) see separate manual<br />
- clean camera and lamp lenses carefully<br />
- exchange the lamp<br />
- use PC with direct serial interface<br />
- change the USB-Serial adaptor<br />
- deactivate the FIFO settings in COM interface (Controlcenter-Hardware<br />
Manager – COM-Interface. Open COM interface – advanced- deactivate<br />
FIFO<br />
- caused by user typing - press SHIFT+F1 to toggle the display